Catalog
Preface
RabbitMQ is a message queue that is used to asynchronize and decouple applications, as well as to buffer and distribute messages.The most important role of message middleware is decoupling. The most standard use of middleware is that producers produce messages to queues, consumers take interest out of queues and process them. Producers do not care who is consuming, consumers do not care who is producing messages, so as to achieve decoupling purpose.In distributed systems, message queuing is also used in many other areas, such as support for distributed transactions, RPC calls, and so on.
@
1. A brief overview of the important role of RabbitMQ
First, talk about the role, you know what it is used to be interested in knowing its important concepts, walk into it, get close to it!As mentioned above, RabbitMQ is primarily used to implement asynchronous and decoupling of programs.Here we will also focus on how it can be asynchronous and decoupled.
1.1, Asynchronous
Compare the benefits of using message queues for asynchronization: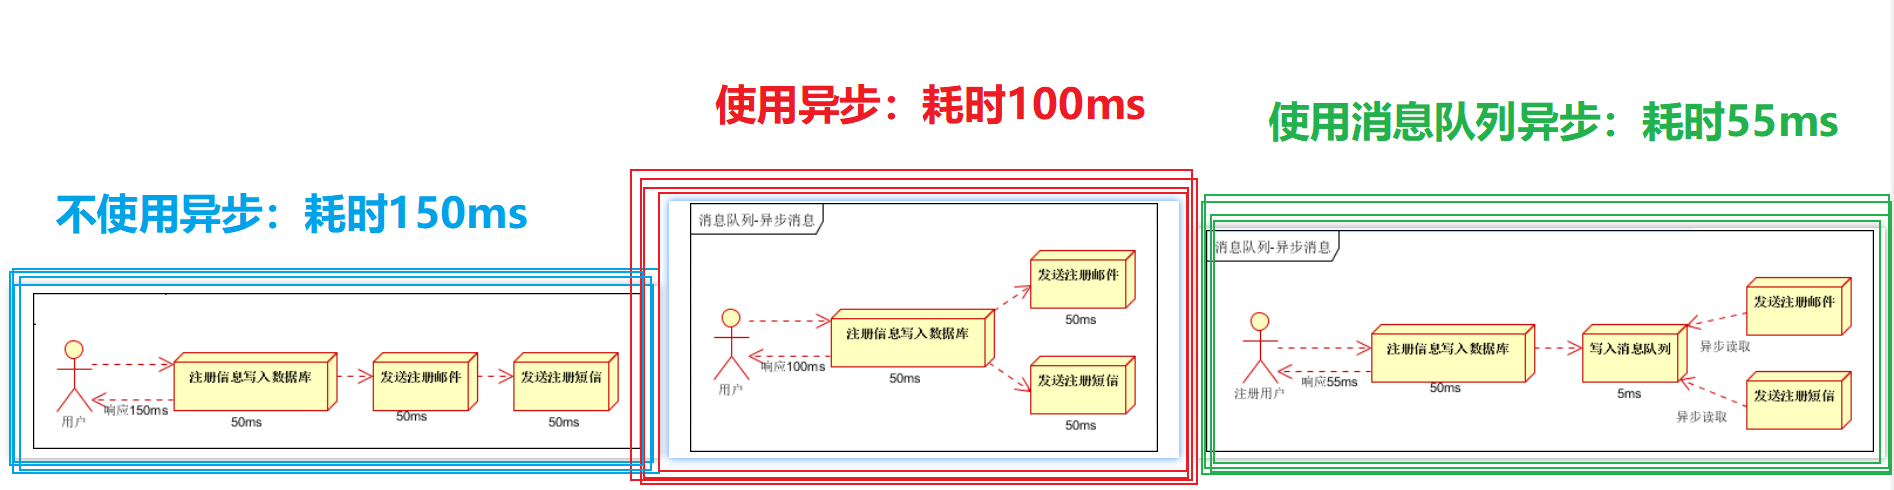
1.2. Decoupling
As for decoupling, you can only rely on your own understanding of coupling, which is outlined in the form of text:
The above message queue implements asynchronous scenario analysis: the main thread still processes low-time inbound operations, and then writes the messages that need to be processed into the message queue, which takes a negligible amount of time and is very fast. Then, an independent e-mail subsystem and an independent e-mail subsystem subscribe to the message queue for separate processing.After processing, send ACK confirmation to the queue, and delete the entire data of the message queue.This process is also the way that companies are now using SOA to service each system, giving time-consuming operations to separate business systems, using message queuing as the middleware, to achieve the purpose of application decoupling, and consuming very low resources, a single server can withstand larger concurrent requests.
Here, after a period of persistent text edification, it is estimated that you have been blurred. All of you are talented people who can read with blurred faces, and your aunt can't help shouting 666 to you.
2. A brief overview of important RabbitMQ concepts
First, RabbitMQ is a kind of message middleware, such as ActiveMQ, RocketMQ.... Generally speaking, these message middleware refer to the basic software that completes sending and receiving messages in distributed systems.
Next we'll focus on...
Message Middleware Work Process==Producer-Consumer Model 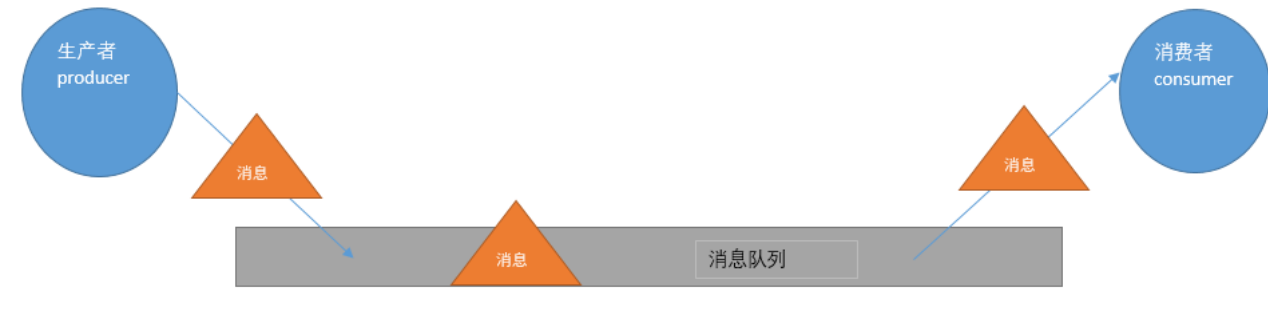
So the three most important concepts for message queues are: producer, message queue, consumer
2.1, RabitMQ workflow
In addition to these three important concepts, an important concept for RabbitMQ message queues is the switch.Switches create isolation between producers and message queues, where producers send messages to the switch, which forwards messages to the corresponding message queues according to scheduling policies.
So the four most important concepts for RabbitMQ are: producer, message queue, consumer, switch
Overall, the workflow for RabitMQ is as follows: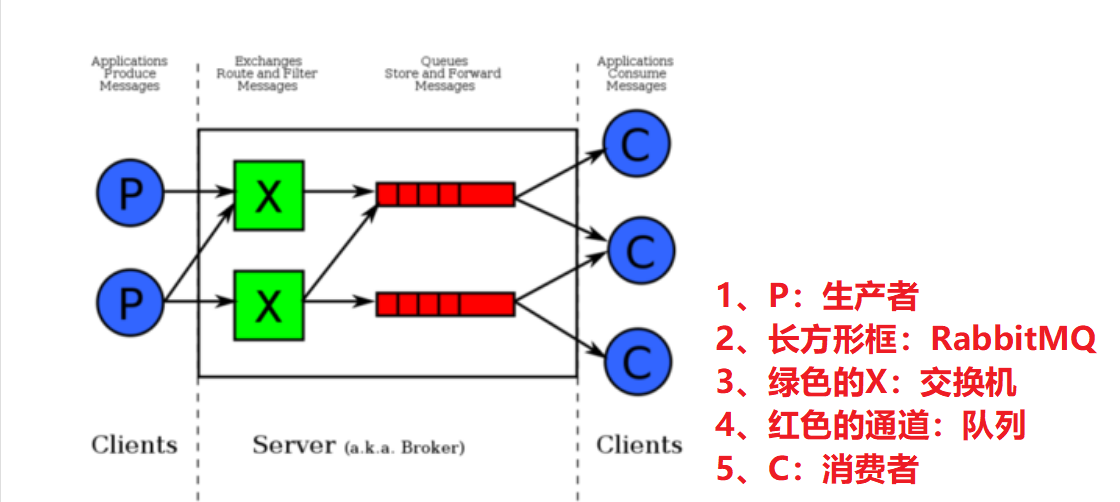
The specific switches are described below.
2.2. Switches
The common sense for a switch is:
A switch is like a courier company dispatching a courier, a Baishi courier dispatching a courier to Baishi courier, a Shentong courier dispatching a courier to Shentong courier, or a Rountong courier dispatching a courier to Yuantong courier. These different dispatch methods are a matching rule. In fact, there are four types of switches, Direct, topic, headers, Fanout, and the four types are just like four types of No.With the same matching rules, switch means something like this.
As mentioned above, there are four types of switches: Direct, topic, headers, Fanout, which is also an important point. Here is a brief overview of these four types:
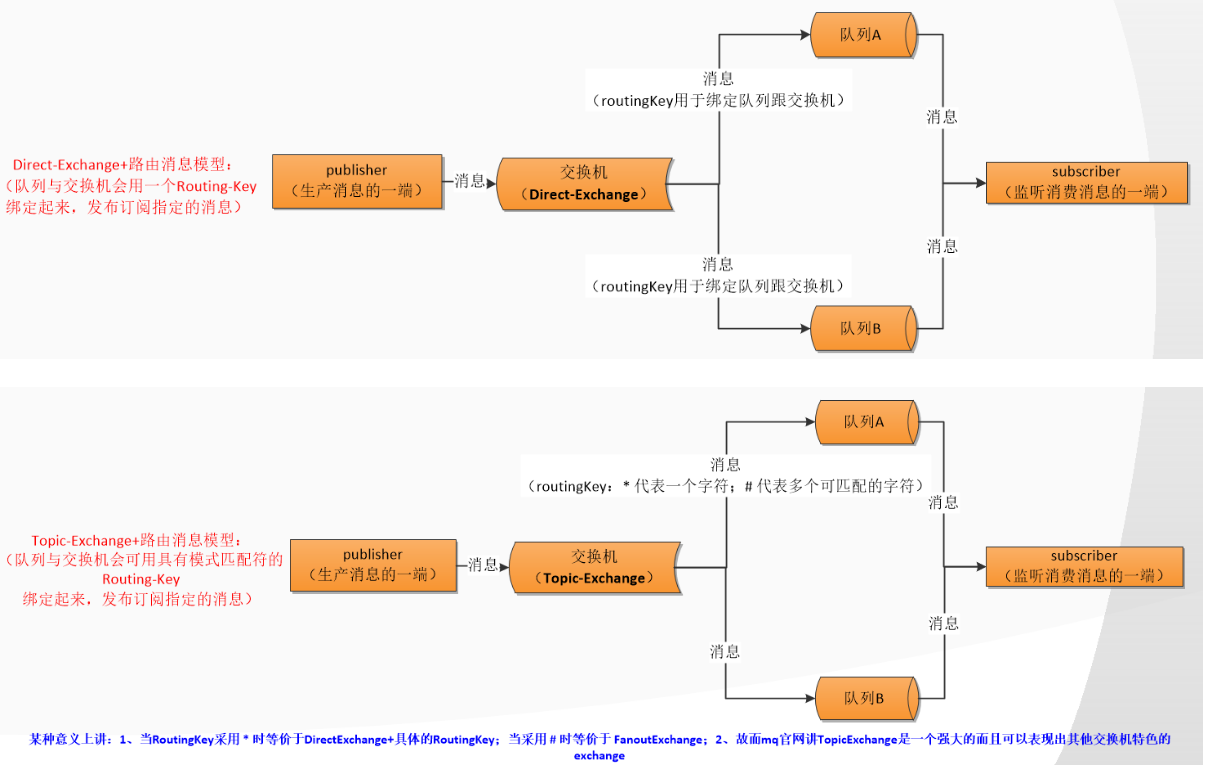
Direct type: [Key]
Direct is RabbitMQ's default switch mode and the simplest mode. When creating a message queue, specify a BindingKey. When the sender sends a message, specify the corresponding Key. When Key and BindingKey of the message queue are consistent, the message is sent to the message queue.
topic Type: [Key]
topic forwards information mainly by wildcards, while queues and switches bind mainly by a pattern (wildcards + strings), and when sending a message, the message is sent to the message queue only if the specified Key matches the pattern.For example, *.news or #.news, where # represents 0 to more than one random character.
Fanout type: [Key]
Fanout is a form of routing broadcast that sends messages to all queues bound to it and is ignored even if a key is set.
headers type:
headers are also matched by a rule that specifies a set of key-value pair rules when message queues and switches are bound, and a set of key-value pair rules when messages are sent. When two sets of key-value pair rules match, messages are sent to a matching message queue.
2.3. Overview of RabbitMQ key concepts
Simply put, the key concepts of RabbitMQ are as follows:
1. Producer: Procedure for sending messages
2. Consumers: the procedure for listening for receiving consumer messages
3. Message: A sequence of binary data streams
4. Queue: Staging/Storage of Messages
5. Switch: A transponder for messages, used to receive and distribute messages.There are four types of fanout, direct, topic, headers
6. Routing\Key: Equivalent to a key/third party, bind to a switch to route messages to a specified queue!
With these concepts in mind, you can learn more about the evolution of the messaging model. Of course, this process is also known on the RabbitMQ website, RabbitMQ website: https://www.rabbitmq.com/getstarted.html
The following is a transcript from https://blog.csdn.net/u013871100/article/details/82982235. In the meantime, I recommend you check out this article, which is really good.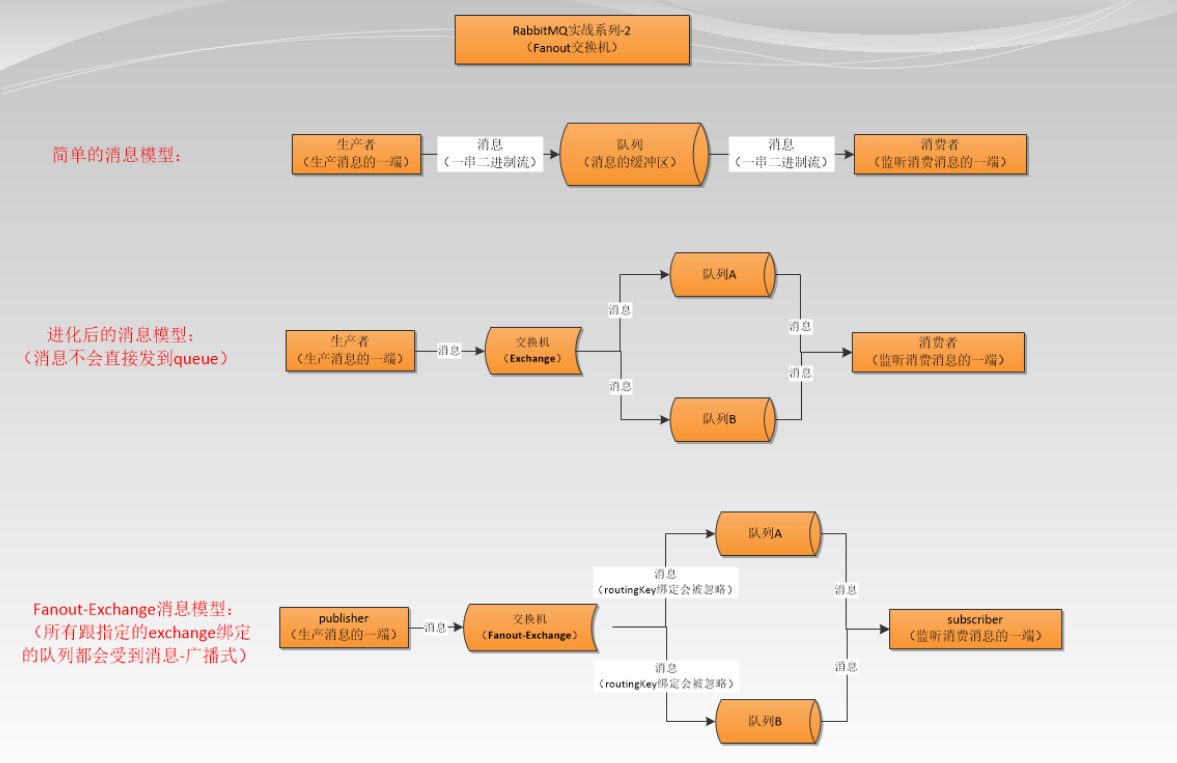
Okay, here's RabbitMQ's overview, so let's move on to the code integration phase.
3. Spring Boot Integration RabbitMQ
Principle Analysis of Spring Boot Integrating RabbitMQ
According to SpringBoot's routine, it is estimated that there may be a Rabbit's XXXAutoConfiguration, retrieved globally and there is no doubt that there is a Rabbit AutoConfiguration, so analyze this class.
1. The first thing you'll notice is the ConnectionFactory, which automatically configures the connection factory
So what has this project done?Go in and see its source code
public CachingConnectionFactory rabbitConnectionFactory(RabbitProperties properties,
                ObjectProvider<ConnectionNameStrategy> connectionNameStrategy) throws Exception {
            PropertyMapper map = PropertyMapper.get();
            CachingConnectionFactory factory = new CachingConnectionFactory(
                    getRabbitConnectionFactoryBean(properties).getObject());
            map.from(properties::determineAddresses).to(factory::setAddresses);
            map.from(properties::isPublisherReturns).to(factory::setPublisherReturns);
            map.from(properties::getPublisherConfirmType).whenNonNull().to(factory::setPublisherConfirmType);
            RabbitProperties.Cache.Channel channel = properties.getCache().getChannel();
            map.from(channel::getSize).whenNonNull().to(factory::setChannelCacheSize);
            map.from(channel::getCheckoutTimeout).whenNonNull().as(Duration::toMillis)
                    .to(factory::setChannelCheckoutTimeout);
            RabbitProperties.Cache.Connection connection = properties.getCache().getConnection();
            map.from(connection::getMode).whenNonNull().to(factory::setCacheMode);
            map.from(connection::getSize).whenNonNull().to(factory::setConnectionCacheSize);
            map.from(connectionNameStrategy::getIfUnique).whenNonNull().to(factory::setConnectionNameStrategy);
            return factory;
        }
There are information operations for connection configurations, which are derived from its parameter class RabbitProperties, and look at RabbitProperties as a configuration class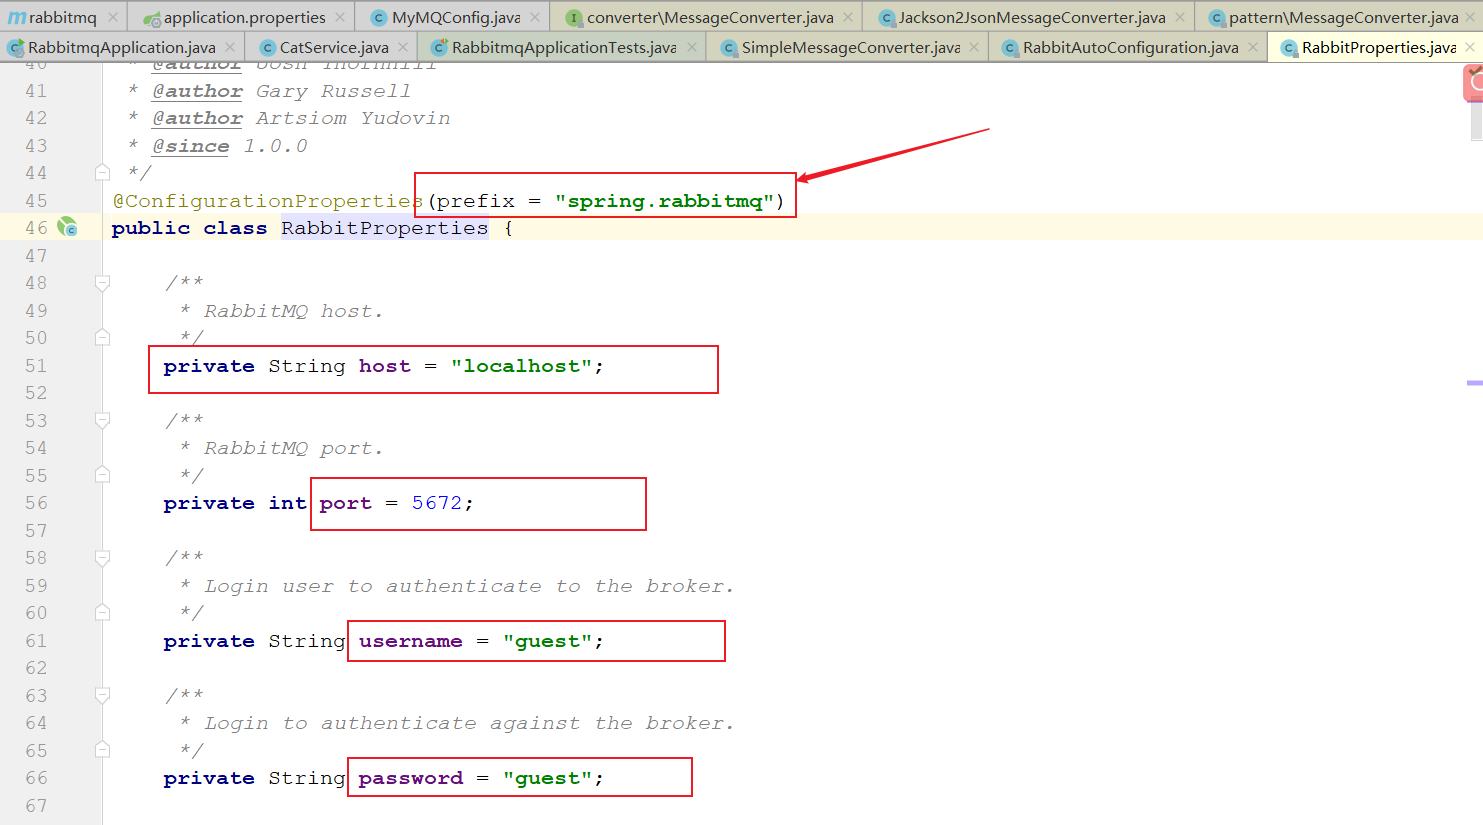
Since it is a configuration class, there is some configuration information, which can be configured in the form of spring.rabbitmq through the configuration file.
2. RabbitTemplate class
Looking further down is the RabbitTemplate class, which is located in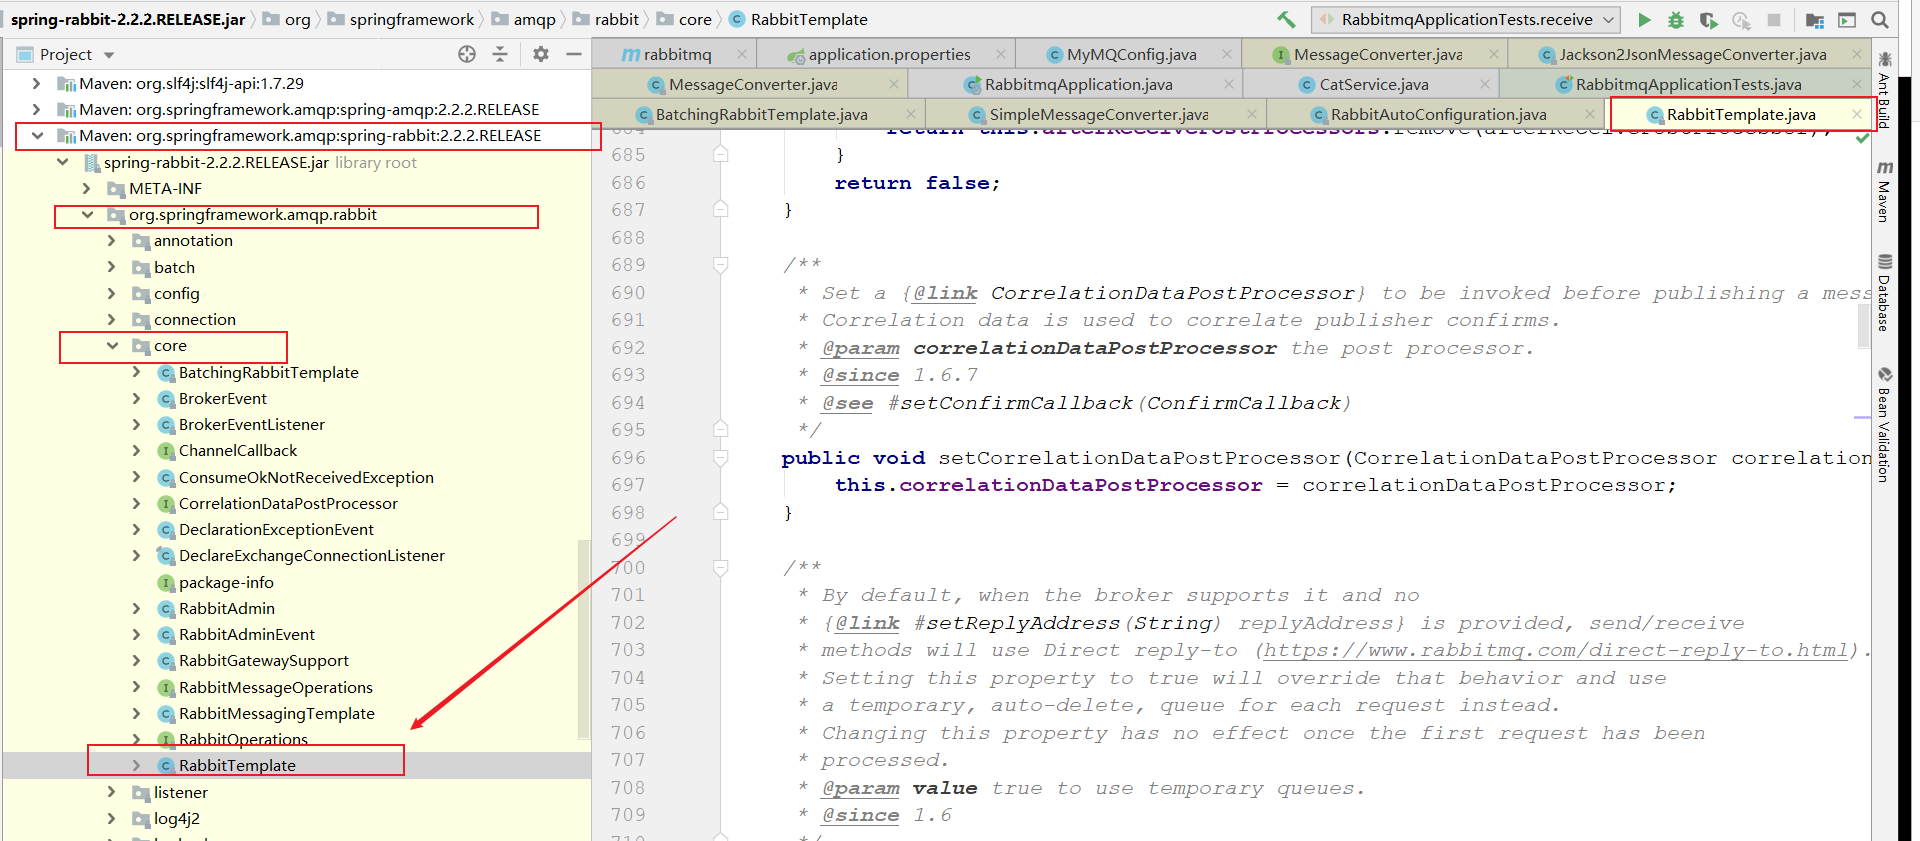
Look at its RabbitTemplate key source:
    @Override
    public void convertAndSend(String exchange, String routingKey, final Object object) throws AmqpException {
        convertAndSend(exchange, routingKey, object, (CorrelationData) null);
    }
    ....
    @Override
    @Nullable
    public Object receiveAndConvert(String queueName) throws AmqpException {
        return receiveAndConvert(queueName, this.receiveTimeout);
    }
You know that RabbitTemplate mainly provides RabbitMQ's ability to send and receive messages;
3,AmqpAdmin
Next up is the AmqpAdmin interface
@Bean
        @ConditionalOnSingleCandidate(ConnectionFactory.class)
        @ConditionalOnProperty(prefix = "spring.rabbitmq", name = "dynamic", matchIfMissing = true)
        @ConditionalOnMissingBean
        public AmqpAdmin amqpAdmin(ConnectionFactory connectionFactory) {
            return new RabbitAdmin(connectionFactory);
        }
Point into the AmqpAdmin interface to see its specific key code:
boolean deleteQueue(String queueName);

    // Note that nowait option is not readily exposed in Rabbit Java API but is for Rabbit .NET API.

    /**
     * Delete a queue.
     * @param queueName the name of the queue.
     * @param unused true if the queue should be deleted only if not in use.
     * @param empty true if the queue should be deleted only if empty.
     */
    void deleteQueue(String queueName, boolean unused, boolean empty);

    /**
     * Purges the contents of the given queue.
     * @param queueName the name of the queue.
     * @param noWait true to not await completion of the purge.
     */
    void purgeQueue(String queueName, boolean noWait);

    /**
     * Purges the contents of the given queue.
     * @param queueName the name of the queue.
     * @return the number of messages purged.
     * @since 2.1
     */
    int purgeQueue(String queueName);

    // Binding operations

    /**
     * Declare a binding of a queue to an exchange.
     * @param binding a description of the binding to declare.
     */
    void declareBinding(Binding binding);

    /**
     * Remove a binding of a queue to an exchange. Note unbindQueue/removeBinding was not introduced until 0.9 of the
     * specification.
     * @param binding a description of the binding to remove.
     */
    void removeBinding(Binding binding);
    ...
AmqpAdmin was found to be used to create and delete Queue s, Exchange, Binding, and so on, to manage components.
Almost, the code in the factory is analyzed here.
3.1. Preparing Rabbitmq environment before integration
Before we can integrate RabbitMQ, we need to install RabbitMQ and its back-end console application and configure RabbitMQ parameters and related Bean components in the project.I'm sure you've all installed it, or read a hammer integration article...
After the RabbitMQ installation is complete, open the back-end console application: http://192.168.42.142:15672 Enter the account guest password guest and log in. The installation is successful when you see the following image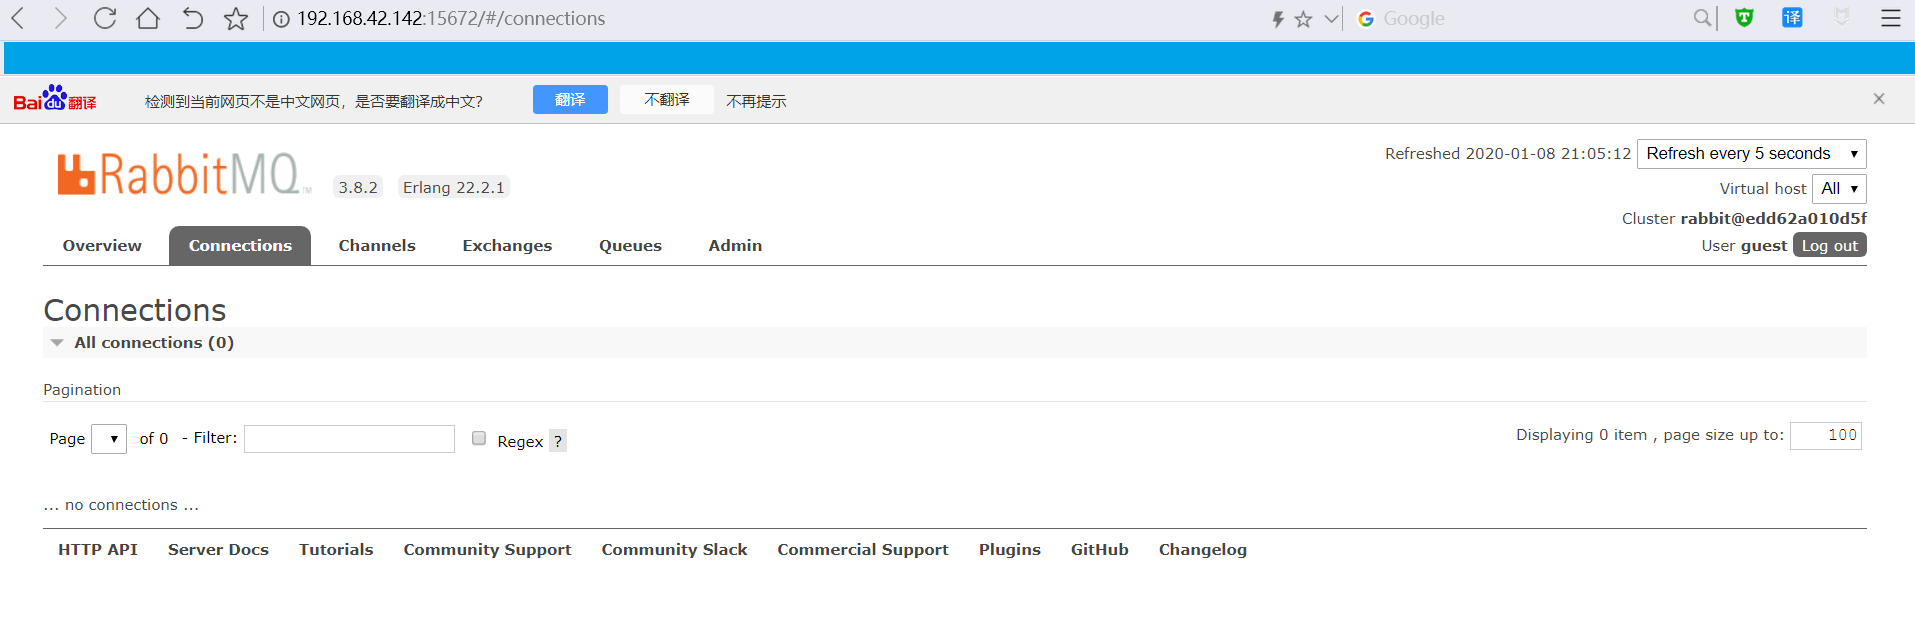
And be sure to create several Exchanges and Queues on your own and have a Bing relationship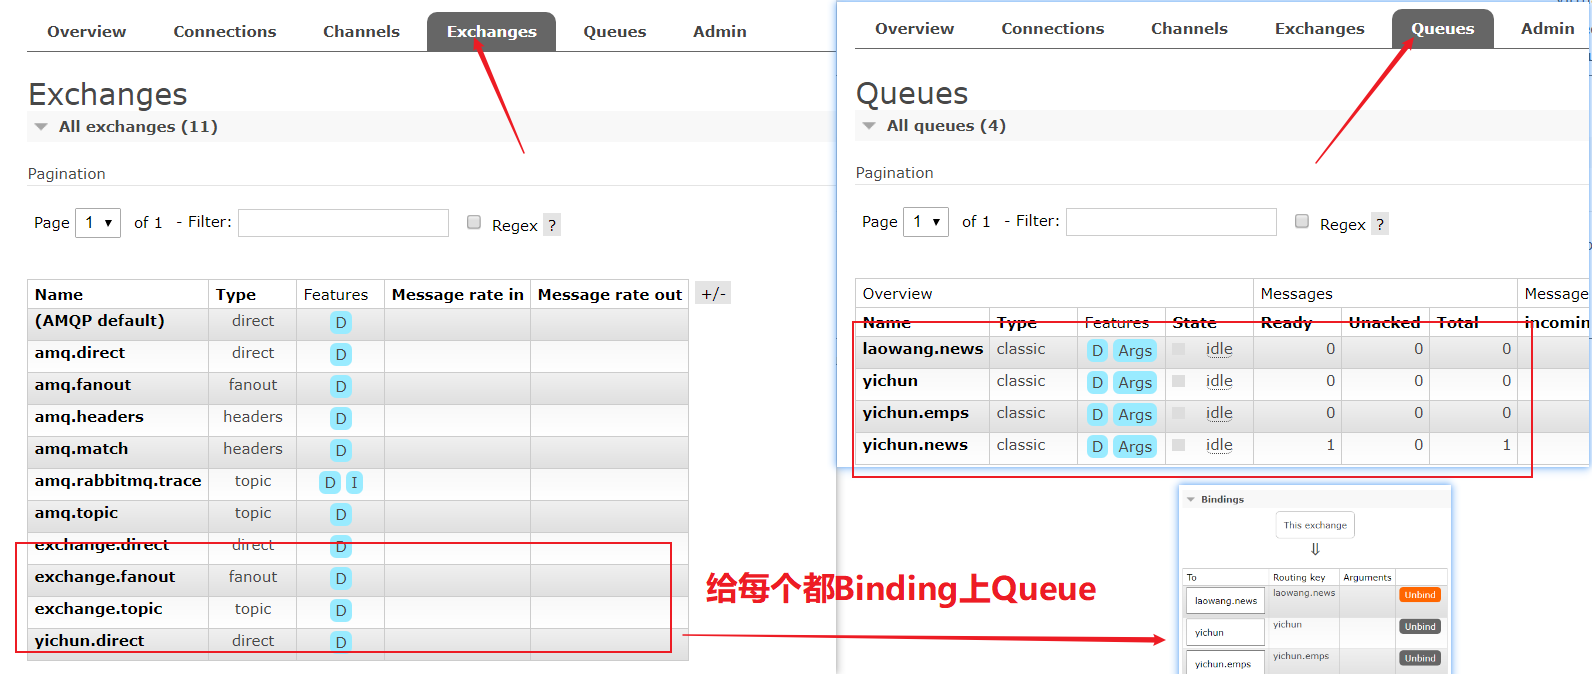
Once you're ready, you can integrate the test results.
3.2. Building a Dependent Environment
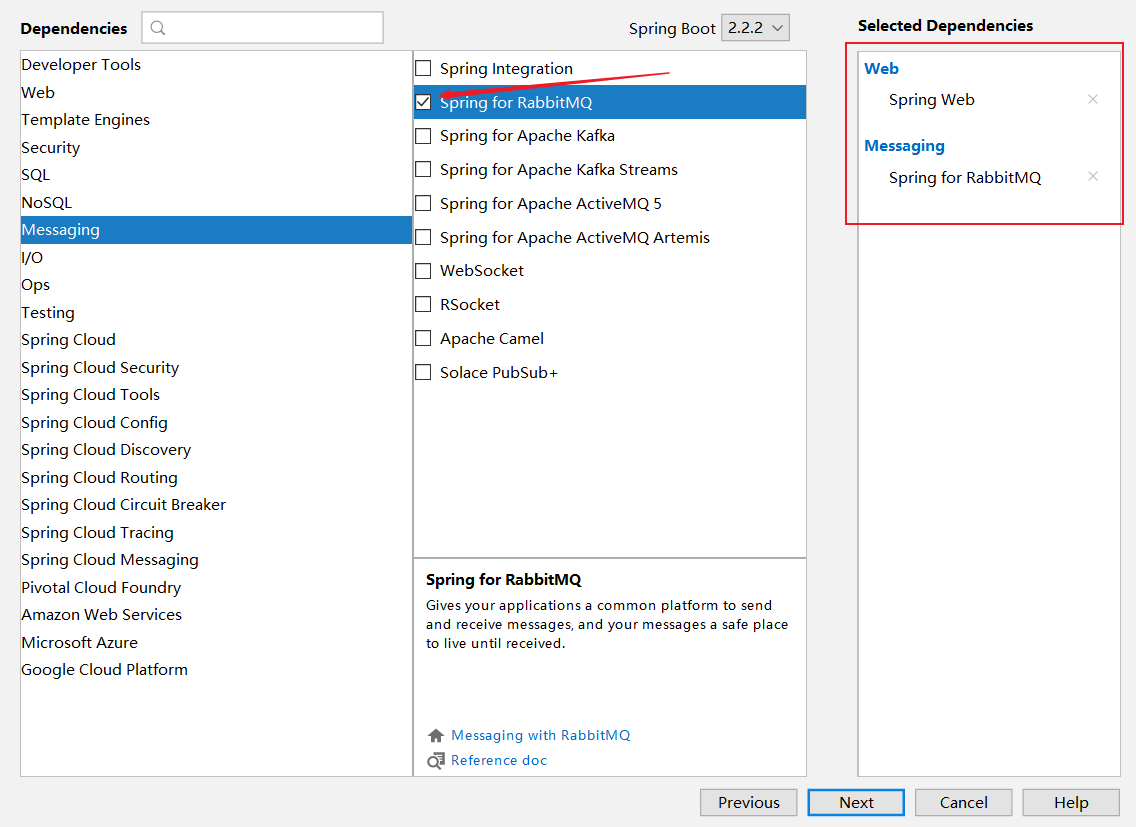
Then the dependencies of pom.xml are as follows:
  <dependency>
      <groupId>org.springframework.boot</groupId>
      <artifactId>spring-boot-starter-amqp</artifactId>
  </dependency>
3.3. Configure the application.properties file
Then the configuration application.properties at the project profile level
spring.rabbitmq.host=192.168.42.142
spring.rabbitmq.username=guest
spring.rabbitmq.password=guest
This is just a test integration of RabbitMQ, and the above configuration is temporarily sufficient.
3.4. Write Application Tests test code
Before you write your code, one thing to know is that springboot provides a jdbcTemplate-like template, RabbitTemplate, that understands the same thing, so you can use its powerful RabbitTemplate functionality.
package com.yichun.rabbitmq;
import org.junit.jupiter.api.Test;
import org.springframework.amqp.rabbit.core.RabbitTemplate;
import org.springframework.beans.factory.annotation.Autowired;
import org.springframework.boot.test.context.SpringBootTest;
import java.util.ArrayList;
import java.util.Arrays;
import java.util.HashMap;
import java.util.Map;
import java.util.function.ObjIntConsumer;
@SpringBootTest
class RabbitmqApplicationTests {
//Dependent Injection RabbitTemplate
@Autowired
RabbitTemplate rabbitTemplate;
//fanout: broadcasting data: independent of routing key
@Test
void sendMsgs() {
rabbitTemplate.convertAndSend("exchange.fanout","","Is your grandfather or your grandfather");
}
//direct: unicast send data: one-to-one correspondence with routing key
@Test
void contextLoads() {
Map<String, Object> map= new HashMap<>();
map.put("1","hello,The bear dei Are you there?");
map.put("2", Arrays.asList("Tom",111));
rabbitTemplate.convertAndSend("exchange.direct","yichun.news",map);
}
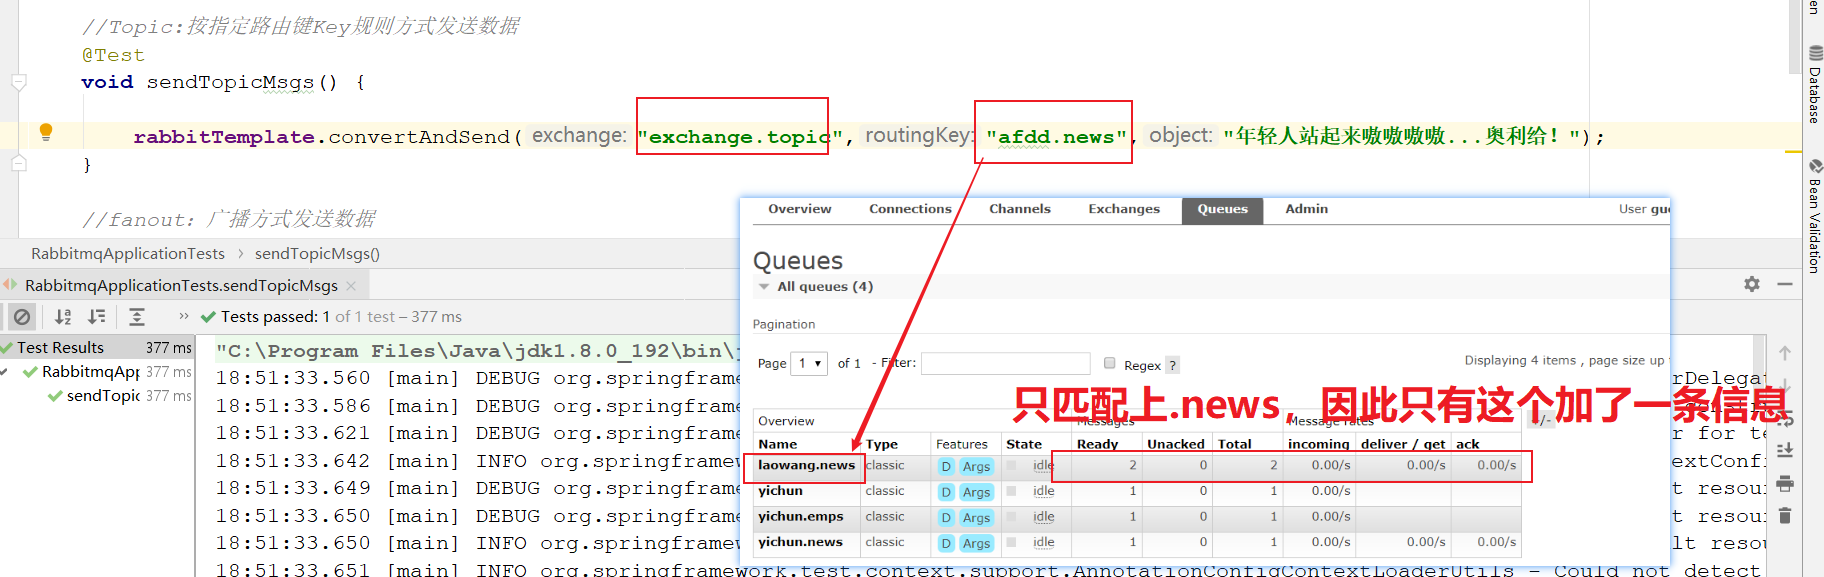
//Topic: Send data as specified routing key Key rule
@Test
void sendTopicMsgs() {
rabbitTemplate.convertAndSend("exchange.topic","afdd.news","Young people stand up and mock...Ollie here!");
}
//receive data
@Test
void receive(){
Object o = rabbitTemplate.receiveAndConvert("yichun.news");
System.out.println(o.getClass());
System.out.println(o);
}
}Single single unit test run
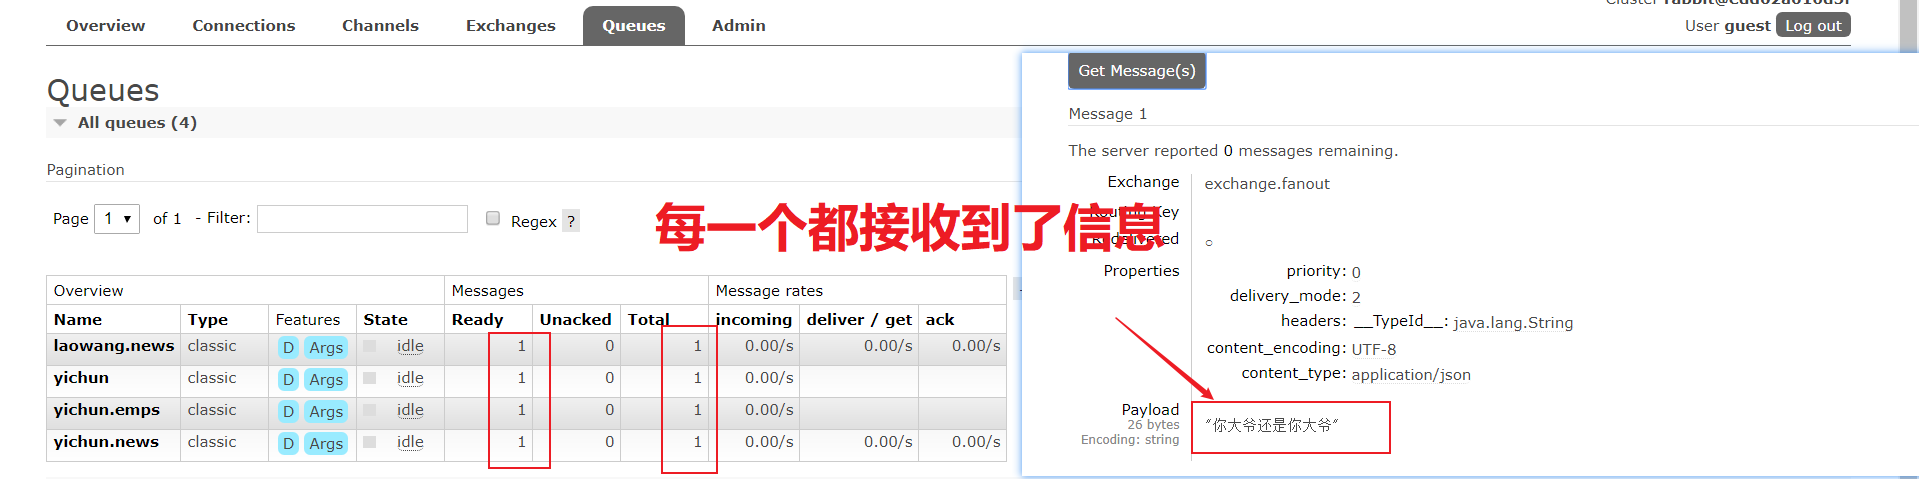
1. Observation of data sent by fanout broadcast
2. Topic Specifies Routing Key Key Rule for Sending Data
3. direct unicast send data
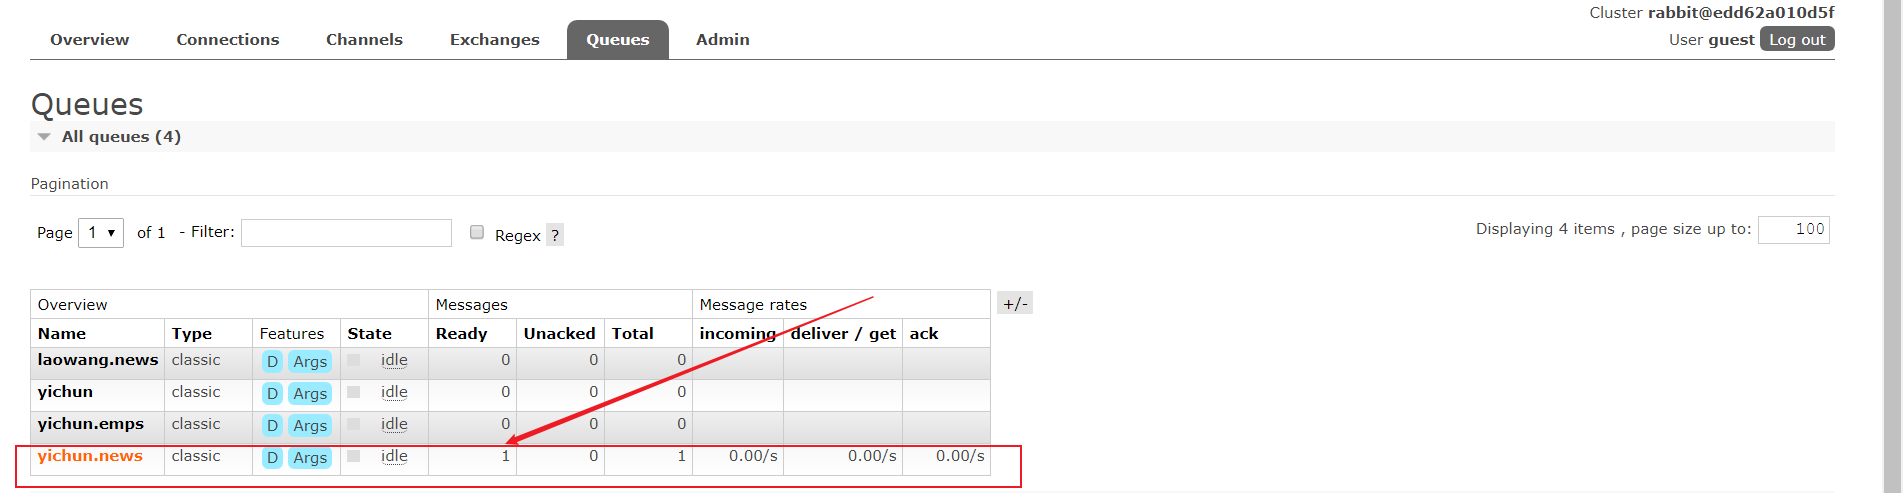
The open information is found as follows: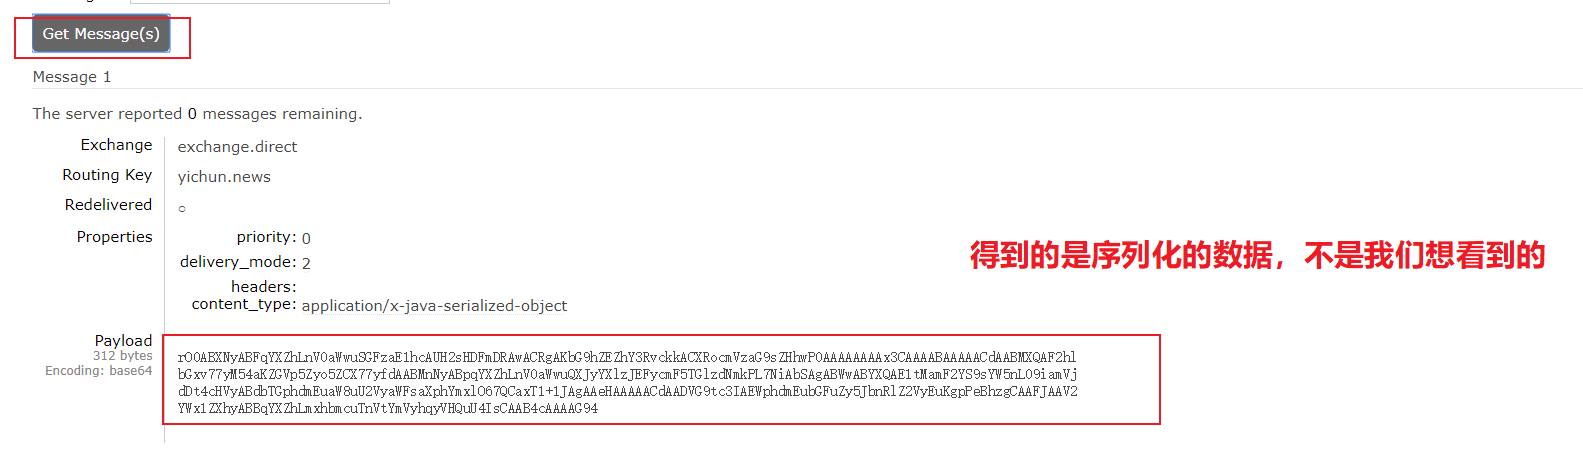
What is this?In fact, this is mainly due to the message conversion rules Springboot uses by default in RabbitAutoConfiguration. To see what data formats you want to see, such as json format, it's time to customize the conversion rules.In fact, this is also the case with two face-to-face tests.
3.5, Custom Message Conversion Rules
First, to customize the message conversion rules, we need to change the default rules. First, open the MessageConverter interface. If it is a shortcut key for eclipse switching, you can directly F4 to see its relationship class that implements inheritance, as shown below.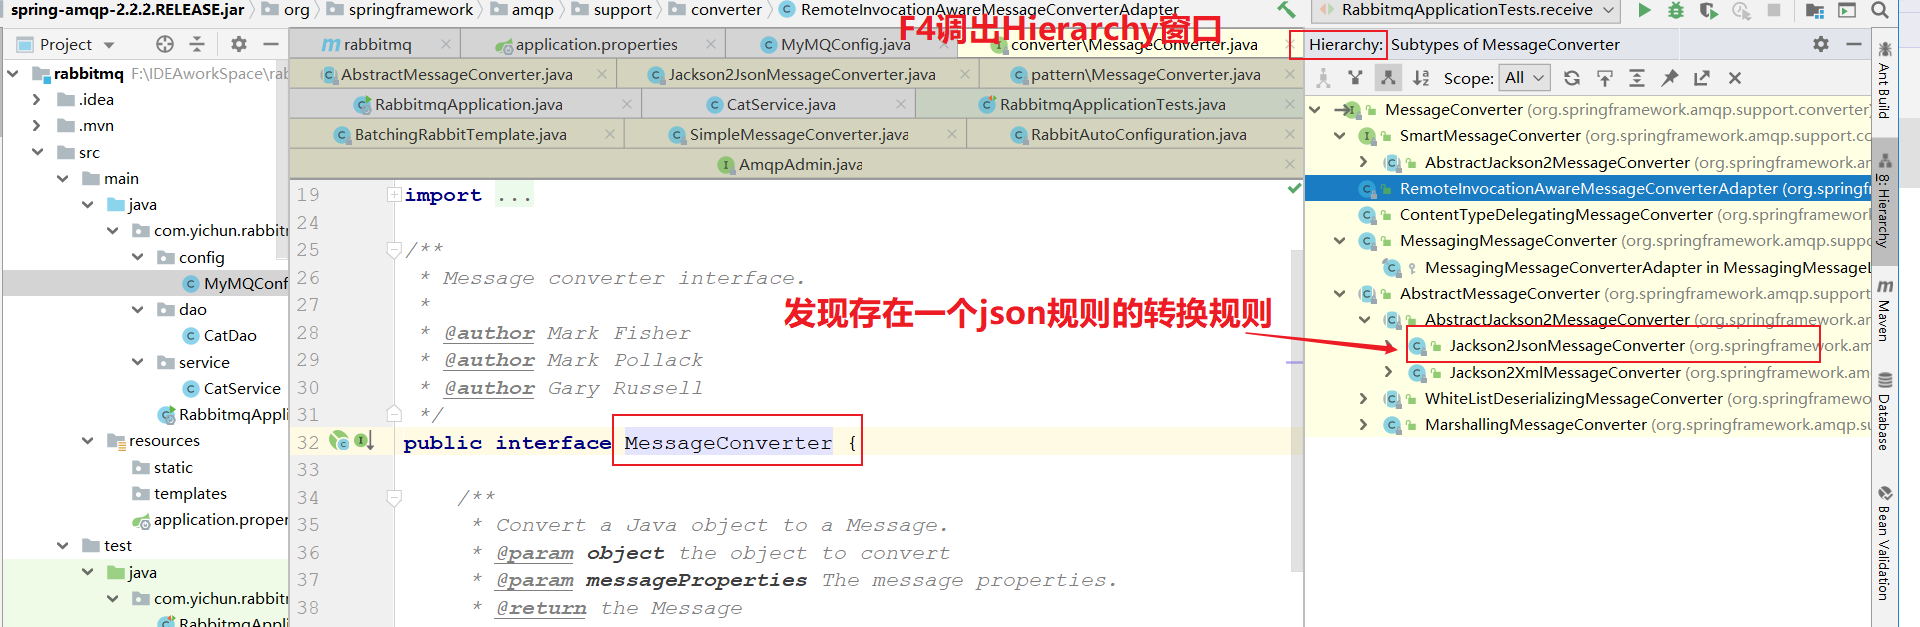
Yes, the analysis found that there were indeed json's translation rules, so it started writing code.First, write a MyMQConfig class, which is implemented as follows:
@Configuration
public class MyMQConfig {

    @Bean
    public MessageConverter messageConverter(){
            return new Jackson2JsonMessageConverter(); //Conversion that returns a json rule
    }
}
After writing, run the sent message again as follows: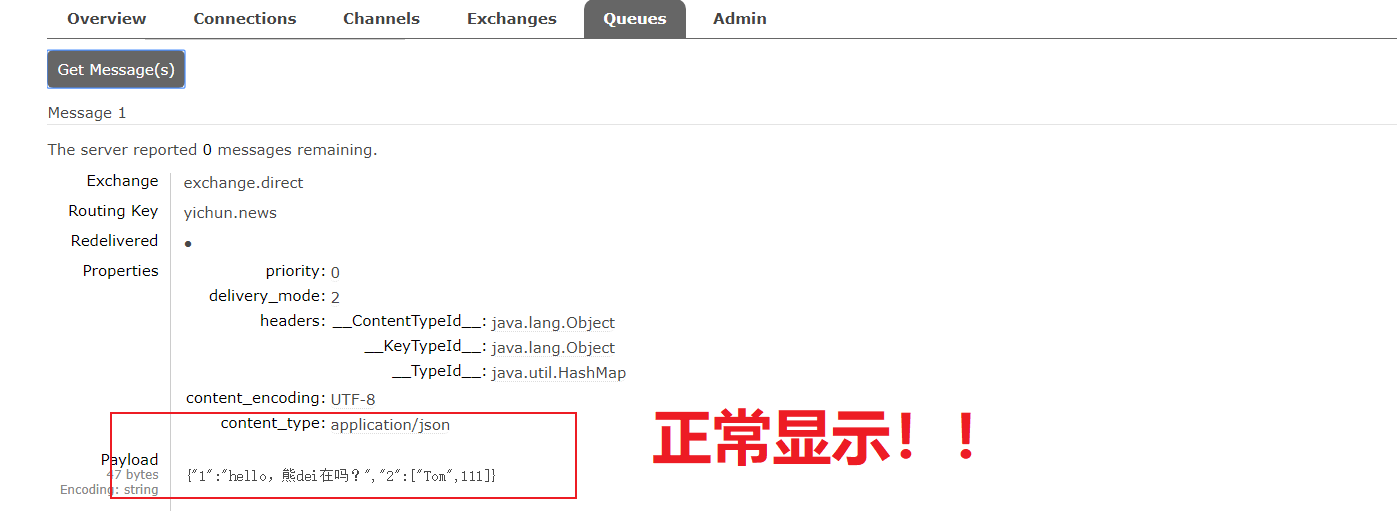
3.6. Use of AmqpAdmin management components
The switches, queues, and binding information we previously integrated were added manually by ourselves. In fact, AmqpAdmin, which exists in the ConnectionFactory factory in Rabbit AutoConfiguration in Springboot, can create and delete Queue s, Exchange, Binding, and so on, to manage components.
==amqpAdmin The declareXXX method is used to create components, while removing and deleting components at the beginning is a trick.Next, the declareXXX method is used to create each component for analysis. As far as deletion is concerned, the component name is simply amqpAdmin.==
1. Create Exchange
Instance Code
    @Autowired
    AmqpAdmin amqpAdmin;

    @Test
    void clareExchange() {
        amqpAdmin.declareExchange(new DirectExchange("Switch name"));
    }
Analyzing the code above, first about Exchange, so first full-text search of Exchange is an interface, as follows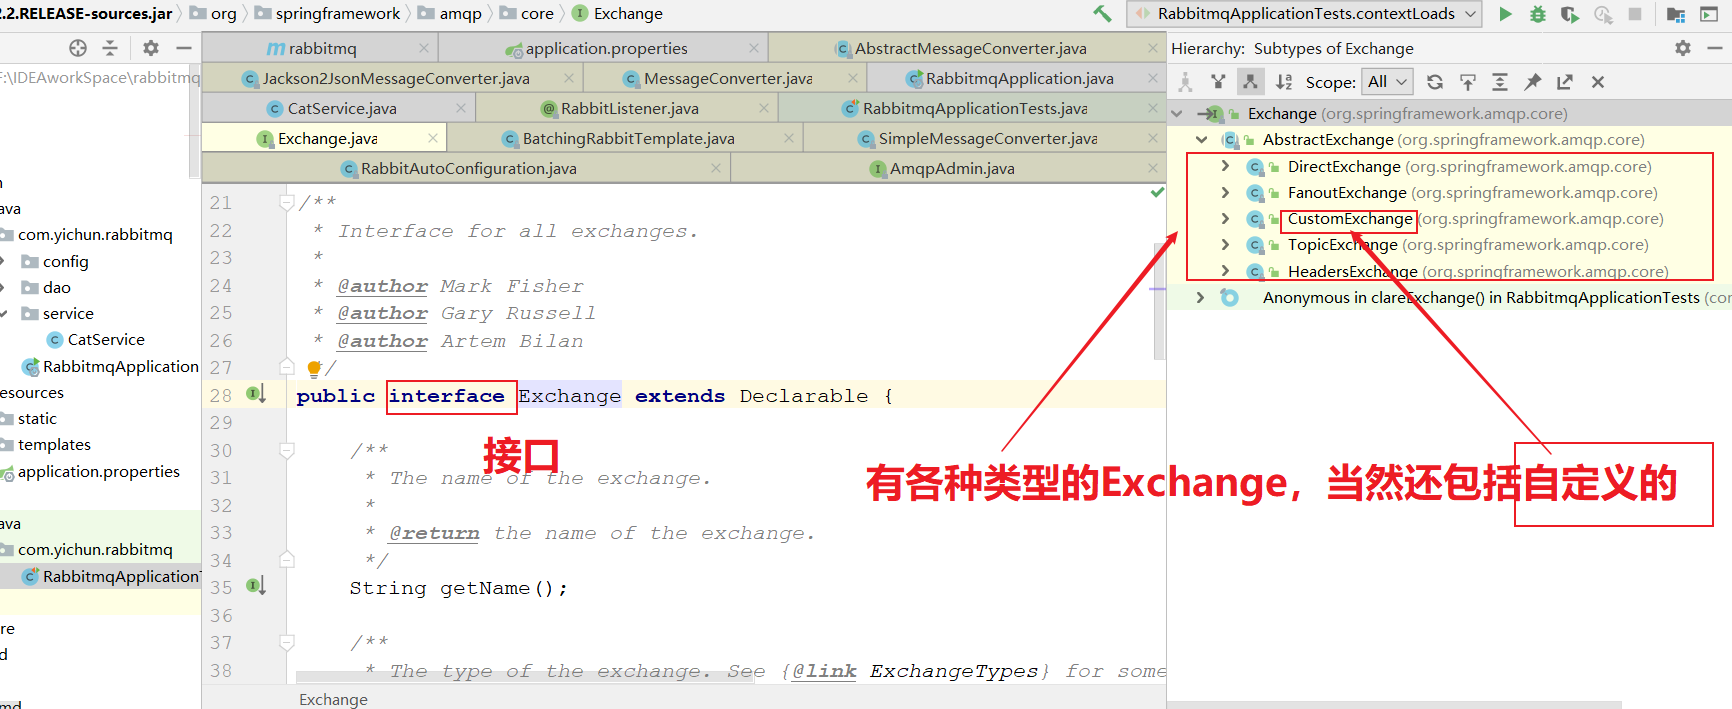
Next, since Exchange was created, the name of the created switch must be written. In the parameter DirectExchange passed in, the mouse clicks in and discovers
At this point, the analysis is almost complete. You can see that the easiest way to create Exchange above is to create an Exchange called Switch Name and run the test. The result is as follows: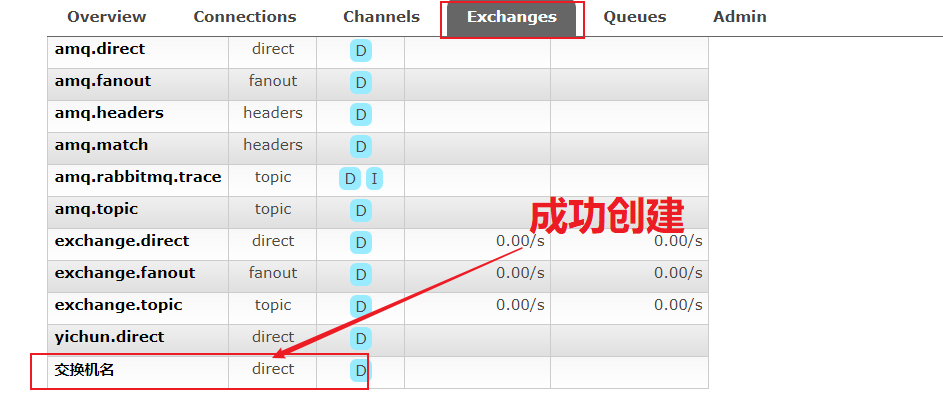
2. Create Queue
Next, create a Queue as well
    @Autowired
    AmqpAdmin amqpAdmin;

    @Test
    void clareExchange() {
        amqpAdmin.declareQueue(new Queue("Test Queue.queue",true)); //true represents whether or not to persist
    }
Operation effect: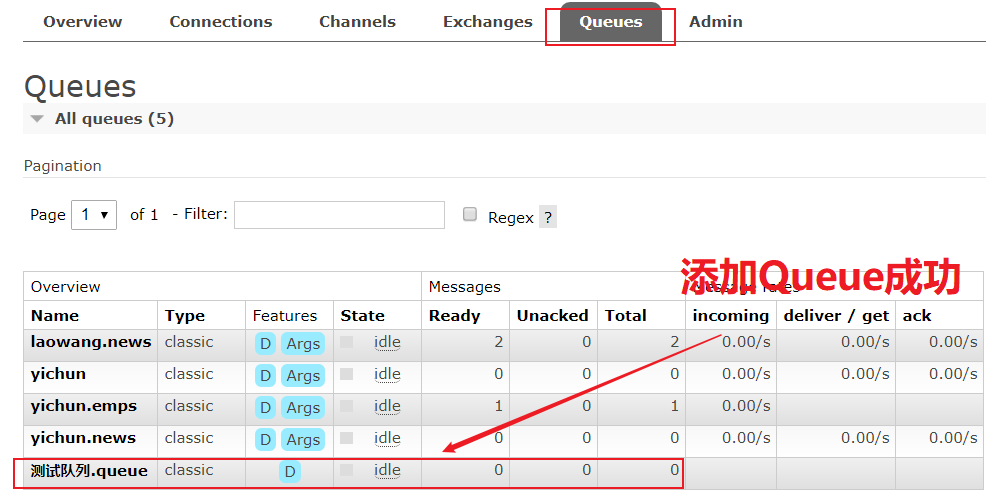
3. Create Binding
    @Autowired
    AmqpAdmin amqpAdmin;

    @Test
    void clareExchange() {
       amqpAdmin.declareBinding(new Binding("Test Queue.queue",Binding.DestinationType.QUEUE,"Switch name","Routing Key Name",null));
    }
Operation effect: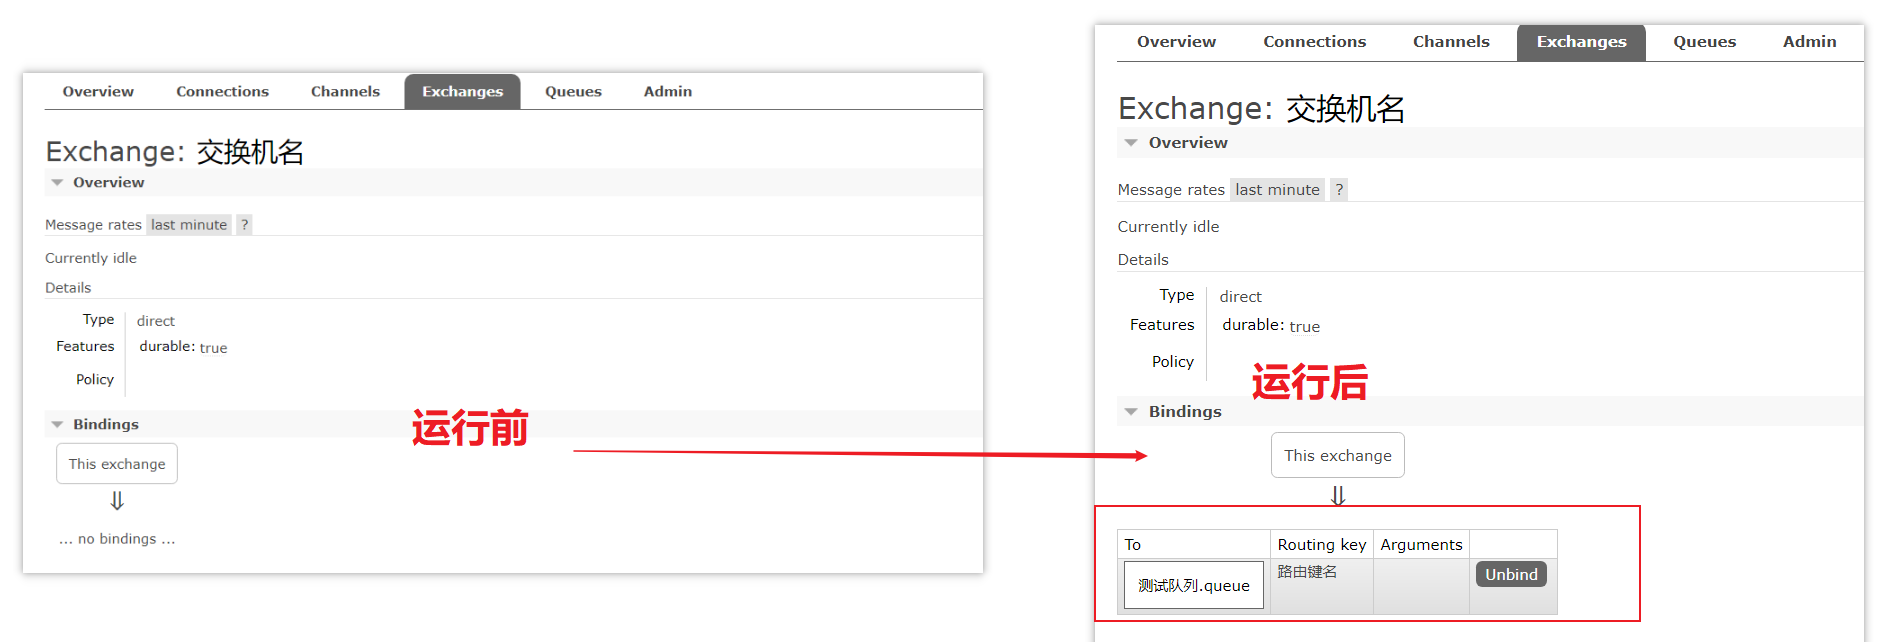
3.7, Listen Message @EnableRabbit + @RabbitListener
In our actual development, there is often a need to change the inventory after placing an order through a message queue, that is, to trigger a monitoring mechanism.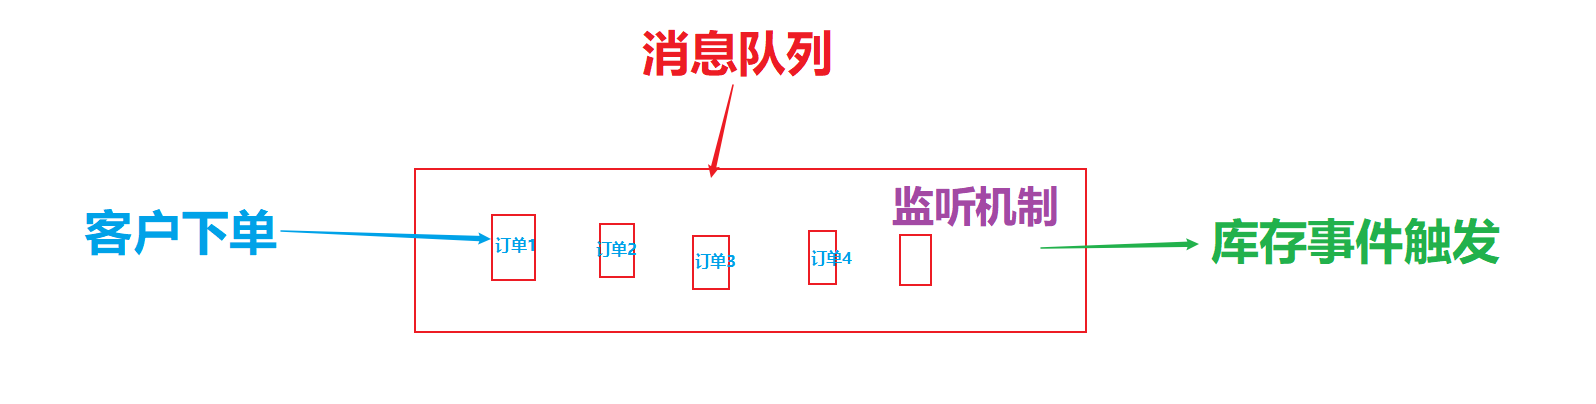
This is often done by: @EnableRabbit + @RabbitListener to listen for the contents of the message queue
Notice that the queues property in @RabbitListener is an array
That is, @RabbitListener can listen for multiple messages at the same time
!
String[] queues() default {};Of course, this listening implementation is also simple, simply add the @RabbitListener annotation to the message business code you need to listen to, and then add the @EnableRabbit annotation to the main Application Method to turn on the annotation-based rabbit mode.The sample code is as follows:
@EnableRabbit  //Turn on annotation-based rabbit mode
@SpringBootApplication
public class RabbitmqApplication {
    public static void main(String[] args) {
        SpringApplication.run(RabbitmqApplication.class, args);
    }
}
dao code:
public class CatDao {
    private String name;
    private int age;

//    get, set, toString, construction method...

}
service business code
@Service
public class CatService {

//    Listening mode 1: Serialize the output of the object directly
    @RabbitListener(queues="yichun.news")
    public void receive(CatDao cat){  //Here, CatDao is a common bean, which is used to print out object information by triggering a listening event
        System.out.println("Monitored information:"+ cat);
    }

//    Monitoring method 2: special needs need information such as message header
    @RabbitListener(queues="yichun")
    public void  receiveMessage(Message message){ //Note that Message here is a special error package for org.springframework.amqp.core.Message
        System.out.println(message.getBody());
        System.out.println(message.getMessageProperties());
    }
}
Unit Test Code:
 @Test
    void contextLoads() {
        rabbitTemplate.convertAndSend("exchange.direct","yichun.news",new CatDao("Tom cat",12)); //Here the data is of type object
    }
Listen mode 1: Serialize the object directly to print the result:
Monitoring Mode 2 Special Requirements Require information such as message headers to print results:
If this article helps you a little, please give a compliment, thank you~
Finally, if there are any deficiencies or inaccuracies, you are welcome to correct the criticism and appreciate it!If in doubt, please leave a message and reply immediately!
Welcome to my Public Number, which contains some java learning materials and a large wave of Java e-books, such as Professor Zhou Zhiming's in-depth Java virtual machine, Java programming ideas, core technology volume, big story design mode, Java Concurrent Programming practice.....are all the Bibles of java, let's not say get on the Tomcat car, let's go!The most important thing is to explore technology together, yearn for technology, and pursue technology. Well, if you come, you'll be friends.