Previously, I wrote an article about cloud development and implementation of applet subscription message (template message) push, Push function of applet subscription message and template message with cloud development There are many students who use java to write in the background, so today I will write an article about how to implement applet subscription and message push in the Java background.
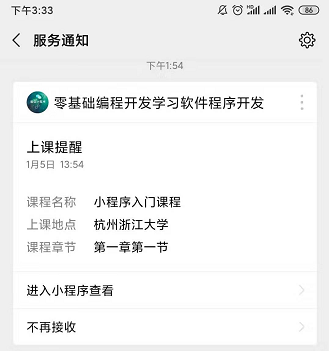
Look at the renderings first according to the old rules
As for how to create a template message, if you want to get the template id, I will not explain it in this section. Students who don't know can check my last article Push function of applet subscription message and template message with cloud development There are detailed explanations.
Today, I will focus on how to write applet subscription message push in the Java background.
In fact, I wrote a Java implementation of template message push a long time ago, but the applet later replaced template push with subscription message, so I will update the article irregularly according to the latest knowledge points.
Three steps to send subscription message
- 1. Get the user's openid
- 2. Get access_token
- 3. Call the applet message push interface
1, Get the user's openid
I've written a lot of articles about the acquisition of user openid, and some students who have recorded videos and don't know how to acquire them can take a look at my previous articles, or take a look at the video of the zero basic entry-level applet I recorded: 5-hour zero basic start applet cloud development So that's not the point today.
2, Get access_token
First of all, let's see what access_token is. The figure below is officially given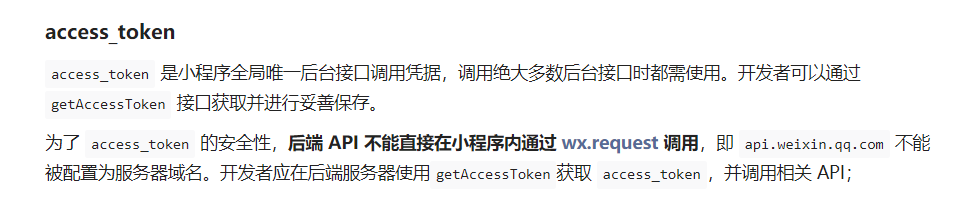
In fact, generally speaking, access_token is a certificate provided by the official applet. If you want to call the official interface of the applet, you must first get access_token. So let's talk about how to obtain access_token
- Looking at the official documents, we can see that we need to use the following parameters
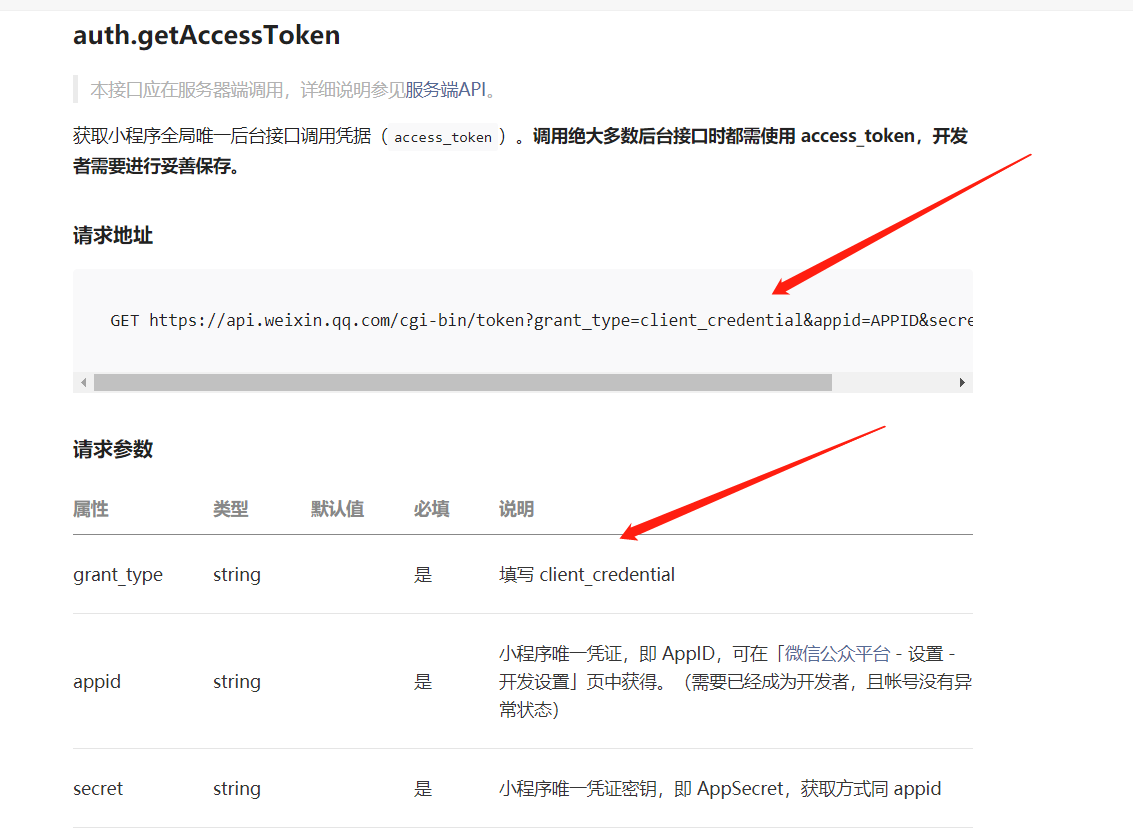
Grant'u type is a fixed value. Only appid and secret need to be filled in. These two values can be obtained in the background of our applet. I also recorded videos to teach you how to get them. If you don't know how to get them, you can take my videos.
Here is how to write Java code
We use springboot here, which involves the official interface of a request applet, so we use the RestTemplate that comes with springboot to make network requests. The specific code is as follows.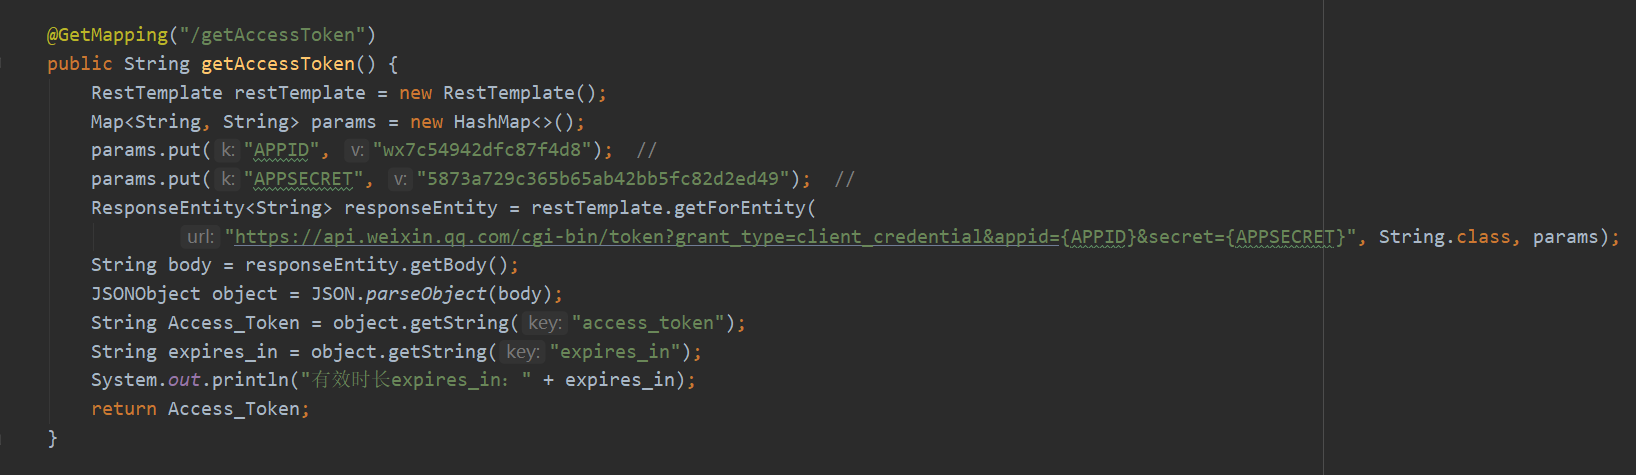
It can be seen that the code is very simple, that is to use RestTemplate to implement a get request, so that we can easily obtain the access_token.
Attention points
There is a valid period for this access_token. Let's see the official prompt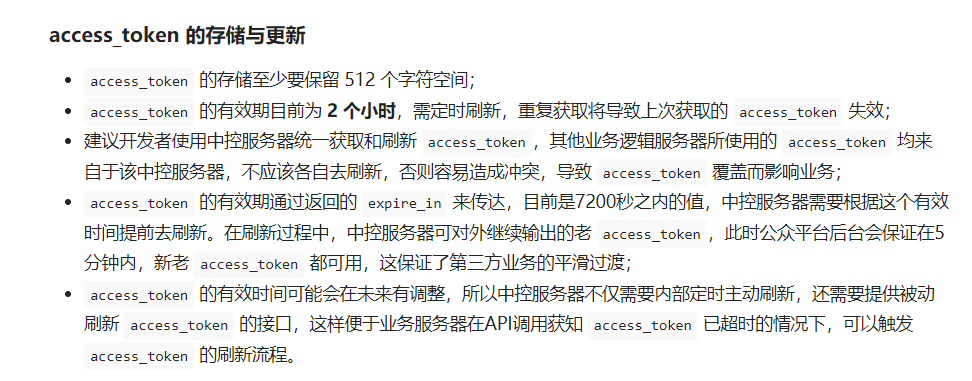
So when I get access_token, I need to save it to the database or local cache, and record the current time. Later, I need to judge whether the access_token is more than 2 hours. If it is more than 2 hours, I need to get it again. Since this is not the focus of this section, I will only talk about the principles here.
3, Send message to applet
Through the second step above, we successfully obtained the access_token. Next, we will call the message sending interface provided by the official applet. First look at the official documents.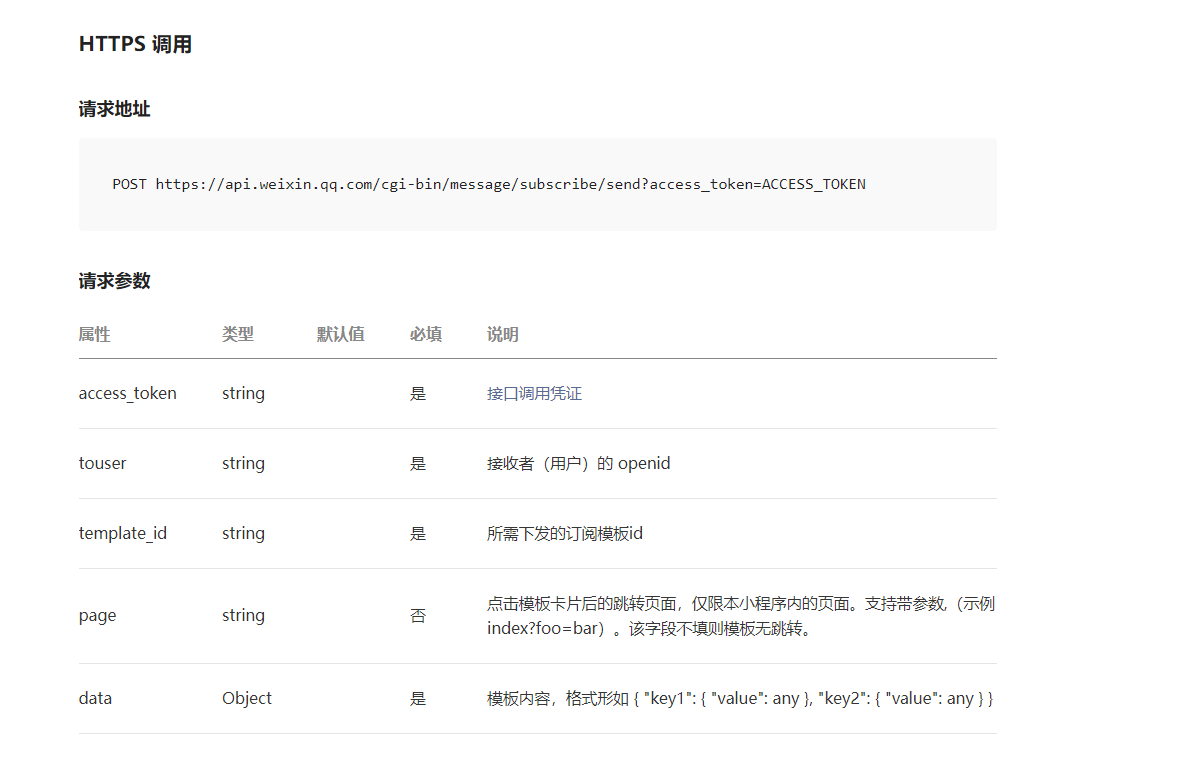
The above parameters are all needed when we send messages. I have talked about the definition and setting of these parameters in the previous article. Students who don't know can go to see the article I wrote earlier Push function of applet subscription message and template message with cloud development
It should be noted that to send messages to users, user authorization must be guided, as shown in the following figure
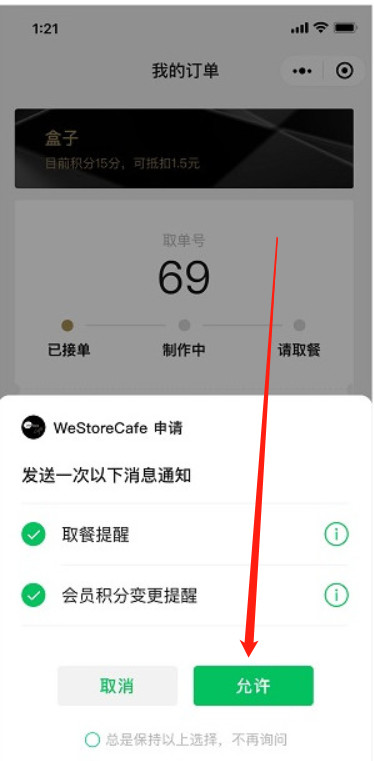
Because users don't click allow, you can't push messages to users. Only one message is allowed to be sent per authorization, so if you want to send as many messages as possible, you need to guide the user authorization as much as possible.
The pushed Java code is as follows
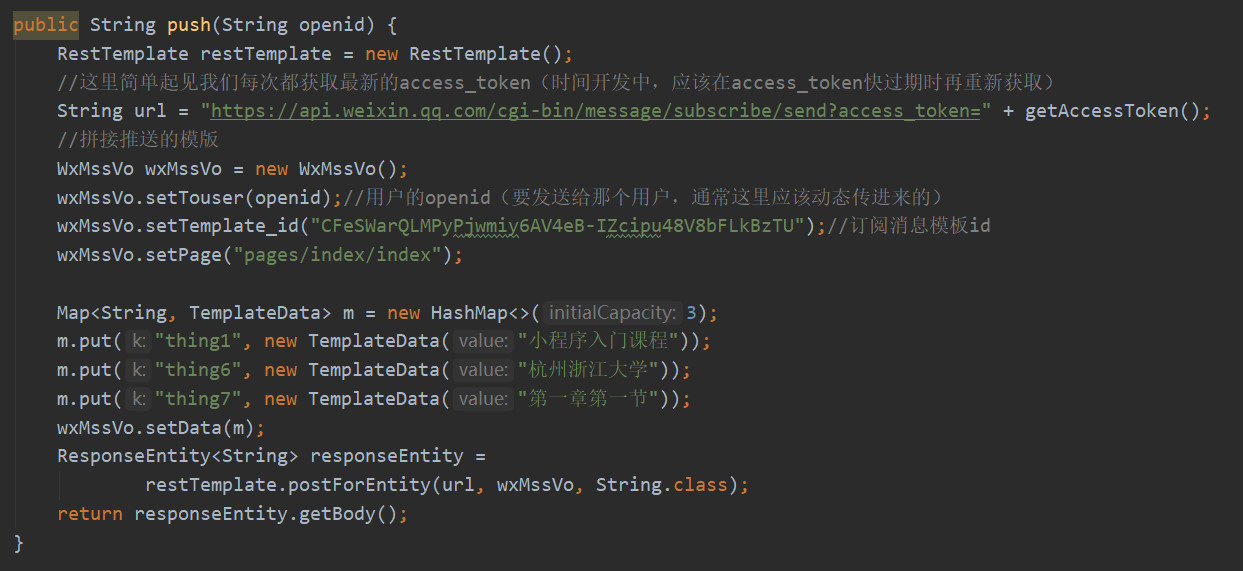
As you can see, we need to define the user's openid, template id, jump path, template message content...
After these are defined, we can provide a service to call other Java code, or provide an interface for the outside world to pass in openid, and then push messages to the corresponding users.

When we call the above interface in the browser, we can see the following figure, which means that our message push is successful.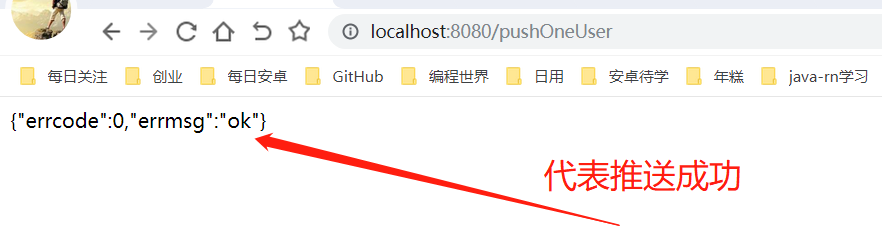
Next I will post the complete code to you.
package com.qcl.demo;

import com.alibaba.fastjson.JSON;
import com.alibaba.fastjson.JSONObject;
import org.springframework.http.ResponseEntity;
import org.springframework.web.bind.annotation.GetMapping;
import org.springframework.web.bind.annotation.RestController;
import org.springframework.web.client.RestClientException;
import org.springframework.web.client.RestTemplate;

import java.util.ArrayList;
import java.util.HashMap;
import java.util.List;
import java.util.Map;

/**
 * Author: programming stone
 * Send applet subscription message
 */
@RestController
public class SendWxMessage {

    /*
     * Send subscription message
     * */
    @GetMapping("/pushOneUser")
    public String pushOneUser() {
        return push("o3DoL0WEdzcJ20AVJg1crP96gbjM");
    }

    public String push(String openid) {
        RestTemplate restTemplate = new RestTemplate();
        //For the sake of simplicity, we get the latest access_token every time (in time development, we should get it again when the access_token is about to expire)
        String url = "https://api.weixin.qq.com/cgi-bin/message/subscribe/send?access_token=" + getAccessToken();
        //Mosaic push template
        WxMssVo wxMssVo = new WxMssVo();
        wxMssVo.setTouser(openid);//User's openid (to send to that user, usually it should be passed in dynamically here)
        wxMssVo.setTemplate_id("CFeSWarQLMPyPjwmiy6AV4eB-IZcipu48V8bFLkBzTU");//Subscription message template id
        wxMssVo.setPage("pages/index/index");

        Map<String, TemplateData> m = new HashMap<>(3);
        m.put("thing1", new TemplateData("Getting started with applets"));
        m.put("thing6", new TemplateData("Hangzhou Zhejiang University"));
        m.put("thing7", new TemplateData("Chapter I Section I"));
        wxMssVo.setData(m);
        ResponseEntity<String> responseEntity =
                restTemplate.postForEntity(url, wxMssVo, String.class);
        return responseEntity.getBody();
    }

    @GetMapping("/getAccessToken")
    public String getAccessToken() {
        RestTemplate restTemplate = new RestTemplate();
        Map<String, String> params = new HashMap<>();
        params.put("APPID", "wx7c54942dfc87f4d8");  //
        params.put("APPSECRET", "5873a729c365b65ab42bb5fc82d2ed49");  //
        ResponseEntity<String> responseEntity = restTemplate.getForEntity(
                "https://api.weixin.qq.com/cgi-bin/token?grant_type=client_credential&appid={APPID}&secret={APPSECRET}", String.class, params);
        String body = responseEntity.getBody();
        JSONObject object = JSON.parseObject(body);
        String Access_Token = object.getString("access_token");
        String expires_in = object.getString("expires_in");
        System.out.println("Effective duration expires_in: " + expires_in);
        return Access_Token;
    }
}
The corresponding two data classes are as follows
WxMssVo is used to encapsulate the parameters of the request official interface
package com.qcl.demo;

import java.util.Map;

/*
 * Applet push required data
 * Programming stone
 * */
public class WxMssVo {
    private String touser;//User openid
    private String template_id;//Subscription message template id
    private String page = "pages/index/index";//Default to applet home page
    private Map<String, TemplateData> data;//Push text

    public String getTouser() {
        return touser;
    }

    public void setTouser(String touser) {
        this.touser = touser;
    }

    public String getTemplate_id() {
        return template_id;
    }

    public void setTemplate_id(String template_id) {
        this.template_id = template_id;
    }

    public String getPage() {
        return page;
    }

    public void setPage(String page) {
        this.page = page;
    }

    public Map<String, TemplateData> getData() {
        return data;
    }

    public void setData(Map<String, TemplateData> data) {
        this.data = data;
    }
}
TemplateData is used to define the content of a message
package com.qcl.demo;

public class TemplateData {
    private String value;//

    public TemplateData(String value) {
        this.value = value;
    }

    public String getValue() {
        return value;
    }

    public void setValue(String value) {
        this.value = value;
    }
}
Here we can complete the function of Java sending applet messages. The complete code has also been posted to you.