[TOC]
Article Directory
1. Configure Nginx Hidden Version Number
1.1. Modify Profile Method
1.2. Modify Source Code Method
2. Modify Nginx Users and Groups
2.1. Modify the profile to specify users and groups
3. Configure Nginx Web Cache Time
IV. Configure Log Splitting
5. Connection timeout
The installation of nginx has been configured in advance, you can refer to my blog if you need it, link to: Configuration of Nginx
1. Configure Nginx Hidden Version Number
In production environments, Nginx version numbers need to be hidden to avoid leaking security vulnerabilities
View Method
View Nginx version number on Windows client using fiddler tool
Use "curl-I web address" command to view in CentOS system
Nginx Hide Version Number Method
Modify Profile Method
Modify Source Code Method
1.1. Modify Profile Method
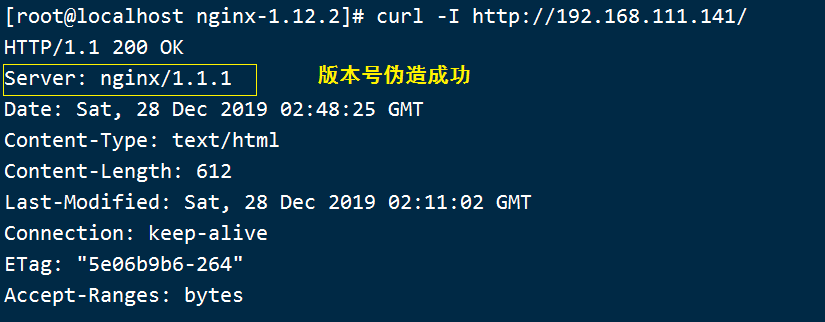
1. View version basic information first
curl -I http://Own IP Address
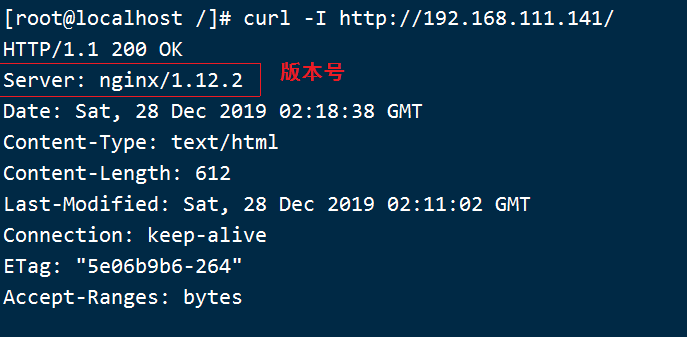
2. Configuration File Add for Nginx: The value of the server_tokens option is set to off
vim /usr/local/nginx/conf/nginx.conf

http {
     include        mime.types;
     default_type   application/octet-stream;
#Add a section below to turn off version display
      server_tokens off;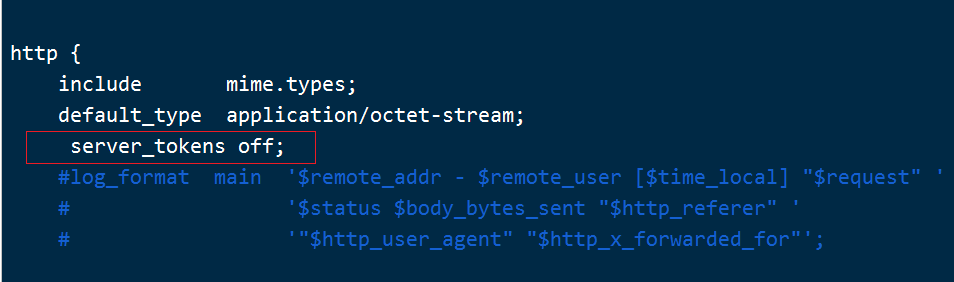
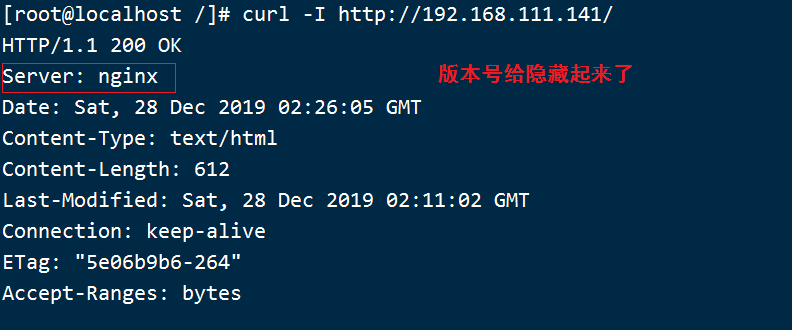
3. Restart Services
//Close the service before turning it on
service nginx stop
service nginx start
4. Use curl command to view version again
1.2. Modify Source Code Method
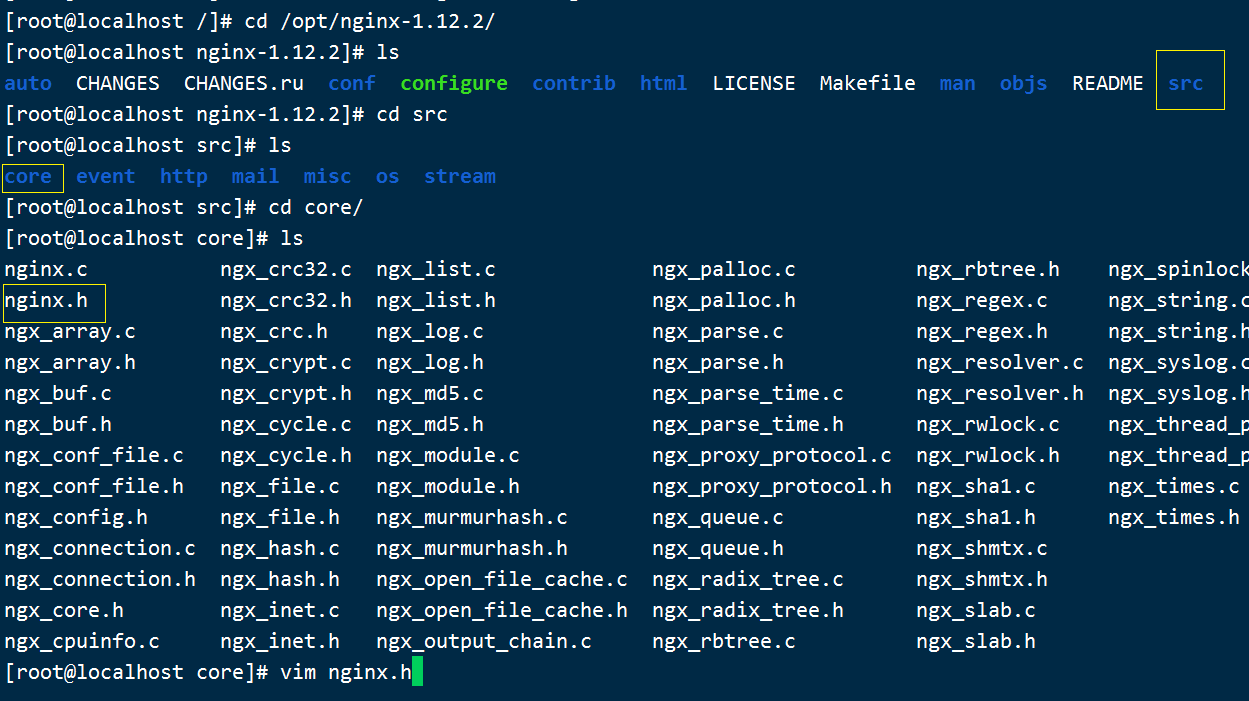
Nginx source file/pot/nginx-1.12.0/src/core/nginx.h
Contains version information and can be set at will
Recompile installation, hide version information
1. Modify version number
#First change the off (off) to on (on) of the sentence you just added.
vim /usr/local/nginx/conf/nginx.conf

cd /opt/nginx-1.12.2/src/core/

vim /opt/ningx-1.12.2/src/core/nginx.h

define nginx_version    1012002
define NGINX_VERSION    "1.1.1"     //Customize a version number
define NGINX_VER    "nginx/" NGINX_VERSION

2. Configuration Compilation
cd nginx-1.12.2/

./configure \
--prefix=/usr/local/nginx \
--user=nginx \
--group=nginx \
--with-http_stub_status_module

make && make install
3. Start the service and view the version
#Starting the service
service nginx stop
service nginx start

#When you look at it, you will see that we have a fake version number of our own
curl -I http://IP Address/

Sercer: nginx/1.1.1  #Forged version number
Note: If the version number is not forged successfully and is not displayed, it is possible that version display is turned off in the configuration file.Solution: Delete server_tokens off;
2. Modify Nginx Users and Groups
Nginx runtime processes require user and group support to allow access control when reading Web site files
Nginx uses Noody user and group accounts by default and generally needs to be modified
Modified method:
Specify users and groups when compiling an installation
Modify profile to specify users and groups
2.1. Modify the profile to specify users and groups
vim /usr/local/nginx/conf/nginx.conf

#user  nobody;
//Remove the previous comment'#'and modify nobody's specified user and group nginx nginx;

Main process created by root Subprocess created by nginx
3. Configure Nginx Web Cache Time
When Nginx returns web page data to the client, it can set the cache time to facilitate direct return when making future requests for the same content, avoid duplicate requests, and speed up access
Normally for static page settings, no caching time is set for dynamic pages
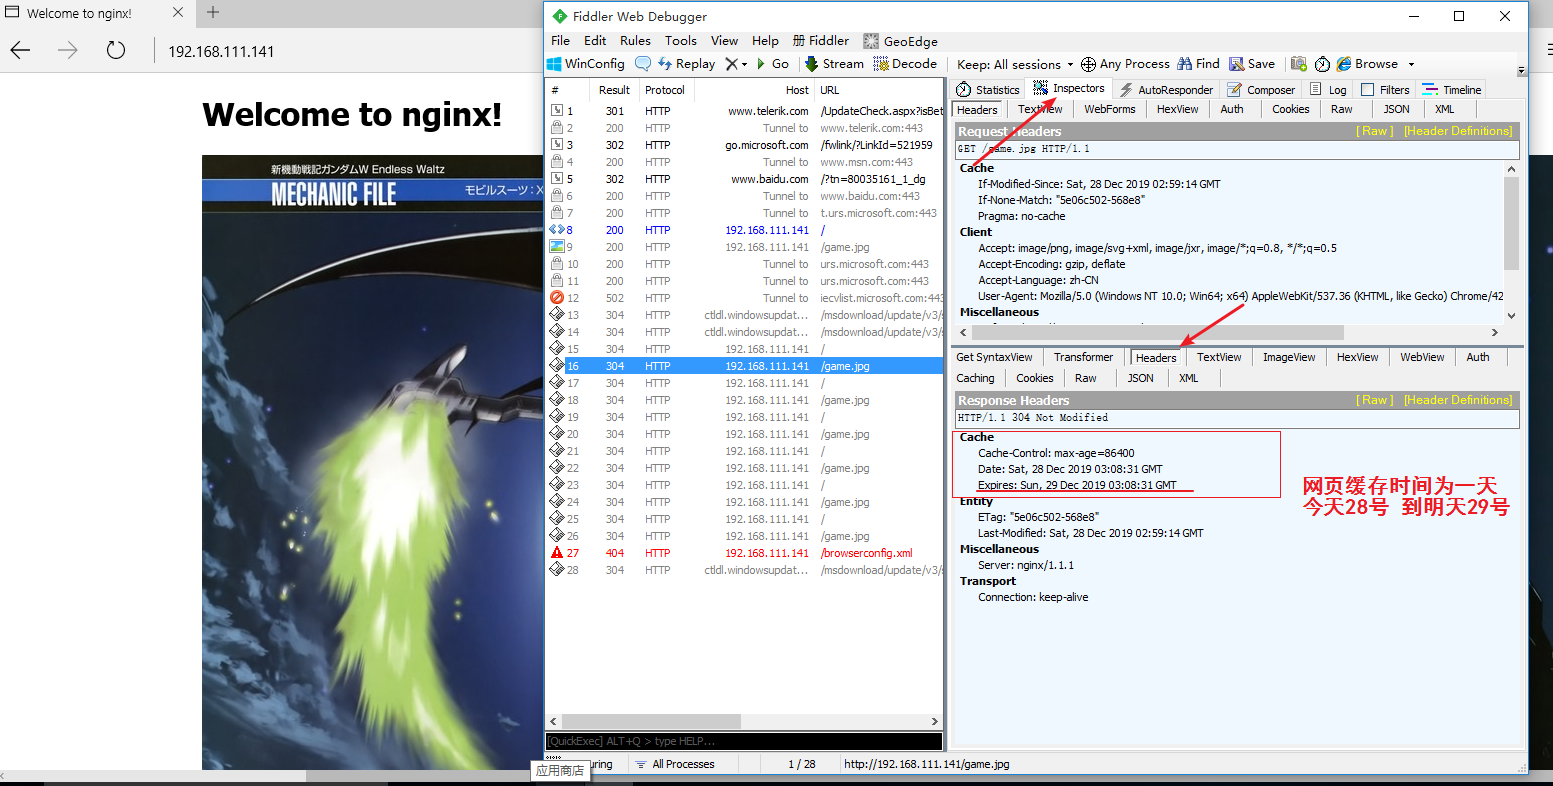
Use fiddler to view page cache time in Windows clients
Setup method:
Configuration files can be modified to include expiration parameters for specific content in http, server, or location segments
1. Copy a picture to the site directory of nginx
#Find "game.jpg" in your own shared file
mkdir /abc
mount.cifs //192.168.56.1/lamp7 /abc
cd /abc/wl
//My picture is in wl's bag
//Copy the picture game.jpg to the site directory
cp /abc/wl/game.jpg /usr/local/nginx/html/
cd /usr/local/nginx/html

2. Add pictures to web content
#modify
vim index.html

#Add a section below Welcome to nginx
<img src="game.jpg"/>

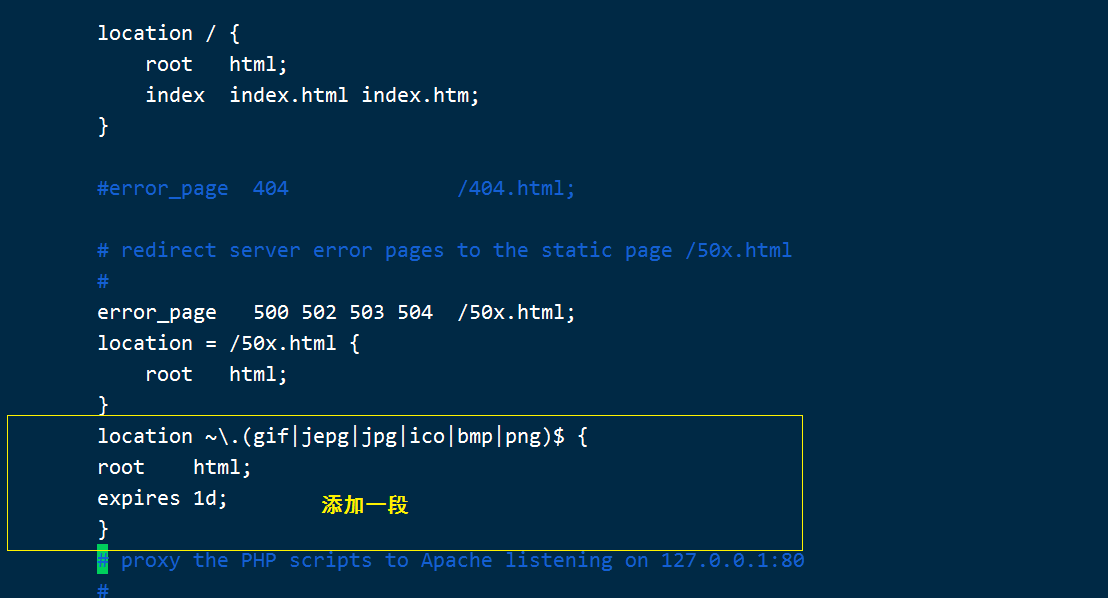
3. Change nginx's configuration file
vim /usr/local/nginx/conf/nginx.conf
#In the http {} section, add a
location ~\.(gif|jepg|jpg|ico|bmp|png)$ {
    root    html;
    expires 1d;
}
4. Start Services
#Restart Service
service nginx restart
5. Verify at win10
IV. Configure Log Splitting
As the Nginx runtime increases, so does the log.Nginx log files are important to keep an eye on for ease of understanding the state of Nginx
Too large a log file is a catastrophe for monitoring
Periodically cut log files
Nginx does not have log split processing on its own, but it can cut logs automatically through scripts with Nginx signal control functions and periodically through Linux's scheduled tasks
Ideas for scripting log cutting:
Setting time variables
Set save log path;
Rename the current log file
Delete log files that take too long
Set up cron tasks, periodically execute scripts to automatically split logs
1. Script splitting
vim /opt/fenge.sh

#!/bin/bash
#Filename:fenge.sh
d=$(date -d "-1 day" "+%Y%m%d")
logs_path="/var/log/nginx"
pid_path="/usr/local/nginx/logs/nginx.pid"
[ -d $logs_path ] || mkdir -p $logs_path
mv /usr/local/nginx/logs/access.log ${logs_path}/test.com-access.log-$d
kill -USR1 $(cat $pid_path)
find $logs_path -mtime +30 | xargs rm -rf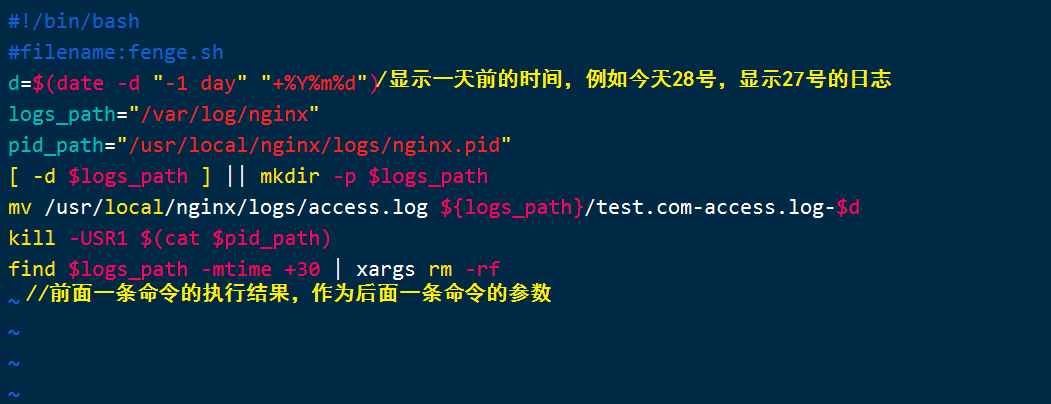
2. Executing scripts
chmod +x fenge.sh
./fengs.sh
//You can change the current time to 2019.12.29. (Customizable)
date -s 2019-12-29
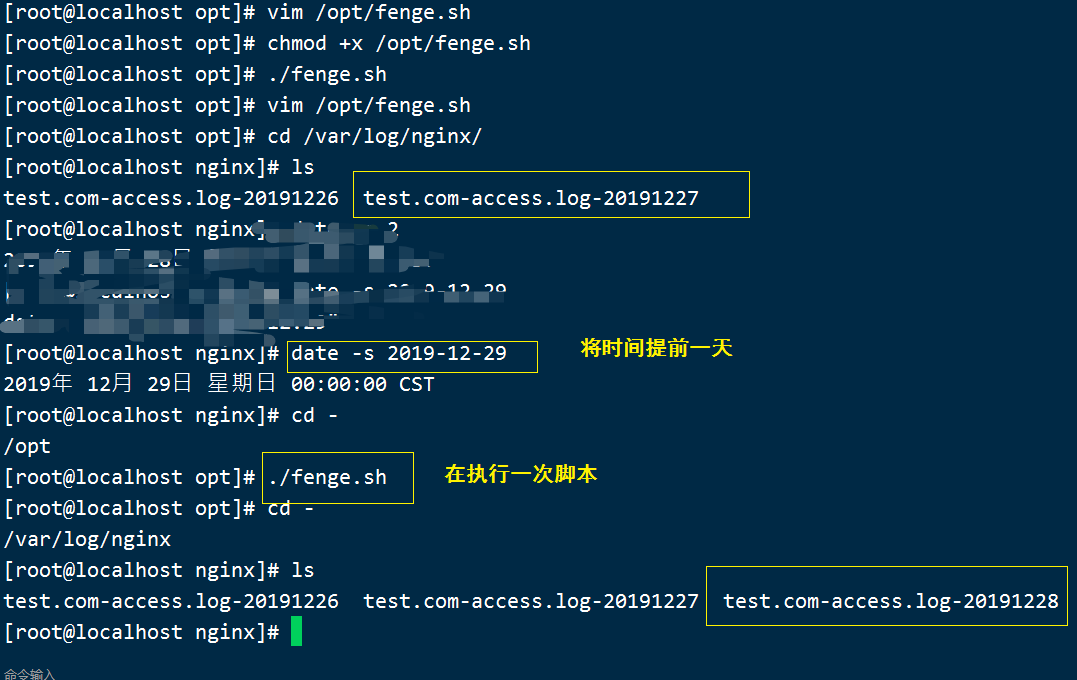
3. Set up cron tasks and execute scripts periodically to automatically split logs
Perform periodically scheduled tasks
crontab -e
0 1 * * * /opt/fengs.sh
5. Connection timeout
In corporate websites, to avoid long-term connections with - - customers,
Causes waste of resources, can set the corresponding connection timeout parameters to achieve control
Connection Access Time
Viewing connection parameters using the Fiddler tool
Explanation of timeout parameters:
Keepalive_timeout
Set the connection retention timeout, which can be set only by default of 75 seconds. It can be set or closed depending on the site. It can be set in http, server, or location segments
Client_header_timeout
Specify the timeout to wait for the client to send the request header
Client_body_timeout
Set Request Body Read Timeout
1. Modify the configuration file
cd /usr/local/nginx/conf
vim nginx.conf
#In http {} section: Add below

keepalive_timeout    65  180;
client_header_timeout 80;
client_body_timeout 80;

//Restart Service
service nginx restart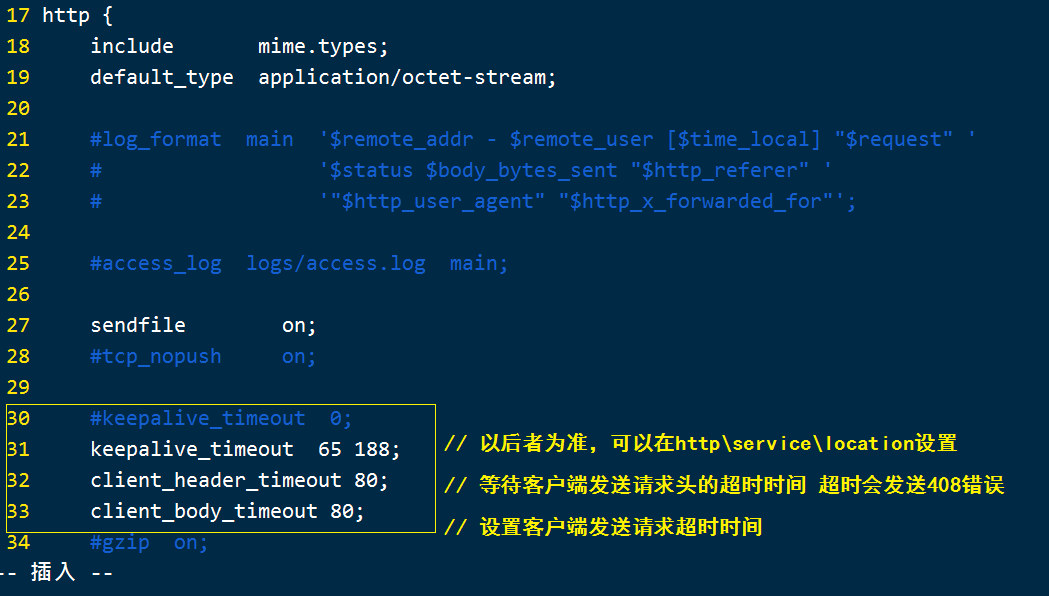
Verify with fidder at win10.
