Helm-v3 Application Package Manager
3.1 Why do I need Helm?
The application objects on K8S consist of specific resource descriptions, including deployment, service, and so on.Save each file or write it together to a configuration file.Then deploy kubectl apply-f.
Why use helm?
In k8s, when we deploy applications, we usually use yaml files to manage the publishing of our applications, such as micro services, including deployment,service,configmap,ingress, but if we have hundreds of micro services, each modification will involve more, feel less flexible, and then management may feel overwhelmed.This is just a problem. In fact, k8s lacks a more advanced application-level management. If we put these yaml files in one place, based on one application-level management, it might be better.
What is the problem with using these yaml files?
And due to the lack of application version management and control over published applications, application maintenance and updates on Kubernetes are facing many challenges, mainly the following issues:
How to manage these services as a whole is that each time we deploy these yaml, we apply them, and then we lack unified management
How can these resource files be reused efficiently? In fact, when we deploy, many types of templates are the same. How can we use a set of templates to publish multiple applications? We only need to make simple changes when publishing.
Application-level versioning is not supported, so there are a lot of yaml here. How can you manage application-level versioning? To solve this problem, helm came into being.
Introduction to 3.2 Helm
Helm is a package management tool for Kubernetes, like the package manager under Linux, such as yum/apt, which makes it easy to deploy previously packaged yaml files to kubernetes.
For example, like yum, which mainly solves a dependent problem, there may be a lot of Yums installed to execute. This helm is equivalent to a package manager of yum, it will be installed directly by application, and this helm is the same.
Helm has three key concepts:
helm: A command-line client tool for creating, packaging, publishing, and managing Kubernetes application chart s.
Chart: Apply description, a series of collections used to describe k8s resource related files.
Release: Deployment entity based on Chart, a release will be generated when a chart is run by Helm; real running resource objects will be created in k8s.
3.3 Helm v3 Change
On November 13, 2019, the Helm team released the first stable version of Helm v3.
The major changes in this release are as follows:
1. Architectural changes
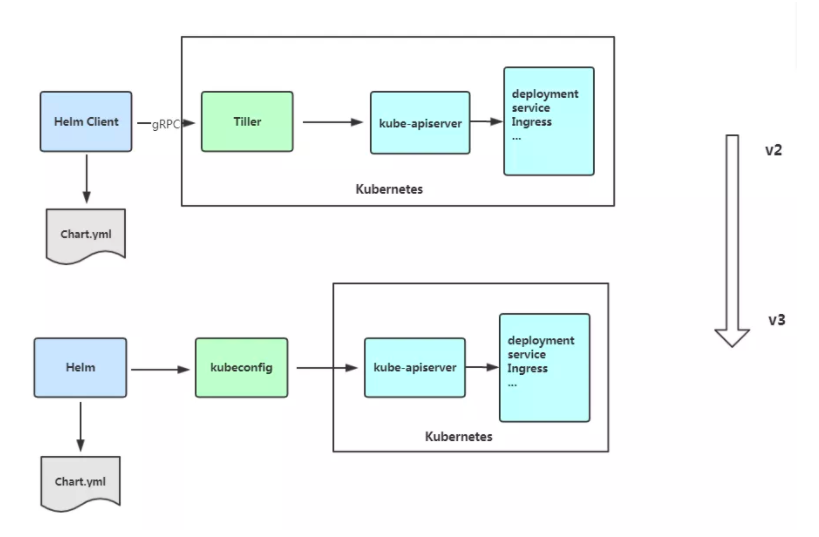
The most obvious change is that it is much simpler. The first change is, and most obviously, that it exists as a service side in a pod cluster where tiller was previously deployed as a pod cluster. It mainly receives requests from helm clients, sends them to the API, and then forwards them to the api. The tiller also needs to be deployed separately and authorized to operate on which namespaces of the cluster it has.In between, what permissions have been deleted.
Kubeconfig's configuration file for connecting to the cluster connects directly to apiserver, which used to be a direct connection API and forwards it. Now kubeconfig is used directly and kubectl uses kubeconfig to connect to the cluster. So helm connects to kubeconfig directly, connects to apiserver, and deploys chart's package, which simplifies a lot. Then v2 deploys a Helm and tiller is also neededCan work normally now, v3 version is no longer needed, just need to download a helm client tool, first this deployment has been simplified a lot, is more reasonable, before the rights management is also very troublesome, but also needs tiller to do rights management, so this authorization is more troublesome, feel that adding this tiller is also redundant, it was also at that timeThe reason for the design is that such a tiller is attached, which is also a necessity. With kubeconfig, it can be done directly through the native kubeconfig, so there is no need for a component to do this alone, such as authorization, connection API, some of which can be implemented by the clients of helm, so it is very simple to use helm, which is alsoIt's a change in community awareness that really makes helm a useful tool.
2. Release names can be reused in different namespaces. Previously, this was maintained by tiller. For example, deploying a web to produce a distribution. This distribution name cannot be used across namespaces. It can only be used by one name, for example, default uses the name of a web. It cannot be used under the namespace of kube-system, mainly for global management, in a single publication.This information is stored under a namespace, so it is maintained under each namespace and should not be duplicated within that namespace.
3. Support for pushing chart s to the Docker mirror warehouse, that is, charts can be pushed to the harbor warehouse. Previously, there was a special storage tool, that is, this support, which can store multiple types in only one warehouse, for example, package management tools for our charts can also be stored through the harbor mirror
4. Validate chart values using JSONSchema, mainly to validate the files of variables in the format values
5. Other
1) Individual rename of Helm CLI in order to better coordinate the wording of other package managers
helm delete renamed helm uninstall
helm inspect renamed to helm show
helm fetch renamed helm pull
However, the old commands above are still available.
2) Remove the helm serve r command for temporarily building Chart Repository locally.
3) Automatically create namespaces
When creating a distribution in a namespace that does not exist, Helm 2 creates the namespace.Helm 3 follows the behavior of other Kubernetes objects and returns an error if the namespace does not exist.
4) requirements.yaml is no longer required, and dependencies are defined directly in chart.yaml.
Basically, the v3 version of helm is code that is basically refactoring
3.4 Helm Client
1. Deploy Helm Client
Helm Client Download Address: https://github.com/helm/helm/releases
Unzip and move to/usr/bin/directory.
wget https://get.helm.sh/helm-v3.0.0-linux-amd64.tar.gz
tar zxvf helm-v3.0.0-linux-amd64.tar.gz
mv linux-amd64/helm /usr/bin/
2. Common Helm commands
3. Configure domestic Chart warehouses
Once you have the client tools ready, configure the repository for this chart, which is an application package
Microsoft Warehouse ( http://mirror.azure.cn/kubernetes/charts/) This repository is recommended for use, and basically all charts on the official website are available here.
Ali Cloud Warehouse ( https://kubernetes.oss-cn-hangzhou.aliyuncs.com/charts )
Official warehouse ( https://hub.kubeapps.com/charts/incubator) Official chart warehouse, a little difficult at home.
Add repository:
helm repo add azure http://mirror.azure.cn/kubernetes/charts
helm repo add aliyun https://kubernetes.oss-cn-hangzhou.aliyuncs.com/charts
helm repo update To update
View the configured repository:
You can also add multiple warehouses here, such as Aliyun and Microsoft. search will help you list all the warehouses you own.
[root@k8s-master1 ~]# helm repo list
NAME    URL
stable  http://mirror.azure.cn/kubernetes/charts
[root@k8s-master1 ~]# helm search repo mysql
Delete repository:
helm repo remove aliyun
3.5 Helm Basic Use
Three commands are introduced:
chart install installation
 chart update upgrade
 chart rollback rollback
1. Deploy an application using chart
Find chart:
helm search repo
helm search repo mysql
Why is mariadb on the list?Because he's related to mysql.
View chart information:
helm show chart azure/mysql
Installation package: db-1 specifies the name of the package (custom)
[root@k8s-master1 ~]# helm install db-1 azure/mysql
NAME: db-1
LAST DEPLOYED: Tue Dec 17 10:24:07 2019
NAMESPACE: default
STATUS: deployed
REVISION: 1
NOTES:
View the publication status:
helm status db-1
//List release
[root@k8s-master1 ~]# helm list
NAME    NAMESPACE   REVISION    UPDATED                                 STATUS      CHART       APP VERSION
db-1    default     1           2019-12-17 10:24:07.593783822 +0800 CST deployed    mysql-1.6.2 5.7.28
View the deployment status of pod s
[root@k8s-master1 ~]# kubectl get pod
NAME                                      READY   STATUS    RESTARTS   AGE
db-1-mysql-765759d7d8-n65x6               0/1     Pending   0          3m47s
View the event, pending appears here, detect why pod can't run, see why pvc can't bind here, explain there is no pv
[root@k8s-master1 ~]# kubectl describe pod db-1-mysql-765759d7d8-n65x6
Events:
  Type     Reason            Age        From               Message
  ----     ------            ----       ----               -------
  Warning  FailedScheduling  <unknown>  default-scheduler  pod has unbound immediate PersistentVolumeClaims (repeated 3 times)
  Warning  FailedScheduling  <unknown>  default-scheduler  pod has unbound immediate PersistentVolumeClaims (repeated 3 times)
Look at the pvc, here is no successful binding, indicating that no suitable pv has been found to bind, as long as it is matched to run successfully
[root@k8s-master1 ~]# kubectl get pvc
NAME         STATUS    VOLUME   CAPACITY   ACCESS MODES   STORAGECLASS   AGE
db-1-mysql   Pending                                                     7m54s
Let's create a pv for it to bind automatically. Here's the network storage I'm using nfs to do. Once it's created, look at the pvc, and it will show you that the binding was successful and see the status of the pod
[root@k8s-master1 ~]# cat pv.yaml
apiVersion: v1
kind: PersistentVolume
metadata:
  name: pv0003
spec:
  capacity:
    storage: 8Gi
  accessModes:
    - ReadWriteOnce
  nfs:
    path: /opt/k8s/db
    server: 10.4.7.200

[root@k8s-master1 ~]# kubectl get pod
NAME                                      READY   STATUS    RESTARTS   AGE
db-1-mysql-765759d7d8-n65x6               1/1     Running   0          24m
View deployed applications through helm list
[root@k8s-master1 ~]# helm list
NAME    NAMESPACE   REVISION    UPDATED                                 STATUS CHART        APP VERSION
db-1    default     1           2019-12-17 10:24:07.593783822 +0800 CST deployemysql-1.6.2  5.7.28
Check out the details, which will tell you how to connect mysql
[root@k8s-master1 ~]# helm status db-1
Here we say to generate a random password and take out the values to generate it
To get your root password run:

    MYSQL_ROOT_PASSWORD=$(kubectl get secret --namespace default db-1-mysql -o jsonpath="{.data.mysql-root-password}" | base64 --decode; echo)
Here's how to connect to the database with this command
Connect using the mysql cli, then provide your password:
    $ mysql -h db-1-mysql -p
First enter this container, then tell us to connect, test and create a database
[root@k8s-master1 ~]# kubectl exec -it db-1-mysql-765759d7d8-n65x6 /bin/bash
root@db-1-mysql-765759d7d8-n65x6:/# mysql -h db-1-mysql -p
Enter password:
Welcome to the MySQL monitor.  Commands end with ; or \g.
Your MySQL connection id is 73
Server version: 5.7.28 MySQL Community Server (GPL)
mysql> create database db;
Query OK, 1 row affected (0.07 sec)

mysql> show databases;
+--------------------+
| Database           |
+--------------------+
| information_schema |
| db                 |
| mysql              |
| performance_schema |
| sys                |
+--------------------+
5 rows in set (0.02 sec)
Now there is another question, there is this NFS auto-supply in itself. Now I want to use my own pv auto-supply how to achieve it?
So it's time to modify the configuration options of charts, because there are some dependencies, such as MySQL just now has a pv dependency, because it doesn't know which storage class we're using. In other words, there are two ways to customize the configuration options before installing charts. The first way is to overwrite it directly with the yaml--values. The helm show values AZU we just usedRe/mysql, yaml of values in this chart
Let's redirect the file just under values to a file first
[root@k8s-master1 ~]# helm show values azure/mysql > volues.yaml
[root@k8s-master1 ~]# cat volues.yaml
mysqlRootPassword: testing
mysqlUser: k8s
mysqlPassword: k8s123
mysqlDatabase: k8s
persistence:
  enabled: true
  storageClass: "managed-nfs-storage"
  accessMode: ReadWriteOnce
  size: 8Gi
I created this storage class before. Instead of demonstrating, specify our storage class in values-yaml
[root@k8s-master1 ~]# kubectl get storageclass
NAME                  PROVISIONER      AGE
managed-nfs-storage   fuseim.pri/ifs   3d23h
Let's create another database. Depending on our values, we can now directly bind our storage class and create a pod
[root@k8s-master1 ~]# helm install db-2 -f volues.yaml azure/mysql
[root@k8s-master1 ~]# helm list
NAME    NAMESPACE   REVISION    UPDATED                                 STATUS        CHART         APP VERSION
db-1    default     1           2019-12-17 10:24:07.593783822 +0800 CST deployed      mysql-1.6.2   5.7.28
db-2    default     1           2019-12-17 11:37:31.852808375 +0800 CST deployed      mysql-1.6.2   5.7.28
[root@k8s-master1 ~]# kubectl get pv
NAME                                       CAPACITY   ACCESS MODES   RECLAIM POLICY   STATUS   CLAIM                                      STORAGECLASS          REASON   AGE
pv0003                                     8Gi        RWO            Retain           Bound    default/db-1-mysql                                                        52m
pvc-0baaf69a-0a3b-4d05-adb5-515057bda753   8Gi        RWO            Delete           Bound    default/db-2-mysql                         managed-nfs-storage            18s
pvc-16725fa9-3fe5-4e87-a2f8-f3f1e7df56b3   16Gi       RWO            Delete           Bound    kube-system/prometheus-data-prometheus-0   managed-nfs-storage            3d23h
pvc-30244364-8bcd-43af-b1a9-d36e044c83c4   1Gi        RWO            Delete           Bound    kube-system/grafana-data-grafana-0         managed-nfs-storage            3d23h
[root@k8s-master1 ~]# kubectl get pod
NAME                                      READY   STATUS    RESTARTS   AGE
db-1-mysql-765759d7d8-n65x6               1/1     Running   0          74m
db-2-mysql-69dc64b75f-b2cxb               1/1     Running   0          59s
Now test our database, our password is also defined in values, so log in directly and see the database we created
root@db-2-mysql-69dc64b75f-b2cxb:/# echo ${MYSQL_ROOT_PASSWORD}
testing
root@db-2-mysql-69dc64b75f-b2cxb:/# mysql -uroot -p${MYSQL_ROOT_PASSWORD}
mysql: [Warning] Using a password on the command line interface can be insecure.
Welcome to the MySQL monitor.  Commands end with ; or \g.
Your MySQL connection id is 52
Server version: 5.7.28 MySQL Community Server (GPL)
mysql> show databases;
+--------------------+
| Database           |
+--------------------+
| information_schema |
| k8s                |
| mysql              |
| performance_schema |
| sys                |
+--------------------+
5 rows in set (0.06 sec)
View user, k8s user created
mysql> select user from mysql.user;
+---------------+
| user          |
+---------------+
| k8s           |
| root          |
| mysql.session |
| mysql.sys     |
| root          |
+---------------+
5 rows in set (0.04 sec)
2. Customize chart configuration options before installation
If you want to use the official chart s, you can use install directly. Some of them have to be prepared in advance, such as the pv you just made
There are two ways to keep some modified files and reference them, or use --set to replace variables on the command line
Configuration file writes can also be used on the command line and then run as well.
--values (or -f): Specifies a YAML file with an overlay.This can be specified multiple times, with the rightmost file taking precedence
--set: Specify a replacement on the command line.If you use both, --set takes precedence
[root@k8s-master1 ~]# helm install db-3 --set persistence.storageClass="managed-nfs-storage" azure/mysql
[root@k8s-master1 ~]# kubectl get pvc
NAME         STATUS   VOLUME                                     CAPACITY   ACCESS MODES   STORAGECLASS          AGE
db-1-mysql   Bound    pv0003                                     8Gi        RWO                                  4h13m
db-2-mysql   Bound    pvc-0baaf69a-0a3b-4d05-adb5-515057bda753   8Gi        RWO            managed-nfs-storage   3h
db-3-mysql   Bound    pvc-2bf895a8-075b-43d9-ade9-fe9b7ae67b1b   8Gi        RWO            managed-nfs-storage
[root@k8s-master1 ~]# kubectl get pod
NAME                                      READY   STATUS    RESTARTS   AGE
db-1-mysql-765759d7d8-n65x6               1/1     Running   0          4h13m
db-2-mysql-69dc64b75f-b2cxb               1/1     Running   0          179m
db-3-mysql-679888dd7b-9m5cm               1/1     Running   0          85s
Or if you want to care about how this official chart is written, you can pull it down and see the details
[root@k8s-master1 ~]# helm pull azure/mysql --untar
This pull down is a compressed package, you can also pull down when directly decompressed, --untar
Here are the values.yaml, which we redirected just now. The others remain unchanged. Under templates, this is the yaml needed to deploy mysql. You will find that deploying a chart is much simpler. I can also quickly start multiple sets of pods, deploy multiple pods to dynamically pass in parameters, and also divide production and test environments as long as you are in VUnder alues, different namespaces are defined to distinguish between different production and test environments.
[root@k8s-master1 ~]# cd mysql
[root@k8s-master1 mysql]# ls
Chart.yaml  README.md  templates  values.yaml
The helm install command can also be installed from multiple sources:
chart repository
 Local chart archive (helm install foo-0.1.1.tgz) or MySQL package that it officially pulled just now, use helm install mysql-1.5.0.gz directly
 chart directory (helm install path/to/foo)
Full URL (helm install https://example.com/charts/foo-1.2.3.tgz) or the address of one of your URLs
3. Build a Helm Chart
How does a chart make up a create +custom name (directory structure)
[root@k8s-master1 test-helm]# helm create chart
Creating chart
[root@k8s-master1 test-helm]# ls
chart
[root@k8s-master1 test-helm]# cd chart/
[root@k8s-master1 chart]# ls
charts  Chart.yaml  templates  values.yaml
Launch the chart we just made, and start the pod custom name helm install name just under the configuration directory
[root@k8s-master1 test-helm]# helm install my-chart chart/
NAME: my-chart
LAST DEPLOYED: Tue Dec 17 15:09:10 2019
NAMESPACE: default
STATUS: deployed
REVISION: 1
NOTES:
1. Get the application URL by running these commands:
  export POD_NAME=$(kubectl get pods --namespace default -l "app.kubernetes.io/name=chart,app.kubernetes.io/instance=my-chart" -o jsonpath="{.items[0].metadata.name}")
  echo "Visit http://127.0.0.1:8080 to use your application"
  kubectl --namespace default port-forward $POD_NAME 8080:80
Let's see what service we started this pod with. The default is an official template. You can see under values that the image it gets is nginx
[root@k8s-master1 test-helm]# kubectl get pod -o wide
my-chart-94997cb67-c2zxx                  1/1     Running   0          10m     10.244.0.43   k8s-node2     <none>           <none>
[root@k8s-master1 chart]# curl -I 10.244.0.43
HTTP/1.1 200 OK
Server: nginx/1.16.0
Date: Tue, 17 Dec 2019 07:22:57 GMT
Content-Type: text/html
Content-Length: 612
Last-Modified: Tue, 23 Apr 2019 10:18:21 GMT
Connection: keep-alive
ETag: "5cbee66d-264"
Accept-Ranges: bytes

[root@k8s-master1 chart]# helm list
NAME        NAMESPACE   REVISION    UPDATED                                 STATUS      CHART       APP VERSION
db-1        default     1           2019-12-17 10:24:07.593783822 +0800 CST deployed    mysql-1.6.2 5.7.28
db-2        default     1           2019-12-17 11:37:31.852808375 +0800 CST deployed    mysql-1.6.2 5.7.28
db-3        default     1           2019-12-17 14:36:00.445305589 +0800 CST deployed    mysql-1.6.2 5.7.28
my-chart    default     1           2019-12-17 15:09:10.164272986 +0800 CST deployed    chart-0.1.0 1.16.0
Take a look at the directory structure of this file
[root@k8s-master1 test-helm]# tree .
.
└── chart
    ├── charts
    ├── Chart.yaml
    ├── templates
    │   ├── deployment.yaml
    │   ├── _helpers.tpl
    │   ├── ingress.yaml
    │   ├── NOTES.txt
    │   ├── serviceaccount.yaml
    │   ├── service.yaml
    │   └── tests
    │       └── test-connection.yaml
    └── values.yaml
4 directories, 9 files
Chart.yaml: Basic information used to describe this Chart, including name, description information, and version.
values.yaml: Stores the values of variables used in template files in the templates directory.
Templates: All yaml template files are stored in the directory.
charts: The directory holds all the subcharts on which this chart depends.
NOTES.txt: Used to introduce Chart help information that is displayed to users after the helm install is deployed.For example: how to use this Chart, list default settings, and so on.
_helpers.tpl: Place the template assistant where it can be reused throughout the chart
Now let's make our own chart template and publish a simple micro-service type
[root@k8s-master1 chart]# tree .
.
├── charts
├── Chart.yaml
├── templates
└── values.yaml
Create a new deployment type pod mirrored by nginx
[root@k8s-master1 templates]# kubectl create deployment app-1 --image=nginx -o yaml --dry-run > deployment.yaml
[root@k8s-master1 templates]# ls
deployment.yaml
Delete some unnecessary field null values from yaml
Let's modify this yaml, start with a simple rendering using variable assignments for values, then publish two microservices, use nginx's image as a small example, and then publish a complete microservice (dubbo,spring cloud's application).
[root@k8s-master1 chart]# cat templates/deployment.yaml
apiVersion: apps/v1
kind: Deployment
metadata:
  labels:
    app: {{ .Values.name }}
  name: {{ .Values.name }}
spec:
  replicas: {{ .Values.replicas }}
  selector:
    matchLabels:
      app: {{ .Values.name }}
  template:
    metadata:
      labels:
        app: {{ .Values.name }}
    spec:
      containers:
      - image: {{ .Values.image }}:{{ .Values.imageTag }}
        name: {{ .Values.image }}
When we publish a microservice, it will call the variables of our upper values'template to render the yaml we publish the application. The benefit of helm is here, to publish a service in the native yaml of k8s. The yaml format does not support variable injection, so helm should come into being, mainly to solve this problem, and we will send it outPublishing multiple tasks directly writes in some changing values through this template, and publishing tasks will be fast and save us time.
[root@k8s-master1 chart]# cat .//values.yaml
name: base-user-devops
image: nginx
imageTag: 1.15
replicas: 2

[root@k8s-master1 ~]# kubectl get pod
NAME                                      READY   STATUS    RESTARTS   AGE
base-user-common-58b7bc9c56-2nmcb         1/1     Running   0          12m
base-user-common-58b7bc9c56-2tgpg         1/1     Running   0          12m
base-user-devops-7cf5c99485-rr295         1/1     Running   0          10m
base-user-devops-7cf5c99485-s2jbb         1/1     Running   0          10m

[root@k8s-master1 test-helm]# helm list
NAME                NAMESPACE   REVISION    UPDATED                                 STATUS      CHART       APP VERSION
base-user-common    default     1           2019-12-17 16:29:01.587768045 +0800 CST deployed    chart-0.1.0 1.16.0
base-user-devops    default     1           2019-12-17 16:27:11.757082258 +0800 CST deployed    chart-0.1.0 1
To see what happens when we render, our variables are assigned to our yaml, and then help us start the pod
[root@k8s-master1 test-helm]# helm get manifest base-user-common

---
Source: chart/templates/deployment.yaml
apiVersion: apps/v1
kind: Deployment
metadata:
  labels:
    app: base-user-common
  name: base-user-common
spec:
  replicas: 2
  selector:
    matchLabels:
      app: base-user-common
  template:
    metadata:
      labels:
        app: base-user-common
    spec:
      containers:
      - image: nginx:1.16
        name: nginx
4. Upgrade, Rollback and Delete
You can use the helm upgrade command when publishing a new version of a chart or when you want to change the configuration of the publication
For example, replace the mirror of our base-user-common service with another one, because our micro-service actually rebuilds during the process of publishing, due to changes in the code we develop, through the dockerfile, so the same is true here. When we publish a new service, we need to replace the mirror of our old code, here itsThe old can be designated as our new mirror.
[root@k8s-master1 test-helm]# vim chart/values.yaml
Modify the mirror to 1.15, then update it, use upgrade to specify the name of our microservice This name is defined by the project, the microservice itself is a molecule of a split organization, this is defined by itself, and then specify this catalog of chart templates
[root@k8s-master1 test-helm]# helm upgrade base-user-common chart/
Release "base-user-common" has been upgraded. Happy Helming!
NAME: base-user-common
LAST DEPLOYED: Tue Dec 17 16:47:55 2019
NAMESPACE: default
STATUS: deployed
REVISION: 2
TEST SUITE: None
Test view has successfully replaced the mirror with version 1.15
[root@k8s-master1 test-helm]# curl -I 10.244.2.24
HTTP/1.1 200 OK
Server: nginx/1.15.12
Date: Tue, 17 Dec 2019 08:48:34 GMT
Content-Type: text/html
Content-Length: 612
Last-Modified: Tue, 16 Apr 2019 13:08:19 GMT
Connection: keep-alive
ETag: "5cb5d3c3-264"
Accept-Ranges: bytes
For example, roll back the application to the first version, and now it's back to 1.16
[root@k8s-master1 ~]# helm rollback base-user-common
Rollback was a success! Happy Helming!
[root@k8s-master1 ~]# curl -I 10.244.1.20
HTTP/1.1 200 OK
Server: nginx/1.16.1
Date: Tue, 17 Dec 2019 09:44:44 GMT
Content-Type: text/html
Content-Length: 612
Last-Modified: Tue, 13 Aug 2019 10:05:00 GMT
Connection: keep-alive
ETag: "5d528b4c-264"
Accept-Ranges: bytes
You can also view versions of history
[root@k8s-master1 chart]# helm history base-user-common
REVISION    UPDATED                     STATUS      CHART       APP VERSION DESCRIPTION
1           Tue Dec 17 16:29:01 2019    superseded  chart-0.1.0 1.16.0      Install complete
2           Tue Dec 17 16:47:55 2019    superseded  chart-0.1.0 1.16.0      Upgrade complete
3           Tue Dec 17 17:43:23 2019    deployed    chart-0.1.0 1.16.0      Rollback to 1
You can also pack a pushed charts repository to share it with others
[root@k8s-master1 test-helm]# helm package chart
The uninstall distribution uses helm uninstall or helm delete, which also deletes the pod
[root@k8s-master1 test-helm]# helm uninstall base-user-common
release "base-user-common" uninstalled