I. environment introduction
| host name | ip | Installation software |
|---|---|---|
| nginx_mysql_m | 192.168.255.67 | keepalived+nginx |
| nginx_mysql_s | 192.168.255.66 | keepalived+nginx |
| mysql1 | 192.168.255.52 | mysql,mysql-server |
| mysql2 | 192.168.255.57 | mysql,mysql-server |
II. keepalived configuration
The configuration of keepalived is similar to that in the previous article
vim /etc/keepalived/keepalived.conf
! Configuration File for keepalived
global_defs {
notification_email {br/>root@localhost
}
notification_email_from keepalived@localhost
smtp_server 127.0.0.1
smtp_connect_timeout 30
router_id nginx_mysql_s
vrrp_skip_check_adv_addr
#vrrp_strict
vrrp_garp_interval 0
vrrp_gna_interval 0
}vrrp_script chk_nginx {
script "/etc/keepalived/nginx_check.sh" # Script to check nginx status
interval 2
weight 3
}vrrp_instance VI_1 {
state BACKUP
interface ens160
virtual_router_id 66
priority 100 #backup is smaller than 100
advert_int 1
authentication {
auth_type PASS
auth_pass 1111
}
virtual_ipaddress {
192.168.255.200
}
track_script {
chk_nginx
}
}
Three. nginx Configuration
Because here nginx Listen to port 3306, no need web Service so the configuration file is simple, but it needs to use stream Modular
When configuring, you need to add -- with--stream
/configure --add-module=../ngx_cache_purge-2.3 --prefix=/usr/local/nginx --with-http_ssl_module --with-stream --with-pcre=../pcre-8.41 --with-zlib=../zlib-1.2.11 --with-openssl=../openssl-1.0.2o
Other installation methods are the same as those in the previous article
Modify nginx configuration file
#user nobody;
worker_processes 1;#error_log logs/error.log;
#error_log logs/error.log notice;
#error_log logs/error.log info;
#pid logs/nginx.pid;events {
worker_connections 1024;
}stream {
upstream mysql {
            server 192.168.255.52:3306 weight=5 max_fails=3 fail_timeout=30s;
            server 192.168.255.57:3306 weight=5 max_fails=3 fail_timeout=30s;
   }

    server {

            listen 3306;
            proxy_connect_timeout 1s;
            proxy_timeout 3s;
            proxy_pass mysql;
}
}
start nginx
/usr/local/nginx/sbin/nginx
netstat -napt
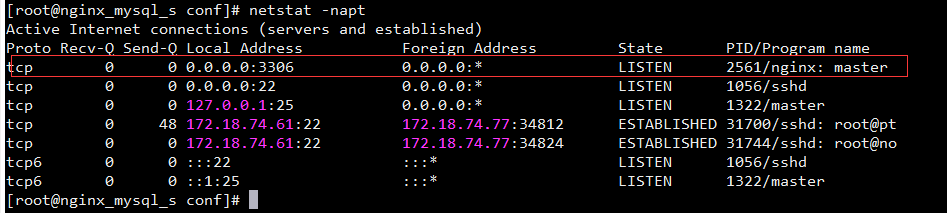
Found that nginx has been successfully monitored
The nginx configuration of backup is the same
IV. mysql database configuration
Next is the play, mysql main configuration
1 mysql installation
wget http://repo.mysql.com/mysql-community-release-el7-5.noarch.rpm
mv http://repo.mysql.com/mysql-community-release-el7-5.noarch.rpm /etc/yum.repo/
rpm -ivh http://repo.mysql.com/mysql-community-release-el7-5.noarch.rpm
yum install -y mysql&&yum install mysql-server -y
systemctl start mysql
First we configure mysql Dual master model for data synchronization
vim /etc.my.cnf
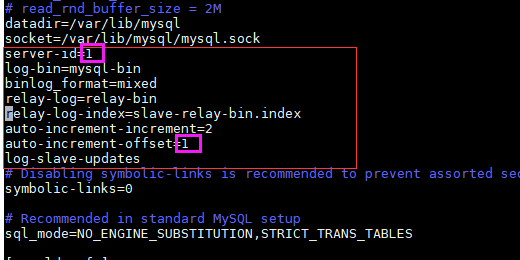
server-id=1
log-bin=mysql-bin
binlog_format=mixed
relay-log=relay-bin
relay-log-index=slave-relay-bin.index
auto-increment-increment=2
auto-increment-offset=1
log-slave-updates
Contents to be added for red box history
Two in the pink frame mysql Different places
mysql2 1 at the pink frame of
Then restart. mysql
systemctl restart mysql
mysql
mysql> grant all privileges on . to zhangsan@192.168.255.53 identified by '123456';
stay mysql2 Upper handle ip Change to mysql1 Of
The rest of the steps are in the last blog mysql data synchronization, which is not covered here
We license the web server to do everything
mysql
mysql> create database db_jd;
mysql> create user web@localhost identified by '123456';
mysql> grant all privileges on . to web@localhost;
mysql> create user web@192.168.255.50 identified by '123456';
mysql> create user web@192.168.255.53 identified by '123456';
mysql> grant all privileges on db_jd. to web@192.168.255.50;
mysql> grant all privileges on db_jd. to web@192.168.255.53;
mysql> flush privileges;
Then connect mysql with php on the web server to see if it is successful
cd /var/www/html
vim con.php
<?php
// mysql_connect("database address", "database account", "database password", "connect to database");
$con = mysql_connect("192.168.255.200","web","123456","db_jd");
//Test whether to connect to the database
if($con){
echo "Successful connection";
}else{
echo "connection failed ";
}
Browser access to web's ip/con.php
mysql2 is the same.