Apache Web page optimization overview
- >In an enterprise, only the default configuration parameters are used after Apache deployment, which will cause many problems in the website. In other words, the default configuration is for the previous lower server configuration. The previous configuration is no longer applicable in the Internet age.
- >In order to meet the needs of enterprises, we need to consider how to improve the performance and stability of Apache, which is the content of Apache optimization.
Optimize content
Configure web page compression
 Selection of working mode and optimization of parameters
 Configure anti-theft chain
 Configure hidden version number
gzip introduction
To configure Apache's web page compression function, gzip compression algorithm is used to compress the web page and then transfer it to the client browser.
Effect
Reduce the number of bytes transmitted by the network and speed up the loading of web pages
 Save traffic and improve users' browsing experience
 gzip has a better relationship with search engine grabbing tools
Apache's compression module
The function modules of Apache to realize web page compression include
        Mod? Gzip module
        Mod? Deflate module
Apache 1.x
        There is no built-in web page compression technology, but compression can be performed using a third-party mod ﹣ gzip module
Apache 2.x
        During the development, the module of mod ﹣ deflate was built in to replace mod ﹣ gzip.
Comparison between mod ﹣ gzip module and mod ﹣ deflate module
*Both of them use gzip compression algorithm, with similar operation principle.
*Mod ABCD deflate compression speed is slightly faster, while mod ABCD gzip compression ratio is slightly higher
 *Mod ﹣ gzip consumes more CPU of the server
 *For high traffic servers, using mod ﹣ deflate may load faster than mod ﹣ gzip
To enable Web page compression

Environment (WEB compression instance)
One Linux server (192.168.13.128)
A win10 tester
1. Mount remote share to Linux
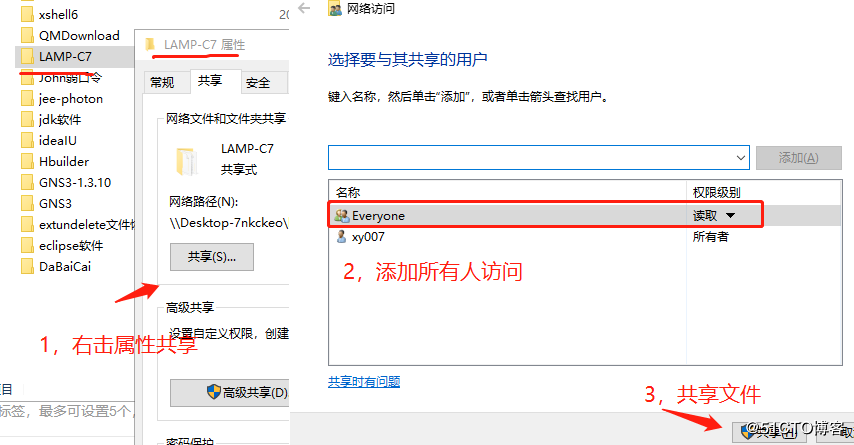
1) share the required compression package of LAMP on Windows (if you have any questions here, please refer to the previous blog articles)

2) use remote share to get files on Linux and mount them to / abc directory
[root @ localhost httpd] ා MKDIR / abc create mount point / abc
root@lamp ~]# smbclient -L //192.168.100.3/
Sharename Type Comment
LAMP-C7 Disk
[root@lamp ~]# mount.cifs //192.168.100.3/LAMP-C7 /mnt
##Remote mount package to / mnt directory
2. Manually compile and install Apache
1) decompress the source package to the / opt directory
[root@lamp mnt]# cd /mnt   ##Switch to / mnt directory
[root@lamp mnt]# tar zxvf apr-1.6.2.tar.gz -C /opt/    ##Decompress the source package to / opt
...
[root@lamp mnt]# tar zxvf apr-util-1.6.0.tar.gz -C /opt/
....
[root@lampt mnt]# tar jxvf httpd-2.4.29.tar.bz2 -C /opt/
...
[root@lamp mnt]# cd /opt / / enter the / opt directory
[root@lamp opt]# ls / / view the extracted file
apr-1.6.2  apr-util-1.6.0  httpd-2.4.29  rh
2) move the apr component package to http and install the compiler
[root@lamp opt]# mv apr-1.6.2/ httpd-2.4.29/srclib/apr
[root@lamp opt]#  mv apr-util-1.6.0/ httpd-2.4.29/srclib/apr-util
[root@localhost opt]# yum -y install \
gcc \                                       //c language
gcc-c++ \                        //c++ language
make \                              //Compiler tool
pcre-devel \                     //pcre language tools
expat-devel \                   //Identifying tagging language tools
perl \
pcre \
zlib-devel                       //Function library for data compression
3) configure installation directory and various modules
[root@lamp opt]# cd /opt/httpd-2.4.29/
[root@lamp httpd-2.4.29]#. / configure \ / / configuration
--prefix=/usr/local/httpd \
--enable-deflate \  //Configure compression module
--enable-expires \  //Configure the cache module (required for the next cache experiment)
--enable-so \      //apache core module on
--enable-rewrite \    //Enable rewrite function, anti-theft chain
--enable-charset-lite \  //Character set support, simplified Chinese
--enable-cgi   //General Gateway Interface
...
4) compilation and installation
[root@lamp httpd-2.4.29]# make / / generates executable binaries
...
[root@lamp httpd-2.4.29]# make install / / copy binaries to the system and configure the application environment
...
5) configure http master profile
[root@localhost httpd-2.4.29]#  cd /usr/local/httpd/
[root@localhost httpd]# ls
bin    cgi-bin  error   icons    lib   man     modules
build  conf     htdocs  include  logs  manual
[root@localhost httpd]# cd conf/             ##Switch to http main profile
[root@localhost conf]# ln -s /usr/local/httpd/conf/httpd.conf /etc/httpd.conf   ##Easy to manage and create soft connection

##Overwrite the original startup script for convenient operation and add it to the service manager
[root@localhost conf]# cp /usr/local/httpd/bin/apachectl /etc/init.d/httpd / / copy the apache startup script to overwrite the original httpd startup script.
[root@localhost conf]# vim /etc/init.d/httpd
#!/bin/sh
# chkconfig: 35 85 21
# description: Apache is a World Wide Web server            //Insert these two lines under ×! / bin/sh
[root@localhost conf]# chkconfig --add httpd / / add httpd to the SERVICE manager

[root@localhost conf]# vim /etc/httpd.conf  ##Configure master profile

Listen 192.168.13.128:80  ##Set listening address
#Listen 80

ServerName www.kgc.com:80  ##Set domain name

LoadModule deflate_module modules/mod_deflate.so  ##Enable compression module
LoadModule headers_module modules/mod_headers.so   ##Enable head module

##Add something from big G to the last line
LoadModule filter_module modules/mod_filter.so
<IfModule mod_deflate.c>
    AddOutputFilterByType DEFLATE text/html text/plain text/css text/xml test/java
script text/jpg text/png    ##Compression type supported
    DeflateCompressionLevel 9   ##High compression ratio
    SetOutputFilter DEFLATE      ##Default filter load
</IfModule>
[root@localhost conf]# service httpd start ##Restart service
[root@localhost conf]# systemctl stop firewalld.service
[root@localhost conf]# setenforce 0
[root@localhost conf]# cd /usr/local/httpd/bin/      ##View the startup status of deflate module
[root@localhost bin]# ./apachectl -t -D DUMP_MODULES | grep "deflate"
 deflate_module (shared)
6) switch to the site and edit the content of the web page
[root@localhost conf]# cd ..
[root@localhost httpd]# pwd
/usr/local/httpd
[root@localhost httpd]# cd htdocs/
[root@localhost htdocs]# ls
index.html
[root@localhost htdocs]# cat index.html
<html><body><h1>It works!</h1></body></html>
3. Install fiddler packet capturing tool in win10

4. Edit the web page and add a picture
1) switch to your shared mount point and copy the pictures to the site
[root@localhost htdocs# cd /mnt   ##Switch to mount point
[root@localhost mnt]# cp kali.jpg /usr/local/httpd/htdocs/    ##Copy pictures to site
[root@localhost mnt]# cd /usr/local/httpd/htdocs/
[root@localhost htdocs]# ls     ##View picture copied successfully
index.html  kali.jpg
2) edit the homepage content of the site
[root@localhost ~]# cd /usr/local/httpd/
[root@localhost httpd]# cd htdocs/      ##Switch to site
[root@localhost htdocs]# ls
index.html  kali.jpg
[root@localhost htdocs]# vim index.html     ##Edit page content and add pictures to the page

<html><body><h1>It works!</h1>
<img src="kali.jpg"/>         ##Put pictures on Web pages
</body></html>
5. Test the web page and view the packet capturing information


Configure cache time for web pages
- >Apache is configured through the mod ﹣ expire module. Web pages can be cached in the client browser for a period of time to avoid repeated requests.
- >After the mod ﹤ expire module is enabled, the Expires tag and cache control tag in the page header information will be automatically generated, so as to reduce the frequency and times of client access, reduce unnecessary traffic and increase access speed.
To enable Web Caching

Environmental Science
The compilation and installation are the same as the previous part. The configuration adds the cache module. The following is the operation of configuring the cache module.
1. Configure the main configuration file and open the cache module
[root@localhost httpd-2.4.29]# vim /etc/http.conf

LoadModule expires_module modules/mod_expires.so    ##Open cache module

<IfModule mod_expires.c>      ##Add configuration file at the end of big G
    ExpiresActive On
    ExpiresDefault "access plus 50 seconds"
</IfModule>
2. Start Apachectl, shut down the firewall and restart the service
[root@localhost httpd-2.4.29]# cd /usr/local/httpd/bin   ##Test syntax for errors
[root@localhost bin]# ./apachectl -t
[root@localhost bin]# ./apachectl start   ##open
[root@localhost bin]# systemctl stop firewalld.service    ##Turn off firewall
[root@localhost bin]# setenforce 0
[root@localhost bin]# ./apachectl -t -D DUMP_MODULES | grep "expires" ##View module on status
 expires_module (shared)
3. Use the tester again to visit the web page and test the packet capture
