Simulate registration - use annotations
Simulate registration functionality (using annotations)
DAO Layer Code
//@Component("userDao")
@Repository("userDao")
public class UserDaoImpl implements UserDao {
	@Override
	public void insert(User user) {
		System.out.println("Registered Dao Method Execution");
	}
}
Service Layer Code
@Service("userService")
public class UserServiceImpl implements UserService {

	/*@Autowired
	@Qualifier("userDao")*/

	@Resource(name="userDao")
	private UserDao dao;

	@Override
	public void register(User user) {
		dao.insert(user);
	}
	//Because you want to use
	public void setDao(UserDao dao) {
		this.dao = dao;
	}
}
Presentation Layer Code
@Controller
public class UserController {
	/*@Autowired
	@Qualifier("userService")*/
	@Resource(name="userService")
	private UserService service;

	public void register(User user) {

		service.register(user);
	}
}
Test Code
public class UserServletTest {

	@Test
	public void testSpring() throws Exception {		//Create user objects: Simulate the process of accepting user parameters and encapsulating objects
		User user = new User();
		user.setUsername("Zhang San");
		user.setPassword("admin");
        UserController controller = context.getBean("userController",CustomerController.class);
		//Perform registration operation
		controller.register(user);
	}
}
applicationContext.xml
Configuration file (only one package scan needs to be configured)
	<!--Configuration package scan
	cn.xc.spring: This package and subpackages are all scanned
	 -->
<context:component-scan base-package="cn.xc.spring"/>
Pure Annotation Configuration
problem
We found that the reason we can't leave the xml configuration file now is because we have a key configuration:
<!--Tell the spring framework to scan annotations, create objects from annotations, and store them in containers when reading configuration files and creating containers-->
	<context:component-scan base-package="cn.zj.spring"></context:component-scan>
If he wants to be able to also configure with annotations, then we can detach from the xml file.
With the @Configuration and @ComponentScan annotations
| Replace the @Configuration comment for the XML configuration file | The @Configuration configuration class annotation, which in pure annotation configurations means that the class is a Spring configuration class. The function of this class is to replace the original XML configuration file. Effect: Used to specify that the current class is a spring configuration class from which annotations are loaded when a container is created. AnnotationConfigApplicationContext is required to get containers (class with @Configuration annotation). |
|---|---|
| @ComponentScan comment | @ComponentScan Annotation Scan Class, which configures the path to the Scan Spring Component Class.Functionally equivalent to the original profile Effect: Used to specify the package that spring will scan when initializing the container. Role and in spring's xml configuration file: <context:component-scan base-package="cn.zj.spring"/>is the same. Attributes: basePackages: Used to specify the package to scan. The value attribute in this comment works the same way. |
| @PropertySource annotation |
Effect: Configuration used to load the.properties file. For example, when configuring a data source, you can write information about connecting to the database to the properties configuration file, and you can use this annotation to specify the location of the properties configuration file. Attributes: value[]: Used to specify the property file location. If it is under the class path, you need to write the classpath: |
| @Bean comment |
Effect: The annotation can only be written in a method that creates an object and places it in the spring container. This is equivalent to the <bean tag that we described earlier in the xml configuration. Attributes: Name: Specify a name (that is, the id of the bean) for the object created by the current @Bean annotation method. |
| @Import comment |
Effect: For importing other configuration classes, you can avoid writing the @Configuration annotation when you import other configuration classes.Of course, that's OK.<import > Attributes: value[]: The byte code used to specify other configuration classes. |
| @Value comment | After reading the properties configuration file, use ${key} to get the corresponding value @Vlaue("${jdbc.dirverClassName}") private String driverClassName in the configuration file; |
Sample Code
Getting Started Simply
Explain
Requirements: Create a configuration class with **@Configuration and @ComponentScan** annotations instead of xml files by using a simple starter example.
Configuration steps
Step 1: Create a Java project
Create a Java project, import the necessary jar packages, and write the required class structures.The code directory is as follows: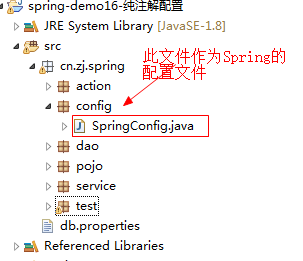
Part 2: Write code for dao layer, pojo layer, service layer, controller layer
dao layer
package cn.xc.spring.dao;
import cn.xc.spring.pojo.User;
public interface UserDao {
	public void insert(User user);
}
package cn.xc.spring.dao.impl;

import java.sql.Connection;
import java.sql.SQLException;

import javax.sql.DataSource;

import org.springframework.beans.factory.annotation.Autowired;
import org.springframework.stereotype.Repository;

import cn.xc.spring.dao.UserDao;
import cn.xc.spring.pojo.User;

@Repository
public class UserDaoImpl implements UserDao {

	@Autowired
	private DataSource datasource;

	@Override
	public void insert(User user) {
		try {
			Connection conn = datasource.getConnection();
			System.out.println("conn:" + conn);
			System.out.println("UserDaoImpl.insert()");
			System.out.println("user" + user);
		} catch (SQLException e) {
			e.printStackTrace();
		}
	}
}
pojo layer
package cn.xc.spring.pojo;

public class User {
	private Integer id;
	private String name;
	private String password;

	public Integer getId() {
		return id;
	}

	public void setId(Integer id) {
		this.id = id;
	}

	public String getName() {
		return name;
	}

	public void setName(String name) {
		this.name = name;
	}

	public String getPassword() {
		return password;
	}

	public void setPassword(String password) {
		this.password = password;
	}

	public User(Integer id, String name, String password) {
		super();
		this.id = id;
		this.name = name;
		this.password = password;
	}

	public User() {
		// TODO Auto-generated constructor stub
	}

	@Override
	public String toString() {
		return "User [id=" + id + ", name=" + name + ", password=" + password + "]";
	}

}
service layer
package cn.xc.spring.service;
import cn.xc.spring.pojo.User;
public interface UserService {
	public void insert(User user);
}
package cn.xc.spring.service.impl;
import javax.annotation.Resource;
import org.springframework.stereotype.Service;
import cn.xc.spring.dao.UserDao;
import cn.xc.spring.pojo.User;
import cn.xc.spring.service.UserService;
@Service
public class UserServiceImpl implements UserService {
	/*
	 * @Autowired Spring Specify labels
	 *
	 * @Resource JavaEE Official Tags
	 */
	// @Autowired
	@Resource
	private UserDao userDao;
	@Override
	public void insert(User user) {
		userDao.insert(user);
	}
}
controller Layer
package cn.xc.spring.controller;

import javax.annotation.Resource;

import org.springframework.stereotype.Controller;

import cn.xc.spring.pojo.User;
import cn.xc.spring.service.UserService;

@Controller
public class UserController {

	@Resource
	private UserService userService;

	public void save(User user) {
		userService.insert(user);
	}
}
Step 3: Write configuration class code
Replace the Spring profile with the code for this configuration class
package cn.xc.spring.config;

import javax.sql.DataSource;

import org.springframework.beans.factory.annotation.Value;
import org.springframework.context.annotation.Bean;
import org.springframework.context.annotation.ComponentScan;
import org.springframework.context.annotation.Configuration;
import org.springframework.context.annotation.PropertySource;

import com.alibaba.druid.pool.DruidDataSource;

/*
 * @Configuration
 * Describes using the current class as a configuration file for the Spring Framework
 * @ComponentScan
 *  Configure the location of the annotation package scan
 * @PropertySource("classpath:db.properties")
 *  Read the configuration file for the.peroperties suffix
 */

@Configuration
//@ComponentScan(basePackages= {"cn.xc.spring.action","cn.xc.spring.service","cn.xc.spring.dao"})
@ComponentScan("cn.xc.spring")
@PropertySource("classpath:db.properties")
public class SpringConfig {

	/**
	 * @Value(value="")
	 * The.properties configuration file content can be read from the Spring container
	 * value : Corresponding key for profile --> Get with ${key}
	 * The program automatically sets the property key s to the fields when it runs
	 *
	 */

	//Equivalent <property name="driverClassName" value="${jdbc.driverClassName}">
	@Value("${jdbc.driverClassName}")
	private String driverClassName;

	@Value("${jdbc.url}")
	private String url;

	@Value("${jdbc.username}")
	private String username;

	@Value("${jdbc.password}")
	private String password;

	@Value("${jdbc.maxActive}")
	private Integer maxActive;

	//<bean id="dataSource" class="com.alibaba.druid.pool.DruidDataSource"
  	//init-method="init" destroy-method="close">
	@Bean(name="dataSource",initMethod="init",destroyMethod="close")
	public DataSource getDataSource() {
		DruidDataSource dataSource = new DruidDataSource();
		dataSource.setDriverClassName(driverClassName);
		dataSource.setUrl(url);
		dataSource.setUsername(username);
		dataSource.setPassword(password);
		dataSource.setMaxActive(maxActive);
		return dataSource;
	}
}
Step 4: Write test code
package cn.xc.spring.test;

import java.sql.Connection;

import javax.sql.DataSource;

import org.junit.Test;
import org.springframework.context.ApplicationContext;
import org.springframework.context.annotation.AnnotationConfigApplicationContext;

import cn.xc.spring.config.SpringConfig;

public class SpringTest {

	@Test
	public void testName() throws Exception {

		// 1. Read the xml configuration file, launch the framework, and create Spring container objects
		//ApplicationContext context = new ClassPathXmlApplicationContext("applicationContext.xml");

		// 1. Read the SpringConfig class configuration file, launch the dynamic framework, and create Spring container objects
		ApplicationContext context = new AnnotationConfigApplicationContext(SpringConfig.class);

		//2. Get Connection Pool Objects
		DataSource dataSource = context.getBean("dataSource", DataSource.class);

		//2.1 Get Database Connection Objects
		Connection conn = dataSource.getConnection();

		System.out.println(conn);
	}
}
The test result outputs the output value of the method invoked by the component class.Configuration Successful