PXE High Efficiency Batch Network Installation
Batch deployment of servers
- Scaling: assembling multiple servers at the same time
- Automation: Install systems, configure services
- Remote implementation: no installation media such as CD, U disk, etc.
About PXE Network
PXE
- Pre-boot execution environment, run before operating system
- Can be used for remote installation to build diskless workstations
Server
-
Run the DHCP service to assign addresses, locate bootstrappers
- DHCP Automatically Assign IP Address Location Boot File
-
Run TFTP server, provide bootstrapper Download
- TFTP Simple File Transfer Protocol
- Use UDP protocol
- Port number 69
- Advantages: High efficiency
- Disadvantages: Small capacity
- For storage: bootstrapper pxelinux.0 (syslinux package), compressed kernel vmlinuz, system initialization file initrd.img, Startup menu default
-
Run FTP service to provide mirror file download
-
FTP (vsftpd) File Transfer Protocol
- Advantages: Safe, large capacity
-
Disadvantage: Slow transmission
-
Use TCP protocol
- Port number 20 is for data transfer and port number 21 is for connection
- For storage: system image
-
- Installation package: dhcp, tftp-server, vsftpd, syslinux
Client
- Network Card Supports PXE Protocol
- Motherboard supports network startup
Basic deployment process
- Prepare CentOS 7 installation source (YUM repository)
- Enable TFTP service and provide kernel, bootstrapper
- Enable the DHCP service to assign addresses, indicate bootstrapper locations
- Configure Startup Menu
TFTP Service and Boot File
- Install the tftp-server package to enable the TFTP service
- Prepare the kernel file vmlinuz, initialize the mirror initrd.img
- Prepare bootstrapper file pxelinux.0
PXE settings for DHCP services
- next-server //point to TFTP path
- filename //bootstrapper file location
Default Startup Menu File
- Create/var/lib/tftpboot/pxelinux.cfg/default
- Directory name pxelinux.cfg is not changeable
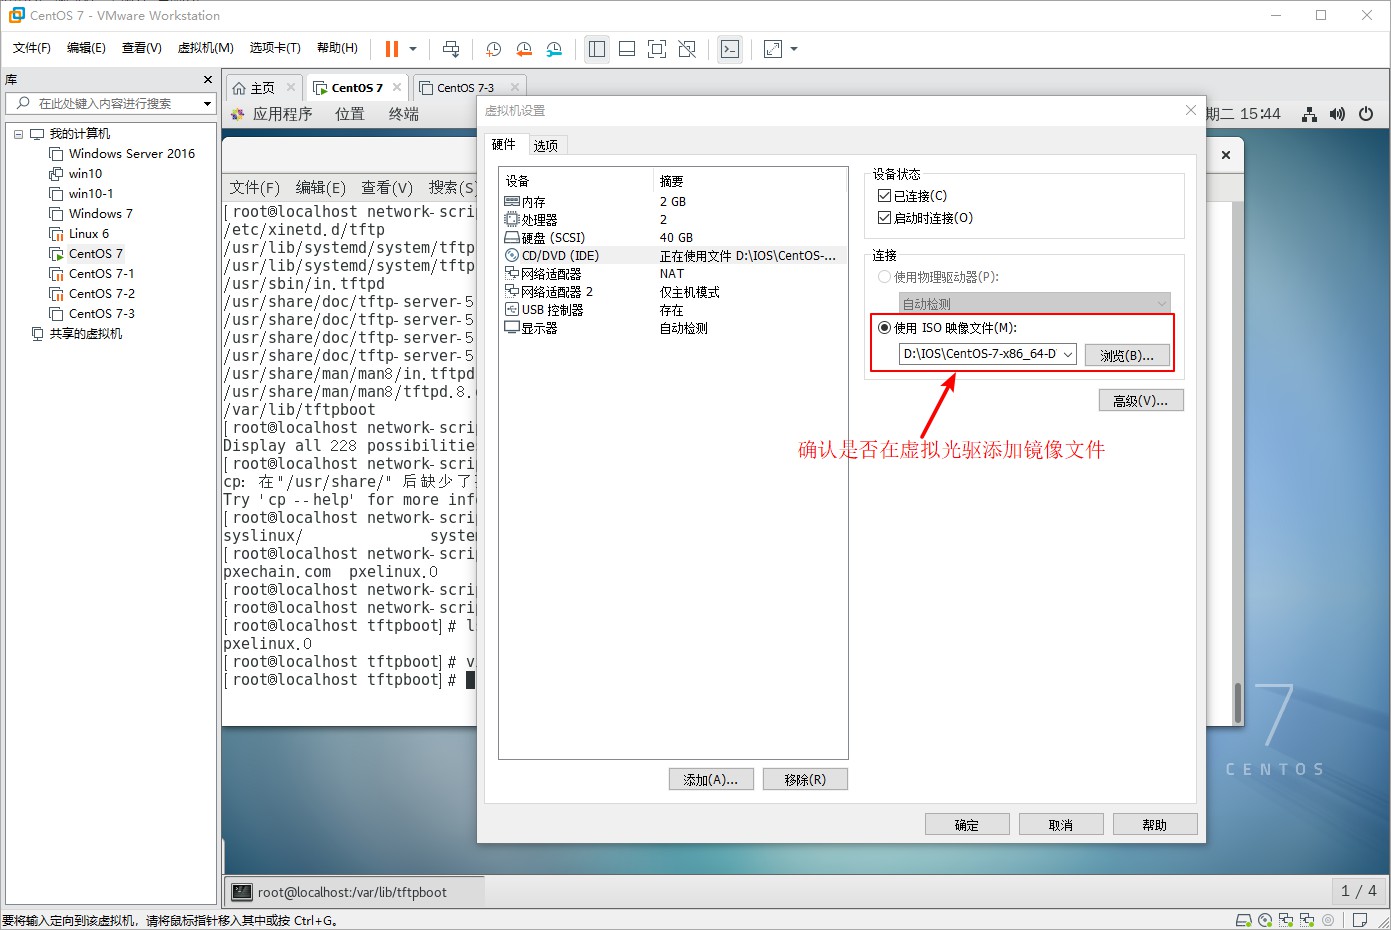
Verify PXE Network Installation
- Adjust BIOS settings to boot from the network
- Obtain IP address automatically and specify CentOS 7 installation source
- The rest is the same as the local installation
Demo
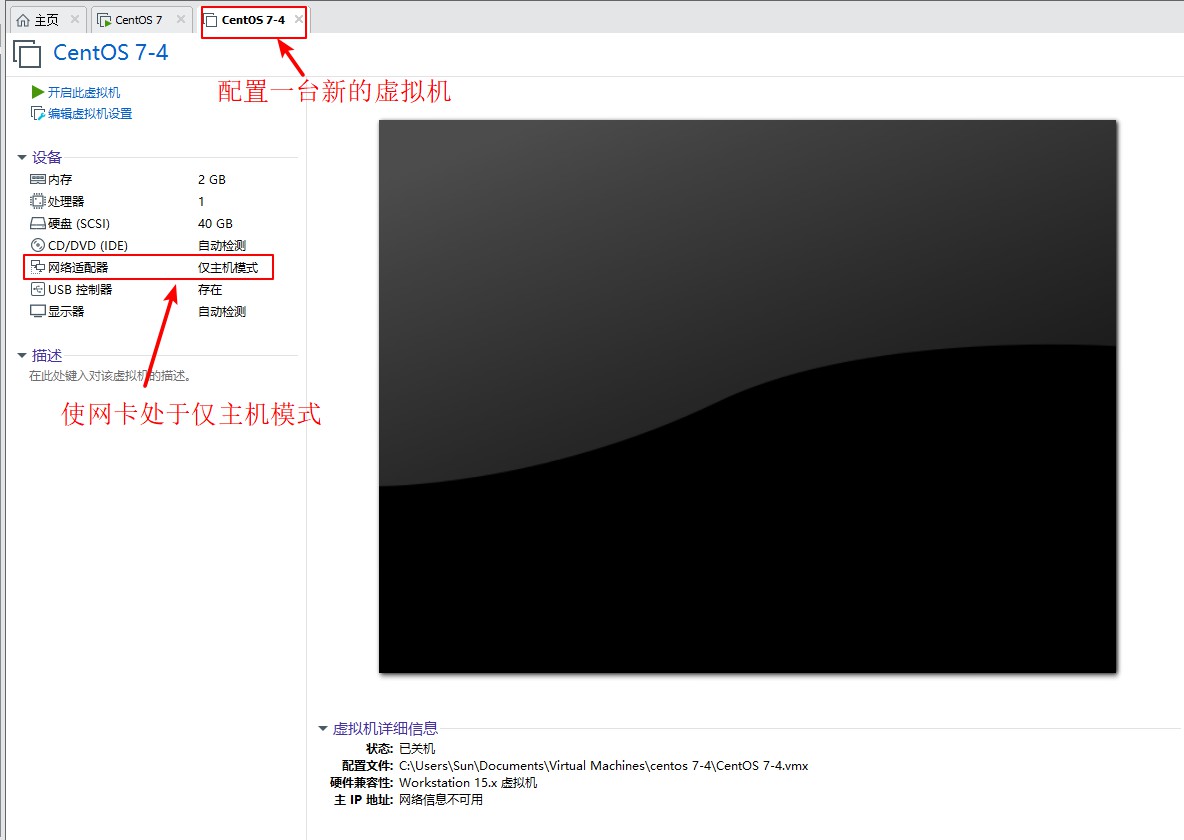
1. First configure a virtual machine in the VMware 15 virtual machine, without installing the system, the network card is set in the host-only mode, which is used to verify the PXE network installation, turn on the CentOS 7 virtual machine, configure the dual network card mode, the original network card is used for network connection, which makes it easy for us to install service software, and the added network card is set to the host-only mode.To bind it to the same device as the configured virtual machine and configure the static IP address in the added network card to provide the IP address to the configured virtual machine.

[root@localhost ~]# ifconfig //View network card information in CentOS 7 system
ens33: flags=4163<UP,BROADCAST,RUNNING,MULTICAST>  mtu 1500     //Original Network Card Information
        inet 192.168.144.133  netmask 255.255.255.0  broadcast 192.168.144.255
        inet6 fe80::a85a:c203:e2e:3f3c  prefixlen 64  scopeid 0x20<link>
        ether 00:0c:29:5b:d3:a0  txqueuelen 1000  (Ethernet)
        RX packets 26199  bytes 36984367 (35.2 MiB)
        RX errors 0  dropped 0  overruns 0  frame 0
        TX packets 8391  bytes 524793 (512.4 KiB)
        TX errors 0  dropped 0 overruns 0  carrier 0  collisions 0

ens36: flags=4163<UP,BROADCAST,RUNNING,MULTICAST>  mtu 1500         //Added Network Card Information
        inet6 fe80::deb1:3cec:3e26:5ec2  prefixlen 64  scopeid 0x20<link>
        ether 00:0c:29:5b:d3:aa  txqueuelen 1000  (Ethernet)
        RX packets 0  bytes 0 (0.0 B)
        RX errors 0  dropped 0  overruns 0  frame 0
        TX packets 10  bytes 1308 (1.2 KiB)
        TX errors 0  dropped 0 overruns 0  carrier 0  collisions 0
[root@localhost ~]# Cd/etc/sysconfig/network-scripts/ //Enter network card profile directory
[root@localhost network-scripts]# ls //View Information
ifcfg-ens33  ifdown-ippp    ifdown-sit       ifup-bnep  ifup-plip    ifup-Team          network-functions-ipv6
ifcfg-lo     ifdown-ipv6    ifdown-Team      ifup-eth   ifup-plusb   ifup-TeamPort
ifdown       ifdown-isdn    ifdown-TeamPort  ifup-ib    ifup-post    ifup-tunnel
ifdown-bnep  ifdown-post    ifdown-tunnel    ifup-ippp  ifup-ppp     ifup-wireless
ifdown-eth   ifdown-ppp     ifup             ifup-ipv6  ifup-routes  init.ipv6-global
ifdown-ib    ifdown-routes  ifup-aliases     ifup-isdn  ifup-sit     network-functions
[root@localhost network-scripts]# Cp-p ifcfg-ens33 ifcfg-ens36 //Copy ens33 configuration file as ens36
[root@localhost network-scripts]# vim ifcfg-ens36 //Edit network card information
TYPE=Ethernet
PROXY_METHOD=none
BROWSER_ONLY=no
BOOTPROTO=static               //Change dhcp to static
DEFROUTE=yes
IPV4_FAILURE_FATAL=no
IPV6INIT=yes
IPV6_AUTOCONF=yes
IPV6_DEFROUTE=yes
IPV6_FAILURE_FATAL=no
IPV6_ADDR_GEN_MODE=stable-privacy
NAME=ens36                        //Change 33 to 36
DEVICE=ens36                      //Change 33 to 36
ONBOOT=yes
IPADDR=192.168.100.100            //Configure IP Address
NETMASK=255.255.255.0             //Configure Subnet Mask
GATEWAY=192.168.100.1             //configure gateway
~                                 //Note: Delete UUID entries
~
~
~
~
~
~
:wq
[root@localhost network-scripts]# service network restart //restart network card service
Restarting network (via systemctl):                        [  Determine  ]
[root@localhost network-scripts]# ifconfig //View network card information
ens33: flags=4163<UP,BROADCAST,RUNNING,MULTICAST>  mtu 1500
        inet 192.168.144.133  netmask 255.255.255.0  broadcast 192.168.144.255
        inet6 fe80::a85a:c203:e2e:3f3c  prefixlen 64  scopeid 0x20<link>
        ether 00:0c:29:5b:d3:a0  txqueuelen 1000  (Ethernet)
        RX packets 124487  bytes 178695031 (170.4 MiB)
        RX errors 0  dropped 0  overruns 0  frame 0
        TX packets 35758  bytes 2193524 (2.0 MiB)
        TX errors 0  dropped 0 overruns 0  carrier 0  collisions 0

ens36: flags=4163<UP,BROADCAST,RUNNING,MULTICAST>  mtu 1500        //Get static IP address
        inet 192.168.100.100  netmask 255.255.255.0  broadcast 192.168.100.255
        inet6 fe80::f6eb:23e3:3afb:fef4  prefixlen 64  scopeid 0x20<link>
        ether 00:0c:29:5b:d3:aa  txqueuelen 1000  (Ethernet)
        RX packets 2  bytes 486 (486.0 B)
        RX errors 0  dropped 0  overruns 0  frame 0
        TX packets 186  bytes 32776 (32.0 KiB)
        TX errors 0  dropped 0 overruns 0  carrier 0  collisions 0
2. Install the DHCP service and edit the DHCP service configuration file
[root@localhost network-scripts]# yum install dhcp -y
//Plugins loaded: fastestmirror, langpacks
Loading mirror speeds from cached hostfile
 * base: mirrors.163.com
 * extras: mirrors.huaweicloud.com
 * updates: mirrors.huaweicloud.com
//Resolving dependencies
--> Checking transactions
---> software package dhcp.x86_64.12.4.2.5-68.el7.centos.1 Will be installed
...//Omit some content...
//Installed:
  dhcp.x86_64 12:4.2.5-68.el7.centos.1

//Upgraded as a dependency:
  dhclient.x86_64 12:4.2.5-68.el7.centos.1    dhcp-common.x86_64 12:4.2.5-68.el7.centos.1
  dhcp-libs.x86_64 12:4.2.5-68.el7.centos.1

//Complete!
[root@localhost network-scripts]# cp /usr/share/doc/dhcp-4.2.5/dhcpd.conf.example /etc/dhcp/dhcpd.conf
cp: Whether to Overwrite"/etc/dhcp/dhcpd.conf"? yes         //Copy the DHCP profile template to the profile and enter yes confirmation
[root@localhost network-scripts]# Vim/etc/dhcp/dhcpd.conf //Edit Configuration DHCP Profile
...//Omit some content...
ubnet 192.168.100.0 netmask 255.255.255.0 {            //Set Segment Address
        range 192.168.100.20 192.168.100.30;           //Set IP Address Assignment Range
        option routers 192.168.100.100;                //Set up a gateway that points to you to make it easier for the server to assign addresses
        option domain-name-servers 8.8.8.8;            //Set Assignment DNS Address
        next-server 192.168.100.100;                   //Set the address to the TFTP server, which is local
        filename "pxelinux.0";                         //Set to point to the boot file location, note: File name cannot be mistyped
}
...//Omit some content...
:wq                            //Save Exit
3. Install bootstrapper files
[root@localhost network-scripts]# Yum install syslinux-y //install bootstrapper
 Plugins loaded: fastestmirror, langpacks
Loading mirror speeds from cached hostfile
 * base: mirrors.163.com
 * extras: mirrors.huaweicloud.com
 * updates: mirrors.huaweicloud.com
 Resolving dependencies
 -->Checking transactions
 --->Package syslinux.x86_64.0.4.05-15.el7 will be installed
 ...//Omit some content...
Installed:
  syslinux.x86_64 0:4.05-15.el7
Complete!
[root@localhost network-scripts]# rpm-ql syslinux | grep pxelinux.0 //Check to see if the boot file was successfully installed in the installed software
/usr/share/syslinux/gpxelinux.0
 /usr/share/syslinux/pxelinux.0//program boot file
4. Install TFTP service software
[root@localhost network-scripts]# Yum install tftp-server-y //install TFTP service
//Plugins loaded: fastestmirror, langpacks
Loading mirror speeds from cached hostfile
 * base: mirrors.163.com
 * extras: mirrors.huaweicloud.com
 * updates: mirrors.huaweicloud.com
//Resolving dependencies
--> Checking transactions
---> software package tftp-server.x86_64.0.5.2-22.el7 Will be installed
...//Omit some content...
//Installed:
  tftp-server.x86_64 0:5.2-22.el7
//Complete!
[root@localhost network-scripts]# Rpm-ql tftp-server //View TFTP service list
/etc/xinetd.d/tftp                                    //tftp profile directory
/usr/lib/systemd/system/tftp.service
/usr/lib/systemd/system/tftp.socket
/usr/sbin/in.tftpd
/usr/share/doc/tftp-server-5.2
/usr/share/doc/tftp-server-5.2/CHANGES
/usr/share/doc/tftp-server-5.2/README
/usr/share/doc/tftp-server-5.2/README.security
/usr/share/man/man8/in.tftpd.8.gz
/usr/share/man/man8/tftpd.8.gz
/var/lib/tftpboot                                     //tftp Site Directory
5. Put the bootstrapper file in the tftp service site and turn on the tftp service function
[root@localhost network-scripts]# Cp/usr/share/syslinux/pxelinux.0/var/lib/tftpboot/ //Copy the file into the tftp site
[root@localhost network-scripts]# Cd/var/lib/tftpboot/ //Enter the tftp site
[root@localhost tftpboot]# ls //View directory information
pxelinux.0                                                   //Bootstrapper file added to site
[root@localhost tftpboot]# Vim/etc/xinetd.d/tftp //Enter editing TFTP master profile
# default: off
# description: The tftp server serves files using the trivial file transfer \
#       protocol.  The tftp protocol is often used to boot diskless \
#       workstations, download configuration files to network-aware printers, \
#       and to start the installation process for some operating systems.
service tftp
{
        socket_type             = dgram
        protocol                = udp
        wait                    = yes
        user                    = root
        server                  = /usr/sbin/in.tftpd
        server_args             = -s /var/lib/tftpboot
        disable                 = no                     //Change yes to turn on service capabilities for no
        per_source              = 11
        cps                     = 100 2
        flags                   = IPv4
}
~
:wq                                                    //Save Exit
6. Install the ftp service function and mount the mirror file CentOS 7 on the ftp site. Find the system initial file and the compressed kernel file and add them to the tftp site.
[root@localhost tftpboot]# yum install vsftpd -y
//Plugins loaded: fastestmirror, langpacks
Loading mirror speeds from cached hostfile
 * base: mirrors.163.com
 * extras: mirrors.huaweicloud.com
 * updates: mirrors.huaweicloud.com
//Resolving dependencies
--> Checking transactions
---> software package vsftpd.x86_64.0.3.0.2-25.el7 Will be installed
...//Omit some content...
//Installed:
  vsftpd.x86_64 0:3.0.2-25.el7
//Complete!
[root@localhost tftpboot]# Rpm-ql vsftpd //View ftp service file list
...//Omit some content...
/usr/share/man/man5/vsftpd.conf.5.gz
/usr/share/man/man8/vsftpd.8.gz
/var/ftp                            //ftp site location
/var/ftp/pub
[root@localhost ~]# Cd/var/ftp/ //Enter FTP service site
[root@localhost ftp]# ls //View Directory
pub
[root@localhost ftp]# mkdir centos7 //Create directory centos7 directory Users mount mirror files
[root@localhost ftp]# ls //View
centos7  pub                             //Created successfully
[root@localhost ftp]# Mount/dev/sr0/var/ftp/centos7/ //Mount the mirror file to the centos7 directory in the FTP site
mount: /dev/sr0 Write protected, mounted read-only
[root@localhost ftp]# Df-hT //View disk information
//File System Type Capacity Used Available%Mountpoint
/dev/sda2      xfs        20G  3.7G   17G   19% /
devtmpfs       devtmpfs  898M     0  898M    0% /dev
tmpfs          tmpfs     912M     0  912M    0% /dev/shm
tmpfs          tmpfs     912M  9.0M  903M    1% /run
tmpfs          tmpfs     912M     0  912M    0% /sys/fs/cgroup
/dev/sda5      xfs        10G   37M   10G    1% /home
/dev/sda1      xfs       6.0G  174M  5.9G    3% /boot
tmpfs          tmpfs     183M   28K  183M    1% /run/user/0
/dev/sr0       iso9660   4.3G  4.3G     0  100% /var/ftp/centos7     //Mount Successfully
[root@localhost ftp]# cd centos7/ //Enter centos7 directory
[root@localhost centos7]# ls //View mounted image information
CentOS_BuildTag  EULA  images    LiveOS    repodata              RPM-GPG-KEY-CentOS-Testing-7
EFI              GPL   isolinux  Packages  RPM-GPG-KEY-CentOS-7  TRANS.TBL
[root@localhost centos7]# cd images/ //enter images directory
[root@localhost images]# ls //View directory information
efiboot.img  pxeboot  TRANS.TBL
[root@localhost images]# cd pxeboot/ //Enter pxeboot directory
[root@localhost pxeboot]# ls //View directory information
initrd.img  TRANS.TBL  vmlinuz           //Compress Kernel and System Initialization Files
[root@localhost pxeboot]# CP initrd.img vmlinuz/var/lib/tftpboot/ //Add compressed kernel and system initialization files to the tdtp site
[root@localhost pxeboot]# Ls/var/lib/tftpboot/ //View tftp site information
initrd.img  pxelinux.0  vmlinuz                      //Successfully added compressed kernel and system initialization files
7. Add a Startup menu to the TFTP site, and when finished, turn on dhcp, tftp, ftp services, and turn off firewalls, enhanced security features
[root@localhost pxeboot]# Cd/var/lib/tftpboot/ //Enter the tftp site
[root@localhost tftpboot]# ls //View site information
initrd.img pxelinux.0 vmlinuz
[root@localhost tftpboot]# mkdir pxelinux.cfg //Add a Startup menu directory to the site, note: The directory name is not writable incorrectly
[root@localhost tftpboot]# ls //View Directory
initrd.img pxelinux.0 pxelinux.cfg vmlinuz //Successfully created Startup menu directory
[root@localhost tftpboot]# cd pxelinux.cfg/ //Enter the created Startup menu directory
[root@localhost pxelinux.cfg]# vim default //Edit Startup Menu File
default auto //Default mode
prompt 1 //Wait time 1 second
//Write Profile Template
label auto
kernel vmlinuz //Kernel Information
append initrd=initrd.img method=ftp://192.168.100.100/centos7
//Load system initialization file in ftp mode with centos7
label linux text
kernel vmlinuz
append text initrd=initrd.img method=ftp://192.168.100.100/centos7
label linux rescue //Enter first aid mode
kernel vmlinuz
append rescue initrd=initrd.img method=ftp://192.168.100.100/centos7
~
~
:wq //Save Exit After Writing Complete
[root@localhost pxelinux.cfg]# systemctl start dhcpd //start dhcp service
[root@localhost pxelinux.cfg]# systemctl start tftp //start tftp service
[root@localhost pxelinux.cfg]# systemctl start vsftpd //start ftp service
[root@localhost pxelinux.cfg]# systemctl stop firewalld.service //turn off firewall functionality
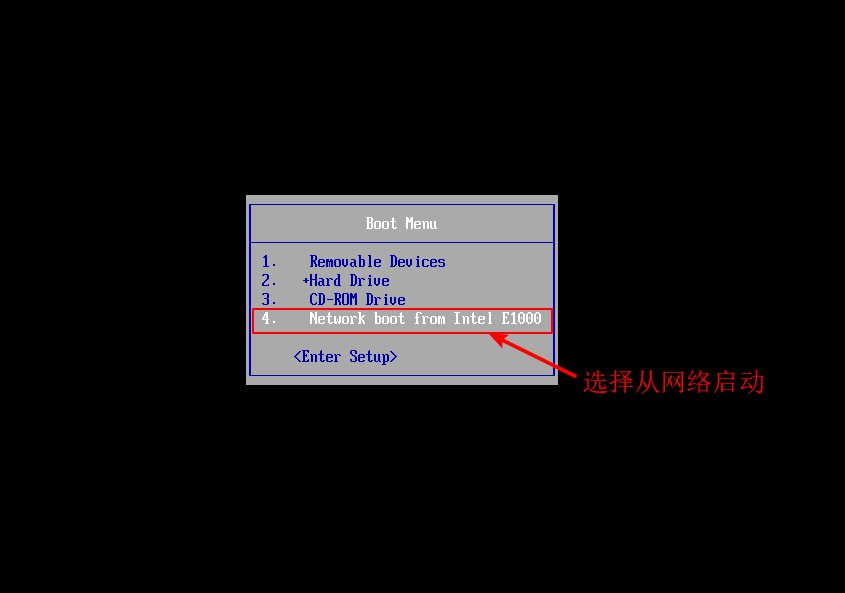
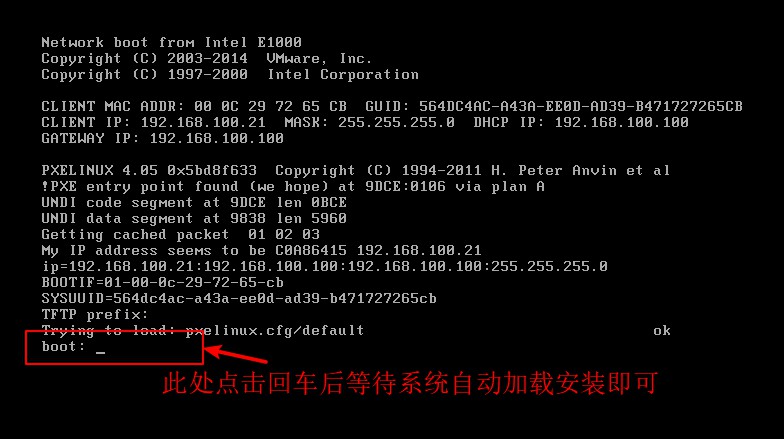
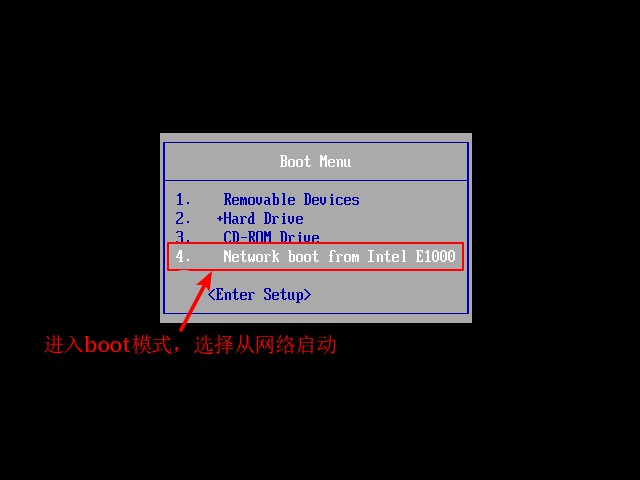
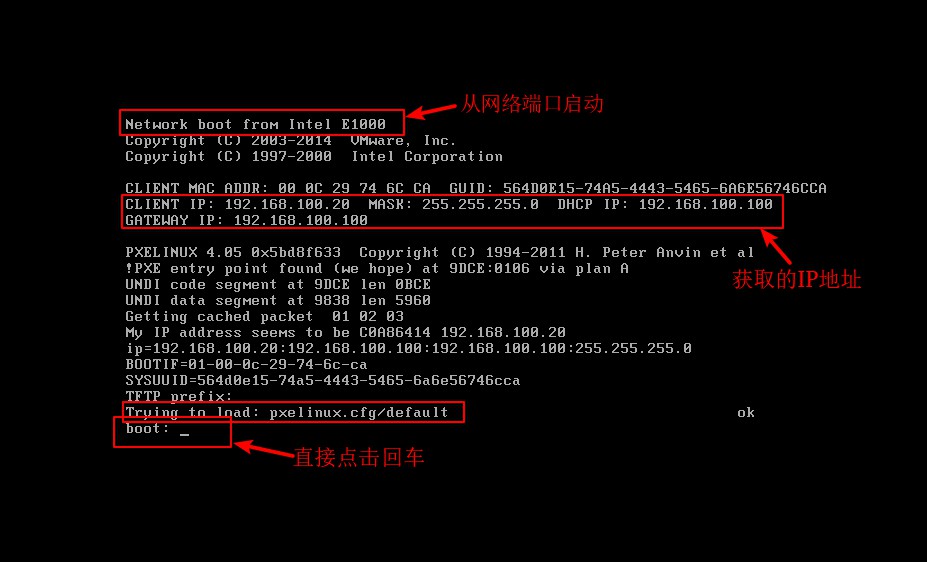
[root@localhost pxelinux.cfg]# setenforce 0 //Turn off enhanced security features8. Verify the installation of PXE network deployment, open the configured virtual machine, press ESC key in the boot interface, enter boot mode, and choose to start from the network

About kickstart
kickstart unattended Technology
- Create an answer file that predefines various installation settings
- Fully automatic installation without interactive setup
- Complete various post-installation configuration operations by adding the%post script
Demo
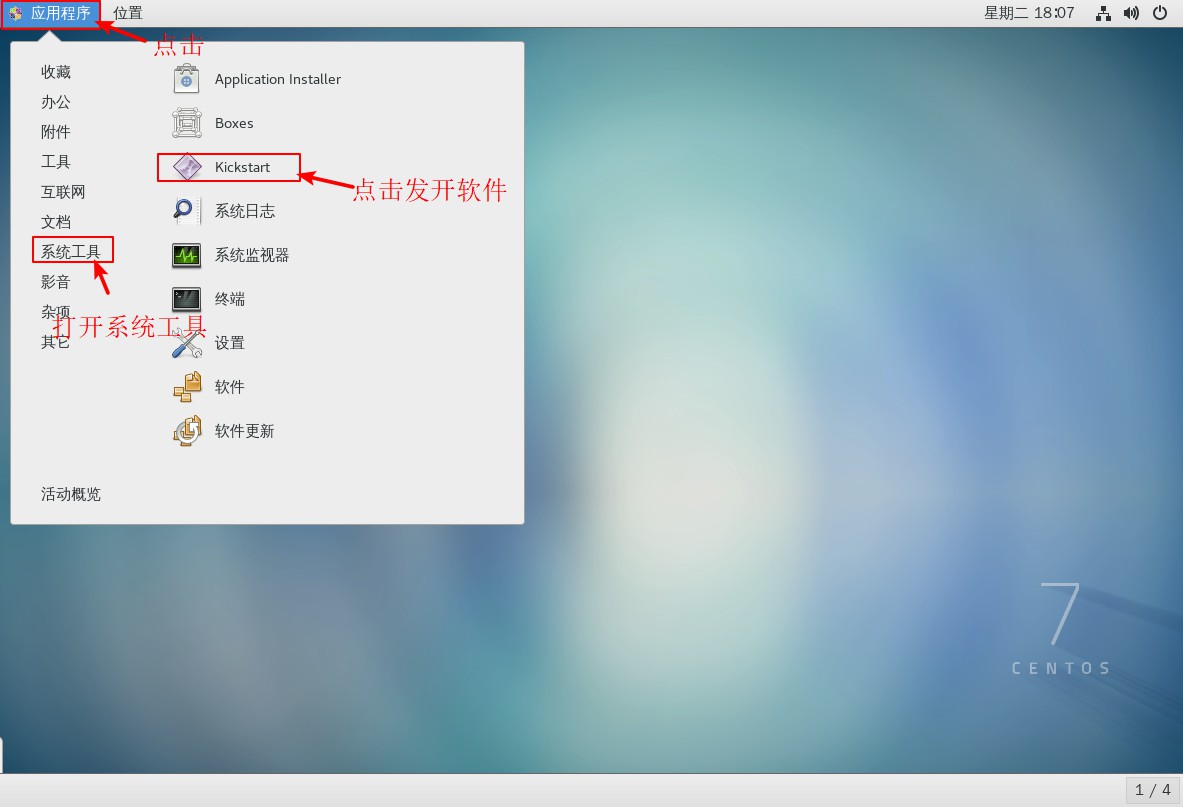
1. Install kickstart service software in CentOS 7
[root@localhost pxelinux.cfg]# Yum install system-config-kickstart-y //install kickstart software
//Plugins loaded: fastestmirror, langpacks
Loading mirror speeds from cached hostfile
 * base: mirrors.163.com
 * extras: mirrors.huaweicloud.com
 * updates: mirrors.huaweicloud.com
//Resolving dependencies
--> Checking transactions
---> software package system-config-kickstart.noarch.0.2.9.7-1.el7 Will be installed
...//Omit some content...
//Installed:
  system-config-kickstart.noarch 0:2.9.7-1.el7
//Installed as a dependency:
  gnome-python2.x86_64 0:2.28.1-14.el7                   gnome-python2-canvas.x86_64 0:2.28.1-14.el7
  libart_lgpl.x86_64 0:2.3.21-10.el7                     libgnomecanvas.x86_64 0:2.30.3-8.el7
  rarian.x86_64 0:0.8.1-11.el7                           rarian-compat.x86_64 0:0.8.1-11.el7
  system-config-date.noarch 0:1.10.6-3.el7.centos        system-config-date-docs.noarch 0:1.0.11-4.el7
  system-config-keyboard.noarch 0:1.4.0-5.el7            system-config-keyboard-base.noarch 0:1.4.0-5.el7
  system-config-language.noarch 0:1.4.0-9.el7            usermode-gtk.x86_64 0:1.111-5.el7
//Complete!
2. Open kickstart service software in graphical interface after installation
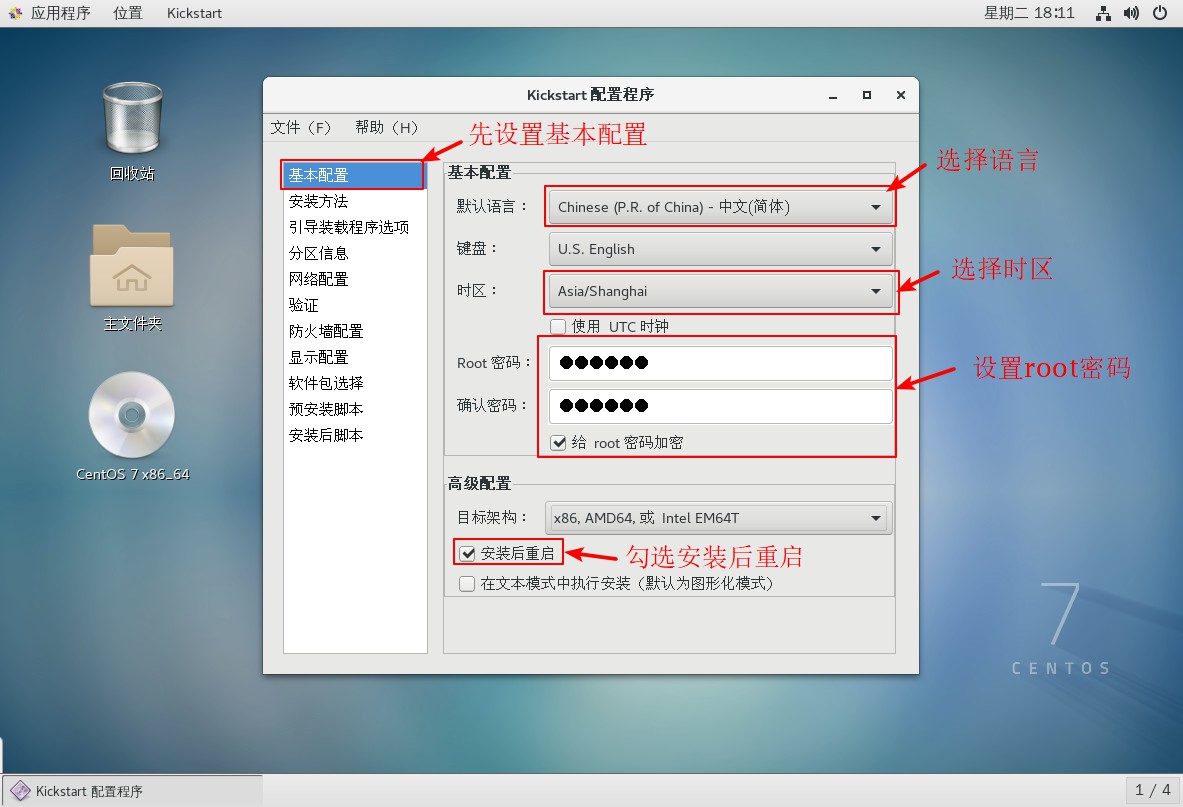
3. Set up the basic configuration after opening the software
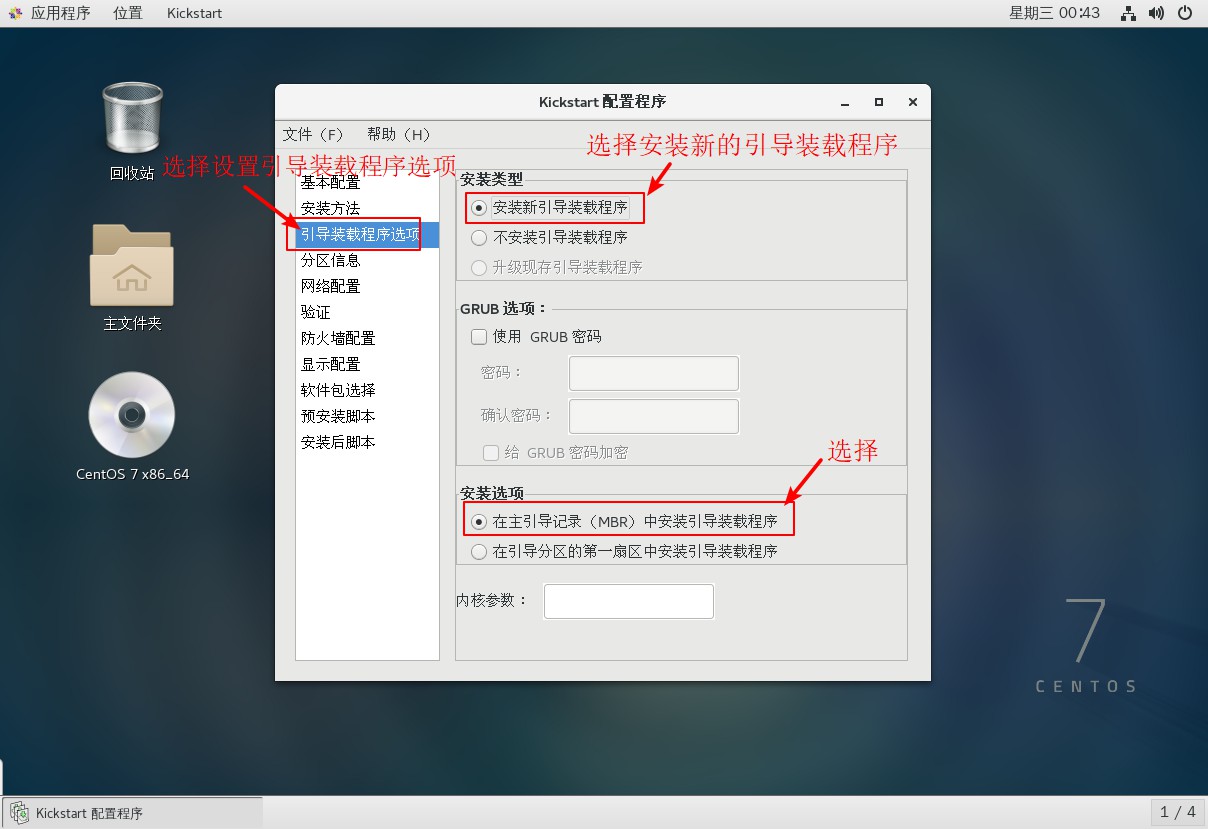
4. Set installation method and boot loader options

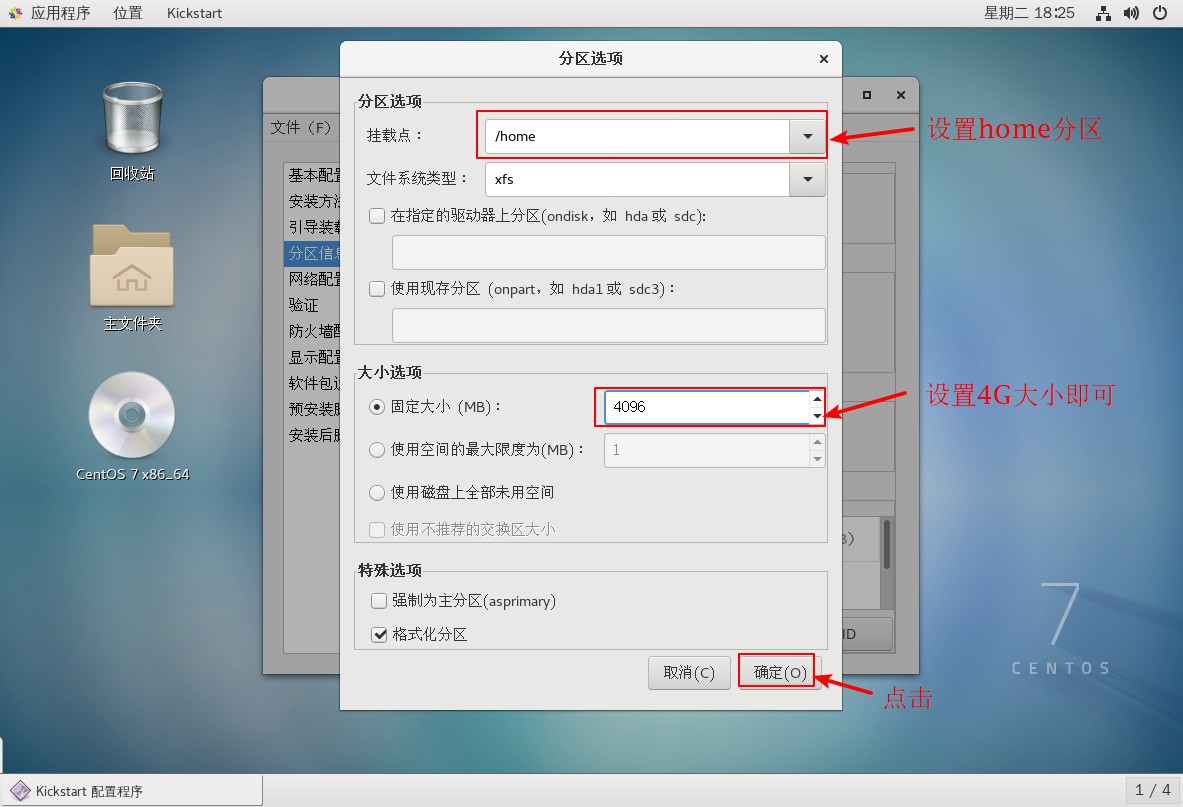
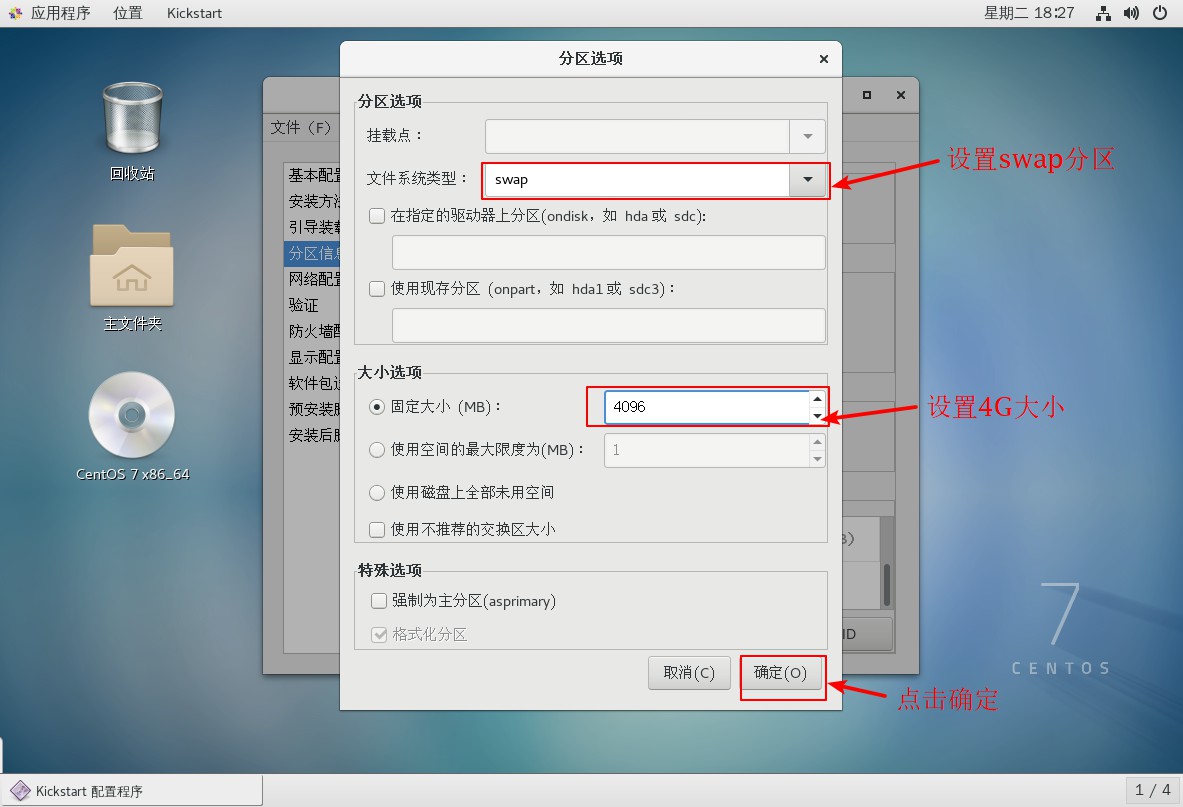
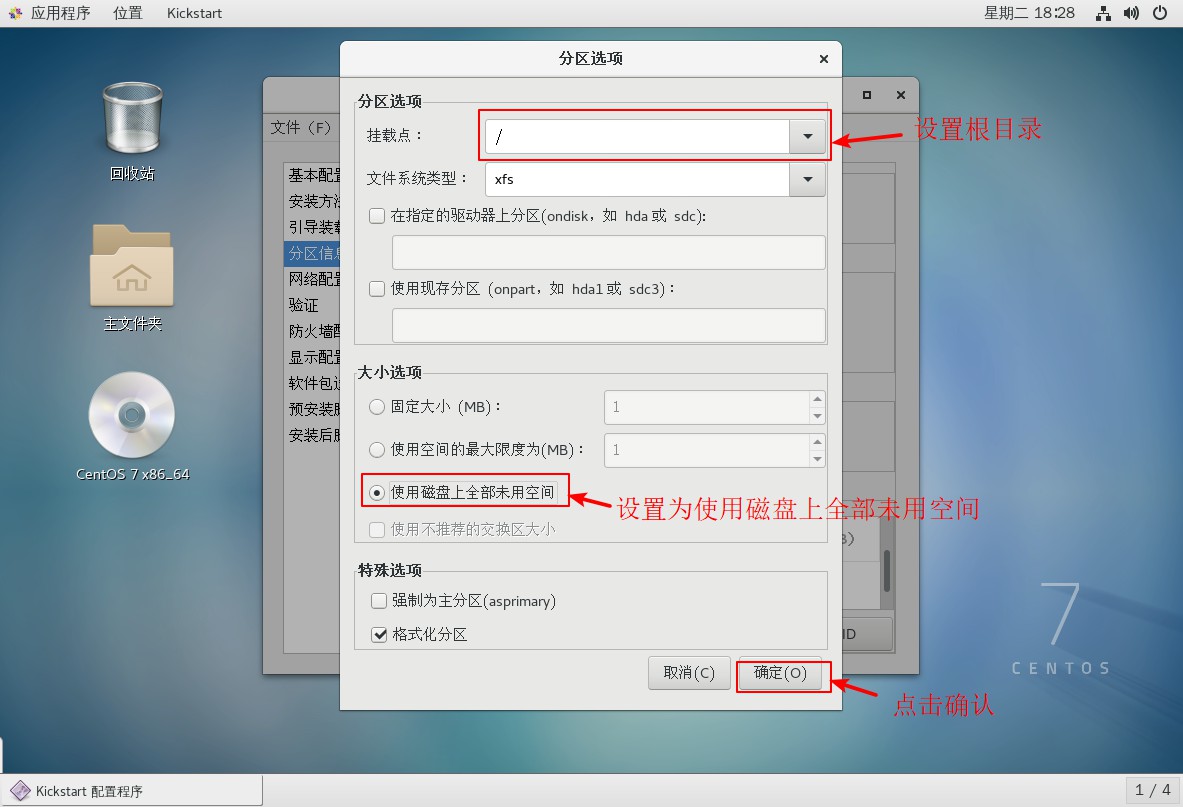
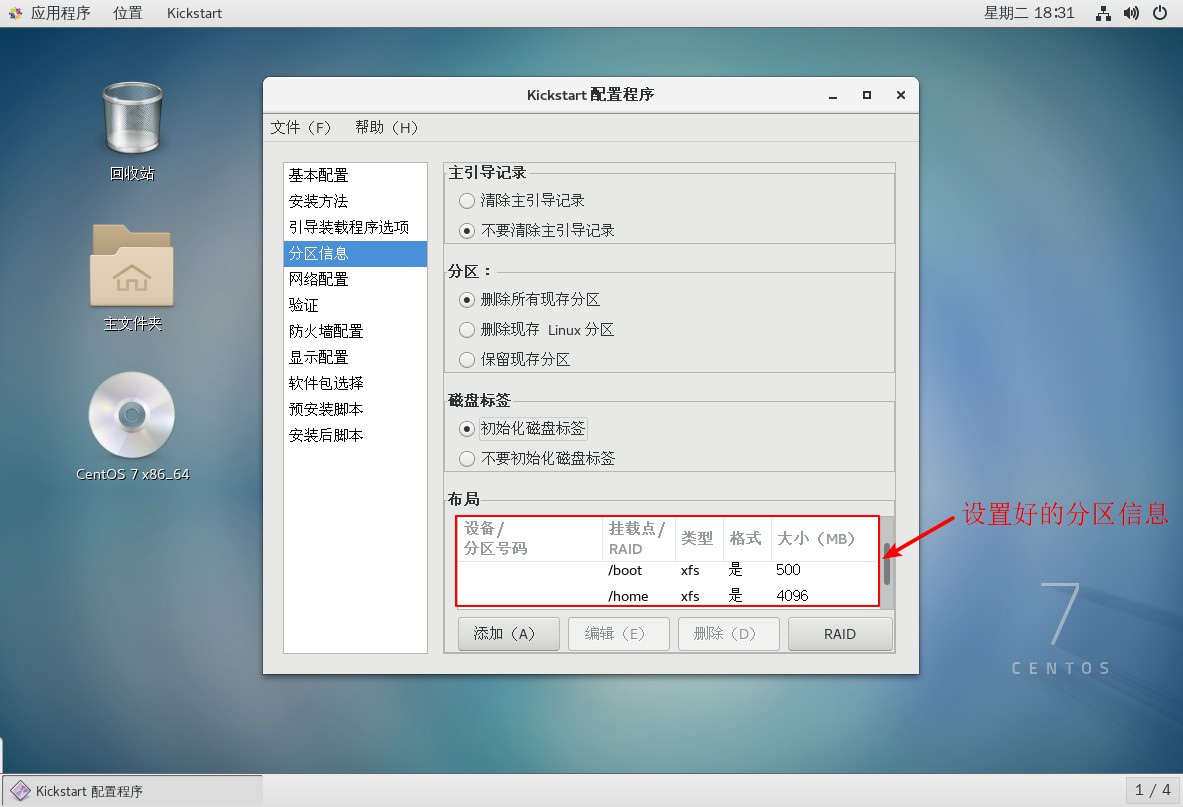
5. Set up partition information


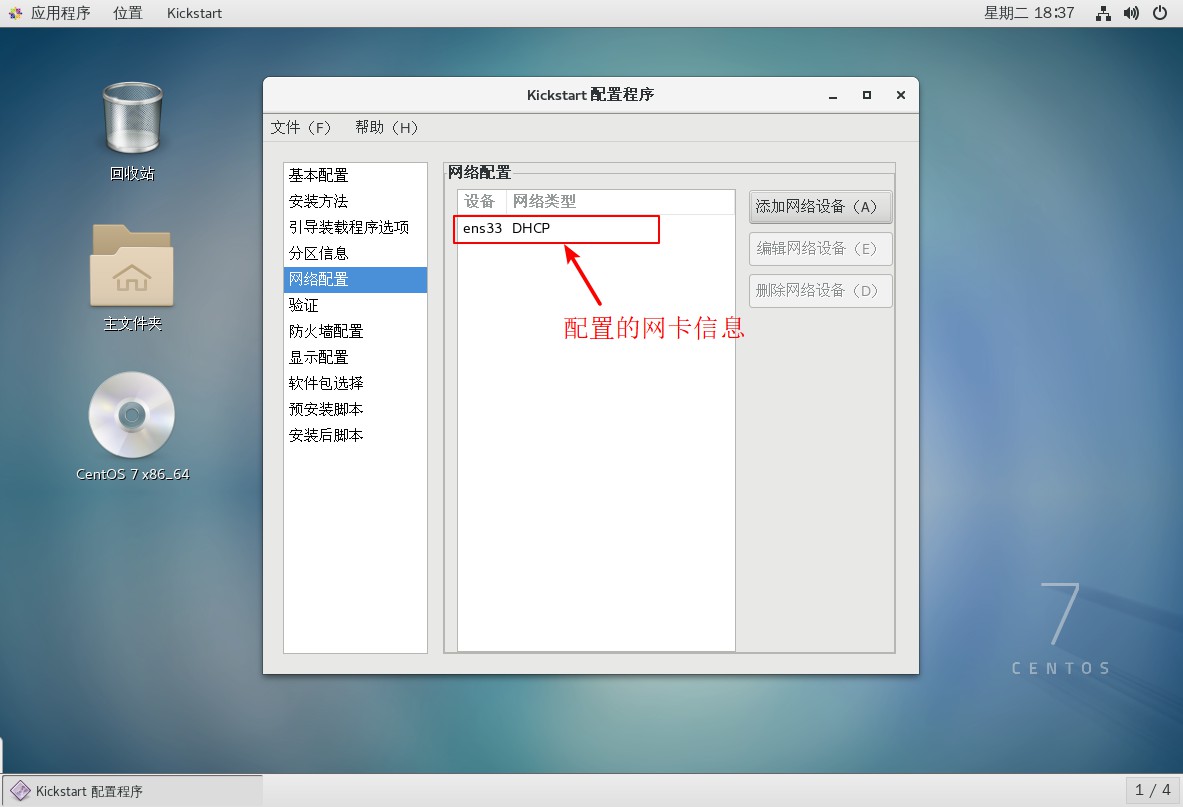
6. Set up network card configuration

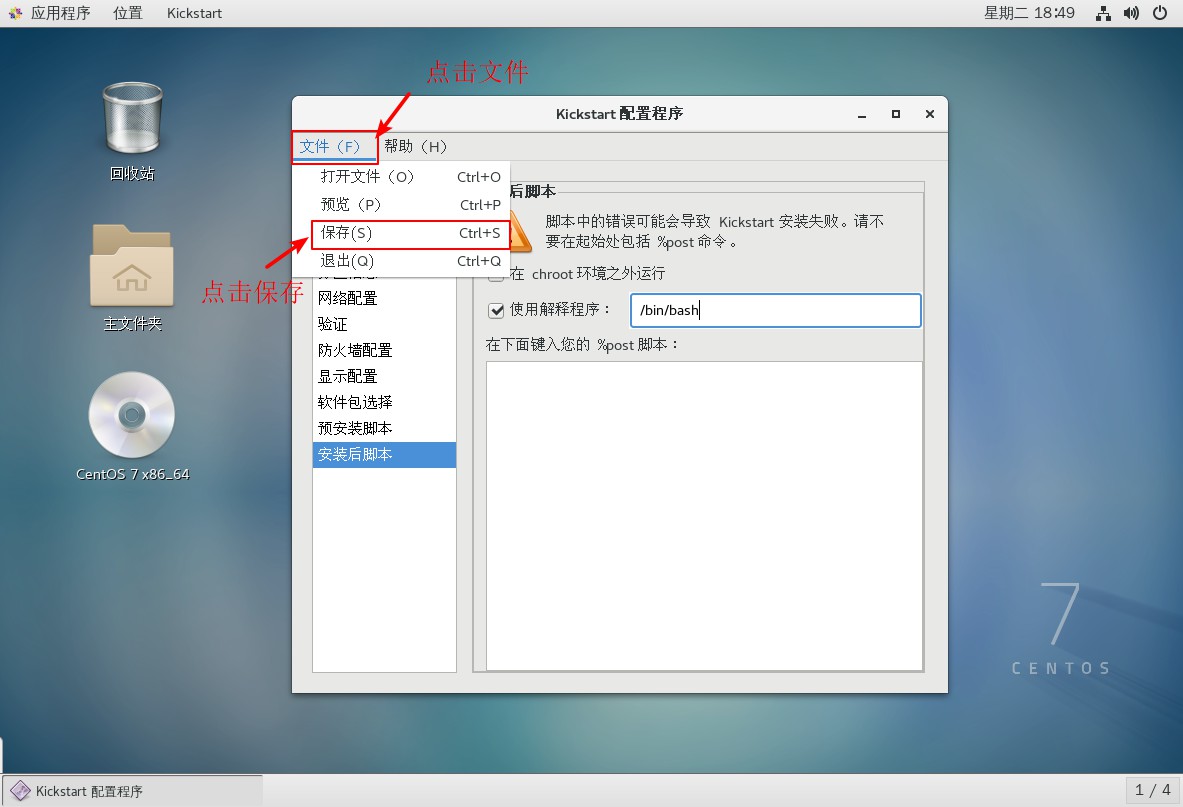
7. Configure post-installation script information

8. Save the configured file information to the FTP site after completion
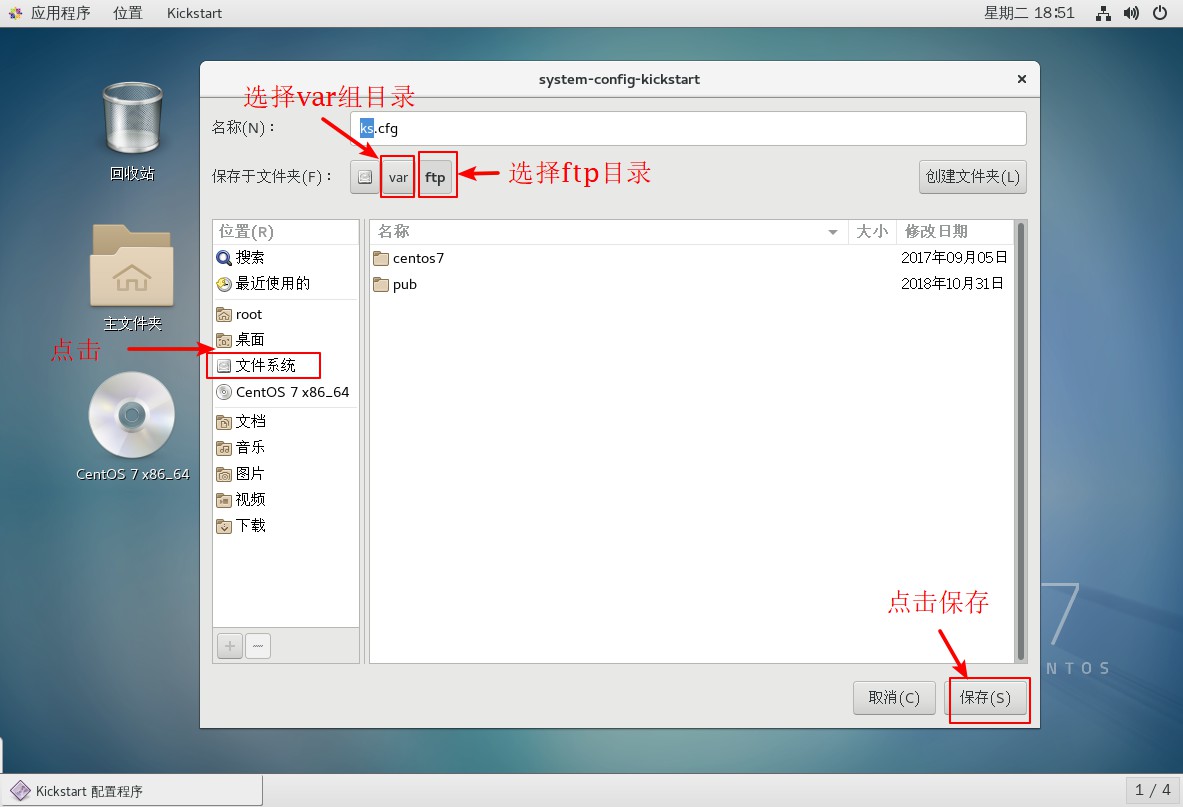
9. Close the software after saving, open the terminal, go to the ftp site to view the saved file, go to view the file, and add the required component installation package to the template.
[root@localhost ~]# Cd/var/ftp //Enter FTP site
[root@localhost ftp]# ls //View directory information
centos7  ks.cfg  pub
[root@localhost ftp]# vim ks.cfg //Enter edit mode to view saved template information
platform=x86, AMD64, or Intel EM64T
#version=DEVEL
# Install OS instead of upgrade
install
# Keyboard layouts
keyboard 'us'
# Root password
rootpw --iscrypted $1$QnfXQpTo$2SWg34gaOZQoLWy.bGlmd/        //root user key template
# Use network installation
url --url="ftp://192.168.100.100/centos7 "//Installation Path Template
# System language
lang zh_CN                                         //Set Keyboard Mode
# Firewall configuration
firewall --disabled
# System authorization information
auth  --useshadow  --passalgo=sha512
# Use graphical install
graphical
firstboot --disable
# SELinux configuration
selinux --enforcing

# Network information
network  --bootproto=dhcp --device=ens33            //Setup Network Card Information
# Reboot after installation
reboot
# System timezone
timezone Asia/Shanghai
# System bootloader configuration
bootloader --location=none
# Partition clearing information
clearpart --all --initlabel
# Disk partitioning information
part /boot --fstype="xfs" --size=500            //Disk Partition Setup Template
part /home --fstype="xfs" --size=4096
part swap --fstype="swap" --size=4096
part / --fstype="xfs" --grow --size=1
:q                        //Exit Template
[root@localhost ftp]# Cd/root//enter root user home directory
[root@localhost ~]# ls //View Home Directory Information
anaconda-ks.cfg       Public Video Document Music        //Find the anaconda-ks.cfg template
initial-setup-ks.cfg  Template Picture Download Desktop
[root@localhost ~]# vim anaconda-ks.cfg //Enter editing anaconda-ks.cfg template
...//Omit some content...
%packages
@^gnome-desktop-environment
@base
@core
@desktop-debugging
@dial-up
@directory-client
@fonts
@gnome-desktop
@guest-agents                     //Find this part of the information and copy it
@guest-desktop-agents
@input-methods
@internet-browser
@java-platform
@multimedia
@network-file-system-client
@networkmanager-submodules
@print-client
@x11
chrony
kexec-tools

%end
...//Omit some content...
:q                        //Sign out
[root@localhost ~]# Vim/var/ftp/ks.cfg //Enter FTP site, edit ks.cfg file
part /boot --fstype="xfs" --size=500
part /home --fstype="xfs" --size=4096
part swap --fstype="swap" --size=4096
part / --fstype="xfs" --grow --size=1

%packages
@^gnome-desktop-environment
@base
@core
@desktop-debugging
@dial-up
@directory-client
@fonts                                           //Paste this section below
@gnome-desktop
@guest-agents
@guest-desktop-agents
@input-methods
@internet-browser
@java-platform
@multimedia
@network-file-system-client
@networkmanager-submodules
@print-client
@x11
chrony
kexec-tools

%end
~
:wq                                            //Save Exit
10. Add ks.cfg file boot entries to the tftp site boot menu file.
[root@localhost ~]# Cd/var/lib/tftpboot/ //Enter the tftp site
[root@localhost tftpboot]# ls //View site information
initrd.img pxelinux.0 pxelinux.cfg vmlinuz
[root@localhost tftpboot]# cd pxelinux.cfg/ //Enter directory
[root@localhost pxelinux.cfg]# ls
default
[root@localhost pxelinux.cfg]# vim default //Enter Edit Startup Menu File
default auto
prompt 1
label auto
kernel vmlinuz //Add ks=ftp://192.168.100.100/ks.cfg entry so that the ks.cfg template content can be read by the system at installation time
append initrd=initrd.img method=ftp://192.168.100.100/centos7 ks=ftp://192.168.100.100/ks.cfg
label linux text
kernel vmlinuz
append text initrd=initrd.img method=ftp://192.168.100.100/centos7
label linux rescue
kernel vmlinuz
append rescue initrd=initrd.img method=ftp://192.168.100.100/centos7
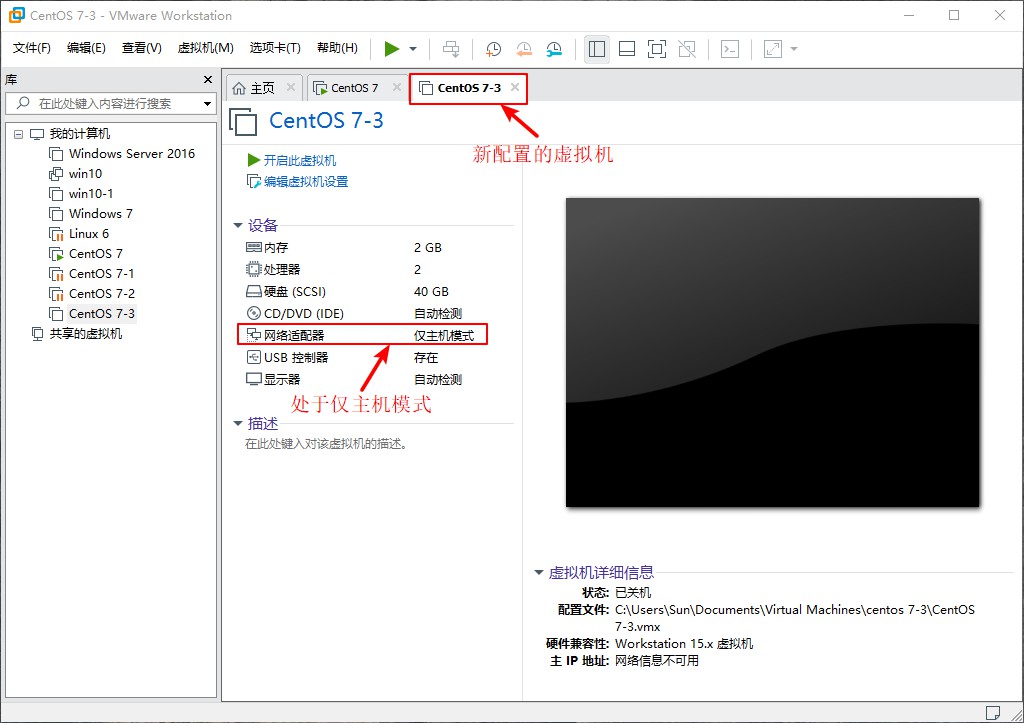
:wq //Save Exit11. Configure a new virtual machine, set the network card to host-only mode, and then verify the PXE deployment setup + kickstart unattended setup.