(Horsehoneycomb technology original content, public ID: mfwtech)
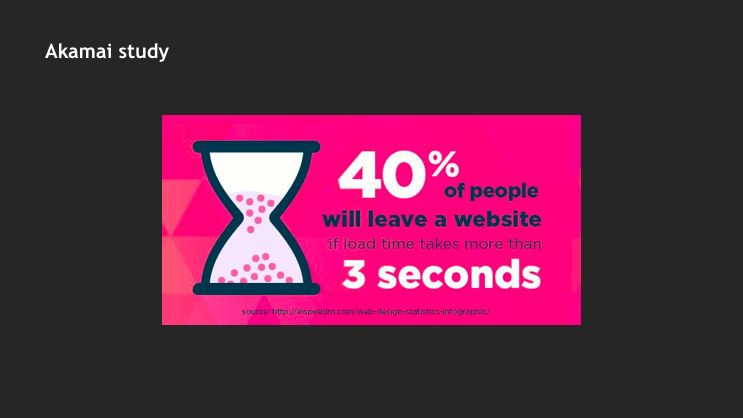
A study from Akamai found that after interviewing 1,048 online shoppers:
-
About 47% of users expect their pages to load in two seconds.
-
If the page load time exceeds 3 seconds, about 40% of users will choose to leave or close the page.
For a long time, in order to improve the user's experience when loading pages, front-end development engineers have done a lot of work in Web, iOS and Android applications. In addition to solving the problem of how to make web pages display faster, it is also important to enhance users'awareness of load waiting time. "Chrysanthemum Diagram" and various loading animations derived from it are a common solution. I believe that both developers and users are familiar with the following icon:

The skeleton screen introduced in this paper is regarded as an upgraded version of chrysanthemum chart. Inspired by the existing skeleton screen scheme, the front-end research and development team of Honeycomb E-commerce realized a method of automatically generating skeleton screen, and applied it in many pages of Honeycomb Mall, and achieved good results.
I. What is Skeleton Screen
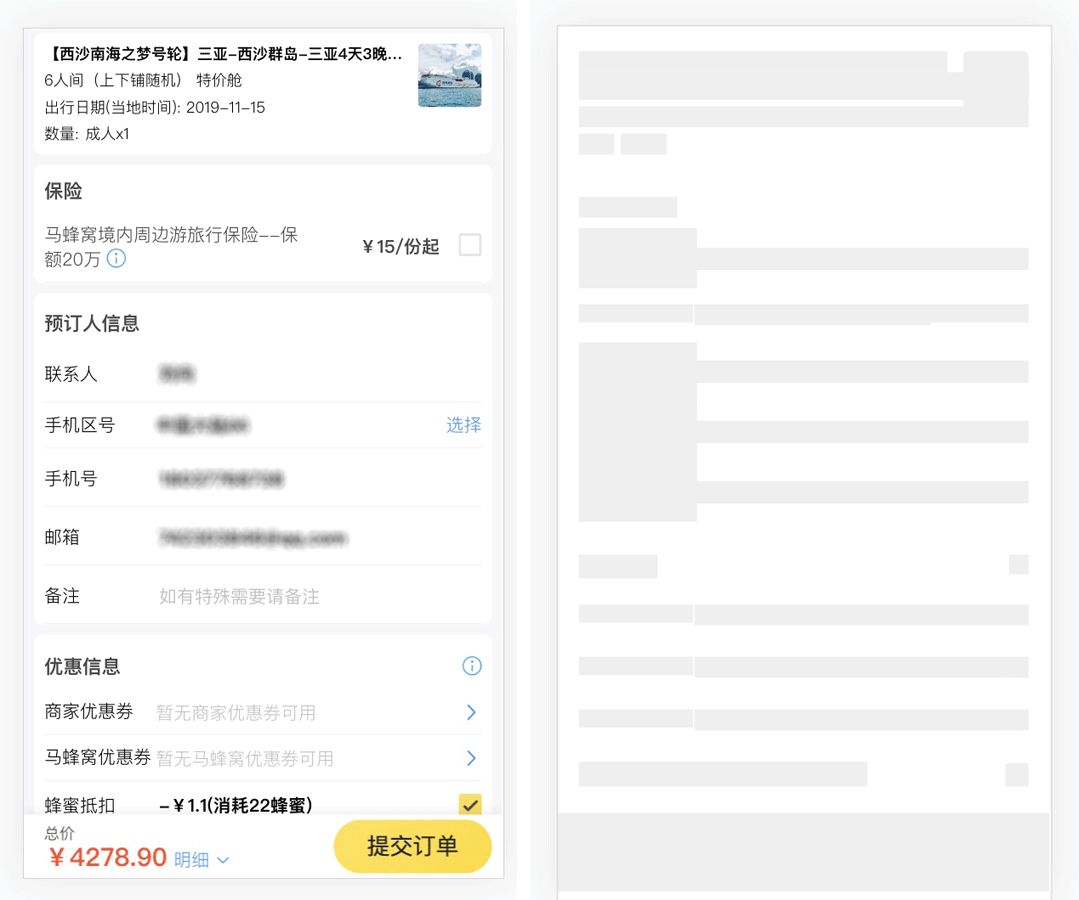
Skeleton screen can be understood as presenting users with a general structure of the current page composed of gray and white blocks before the page data has returned or the page has not been rendered completely, so that users can feel that the page is being rendered gradually, thus making the loading process visually smooth. The generated skeleton screen page is shown in the following figure:

The main advantages of skeleton screen are:
- Users avoid seeing long white pages
- You can learn the general structure of the page and reduce the probability that users will leave because they think the page is wrong.
- Visual fluency is better than Chrysanthemum
2. Common front-end skeleton screens
Before choosing the skeleton screen, we also consider some other methods, such as whether we can avoid the problem of front-end white screen time by server rendering (SSR). However, it is found that there are too many projects involved, and it also involves the construction and deployment of services; or it can provide simple pre-rendering through prerender-spa-plugin, which is friendly to SPA, but requires additional web pack configuration, and because of the problem of package source, the download time is too long, sometimes inexplicable failure, and so on, because of various reasons. The reason finally gave up.
After a series of research, we have a simple comb of several common skeleton screen solutions in the industry, as well as their advantages and disadvantages.
1. UI skeleton screen
That is to say, the skeleton screen is provided by UI, which is in accordance with the style of the page's home page. The skeleton screen base64 image is inserted into the root node and embedded in the project when the web pack is packaged.
This is a simple and crude method, which is easy to implement. But the disadvantage is also obvious, that is, UI designers need to support and develop interventions, can not automatically generate.
2. Handwritten skeleton screen
That is, customize the skeleton screen for the target page by handwritten HTML and CSS. This way can replicate the real style of the page. However, once the page style changes due to various reasons, we need to change the style and layout of the skeleton screen again, which greatly increases the cost of maintenance.
3. Automatic generation of static skeleton screens
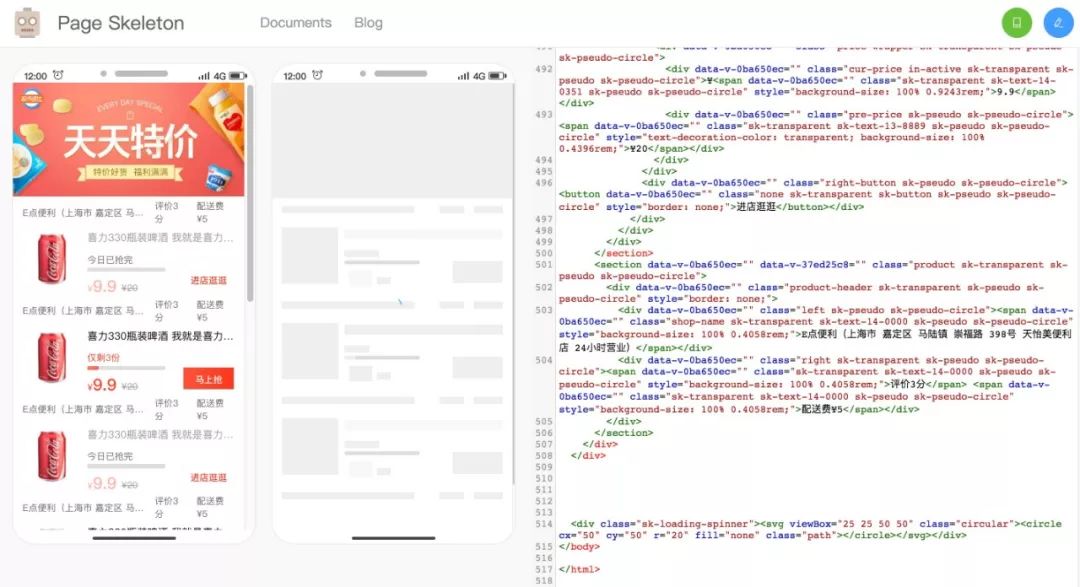
At present, more attention is paid to the open source plug-in page-skeleton-webpack-plugin, whose specific implementation principle is as follows:
-
Generating Skeleton Screen
Puppter controls handless Chrome to open the skeleton screen page that needs to be generated. After waiting for the page to be loaded, the layout style of the page is retained. By adding and deleting the elements in the page, the existing elements are covered by cascading style, so that they can be displayed as gray and white blocks. Then the modified HTML and CSS are extracted, and the page is divided into different block areas, such as text block, picture block, button block, SVG, pseudo-Class element block and so on. Each block is processed separately to make it as consistent as possible with the original page. The addScriptTag method of the Puppetter page instance is used to insert the script of the processing block into the page opened by headless Chrome.
There may still be a gap between the actual generated skeleton screen page and the original page. The plug-in writes the skeleton screen into memory through memory-fs. It can edit the generated skeleton screen twice and preview the effect through the preview page. When the modification is completed, a new skeleton screen can be written into the project by clicking the generation button.
Lend a picture to illustrate:
-
Insert Skeleton Screen
After the DOM structure and CSS of the skeleton screen are generated offline, the HTML is inserted under the nodes in the injection template (EJS) at the time of construction, in the after-emit hook function.
The scheme of page-skeleton-webpack-plguin generating skeleton screen can generate corresponding skeleton screen pages according to different routing pages in the project, and pack skeleton screen pages into corresponding static routing pages through webpack.
Its shortcomings lie in:
-
It is not possible to monitor the accuracy of the time when the interface returns to generate the skeleton screen in the actual use process.
-
The generated pages are directly related to the quality of the structure written by the business people, and there are often situations requiring manual secondary adjustment.
In this context, the research and development front-end team of Honeycomb E-commerce hopes to find a more friendly way to generate skeleton screens while improving user experience, which can automatically generate similar skeleton screens for different business scenarios and achieve automatic injection. For development, only one command or simple configuration is needed to generate the skeleton screen without considering the subsequent maintenance work.
draw-page-structure provides inspiration for our design in the process of project investigation.
4. draw-page-structure
-
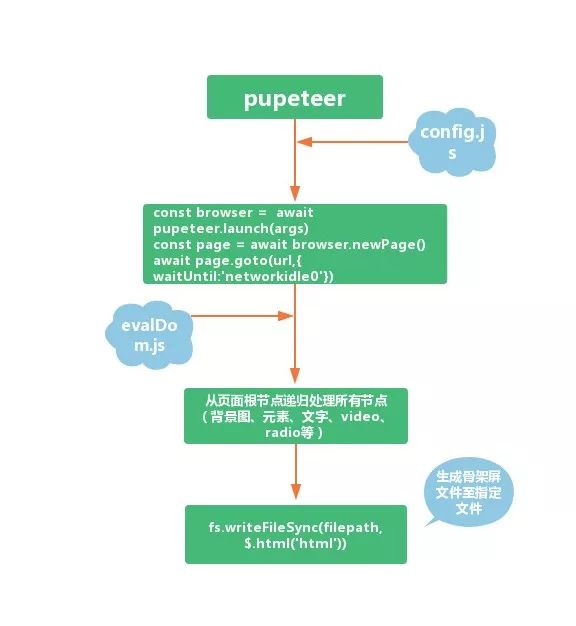
Generating skeleton screen:
// dps.config.js
{
  url: 'https://baidu.com',
  output: {
    filepath: '/Users/famanoder/DrawPageStructure/example/index.html',
    injectSelector: '#app'
  },
  background: '#eee',
  animation: 'opacity 1s linear infinite;',
  // ...
}
According to the online address specified by the URL, the DOM structure of the current page can be obtained by cooperating with Puppeteer, and the skeleton screen file can be generated by generating the skeleton screen file into the file specified by filepath. The results are as follows:

-
Insert Skeleton Screen
Inserting the skeleton screen file generated above into the node with id="app" under the root node of the page, and then providing the method of active destruction of the skeleton screen in the general tool, can help to develop active control or destruction of the skeleton screen and display the real content of the page.
draw-page-structure design ideas can largely meet our needs, but the shortcoming is that it can only generate skeleton screens for existing URL s online, and does not support the development environment. In addition, because of automatic generation, the generated skeleton screen may not match expectations when there is a redirection (if there is no login redirection to the login page). And its internal implementation is not perfect, which may lead to the skeleton screen generated under some complex pages need to be adjusted twice.
Therefore, we began to explore further.
3. A more friendly implementation plan for development
1. Design ideas
Based on the existing scheme, we think of the method of specifying the page URL and the directory of file output to generate skeleton screen in the configuration file, reading the configuration items in the configuration file at run time, opening the specified page through Pupeteer and injecting evalDom.js. Because this JS is executed in Pupeteer, we can get the complete DOM structure of the current page, which leaves us a lot of room to play.
Initially, we started from the body tag in the acquired DOM structure, dealing with all the nodes on the page recursively, and replaced the position of the original element with the generated DIV after processing. In the first version of the scheme, all computing attributes and relative viewport widths and positions of elements are obtained by getBounding ClientRect and getComputedStyle, and then rendered recursively by combining the style attributes of the elements themselves, preserving the original DOM nesting hierarchy of the page.
However, there are too many attributes that can determine the location of elements, such as position, z-index, width, height, top, display, box-sizing, flex and so on. As a result, it is impossible to focus on the logic of DOM structure processing, and these attributes need to be added to the style of the final generation skeleton screen node after processing. On top of that, skeleton screen files may be larger than the original full page structure, which is certainly not what we want.
The optimized scheme uses getBounding ClientRect and getComputedStyle to obtain the related attributes of elements, and then generates the final skeleton screen nodes directly by absolute positioning. The final attributes needed on the page are position, z-index, top, left, width, height, background, border-radius. In addition to not guaranteeing the original DOM structure of the page, other requirements can basically be met, and more focus on the processing of nodes.
The main implementation process is as follows:
At present, this scheme is mainly applied in the multi-page project of Honeycomb e-commerce business, including the following single page, visa page, etc. The following single page as an example shows the effect as follows:
2. Realization
-
Generating Skeleton Screen
(1) Configuration of config.js
const dpsConfig = {
   //The default generation location is the skeleton folder of the current project directory. Existing skeleton screen pages will not be generated again. The new page configuration only needs to add new entries.
    visa_guide: {
        url: 'https://w.mafengwo.cn/sfe-app/visa_guide.html?mdd_id=10083', // required
    },
    call_charge:  {
        url: 'http://localhost:8081/sfe-app/call_charge.html?rights_id=25', // mandatory entry. The address of the skeleton screen page to be generated can also be tried with Baidu (https://baidu.com).
        //url:'https://www.baidu.com',
        device: 'pc', //Not required, default mobile
        background: '#eee', // Not required
        animation: 'opacity 1s linear infinite;', //Not required
        headless:false, //Not required
        customizeElement: function(node) { //Not required
            //If the return value enumeration is true, it does not recurse down to this level. If the return value is an object, the file of the node is drawn according to the style inside the object.
            //If the return value is 0, it means normal recursive rendering
            //If the return value is 1, the rendering of the current node is not recursive down
            //If the return value is 2, the current node is not processed.
            if(node.className === 'navs-bottom-bar'){
                return 2;
            }
            return 0;
        },
        showInitiativeBtn: true,//If this value is set to true, it means that development needs to actively trigger the generation of skeleton screen, and headless needs to be set to false.
        writePageStructure: function(html) { //Not required
            //Self-processing generated skeleton screens
            // fs.writeFileSync(filepath, html);
            // console.log(html)
        },
        init: function() { //Not required
            //Operations before generating skeleton screens, such as deleting interference nodes
        }
    }
}


module.exports = dpsConfig;
(2) Pupeteer opens a new page and returns the browser instance, openPage
const ppteer = require('puppeteer');
const { log, getAgrType } = require('./utils');
const insertBtn = require('../insertBtn');


const devices = {
  mobile: [375, 667, 'Mozilla/5.0 (iPhone; CPU iPhone OS 11_0 like Mac OS X) AppleWebKit/604.1.38 (KHTML, like Gecko) Version/11.0 Mobile/15A372 Safari/604.1'],
  ipad: [1024, 1366, 'Mozilla/5.0 (iPad; CPU OS 11_0 like Mac OS X) AppleWebKit/604.1.34 (KHTML, like Gecko) Version/11.0 Mobile/15A5341f Safari/604.1'],
  pc: [1200, 1000, 'Mozilla/5.0 (iPhone; CPU iPhone OS 11_0 like Mac OS X) AppleWebKit/604.1.38 (KHTML, like Gecko) Version/11.0 Mobile/15A372 Safari/604.1']
};

async function pp({device = 'mobile', headless = true, showInitiativeBtn = false}) {

  const browser = await ppteer.launch({headless});//Return the browser instance

  async function openPage(url, extraHTTPHeaders) {
    const page = await browser.newPage();
    let timeHandle = null;

   if(showInitiativeBtn){
    browser.on('targetchanged', async ()=>{//Monitor page routing changes and get the latest page of the current tab. When show Initiative Btn is true, insert buttons to actively generate skeleton screen by development control.
      const targets = await browser.targets();
      const currentTarget = targets[targets.length - 1]
      const currentPage = await currentTarget.page();

      clearTimeout(timeHandle)
      setTimeout(()=>{
        if(currentPage){
          currentPage.evaluate(insertBtn);
        }
      },300)
    })
   }
    try{
      let deviceSet = devices[device];
      page.setUserAgent(deviceSet[2]);
      page.setViewport({width: deviceSet[0], height: deviceSet[1]});

      if(extraHTTPHeaders && getAgrType(extraHTTPHeaders) === 'object') {
        await page.setExtraHTTPHeaders(new Map(Object.entries(extraHTTPHeaders)));
      }
      await page.goto(url, {
        waitUntil: 'networkidle0'//Triggered when there is no more network connection (at least 500 ms later)
      });
    }catch(e){
      console.log('\n');
      log.error(e.message);
    }
    return page;
  }
  return {
    browser,
    openPage
  }
};

module.exports = pp;
(3) Implement the main logic of node processing in evalDom.js and evalDom.js in the browser environment
agrs.unshift(evalScripts);//evalScripts = require ('. / evalDOM'); execute evalDom.js in pupeteer and pass the parameters configured in config.js to evalDom
html = await page.evaluate.apply(page, agrs);
//evalDom.js Main Logic
startDraw: function () {
    const $this = this;
    const nodes = this.rootNode.childNodes;
    this.beforeRenderDomStyle();
    function childNodesStyleConcat(childNodes) {
        for (let i = 0; i < childNodes.length; i++) {
            const currentChildNode = childNodes[i];//Current child node
            //Which nodes need to skip the skeleton screen drawing process

            if ($this.shouldIgnoreCurrentElement(currentChildNode)) { //Should we ignore the current node and take no measures? Subsequently, the user can specify which nodes should be omitted, todo
                continue;
            }

            const backgroundHasurl = analyseIfHadBackground(currentChildNode);
            const hasDirectTextChild = childrenNodesHasText(currentChildNode);//Determine whether the current element has a direct child element and that the element is Text
            if ($this.customizeElement && $this.customizeElement(currentChildNode) !== 0 && $this.customizeElement(currentChildNode) !==  undefined) {
                //The developer customizes the rendered look of the node and returns false by default to indicate that the normal recursive algorithm is used to process the node. If the return value is true, it does not recurse downward. If the return value is an object, it is good to draw directly when custom style is needed for development. todo
                if (getArgtype($this.customizeElement(currentChildNode)) === 'object') {
                    console.log('object');
                    //Here, if an object is returned to represent the object, the last drawn object is customized
                } else if ($this.customizeElement(currentChildNode) === 1) {
                    //If true is returned at this time, this node is filtered
                    getRenderStyle(currentChildNode);
                } else if ($this.customizeElement(currentChildNode) === 2){
                    continue ;
                }
                continue;
            }
            if (backgroundHasurl || analyseIsEmptyElement(currentChildNode) || hasDirectTextChild || shouldDrawCurrentNode(currentChildNode)) { //If the current element is an inline element or the current element is not an inline element, but does not contain child nodes or child nodes are inline elements, then we draw this node on the current skeleton screen. _
                getRenderStyle(currentChildNode, hasDirectTextChild);
            } else if (currentChildNode.childNodes && currentChildNode.childNodes.length) { //If the current node contains child nodes
                //recursion
                childNodesStyleConcat(currentChildNode.childNodes);
            }
        }
    }
    childNodesStyleConcat(nodes);
    return this.showBlocks();
},
-
The above rootNode is the root node, default to document.body or can be specified by development
-
The main logic is to determine whether the current node needs to ignore, whether the background picture is set, whether the text information is contained, whether the development specifies the processing mode of the current node, and so on. The corresponding skeleton screen nodes satisfying the conditions are rendered, otherwise the sub-nodes of the current node are processed.
-
When all nodes are processed, call showBlocks to splice the generated skeleton screen nodes into HTML strings for subsequent processing.
(4) getRenderStyle generates skeleton screen style
const styles = [
    'position: fixed',
    `z-index: ${zIndex}`,
    `top: ${top}%`,
    `left: ${left}%`,
    `width: ${width}%`,
    `height: ${height}%`,
    'background: '+(background || '#eee'),
];
const radius = getStyle(node, 'border-radius');
radius && radius != '0px' && styles.push(`border-radius: ${radius}`);
blocks.push(`<div style="${styles.join(';')}"></div>`);
- zIndex, top, left, width, height are processed attributes, and then all the strings of skeleton screen nodes are push ed into the blocks array.
(5) The HTML files that eventually generate the skeleton screen are as follows:
<html><head></head>
    <body><div style="position: fixed;z-index: 999;top: 89.805%;left: 4.267%;width: 91.467%;height: 11.994%;background: #eee"></div></body></html>
- Insert Skeleton Screen
Add in the project entry index.html file
<body>
    <div id="app">
    </div>
    <% if(htmlWebpackPlugin.options.hasSkeleton) { %>
        <div id="skeleton"><!-- Skeleton screen through htmlWebpackPlugin Automatically inject when starting packaging -->
            <%= htmlWebpackPlugin.options.loading.html %>
        </div>
    <% } %>
    <!-- built files will be auto injected -->
</body>
IV. Summary
At present, the scheme has supported the development of active control of skeleton screen generation time, so as to avoid the page redirection process can not generate the correct skeleton screen, and can support the local development of skeleton screen. In the future, we will support the development of custom generation skeleton screen node style and component skeleton screen generation, and optimize evalDom.js internal node filtering and processing algorithm. Coming soon!
Finally, we are looking for a senior front-end development engineer. Interested students are welcome to send their resumes to kangcenbo@mafengwo.com.
Author: Kang Cenbo, Sun Hao, Front-end Research and Development Engineer of Horsehoneycomb E-commerce Platform.