Android UI design can be said to be a key factor in determining the quality of an app, because when people use an app, the first thing they see is the app interface. A beautiful and full interface can bring users a very good experience and leave a good impression in the user's mind.
For UI design, Android native controls plus some open source libraries have been able to meet most of the UI requirements, but some relatively novel and fancy control effects can only be achieved through custom View. So, starting with this blog, I will record the learning content about Android custom View. And present it to you.
We implement a Youku menu case, which involves a lot of knowledge.
The effect of the case is as follows: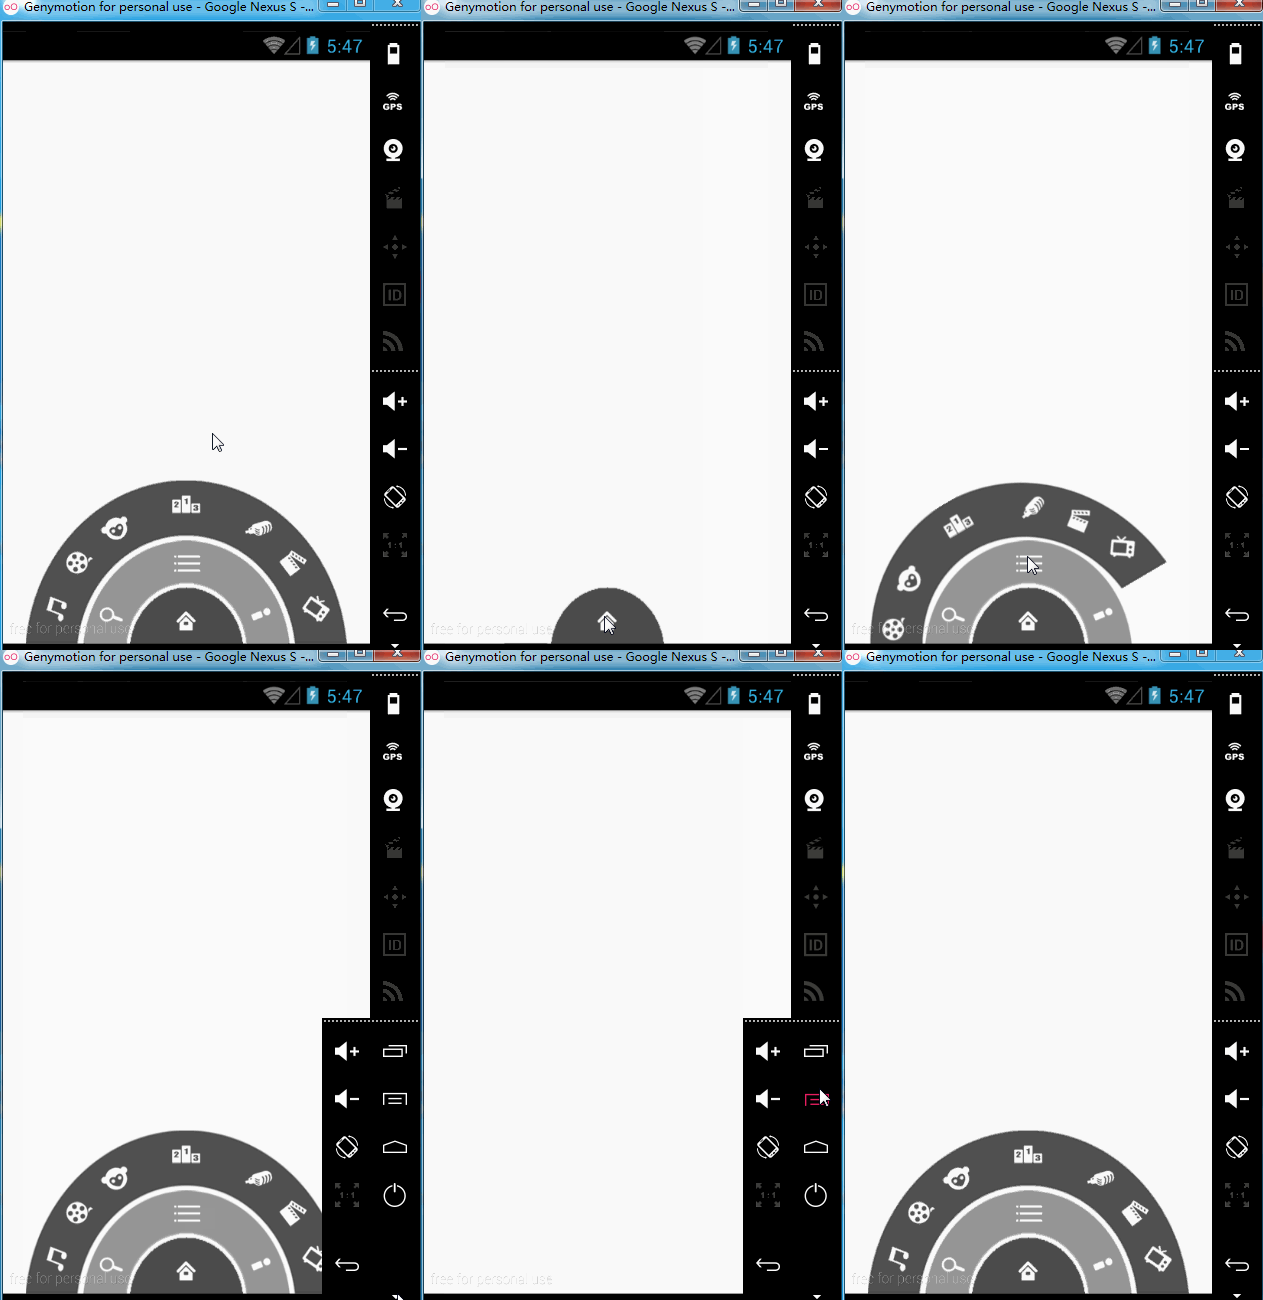
Modify the activity_main.xml file.
<?xml version="1.0" encoding="utf-8"?>
<RelativeLayout xmlns:android="http://schemas.android.com/apk/res/android"
    xmlns:app="http://schemas.android.com/apk/res-auto"
    xmlns:tools="http://schemas.android.com/tools"
    android:layout_width="match_parent"
    android:layout_height="match_parent"
    tools:context="com.itcast.youkumenu.MainActivity">

    <RelativeLayout
        android:id="@+id/level1"
        android:layout_width="100dp"
        android:layout_height="50dp"
        android:layout_alignParentBottom="true"
        android:layout_centerHorizontal="true"
        android:background="@drawable/level1">
    </RelativeLayout>

    <RelativeLayout
        android:id="@+id/level2"
        android:layout_width="180dp"
        android:layout_height="90dp"
        android:layout_alignParentBottom="true"
        android:layout_centerHorizontal="true"
        android:background="@drawable/level2">
    </RelativeLayout>

    <RelativeLayout
        android:id="@+id/level3"
        android:layout_width="280dp"
        android:layout_height="140dp"
        android:layout_alignParentBottom="true"
        android:layout_centerHorizontal="true"
        android:background="@drawable/level3">
    </RelativeLayout>

</RelativeLayout>
Preview the effect.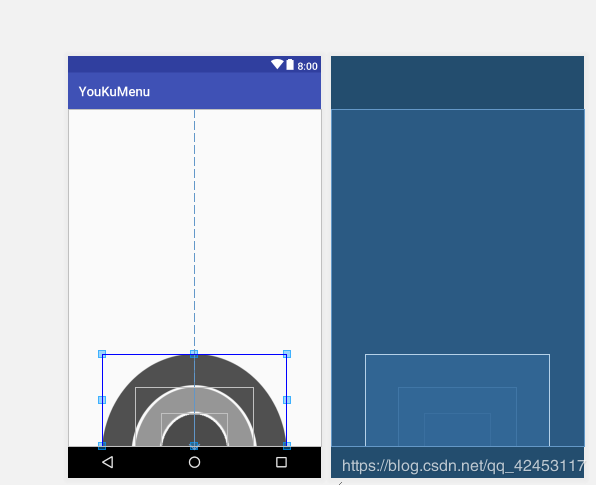
It seems that the effect has come out, but please note that if I lay out this way, can I point to each circle? Looking at the picture above, I can only point to the rectangle with the blue line. This is because the small circle is covered by the big circle. Let's revise the layout code.
<?xml version="1.0" encoding="utf-8"?>
<RelativeLayout xmlns:android="http://schemas.android.com/apk/res/android"
    xmlns:app="http://schemas.android.com/apk/res-auto"
    xmlns:tools="http://schemas.android.com/tools"
    android:layout_width="match_parent"
    android:layout_height="match_parent"
    tools:context="com.itcast.youkumenu.MainActivity">

    <RelativeLayout
        android:id="@+id/level3"
        android:layout_width="280dp"
        android:layout_height="140dp"
        android:layout_alignParentBottom="true"
        android:layout_centerHorizontal="true"
        android:background="@drawable/level3">
    </RelativeLayout>

    <RelativeLayout
        android:id="@+id/level2"
        android:layout_width="180dp"
        android:layout_height="90dp"
        android:layout_alignParentBottom="true"
        android:layout_centerHorizontal="true"
        android:background="@drawable/level2">
    </RelativeLayout>

    <RelativeLayout
        android:id="@+id/level1"
        android:layout_width="100dp"
        android:layout_height="50dp"
        android:layout_alignParentBottom="true"
        android:layout_centerHorizontal="true"
        android:background="@drawable/level1">
    </RelativeLayout>

</RelativeLayout>
Here's a preview.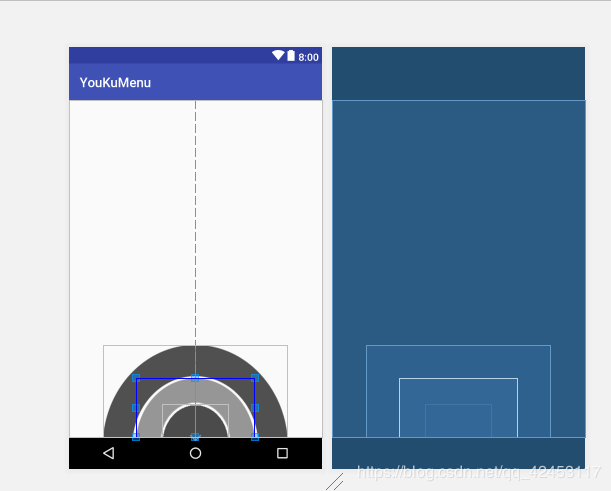
I've been able to click on each circle correctly, and my code just changed the three relative layouts. Since the big circle will cover the small circle, we put the big circle directly on the top, so there will be no coverage problem.
This is a point we need to pay attention to. Next, post the complete layout code.
<?xml version="1.0" encoding="utf-8"?>
<RelativeLayout xmlns:android="http://schemas.android.com/apk/res/android"
    xmlns:app="http://schemas.android.com/apk/res-auto"
    xmlns:tools="http://schemas.android.com/tools"
    android:layout_width="match_parent"
    android:layout_height="match_parent"
    tools:context="com.itcast.youkumenu.MainActivity">

    <RelativeLayout
        android:id="@+id/level3"
        android:layout_width="280dp"
        android:layout_height="140dp"
        android:layout_alignParentBottom="true"
        android:layout_centerHorizontal="true"
        android:background="@drawable/level3">

        <ImageView
            android:id="@+id/channel1"
            android:layout_width="wrap_content"
            android:layout_height="wrap_content"
            android:layout_alignParentBottom="true"
            android:layout_marginBottom="8dp"
            android:layout_marginLeft="8dp"
            android:src="@drawable/channel1" />

        <ImageView
            android:id="@+id/channel2"
            android:layout_width="wrap_content"
            android:layout_height="wrap_content"
            android:layout_above="@id/channel1"
            android:layout_marginBottom="8dp"
            android:layout_marginLeft="33dp"
            android:src="@drawable/channel2" />

        <ImageView
            android:id="@+id/channel3"
            android:layout_width="wrap_content"
            android:layout_height="wrap_content"
            android:layout_above="@id/channel2"
            android:layout_marginBottom="8dp"
            android:layout_marginLeft="63dp"
            android:src="@drawable/channel3" />

        <ImageView
            android:id="@+id/channel4"
            android:layout_width="wrap_content"
            android:layout_height="wrap_content"
            android:layout_centerHorizontal="true"
            android:layout_marginTop="8dp"
            android:src="@drawable/channel4" />

        <ImageView
            android:id="@+id/channel7"
            android:layout_width="wrap_content"
            android:layout_height="wrap_content"
            android:layout_alignParentBottom="true"
            android:layout_alignParentRight="true"
            android:layout_marginBottom="8dp"
            android:layout_marginRight="8dp"
            android:src="@drawable/channel7" />

        <ImageView
            android:id="@+id/channel6"
            android:layout_width="wrap_content"
            android:layout_height="wrap_content"
            android:layout_above="@id/channel7"
            android:layout_alignParentRight="true"
            android:layout_marginBottom="8dp"
            android:layout_marginRight="33dp"
            android:src="@drawable/channel6" />

        <ImageView
            android:id="@+id/channel5"
            android:layout_width="wrap_content"
            android:layout_height="wrap_content"
            android:layout_above="@id/channel6"
            android:layout_alignParentRight="true"
            android:layout_marginBottom="8dp"
            android:layout_marginRight="63dp"
            android:src="@drawable/channel5" />
    </RelativeLayout>

    <RelativeLayout
        android:id="@+id/level2"
        android:layout_width="180dp"
        android:layout_height="90dp"
        android:layout_alignParentBottom="true"
        android:layout_centerHorizontal="true"
        android:background="@drawable/level2">

        <ImageView
            android:layout_width="wrap_content"
            android:layout_height="wrap_content"
            android:layout_alignParentBottom="true"
            android:layout_marginBottom="8dp"
            android:layout_marginLeft="8dp"
            android:src="@drawable/icon_search" />

        <ImageView
            android:id="@+id/icon_menu"
            android:layout_width="wrap_content"
            android:layout_height="wrap_content"
            android:layout_centerHorizontal="true"
            android:layout_marginTop="8dp"
            android:src="@drawable/icon_menu" />

        <ImageView
            android:layout_width="wrap_content"
            android:layout_height="wrap_content"
            android:layout_alignParentBottom="true"
            android:layout_alignParentRight="true"
            android:layout_marginBottom="8dp"
            android:layout_marginRight="8dp"
            android:src="@drawable/icon_myyouku" />
    </RelativeLayout>

    <RelativeLayout
        android:id="@+id/level1"
        android:layout_width="100dp"
        android:layout_height="50dp"
        android:layout_alignParentBottom="true"
        android:layout_centerHorizontal="true"
        android:background="@drawable/level1">

        <ImageView
            android:id="@+id/icon_home"
            android:layout_width="wrap_content"
            android:layout_height="wrap_content"
            android:layout_centerInParent="true"
            android:src="@drawable/icon_home" />
    </RelativeLayout>

</RelativeLayout>
So we're done with the layout, and then we're going to implement the functionality.
We can divide the function into two layers. First, we complete the animation of the middle circle menu key to control the outermost circle rotation. Then complete the animation of the innermost ring home key to control the rotation of the middle ring.
Modify the MainActivity code.
package com.itcast.youkumenu;

import android.os.Bundle;
import android.support.v7.app.AppCompatActivity;
import android.view.View;
import android.widget.ImageView;
import android.widget.RelativeLayout;
import android.widget.Toast;

public class MainActivity extends AppCompatActivity {

    private RelativeLayout level1;
    private RelativeLayout level2;
    private RelativeLayout level3;
    private ImageView icon_menu;
    private ImageView icon_home;

    /**
     * Whether to display the outermost ring
     * true:display
     * false:hide
     */
    private boolean isShowLevel3 = true;

    /**
     * Whether to display the middle ring or not
     * true:display
     * false:hide
     */
    private boolean isShowLevel2 = true;

    /**
     * Whether the innermost circle is displayed
     * true:display
     * false:hide
     */
    private boolean isShowLevel1 = true;

    @Override
    protected void onCreate(Bundle savedInstanceState) {
        super.onCreate(savedInstanceState);
        setContentView(R.layout.activity_main);
        initView();

    }

    private void initView() {
        level3 = (RelativeLayout) findViewById(R.id.level3);
        icon_menu = (ImageView) findViewById(R.id.icon_menu);
        level2 = (RelativeLayout) findViewById(R.id.level2);
        icon_home = (ImageView) findViewById(R.id.icon_home);
        level1 = (RelativeLayout) findViewById(R.id.level1);

        MyOnClickListener myOnClickListener = new MyOnClickListener();
        //Setting Click Events
        icon_home.setOnClickListener(myOnClickListener);
        icon_menu.setOnClickListener(myOnClickListener);
    }

    class MyOnClickListener implements View.OnClickListener {

        @Override
        public void onClick(View v) {
            switch (v.getId()) {
                case R.id.icon_home://home key
                    //If both the outermost menu and the intermediate menu are displayed, they are set to hide.
                    if(isShowLevel2){
                        //Hide the middle menu
                        isShowLevel2 = false;
                        Tools.hideView(level2);

                        if(isShowLevel3){
                            //Hide the outermost menu
                            isShowLevel3 = false;
                            Tools.hideView(level3,200);
                        }
                    }else{
                        //Display intermediate menu
                        isShowLevel2 = true;
                        Tools.showView(level2);
                    }
                    //If all are hidden, only the middle menu is displayed.

                    break;
                case R.id.icon_menu://Menu key

                    if(isShowLevel3){
                        //hide
                        isShowLevel3 = false;
                        Tools.hideView(level3);
                    }else{
                        //display
                        isShowLevel3 = true;
                        Tools.showView(level3);
                    }
                    break;
            }
        }
    }
}
While displaying and hiding the layout, I extracted a tool class to implement the rotation animation. The tool class code is as follows.
package com.itcast.youkumenu;

import android.view.View;
import android.view.animation.RotateAnimation;
import android.widget.RelativeLayout;

/**
 * Display and hide specified controls
 */
class Tools {

    public static void hideView(View view) {
        hideView(view,0);
    }

    public static void showView(View view) {
        RotateAnimation ra = new RotateAnimation(180, 360, view.getWidth() / 2, view.getHeight());
        ra.setDuration(500);//Set animation playback duration
        ra.setFillAfter(true);//The animation stays in the state of finished play.
        view.startAnimation(ra);
    }

    public static void hideView(View view, int startOffset) {
        RotateAnimation ra = new RotateAnimation(0, 180, view.getWidth() / 2, view.getHeight());
        ra.setDuration(500);//Set animation playback duration
        ra.setFillAfter(true);//The animation stays in the state of finished play.
        ra.setStartOffset(startOffset);//Setting Animation Delay Time
        view.startAnimation(ra);
    }
}
Running the project, the effect is as follows.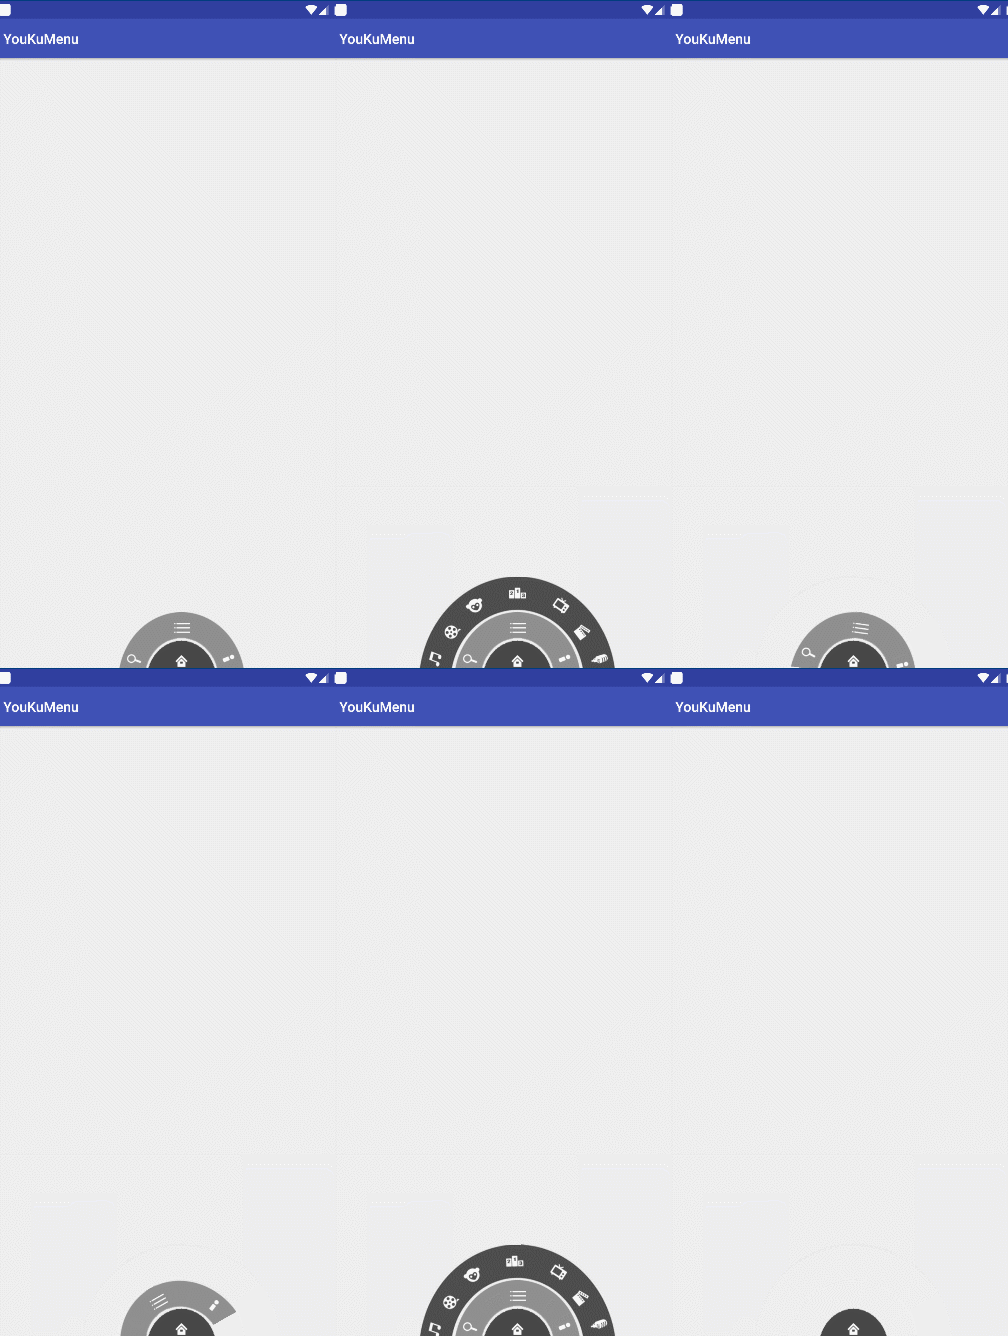
Now let's just click the menu button to hide the ring. To achieve this effect, you have to control the phone button.
Re-modify MainActivity's code.
package com.itcast.youkumenu;

import android.os.Bundle;
import android.support.v7.app.AppCompatActivity;
import android.view.KeyEvent;
import android.view.View;
import android.widget.ImageView;
import android.widget.RelativeLayout;
import android.widget.Toast;

public class MainActivity extends AppCompatActivity {

    private RelativeLayout level1;
    private RelativeLayout level2;
    private RelativeLayout level3;
    private ImageView icon_menu;
    private ImageView icon_home;

    /**
     * Whether to display the outermost ring
     * true:display
     * false:hide
     */
    private boolean isShowLevel3 = true;

    /**
     * Whether to display the middle ring or not
     * true:display
     * false:hide
     */
    private boolean isShowLevel2 = true;

    /**
     * Whether the innermost circle is displayed
     * true:display
     * false:hide
     */
    private boolean isShowLevel1 = true;

    @Override
    protected void onCreate(Bundle savedInstanceState) {
        super.onCreate(savedInstanceState);
        setContentView(R.layout.activity_main);
        initView();

    }

    private void initView() {
        level3 = (RelativeLayout) findViewById(R.id.level3);
        icon_menu = (ImageView) findViewById(R.id.icon_menu);
        level2 = (RelativeLayout) findViewById(R.id.level2);
        icon_home = (ImageView) findViewById(R.id.icon_home);
        level1 = (RelativeLayout) findViewById(R.id.level1);

        MyOnClickListener myOnClickListener = new MyOnClickListener();
        //Setting Click Events
        icon_home.setOnClickListener(myOnClickListener);
        icon_menu.setOnClickListener(myOnClickListener);
    }

    class MyOnClickListener implements View.OnClickListener {

        @Override
        public void onClick(View v) {
            switch (v.getId()) {
                case R.id.icon_home://home key
                    //If both the outermost menu and the intermediate menu are displayed, they are set to hide.
                    if(isShowLevel2){
                        //Hide the middle menu
                        isShowLevel2 = false;
                        Tools.hideView(level2);

                        if(isShowLevel3){
                            //Hide the outermost menu
                            isShowLevel3 = false;
                            Tools.hideView(level3,200);
                        }
                    }else{
                        //Display intermediate menu
                        isShowLevel2 = true;
                        Tools.showView(level2);
                    }
                    //If all are hidden, only the middle menu is displayed.

                    break;
                case R.id.icon_menu://Menu key

                    if(isShowLevel3){
                        //hide
                        isShowLevel3 = false;
                        Tools.hideView(level3);
                    }else{
                        //display
                        isShowLevel3 = true;
                        Tools.showView(level3);
                    }
                    break;
            }
        }
    }

    @Override
    public boolean onKeyDown(int keyCode, KeyEvent event) {
        if (keyCode == KeyEvent.KEYCODE_MENU){

            //If the three rings are displayed, they are all hidden.
            if (isShowLevel1){
                isShowLevel1 = false;
                Tools.hideView(level1);
                if(isShowLevel2){
                    //Hide the middle ring
                    isShowLevel2 = false;
                    Tools.hideView(level2,200);

                    if (isShowLevel3){
                        //Hidden outermost ring
                        isShowLevel3 = false;
                        Tools.hideView(level3,400);
                    }
                }
            }else{
                //If the innermost ring and the middle ring are hidden, they are displayed.
                //Show the innermost ring
                isShowLevel1 = true;
                Tools.showView(level1);

                //Display the middle ring
                isShowLevel2 = true;
                Tools.showView(level2,200);
            }

            return true;
        }
        return super.onKeyDown(keyCode, event);
    }
}
Tool class code.
package com.itcast.youkumenu;

import android.view.View;
import android.view.animation.RotateAnimation;
import android.widget.RelativeLayout;

/**
 * Display and hide specified controls
 */
class Tools {

    public static void hideView(View view) {
        hideView(view,0);
    }

    public static void showView(View view) {
        showView(view,0);
    }

    public static void hideView(View view, int startOffset) {
        RotateAnimation ra = new RotateAnimation(0, 180, view.getWidth() / 2, view.getHeight());
        ra.setDuration(500);//Set animation playback duration
        ra.setFillAfter(true);//The animation stays in the state of finished play.
        ra.setStartOffset(startOffset);//Setting Animation Delay Time
        view.startAnimation(ra);
    }

    public static void showView(View view, int startOffset) {
        RotateAnimation ra = new RotateAnimation(180, 360, view.getWidth() / 2, view.getHeight());
        ra.setDuration(500);//Set animation playback duration
        ra.setFillAfter(true);//The animation stays in the state of finished play.
        ra.setStartOffset(startOffset);
        view.startAnimation(ra);
    }
}
Running the project, the effect is as follows.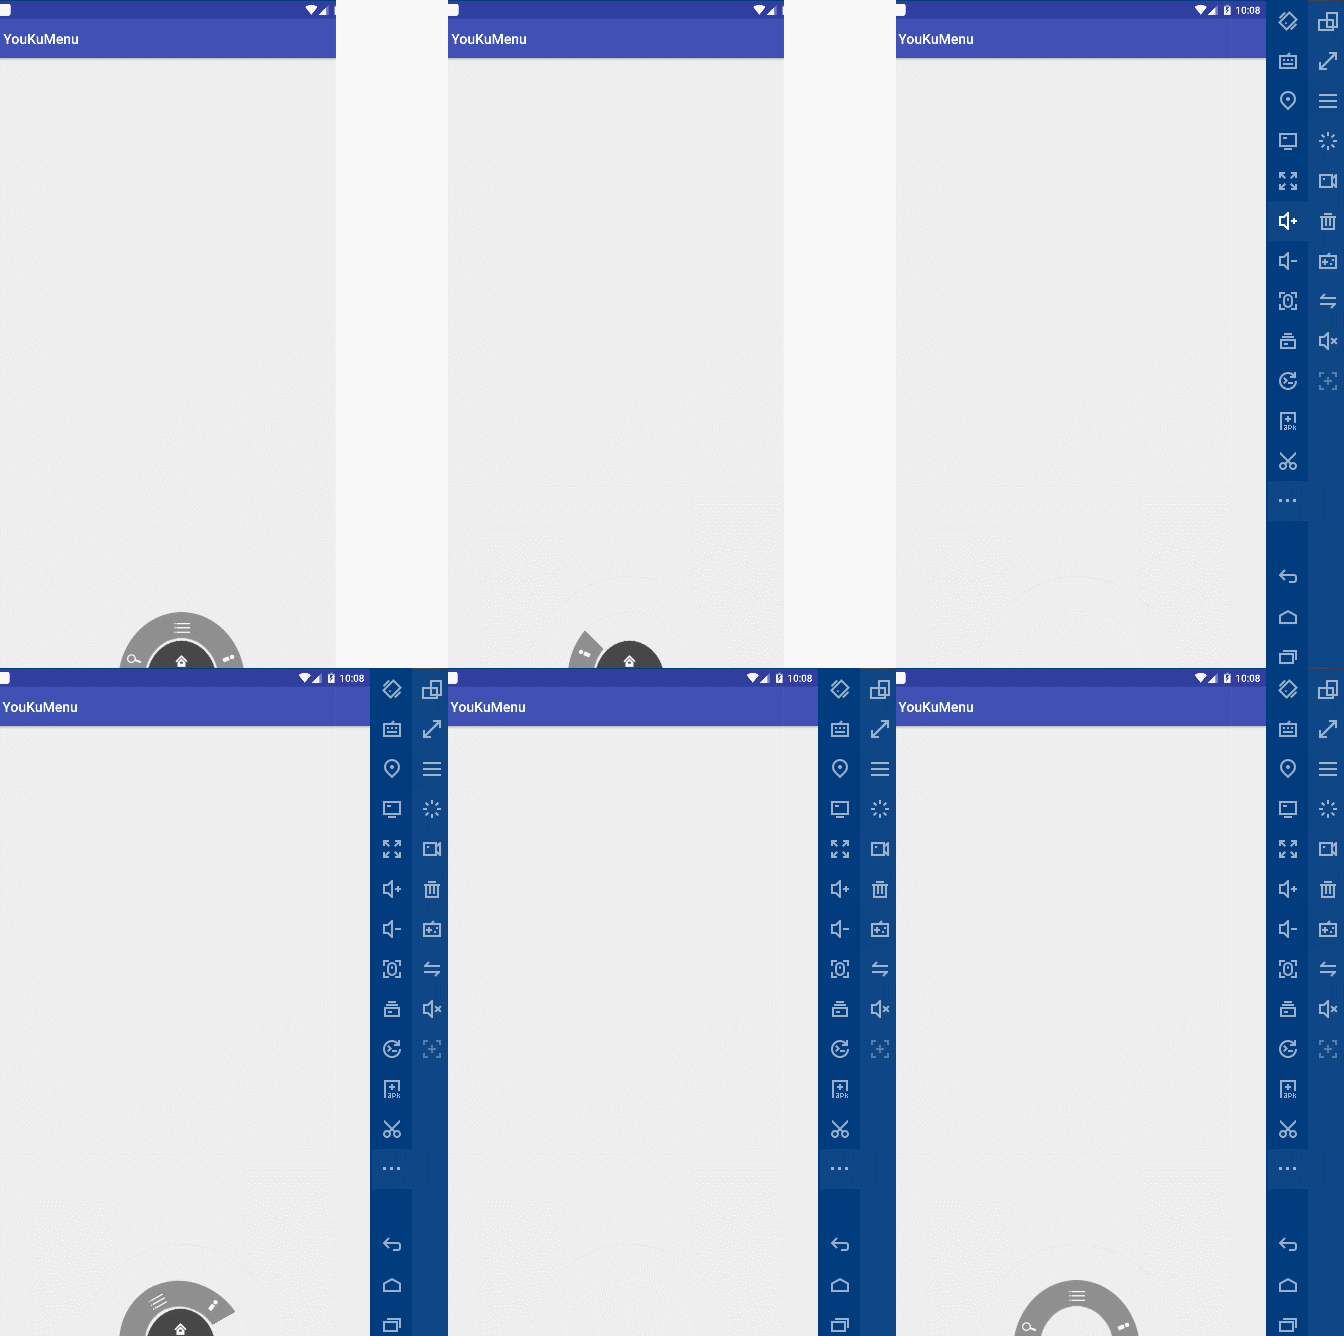
In this way, when I click on the menu key of the mobile phone again, the circle rotates away, but this creates a bug. I don't know if you have observed the above motion map. When I press the menu key to hide the circle, I click on the position of the circle again. The circle still rotates out. After our circle disappears, according to reason, it will not. Let's click it out. This involves the difference between ordinary animation and attribute animation. Of course, there are many solutions. I'll introduce two.
The first is to give each child a non-clickable setting.
Many people have the idea of adding view.setEnabled(false) to the hideView() method of the Tools class; and then view.setEnabled(true) to the showView() method; some people think that this will solve the bug. In fact, the person who thinks that this can solve the problem does not understand the difference between View and ViewGroup. View can not operate on children. In our method, we convert the layout passed to View, and some of its original attributes are lost. In fact, if the view parameter is set to be clickable, the relative layout can not be clicked, but its children can still be clicked. So what should we do? We change the View parameters of the four methods in the Tools class to ViewGroup, and then do a no-click operation on the children of ViewGroup. The specific code is as follows.
package com.itcast.youkumenu;

import android.view.View;
import android.view.ViewGroup;
import android.view.animation.RotateAnimation;
import android.widget.RelativeLayout;

/**
 * Display and hide specified controls
 */
class Tools {

    public static void hideView(ViewGroup view) {
        hideView(view,0);
    }

    public static void showView(ViewGroup view) {
        showView(view,0);
    }

    public static void hideView(ViewGroup view, int startOffset) {
        RotateAnimation ra = new RotateAnimation(0, 180, view.getWidth() / 2, view.getHeight());
        ra.setDuration(500);//Set animation playback duration
        ra.setFillAfter(true);//The animation stays in the state of finished play.
        ra.setStartOffset(startOffset);//Setting Animation Delay Time
        view.startAnimation(ra);

        for(int i = 0;i < view.getChildCount();i++){
            View childView = view.getChildAt(i);
            //Settings cannot be clicked
            childView.setEnabled(false);
        }
    }

    public static void showView(ViewGroup view, int startOffset) {
        RotateAnimation ra = new RotateAnimation(180, 360, view.getWidth() / 2, view.getHeight());
        ra.setDuration(500);//Set animation playback duration
        ra.setFillAfter(true);//The animation stays in the state of finished play.
        ra.setStartOffset(startOffset);
        view.startAnimation(ra);

        for(int i = 0;i < view.getChildCount();i++){
            View childView = view.getChildAt(i);
            //Settings cannot be clicked
            childView.setEnabled(true);
        }
    }
}
Then you run the project and click the menu button to hide the circle. No matter how you click, the circle will never come out again.
The second way, as mentioned earlier, we can solve the bug by animating the attributes.
The difference between attribute animation and ordinary animation is that ordinary animation only has visual effect, and the control will not change its position; attribute animation not only has animation effect, but also the control will change its position with the animation. Imagine using attribute animation to rotate, when the animation is finished, the layout rotates 180 degrees, at this time the control will rotate to the bottom of the screen, so that the user can not click on the control and thus can not trigger the click event.
Modify the tool class code.
package com.itcast.youkumenu;

import android.animation.ObjectAnimator;
import android.view.View;
import android.view.ViewGroup;
import android.view.animation.RotateAnimation;
import android.widget.RelativeLayout;

/**
 * Display and hide specified controls
 */
class Tools {

    public static void hideView(ViewGroup view) {
        hideView(view, 0);
    }

    public static void showView(ViewGroup view) {
        showView(view, 0);
    }

    public static void hideView(ViewGroup view, int startOffset) {
//        RotateAnimation ra = new RotateAnimation(0, 180, view.getWidth() / 2, view.getHeight());
//        ra.setDuration(500); //Set the duration of animation play
//        ra.setFillAfter(true); // Animation stays in the state of completion of playback
//        ra.setStartOffset(startOffset); //Set animation latency
//        view.startAnimation(ra);
//
//        for(int i = 0;i < view.getChildCount();i++){
//            View childView = view.getChildAt(i);
//            // Settings cannot be clicked
//            childView.setEnabled(false);
//        }

        //Change to Attribute Animation
        ObjectAnimator animator = ObjectAnimator.ofFloat(view, "rotation", 0, 180);
        animator.setDuration(500);
        animator.setStartDelay(startOffset);
        animator.start();
        view.setPivotX(view.getWidth() / 2);
        view.setPivotY(view.getHeight());
    }

    public static void showView(ViewGroup view, int startOffset) {
//        RotateAnimation ra = new RotateAnimation(180, 360, view.getWidth() / 2, view.getHeight());
//        ra.setDuration(500); //Set the duration of animation play
//        ra.setFillAfter(true); // Animation stays in the state of completion of playback
//        ra.setStartOffset(startOffset);
//        view.startAnimation(ra);
//
//        for (int i = 0; i < view.getChildCount(); i++) {
//            View childView = view.getChildAt(i);
//            // Settings cannot be clicked
//            childView.setEnabled(true);
//        }

        //Change to Attribute Animation
        ObjectAnimator animator = ObjectAnimator.ofFloat(view, "rotation", 180, 360);
        animator.setDuration(500);
        animator.setStartDelay(startOffset);
        animator.start();
        view.setPivotX(view.getWidth() / 2);
        view.setPivotY(view.getHeight());
    }
}
Running the project, the effect is the same as the original, but the bug has been solved, you can try it on your own, the principle I have already said. For animation, Android is divided into three parts, interpolation animation, frame animation, attribute animation, animation, I will also specifically explain in the future blog. So that's all for today.