In the last article, we said that we should write another important step back after dinner - model. If we think about it, we won't write it alone. Today, we are going to do the registration and login process of django, which involves model, let's talk about it together.
Thank you here. Liu Jiang's Blog Course I feel very thorough, ready to follow through, if completed smoothly, I will give some praise to the blog later. There is the use of bootstrap involved in it, and I'm going to go.
The first step is to create a new app:
python manage.py startapp login
Then change the time zone and everything:
# Internationalization
# https://docs.djangoproject.com/en/1.11/topics/i18n/

LANGUAGE_CODE = 'zh-hans'     # Here's a change.

TIME_ZONE = 'Asia/Shanghai'    # Here's a change.

USE_I18N = True

USE_L10N = True

USE_TZ = False    # It's revised here. It's probably a time stamp meaning, the difference between what local time and what time. Let's change it first.
Step 2: Write login's model! (Note that this is different from the steps I mentioned above. I'm also trying to find the most suitable steps for me. Don't get bogged down here. The order seems to have little impact on development.)
I've written the comments in the code, not the maps.
from django.db import models  #Automatically generated

# Create your models here.

class User(models.Model):
    gender = (
        ('male',"male"),
        ('female',"female"),
    )

    #Name: Must be filled in, up to 128 characters, and only, that is, can not have the same name;
    #unique = True is the only meaning
    name = models.CharField(max_length=128,unique=True)

    #password: Mandatory, up to 256 characters (which may not be required in practice);
    password = models.CharField(max_length=256)

    #email: Use Django built-in mailbox type, and unique;
    email = models.EmailField(unique=True)

    #sex: sex, using a choice, can only choose men or women, the default is men;
    sex = models.CharField(max_length=32,choices=gender,default="male")

    c_time = models.DateTimeField(auto_now_add= True)


    #The _str_ method is used to help human display object information.
    #Function: What you see in admin background before adding is an object, and what you see after adding is the value of a field.
    def __str__(self):
        return  self.name


    #In metadata, users are defined in reverse order of creation time, which is the most recent first display.
    class Meta:
        ordering = ["-c_time"]
        verbose_name = "user"
        verbose_name_plural = "user"
** Step 3: Write settings file, ** Here is the database settings section, the default is SQlite, in fact, I want to use mysql, and then explore it later.
Step 4: Register app s in settings
INSTALLED_APPS = [
    'django.contrib.admin',
    'django.contrib.auth',
    'django.contrib.contenttypes',
    'django.contrib.sessions',
    'django.contrib.messages',
    'django.contrib.staticfiles',
    'apps.news'
    'login'
]
Step 5: Let's create data migration records and User tables! ** Because when the models in app are established, they will not automatically generate the corresponding tables in the database, so you need to create them manually.
Input in terminal terminal:
python manage.py makemigrations
Information appears: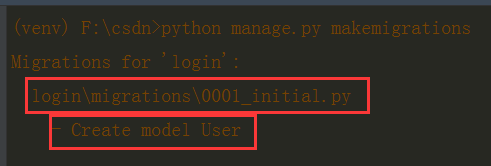
The above sentence means that Django automatically created the login migrations initial. py file for us, and saved our first data migration, which is to create the User model.
Then execute the following command:
python manage.py migrate
Django will create real data tables in the database. If this command is executed for the first time, some built-in frameworks, such as auth, session, and other data tables, will also be created together, as follows:
(venv) F:\csdn>python manage.py migrate
Operations to perform:
  Apply all migrations: admin, auth, contenttypes, login, sessions
Running migrations:
  Applying contenttypes.0001_initial... OK
  Applying auth.0001_initial... OK
  Applying admin.0001_initial... OK
  Applying admin.0002_logentry_remove_auto_add... OK
  Applying admin.0003_logentry_add_action_flag_choices... OK
  Applying contenttypes.0002_remove_content_type_name... OK
  Applying auth.0002_alter_permission_name_max_length... OK
  Applying auth.0003_alter_user_email_max_length... OK
  Applying auth.0004_alter_user_username_opts... OK
  Applying auth.0005_alter_user_last_login_null... OK
  Applying auth.0006_require_contenttypes_0002... OK
  Applying auth.0007_alter_validators_add_error_messages... OK
  Applying auth.0008_alter_user_username_max_length... OK
  Applying auth.0009_alter_user_last_name_max_length... OK
  Applying auth.0010_alter_group_name_max_length... OK
  Applying auth.0011_update_proxy_permissions... OK
  Applying login.0001_initial... OK
  Applying sessions.0001_initial... OK
OK data table has been established, how to look at the database I will not, and will come back to replenish Ang later.
Okay, now we need to add a few test users to do it. Where to add it? django gives you an off-the-shelf background, which is also an app, called international general admin, haha, first go to your settings file and see if there is a wooden pre-made for you, as well as session session session framework, which we will use later. :
# Application definition

INSTALLED_APPS = [
    'django.contrib.admin',     # Look here
    'django.contrib.auth',
    'django.contrib.contenttypes',
    'django.contrib.sessions',      # Look here
    'django.contrib.messages',
    'django.contrib.staticfiles',
    'login',
]
Then open login/admin.py, and the code reads as follows:
from django.contrib import admin #Default

# Register your models here.
from . import models #Additional

#One way to register medel class to admin: I don't understand
admin.site.register(models.User)
Then create a super administrator:
Django admin backstage has a complete and more secure user authentication and authorization mechanism, protection level is still acceptable.
To get into the background, we need to create a super administrator, which is not a concept with the User user we created earlier, and we should pay attention to the difference.
Also on the Pycharm terminal, execute the following commands:
python manage.py createsuperuser
Please set your own username, email and password, but don't forget it. Passwords should be strong and not too simple and common. There will be hints. I'm here to force them through.
The code is as follows:
(venv) F:\csdn>python manage.py createsuperuser
 User name (leave blank to use'administrator'): admin
 E-mail address: 12332323232@qq.com
Password:
Password (again):
The password is too similar to the e-mail address.
The password length is too short. The password must contain at least eight characters.
This password is too common.
Passwords contain only numbers.
Bypass password validation and create user anyway? [y/N]: y
Superuser created successfully.
Then let's look at the background of django. The browser opens http://127.0.0.1:8000/admin/address:
Can't you open the bedroom? Oh, I forgot to start the server. Click the green arrow: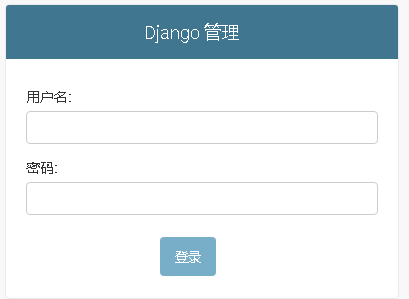
OK, log in: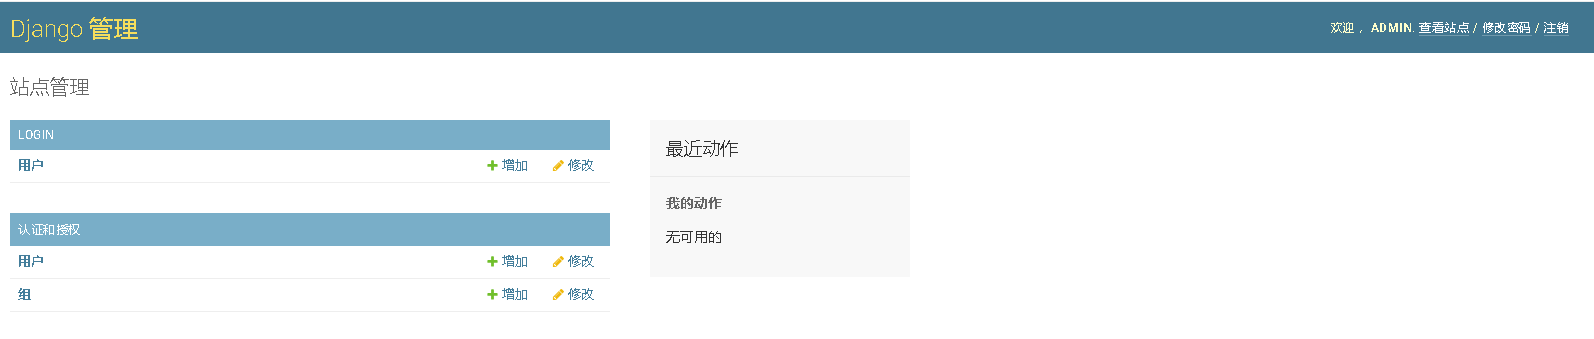
Wow, write so much code and see live pages the first time. Haha, look at the money back. Haha.
Note that the authentication and authorization at the bottom of the figure is admin application's own account management, and the LOGIN column above is the User model corresponding to the login application we created. That is to say, it must be empty for you to click login User to go in now, because there is no, and you can click authentication and authorization to go in, you can see the super administrator you just created. Don't believe it. Okay, let's go to login and create a few users.
(Brief)
Step 6: Write the routing in the urls.py file, which is the address rule of your login page.
Generally speaking, we write four, namely, home page, login, registration and cancellation. The strategies for specific visits are as follows:
1. Unregistered personnel, whether accessing index or login and logout, all jump to login interface
2. Login users will automatically jump to index page when accessing login
3. Registered personnel are not allowed to access the register page directly. They need to log out first.
4. After logout, jump to login interface automatically
OK, go to csdn/urls.py and write these routing codes:
from django.contrib import admin
from django.urls import path
from apps.news import views
from django.urls import path

from login import views#I must import it here, as I said before, though I forgot it just now.

urlpatterns = [
    path('admin/', admin.site.urls),
    path('index/', views.index),
    path('login/',views.login),
    path('register/',views.register),
    path('logout/',views.logout),
]
Step 7: Write business logic in the views.py file (which is not the same order as what I said yesterday)
from django.shortcuts import render # Self-contained

#redirect means accepting a URL parameter, meaning that the browser is allowed to jump to the specified URL.
#For example, def index(request):
    # Business logic code
    #return redirect("https://blog.csdn.net/miaoqinian")

from django.shortcuts import redirect
# Create your views here.

def index(request):
    pass
    return render(request,'login/index.html')

def login(request):
    pass
    return  render(request,'login/login,html')

def register(request):
    pass
    return render(request,'login/register,html')

def logout(request):
    pass
    return render(request,'login/logout.html')