Previous Content Summary:
- [Draw Platform Development (1) HTML+JS+CSS] Front-end implementation of lottery function
After the front end of the lottery function is built, the main goal of this chapter is to submit the results of the lottery to the background through a form.
Basic idea: Unlike the general background of form submission after accepting user input, what needs to be submitted to the background is the user's lottery results, which are not generated by user manual input but by JS operation.The data submitted by the form should be a value within the <input>tag, which requires converting the lottery results into a value that is passed into one of the <input>tags in the form.
Specifically, as shown in the figure above, create a <input>tag in the form to accept data with an empty value waiting for the value to be passed; print the lottery results to the console through console.log, then transfer the results from the console to a <div>tag, and finally transfer the lottery results from the <div>tag to the <input>tag.Within the value of, after triggering the submit event, submit the form to the background.
1. Create data containers and store data results
1. Create a data container
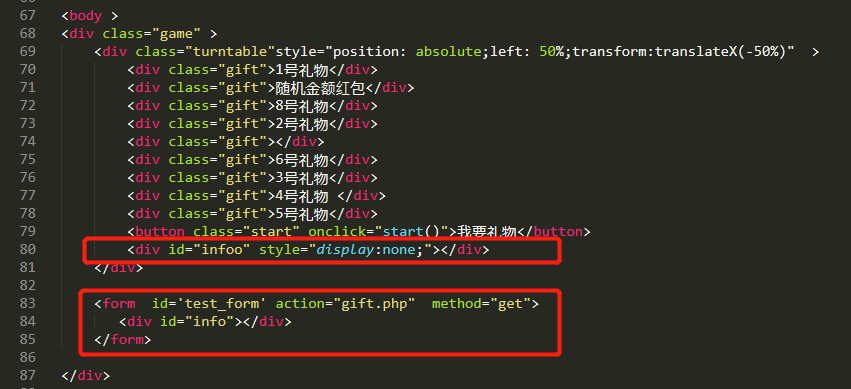
On the one hand, you need to create a <div>label (Id=infoo) that accepts the results of the console printing, and on the other hand, you need to create a <div>label (Id=info) inside the form to accept the data:
	<div id="infoo" style="display:none;"></div>

<form  id='test_form' action="gift.php"  method="get">
      <div id="info"></div>
</form>
2. Define how data is stored
<script>
var infooConsole = document.getElementById('infoo');
        if (infooConsole) {
        if (console) {
        	var _consolee = {
        		log:console.log
        	}
        	console.log = function(attr){
        		_consolee.log(attr);
        		var str = JSON.stringify(attr, null, 4);
        		var node = document.createElement("h1");
				var textnode = document.createTextNode(str);

				node.setAttribute("type","text");
        		node.appendChild(textnode);
        		infooConsole.appendChild(node);
        	}
        }
        function show(){
        	var type = infooConsole.getAttribute("type");
        	if (type === "0") {
        		infooConsole.style.cssText  = "width:100vw;height:40vh;";
        		infooConsole.setAttribute("type","1");
        	}else{
        		infooConsole.removeAttribute('style');
        		infooConsole.setAttribute("type","0");
        	}
        }
        }


var infoConsole = document.getElementById('info');
        if (infoConsole) {
        if (console) {
        	var _console = {
        		log:console.log
        	}
        	console.log = function(attr){
        		_console.log(attr);
        		var str = JSON.stringify(attr, null, 4);
        		var node = document.createElement("input");
				var textnode = document.createTextNode(str);

        		node.setAttribute("name","results");
                node.setAttribute("Id","results");
				node.setAttribute("type","hidden");
              	node.setAttribute("value",null);
        		node.appendChild(textnode);
        		infoConsole.appendChild(node);
        	}
        }
        function show(){
        	var type = infoConsole.getAttribute("type");
        	if (type === "0") {
        		infoConsole.style.cssText  = "width:100vw;height:40vh;";
        		infoConsole.setAttribute("type","1");
        	}else{
        		infoConsole.removeAttribute('style');
        		infoConsole.setAttribute("type","0");
        	}
        }
        }
</script>
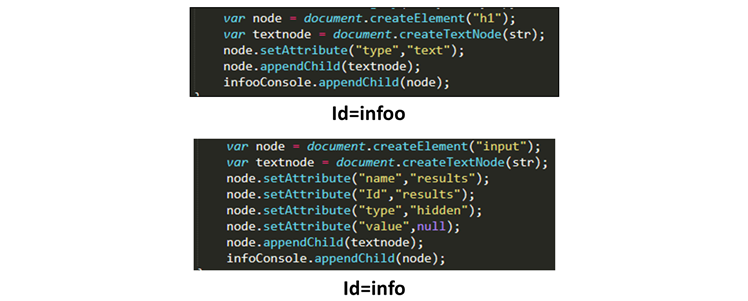
When the <div>label (Id=infoo) receives the console transfer result, a <h1>sublabel is automatically created to store the result; when the <div>label (Id=info) in the form that receives the data receives the console transfer result, an <input>with an initial attribute (name=results, Id=results, type=hidden, value=null) is generated.Label.
The name attribute is used to locate the tag for the last submitted form, upload the tag content to the back end, and the Id attribute is used to locate the <input>tag as its unique identifier and assign a value to it.
2. Assign a value to the <input>tag in the form
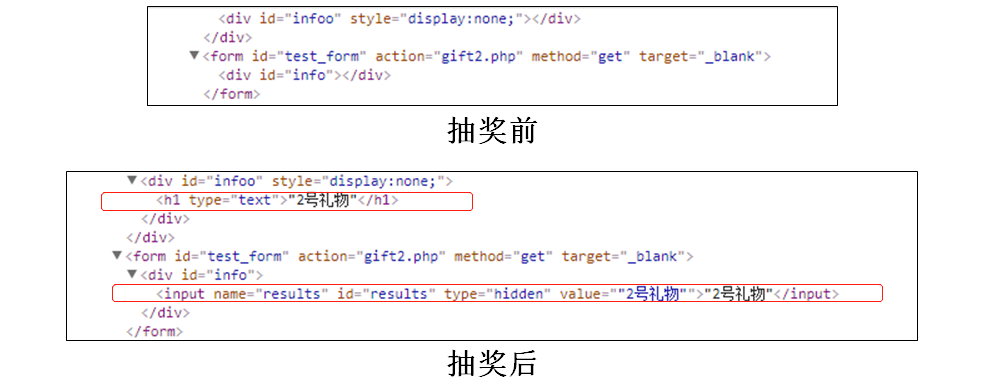
We need to transfer the <div>tag (Id=infoo) automatically created to store the results after receiving the console transfer results to the <h1>subtag content of the <div>tag (Id=info) in the form for receiving data (the initial property is value=null) in the <input>tag value property to submit as form content.
<script>

function tijiao(){
	var obox = document.getElementById("infoo");
	aa = obox.firstElementChild.innerHTML;
    var input = document.getElementById("results");
	input.value=aa;

	}
</script>
It is worth mentioning that here I only chose the first sublabel value under the <div>label (Id=infoo) to transfer it. The purpose is to prevent the database from being written in large quantities by malicious lottery results. Of course, we can not restrict the value to be passed in the first sublabel, so I referred to the <div>label (Id=info) when creating it.The div>tag (Id=infoo) generates its subtags in the same way as the subtag for subsequent modifications, but it is important to note that the native JS will also be captured when subtags are captured, so you can try to implement the requirements using jQuery.

3. Submitting Forms
The form needs to be generated before it can be submitted, so the steps for submitting the form can be placed in the start() function, specifically by locating the Id:test_form of the form through var form and submitting the form content using form.submit():
<script>

	function start(){
		var initial=getArrayItems(ArrList,1);
		var forms = document.getElementById('info');
		var form = document.getElementById('test_form');
		for (var i = 0; i < initial; i++) {
			setTimeout(()=>{
				$('.gift').removeClass("selected");
				gift=$('.gift:eq('+ position[(x%8)] +')');
				gift.addClass('selected');
				x++;
				if (x==initial) {setTimeout(()=>{
					if (position[(x%8)]==5) {
						randmoney();
					}else{
						alert('Congratulations on your gift:'+gift.text());
					}
					console.log(gift.text());
					tijiao();
					form.submit();
					forms.submit();
					x=0;
				},300)}
			},i*150);
		}
	}
</script>
You can see that after clicking the draw button, the start() function starts to execute, and the result is notified by a pop-up window (alert('Congratulations on Gifts:'+gift.text())), and then printed to the console (console.log(gift.text()), where the result is transferred to the <div>label (Id=infoo)).The <h1>sublabel and the <input>label under the <div>label (Id=info) used to accept data in the form are then executed with the tijiao() function to transfer the <h1>sublabel storage results to the value attribute in the <input>label, and finally form.submit() is executed to submit the form.
Note: Here I have defined a form to locate a non-form label and attempt to submit this form in the end. Obviously, this will result in an error as shown in the following figure. The purpose of this step is to block the second execution of the start() function in order to prevent the user from clicking the lottery button many times in a short period of time to transfer large amounts of data to the back end.Load.If necessary, you can choose to delete.

4. Backend PHP Receive Data
- Front-end submits data to back-end gift.php through a form
It is important to note that if the form has target="_blank", it will not submit data to the back end properly because it pops up a new page after executing the start() function and is not a real-time click by the user, and will be blocked as a malicious pop-up window by the browser.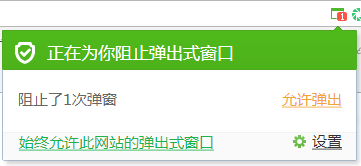
<form  id='test_form' action="gift.php"  method="get">
      //content
</form>
- Backend gift.php receives data submitted by the front end
The back end gets the value of the label named results in the form, which is the value of the <div>label (Id=info) used to accept data in the form and the <input>label (the initial property has been set to name=results), which is the lottery result.
<html>
<body>
Gift lists: <?php echo $_GET["results"]. "<br>"; ?>
</body>
</html>
-
Online test:
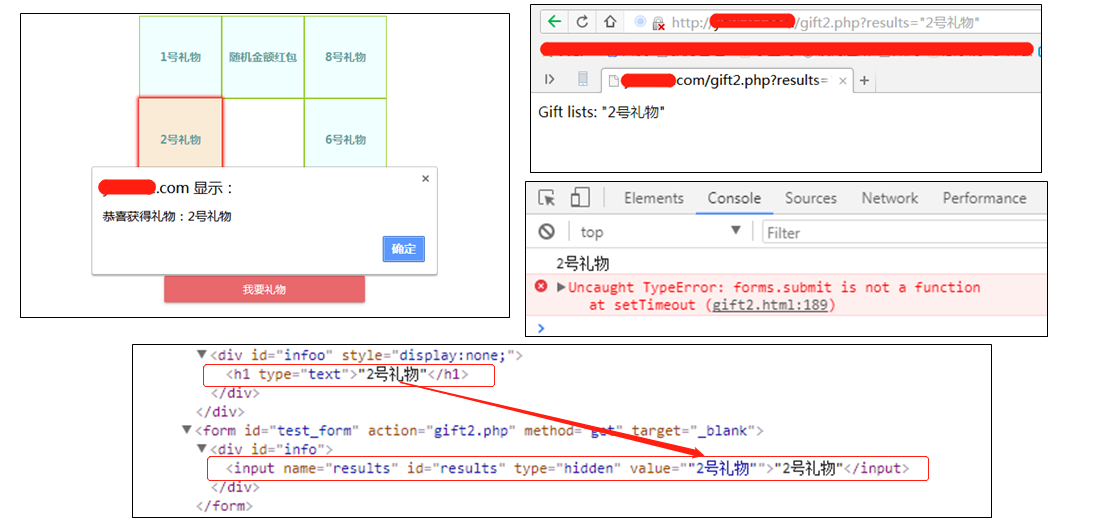
So far, we have successfully submitted the results of the lottery to the back-end through a form (the source code has been uploaded), the next chapter will record how to upload the form submitted by the results of the lottery to the database, complete the development of the lottery platform.
Later Content Summary:
- [Drawing Platform Development (3) PHP+MySQL] Upload the form submitted by the results of the drawing to the database
If you have any questions or good suggestions, look forward to your comments and comments!