When writing a registration, I want to use the mobile phone number to verify, to ensure the user's safe operation, because the previous use of email verification is too troublesome. So we found a better third party on the Internet to provide short message service.
Try it, the speed is good, basically three seconds or so can receive short messages. This is the website. https://www.163yun.com/product/sms Just click on the free trial.
Let's start with the steps of the whole module:
- The front-end starts to get the verification code and starts counting down at the same time.
- Background sends authentication code information through proxy platform
- After the user submits the form, verify the authentication code in the background
The entire document structure of the project is as follows: you can download the project file in the final link of the article:
The realization of specific functions is described in detail below.
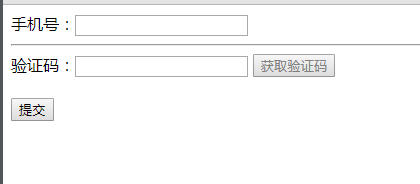
Front page
First of all, the example in this paper is implemented by spring mvc, so we should set up the basic configuration first, and then write the front-end interface. As shown in the following figure (the interface is a bit simple, it will focus on implementation)
The code is as follows:
<%@ page contentType="text/html;charset=UTF-8"%>
<html>
<head>
<script src="http://code.jquery.com/jquery-1.9.1.min.js"></script>
<script src="../static/js/register.js"></script>
</head>
<body>
<div>
   <form action="validation" method="post">
     <div align="left">
         Cell-phone number:<input id="phone" name="phone" class="phone" type="number">
            <br><hr>
           Verification Code:<input  id="verification" name="verification" type="number">

           <input type="button" value="Get the authentication code" name="yzm" class="yzm" disabled="disabled">
           <br><br>
           <input type="submit" id="submit" value="Submission">
     </div>
   </form>
 </div>
</body>
</html>
And our js code, jQuery used here, so jsp page header to introduce jQuery. js has written a comment, if you don't understand it, you can search it
$(document).ready(function(){
     var ordertime=20   //Set the waiting time for sending validation code again
        var timeleft=ordertime
        var btn=$(".yzm")
        var phone=$(".phone")
        var tel
        var reg = /^1[0-9]{10}$/;  //Regular Matching of Telephone Numbers
        phone.keyup(function() {
                if (reg.test(phone.val())) {
                    tel = phone.val()
                    btn.removeAttr("disabled") //When the number conforms to the rule, send the validation number button to click
                } else {
                    btn.attr("disabled", true)
                }
            })

            //Timing Function
            function timeCount() {
                timeleft -= 1
                if (timeleft > 0) {
                    btn.val(timeleft + " Repeat in seconds");
                    setTimeout(timeCount, 1000)
                } else {
                    btn.val("Resend");
                    timeleft = ordertime //Reset waiting time
                    btn.removeAttr("disabled");
                }
            }

            //Event Handler
            btn.on("click", function() {
                $(this).attr("disabled", true); //Prevent multiple clicks
                timeCount(this);

                var paras = "o_tel="+tel;
                //Here is the request to the background to get the authentication code
                $.post('http://localhost:8080/Phone_verification/login/sendCode?'+paras,function(data) {
                    if(data!=null&&typeof(data)!="undefined"){
                        var msg = data.msg;  //The return value is in json format
                        if(msg!=null&&typeof(msg)!="undefined"&&msg=="SUCCESS"){

                        }else{
                            alert("Short Message Verification Code failed to send! Please retrieve it.");
                        }
                    }else{
                        alert("Short Message Verification Code failed to send! Please retrieve it.");
                    }
                },"json");
            });
    });
II. Backstage Processing
After receiving the request from js, the background calls the corresponding controller and sendCode method. The method realizes the mobile phone number in the front-end data. Then it sends HTTP requests to the platform and accesses the short message interface by calling the code in the example of Netease cloud.
There are four important parameters that need to be modified according to the information in Netease's cloud console.
- appkey: appkey allocated by Developer Platform
- Nonce: I've generated random numbers through controller s.
- CurTime: The current UTC timestamp, from 0:0:0 on January 1, 1970 to the current number of seconds (String)
- CheckSum:SHA1(AppSecret + Nonce + CurTime), a string spliced by three parameters, is hashed by SHA1 and converted into 16-digit characters (String, lowercase)
Among them, Appkey, Appsecret acquisition step:
- Become a developer of Yunxin
- Login Yunxin Management Background( http://app.netease.im/login)
- Create applications
- Open App Key Management
The following is the specific code for the sendCode() method:
@RequestMapping(value="/sendCode",method={RequestMethod.POST,RequestMethod.GET})
    public String sendCode(HttpServletRequest request,HttpServletResponse response) throws Exception{

        String ret="";
        String o_tel = request.getParameter("o_tel");//Get the phone number from the front end

        if(o_tel!=null&&o_tel!=""){
            int Random  = (int) ((Math.random()*9+1)*100000);//Random Generation of 6-digit (Verification Code)

            //Call the encapsulated tool class SendCode to return the validation code
            SendCode s = new SendCode();
            verification = s.send(o_tel, Random);
            if(verification != null){
                ret = "{\"msg\":\"SUCCESS\"}";
            }else{
                ret = "{\"msg\":\"ERROR\"}";
            }
        }else{
            ret = "{\"msg\":\"ERROR\"}";
        }
        response.setContentType("application/json;charset=UTF-8");
        PrintWriter writer = null;
        try {
            writer = response.getWriter();
        } catch (IOException e) {
            e.printStackTrace();
        }
        writer.write(ret);//Push back to the front end
        return null;
    }
The SendCode class is called getCheckSum(), and I use the java code that calculates CheckSum directly in the Netease cloud instance document.
package tool;

import java.util.ArrayList;
import java.util.Date;
import java.util.List;

import org.apache.http.HttpEntity;
import org.apache.http.HttpResponse;
import org.apache.http.NameValuePair;
import org.apache.http.client.entity.UrlEncodedFormEntity;
import org.apache.http.client.methods.HttpPost;
import org.apache.http.impl.client.DefaultHttpClient;
import org.apache.http.message.BasicNameValuePair;
import org.apache.http.util.EntityUtils;

/**
 * Send Verification Code
 * @author liuxuanlin
 *
 */
public class SendCode {
    //Request path URL for sending authentication code
    private static final String
            SERVER_URL="https://api.netease.im/sms/sendcode.action";
    //The account assigned by Netease Yunxin, please replace the Appkey you applied for under the management background application.
    private static final String
            APP_KEY="**********************";
    //The key assigned by Netease Yunxin, please replace the appSecret you applied for under the management background application.
    private static final String APP_SECRET="**********";
    //Short Message Template ID
    private static final String TEMPLATEID="******";
    //Verification code length, range 4-10, default 4
    private static final String CODELEN="6";

    public String send(String MOBILE,int Random) throws Exception {

        DefaultHttpClient httpClient = new DefaultHttpClient();
        HttpPost httpPost = new HttpPost(SERVER_URL);
        String curTime = String.valueOf((new Date()).getTime() / 1000L);
        /*
         * Refer to the java code for computing CheckSum. In the parameter list of the above documents, there are examples of CheckSum's computing documents.
         */
        String NONCE = String.valueOf(Random);

        String checkSum = CheckSumBuilder.getCheckSum(APP_SECRET, NONCE, curTime);

        // Setting the header of the request
        httpPost.addHeader("AppKey", APP_KEY);
        httpPost.addHeader("Nonce", NONCE);
        httpPost.addHeader("CurTime", curTime);
        httpPost.addHeader("CheckSum", checkSum);
        httpPost.addHeader("Content-Type", "application/x-www-form-urlencoded;charset=utf-8");

        // Set the request parameters, requestBody parameters
        List<NameValuePair> nvps = new ArrayList<NameValuePair>();

        nvps.add(new BasicNameValuePair("templateid", TEMPLATEID));
        nvps.add(new BasicNameValuePair("mobile", MOBILE));
        nvps.add(new BasicNameValuePair("codeLen", CODELEN));

        httpPost.setEntity(new UrlEncodedFormEntity(nvps, "utf-8"));

        // Execution of requests
        HttpResponse response = httpClient.execute(httpPost);
        /*
         * 1.Print execution results, typing results will generally be 200, 315, 403, 404, 413, 414, 500
         * 2.Specific code problems can be referred to the Code status table of the official website.
         */
        String result = EntityUtils.toString(response.getEntity(), "utf-8");

        String verification =  result.split("\"")[9];

        System.out.println("Verification code sent successfully!");

        return verification;

    }
}
This is the controller that jumps to the home page:
@RequestMapping(value="/index")
    public String send(){
        return "index";
    }
Finally, validate the validation code in the form submitted. Here I talk about how the data in the form is encapsulated in a POJO, and then compare the validation code registration success.
@RequestMapping(value="/validation")
    //Put the data in the form form of the front-end interface into the Phone class
    //Use @RequestParam to get parameters that are not in POJO.
    public String login(@ModelAttribute("form") Phone phone){
        /*
         * Validation data
        System.out.println("The verification code is: "+verification";
        System.out.println(phone.getPhone()+"------"+phone.getVerification());
        */
        //Judging the validation code and jumping to the corresponding interface
        if(phone.getVerification().equals(verification)){
            return "success";
        }
        else{
            return "failure";
        }
    }
Above is the implementation of specific verification of mobile phone sending SMS when registering. The core content has already been described above. The code is a bit rough. You can modify it again. The configuration errors can be compared with the project files uploaded to CSDN. If there are any shortcomings in the article, we hope to point out and correct them.
Download address: http://download.csdn.net/detail/leoe_/9895443