In the development of business system, the query, paging and sorting of table records are very common. In the development of Web, many powerful plug-ins can be used to meet the requirements and greatly improve the development efficiency. This article introduces bootstrap-table as a very famous open source form plug-in, which is widely used in many projects. Bootstrap-table plug-in provides a very rich set of attributes, can achieve query, paging, sorting, check box, set display column, Card view view, master-slave table display, merge column, internationalization processing and other processing functions, and the plug-in also provides some good extension functions, such as mobile row, mobile column location and other special functions, plug-in can use the base. data - * attribute identification settings in HTML5 can also be set in Javascript mode, which is very convenient. This article briefly introduces the application of bootstrap-table plug-in in my actual project, and summarizes the experience of problem-solving encountered in the use of bootstrap-table plug-in.
1. Introduction to Bootstrap-table Resources and Their Use
The source address of Bootstrap-table on GitHub is: https://github.com/wenzhixin/bootstrap-table
Document address of Bootstrap-table: http://bootstrap-table.wenzhixin.net.cn/
Various examples of Bootstrap-table: https://github.com/wenzhixin/bootstrap-table-examples
Bootstrap-Table displays data to tables in two ways: client mode and server mode.
The so-called client mode refers to loading the data to be displayed in the form at one time in the server and then transferring it into JSON format to the interface to be displayed. The client mode is relatively simple. It loads the data at one time into the interface, and then automatically generates pages according to the number of records per page you set. When you click on the second page, the data will be automatically loaded and no more requests will be sent to the server. At the same time, users can use their own search function to achieve full data search. This method can be used when the amount of data is small.
The so-called server mode refers to sending data to the server for query according to the number of records per page and the current page number to be displayed, and then displaying it in the table. This method can load data dynamically according to user's needs and save server's resources, but it can't use its own full data search function.
Bootstrap-table is a plug-in based on Boostrap, so when using it, you need to introduce Bootstrap scripts and styles.
If we do not introduce related files in our project, we need to introduce these style and script files, as shown below.
<link rel="stylesheet" href="bootstrap.min.css">
<script src="jquery.min.js"></script>
<script src="bootstrap.min.js"></script>
However, there must be some of the above when we develop the project, so we still put the center on the import files needed to use the plug-in.
Introduction of CSS Files
<link rel="stylesheet" href="bootstrap-table.css">
Introduction of script files
<script src="bootstrap-table.js"></script>
<--Sinicized documents, put in bootstrap-table.js behind-->
<script src="bootstrap-table-zh-CN.js"></script>
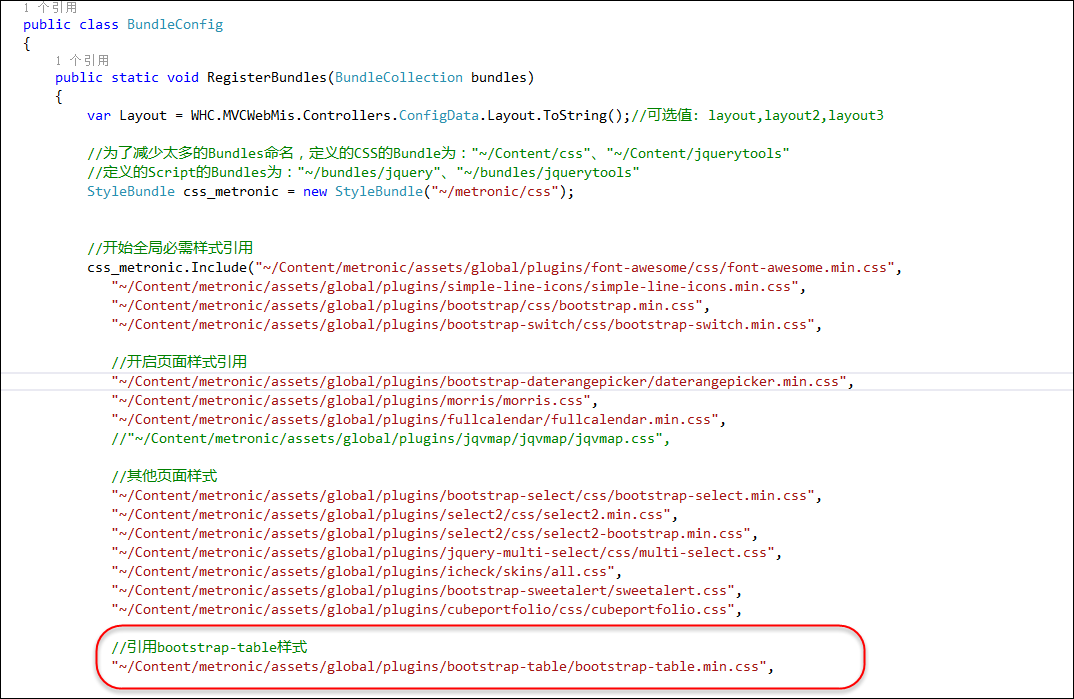
Generally speaking, if we develop a system based on MVC, the code of CSS and JS is initialized in BundleConfig.cs, as follows
The use of bootstrap-table in pages can be divided into two types: one is simply written in HTML5, specifying various attribute settings by data - * and the other is flexible settings by HTML+JS.
If we initialize HTML code with HTML5 identifiers, then the following code is available.
<table data-toggle="table" data-url="data1.json">
    <thead>
        <tr>
            <th data-field="id">Item ID</th>
            <th data-field="name">Item Name</th>
            <th data-field="price">Item Price</th>
        </tr>
    </thead>
</table>
If we use JS code to initialize the form plug-in, we only need to declare a table object on HTML, as follows.
<table id="table"></table>
Then the simple JS code initialization is as follows
$('#table').bootstrapTable({
    url: 'data1.json',
    columns: [{
        field: 'id',
        title: 'Item ID'
    }, {
        field: 'name',
        title: 'Item Name'
    }, {
        field: 'price',
        title: 'Item Price'
    }, ]
});
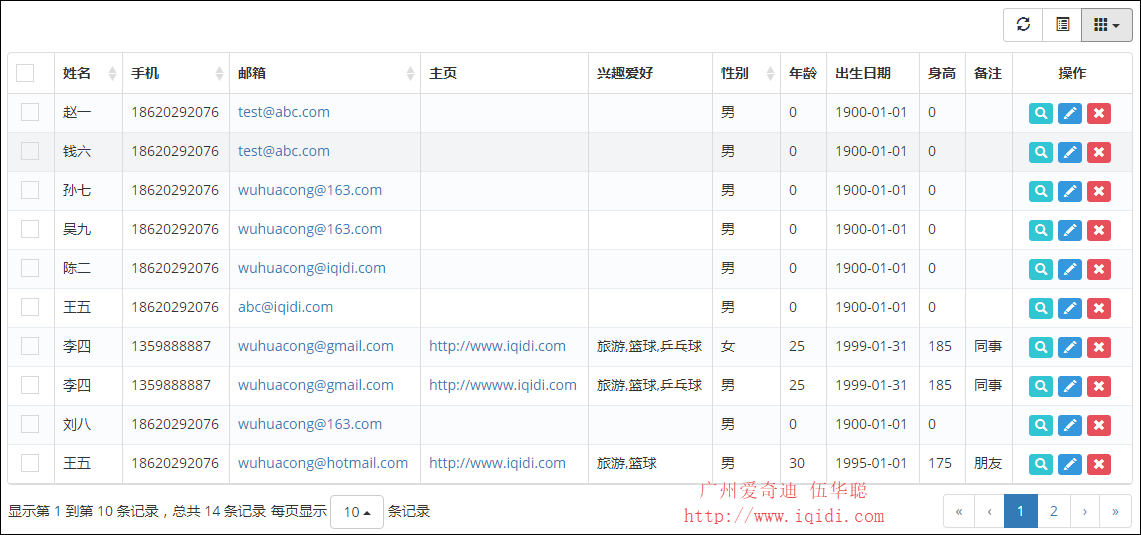
In fact, the JS configuration function of bootstrap-table is much more complicated than that. The following interface effect is the data display of the actual table.
2. Detailed use of bootstrap-table
1) Overall JS property configuration
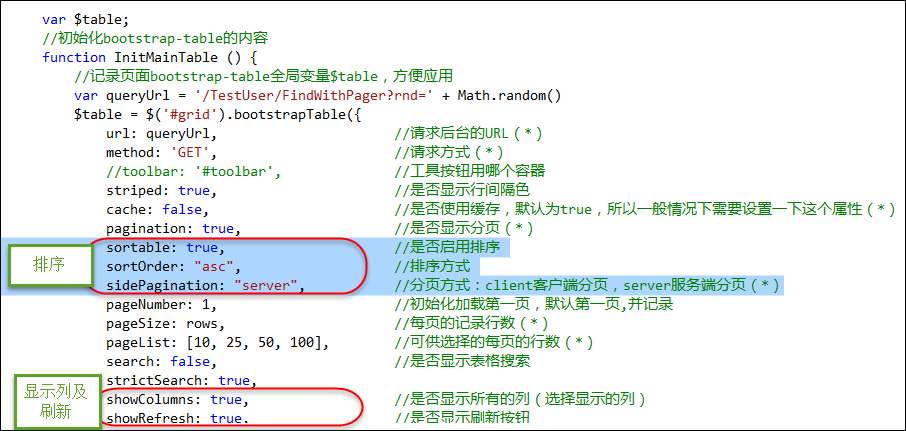
In the figure above, we initialized the table content in JS mode, and the JS code is as follows
        var $table;
        //Initialization bootstrap-table Contents
        function InitMainTable () {
            //Record page bootstrap-table global variable $table,Convenient application
            var queryUrl = '/TestUser/FindWithPager?rnd=' + Math.random()
            $table = $('#grid').bootstrapTable({
                url: queryUrl,                      //Backstage URL(*)
                method: 'GET',                      //Request mode(*)
                //toolbar: '#Which container does toolbar', // Tool Button use?
                striped: true,                      //Whether to display row spacing color
                cache: false,                       //Whether to use caching, default is true,So in general, you need to set this property.(*)
                pagination: true,                   //Whether Paging is Displayed(*)
                sortable: true,                     //Whether or not to enable sorting
                sortOrder: "asc",                   //sort order
                sidePagination: "server",           //Paging method: client Client Paging, server Server Paging(*)
                pageNumber: 1,                      //Initialize loading page 1, default page 1,And record
                pageSize: rows,                     //Number of rows per page(*)
                pageList: [10, 25, 50, 100],        //Number of rows per page available(*)
                search: false,                      //Whether to display table search
                strictSearch: true,
                showColumns: true,                  //Whether to display all columns (select columns to display)
                showRefresh: true,                  //Whether to display refresh button
                minimumCountColumns: 2,             //Minimum permissible number of columns
                clickToSelect: true,                //Whether to enable click-select rows
                //height: 500,                      //Line height. If the height attribute is not set, the table automatically feels the height of the table according to the number of records.
                uniqueId: "ID",                     //The unique identifier for each row, usually the primary key column
                showToggle: true,                   //Whether to display the toggle button for detail view and list view
                cardView: false,                    //Whether to display detailed view or not
                detailView: false,                  //Whether to display parent-child table
                //Get the parameters of the query
                queryParams : function (params) {
                    //The key name here and the variable name of the controller have to be changed all the time. This way, the controller has to be changed as well.
                    var temp = {
                        rows: params.limit,                         //Page size
                        page: (params.offset / params.limit) + 1,   //Page number
                        sort: params.sort,      //Sort column names
                        sortOrder: params.order //Ranking command( desc,asc)
                    };
                    return temp;
                },
                columns: [{
                    checkbox: true,
                    visible: true                  //Whether to display check boxes
                }, {
                    field: 'Name',
                    title: 'Full name',
                    sortable: true
                }, {
                    field: 'Mobile',
                    title: 'Mobile phone',
                    sortable: true
                }, {
                    field: 'Email',
                    title: 'mailbox',
                    sortable: true,
                    formatter: emailFormatter
                }, {
                    field: 'Homepage',
                    title: 'homepage',
                    formatter: linkFormatter
                }, {
                    field: 'Hobby',
                    title: 'Hobby'
                }, {
                    field: 'Gender',
                    title: 'Gender',
                    sortable: true
                }, {
                    field: 'Age',
                    title: 'Age'
                }, {
                    field: 'BirthDate',
                    title: 'Date of birth',
                    formatter: dateFormatter
                }, {
                    field: 'Height',
                    title: 'height'
                }, {
                    field: 'Note',
                    title: 'Remarks'
                }, {
                    field:'ID',
                    title: 'operation',
                    width: 120,
                    align: 'center',
                    valign: 'middle',
                    formatter: actionFormatter
                }, ],
                onLoadSuccess: function () {
                },
                onLoadError: function () {
                    showTips("Data loading failed!");
                },
                onDblClickRow: function (row, $element) {
                    var id = row.ID;
                    EditViewById(id, 'view');
                },
            });
        };
The configuration attributes of the above JS code are basically annotated and easy to understand.
2) Query and Paging
The tabular data pagination here adopts the way of server pagination, returns the data records from the server according to the search conditions, and uses the sorting method. The queryParams parameter here is the parameter submitted to the server side.
                //Get the parameters of the query
                queryParams : function (params) {
                    //The key name here and the variable name of the controller have to be changed all the time. This way, the controller has to be changed as well.
                    var temp = {
                        rows: params.limit,                         //Page size
                        page: (params.offset / params.limit) + 1,   //Page number
                        sort: params.sort,      //Sort column names
                        sortOrder: params.order //Ranking command( desc,asc)
                    };
                    return temp;
                },
In addition, we see that the URL address interface of the returned data is FindWithPager. Let's see how the MVC controller method handles the returned data.
        /// <summary>
        /// Query database according to condition,And returns a collection of objects(Paging data display)
        /// </summary>
        /// <returns>Collection of specified objects</returns>
        public override ActionResult FindWithPager()
        {
            //Check whether the user has permission or not, otherwise throw MyDenyAccessException abnormal
            base.CheckAuthorized(AuthorizeKey.ListKey);

            string where = GetPagerCondition();
            PagerInfo pagerInfo = GetPagerInfo();
            var sort = GetSortOrder();

            List<TestUserInfo> list = null;
            if (sort != null && !string.IsNullOrEmpty(sort.SortName))
            {
                list = baseBLL.FindWithPager(where, pagerInfo, sort.SortName, sort.IsDesc);
            }
            else
            {
                list = baseBLL.FindWithPager(where, pagerInfo);
            }

            //Json Format requirements{total:22,rows:{}}
            //Tectonic formation Json Format transfer
            var result = new { total = pagerInfo.RecordCount, rows = list };
            return ToJsonContent(result);
        }
The above code handles two parts of object information, one is paging entity class information, the other is sorting information, and then gets records according to these conditions, returning similar information.
{total:22,rows:{}}
JSON data record in format.
            var result = new { total = pagerInfo.RecordCount, rows = list };
            return ToJsonContent(result);
Get the paging parameter information as follows
        /// <summary>
        /// according to Request Parameter acquisition of paging object data
        /// </summary>
        /// <returns></returns>
        protected virtual PagerInfo GetPagerInfo()
        {
            int pageIndex = Request["page"] == null ? 1 : int.Parse(Request["page"]);
            int pageSize = Request["rows"] == null ? 10 : int.Parse(Request["rows"]);

            PagerInfo pagerInfo = new PagerInfo();
            pagerInfo.CurrenetPageIndex = pageIndex;
            pagerInfo.PageSize = pageSize;

            return pagerInfo;
        }
The code for obtaining sorting parameter information is as follows
        /// <summary>
        /// Get sorting information
        /// </summary>
        /// <returns></returns>
        protected SortInfo GetSortOrder()
        {
            var name = Request["sort"];
            var order = Request["sortOrder"];
            return new SortInfo(name, order);
        }
Finally, the data recording under specific conditions, specific page numbers and specific sorting conditions can be realized. This part can implement logic according to its own requirements. Here, only a encapsulated processing call can be given.
baseBLL.FindWithPager(where, pagerInfo, sort.SortName, sort.IsDesc);
In fact, the display of our list generally needs to use different conditions for data query. Although this Bootstrap-table control provides a default query button, it is generally used in the case of client paging, and it is slightly simple. We usually use our own query conditions to process, as shown in the following interface.

Or

So you need to adjust the query condition parameter queryParams for the js attribute above.
                //Get the parameters of the query
                queryParams : function (params) {
                    //The key name here and the variable name of the controller have to be changed all the time. This way, the controller has to be changed as well.
                    var temp = {
                        rows: params.limit,                         //Page size
                        page: (params.offset / params.limit) + 1,   //Page number
                        sort: params.sort,      //Sort column names
                        sortOrder: params.order //Ranking command( desc,asc)
                    };
                    return temp;
                },
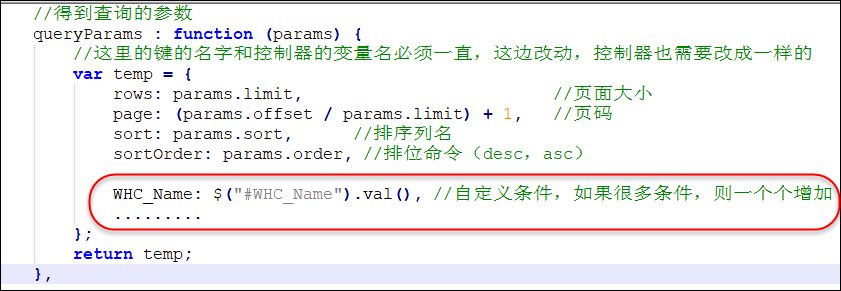
For custom query conditions, we can add parameters in the following general way, as shown below
But the parameters of query conditions are not easy to set one by one. We want to deal with them in a faster way. Then we need to make a special modification to this method. First, we add an extension function to deal with the conditions of the form (refer to the introduction of blog http://www.cnblogs.com/zcsj/p/6635677.html).
        //Custom Function Processing queryParams Batch increase
        $.fn.serializeJsonObject = function () {
            var json = {};
            var form = this.serializeArray();
            $.each(form, function () {
                if (json[this.name]) {
                    if (!json[this.name].push) {
                        json[this.name] = [json[this.name]];
                    }
                    json[this.name].push();
                } else {
                    json[this.name] = this.value || '';
                }
            });
            return json;
        }
Then we can batch the query conditions of the form.
                queryParams : function (params) {
                    //The key name here and the variable name of the controller have to be changed all the time. This way, the controller has to be changed as well.
                    var temp = $("#ffSearch").serializeJsonObject();
                    temp["rows"] = params.limit;                        //Page size
                    temp["page"] = (params.offset / params.limit) + 1;  //Page number
                    temp["sort"] = params.sort;                         //Sort column names
                    temp["sortOrder"] = params.order;                   //Ranking command( desc,asc)

                    //Conditional Processing of Special Format
                    temp["WHC_Age"] = $("#WHC_Age").val() + "~" + $("#WHC_Age2").val();
                    temp["WHC_BirthDate"] = $("#WHC_BirthDate").val() + "~" + $("#WHC_BirthDate2").val();

                    return temp;
                },
Then the back end can process the query parameters according to the logic.
3) Format output functions and others
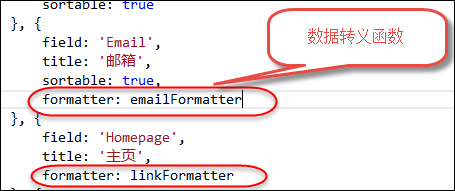
For the configuration information of the JS above, let's review it again. For example, for data escape functions, you can format the output content, as shown in the following interface code.
The formatted data escape function is as follows. It is mainly a JS function that formats the output according to the content. It seems that it needs to be placed in a file.
        //Connection field formatting
        function linkFormatter(value, row, index) {
            return "<a href='" + value + "' title='Click Open Connection' target='_blank'>" + value + "</a>";
        }
        //Email field formatting
        function emailFormatter(value, row, index) {
            return "<a href='mailto:" + value + "' title='Click Open Connection'>" + value + "</a>";
        }
        //Gender field formatting
        function sexFormatter(value) {
            if (value == "female") { color = 'Red'; }
            else if (value == "male") { color = 'Green'; }
            else { color = 'Yellow'; }

            return '<div  style="color: ' + color + '">' + value + '</div>';
        }
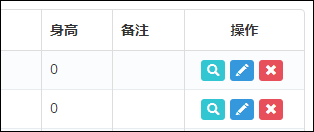
In addition, we see that at the end of the row record, we add several operation buttons to facilitate the viewing, editing and deleting of the current record, as shown in the following effect chart.
This part is also handled by formatting functions.
        //Formatting of operation bar
        function actionFormatter(value, row, index) {
            var id = value;
            var result = "";
            result += "<a href='javascript:;' class='btn btn-xs green' onclick=\"EditViewById('" + id + "', view='view')\" title='See'><span class='glyphicon glyphicon-search'></span></a>";
            result += "<a href='javascript:;' class='btn btn-xs blue' onclick=\"EditViewById('" + id + "')\" title='edit'><span class='glyphicon glyphicon-pencil'></span></a>";
            result += "<a href='javascript:;' class='btn btn-xs red' onclick=\"DeleteByIds('" + id + "')\" title='delete'><span class='glyphicon glyphicon-remove'></span></a>";

            return result;
        }
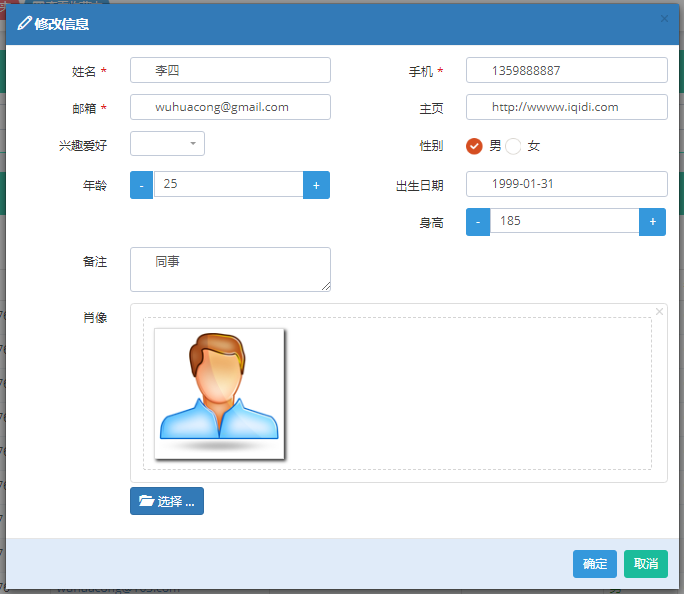
If we need to double-click the layer of the pop-up editing interface, we can handle the double-click event of the table, as shown in the code below.
                onDblClickRow: function (row, $element) {
                    var id = row.ID;
                    EditViewById(id, 'view');
                },
If we need to set up different style display of rows, we can add the JS processing function of rowStyle, as shown in the following code
                rowStyle: function (row, index) { //Set the special style of the row
                    //Here are five values['active', 'success', 'info', 'warning', 'danger'];
                    var strclass = "";
                    if (index == 0) {
                        strclass = "warning";
                    }
                    return { classes: strclass }
                }
For table record acquisition, we can get it through the following code: $table. bootstrapTable ('get Selections')
            var rows = $table.bootstrapTable('getSelections');
            if (rows.length > 0) {
                ID = rows[0].ID;
            }
If multiple records are processed, such as deleting records
        //Method of Implementing Delete Data
        function Delete() {
            var ids = "";//Getting the data selected by the user ID
            var rows = $table.bootstrapTable('getSelections');
            for (var i = 0; i < rows.length; i++) {
                ids += rows[i].ID + ',';
            }
            ids = ids.substring(0, ids.length - 1);

            DeleteByIds(ids);
        }
If you need to set the display column display, the following interface is shown
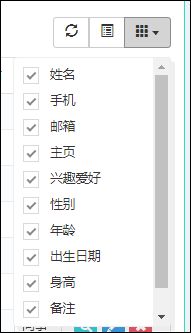
And sort processing
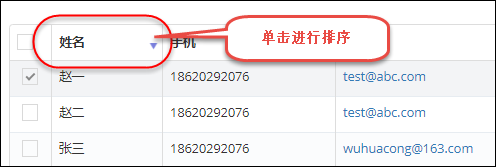
These require opening the relevant properties in the JS code.
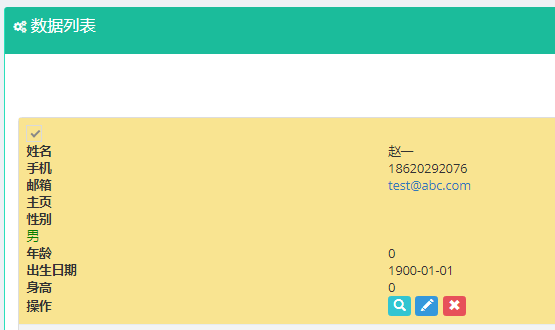
There is also a card view format for CardView, as shown below.
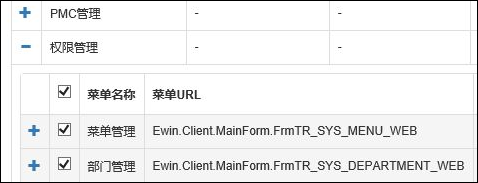
The other is the format for expanding the parent-child table in detail, as shown below.
The above is the application of bootstrap-table plug-in in my actual project. Basically, the use of JS attributes is introduced. We can refer to its documents for specific applications to obtain detailed description of corresponding attributes, methods and events, so that we can apply the various functions of this plug-in in more detail.
http://bootstrap-table.wenzhixin.net.cn/documentation/
I hope the above summary will be helpful for you to use the bootstrap-table plug-in. Thank you for your patience.