http://blog.csdn.NET/huaxun66/article/details/53427771
http://blog.csdn.net/huaxun66/article/details/53427771
Recently, live video broadcasting has been a fire. In the field of live video broadcasting, different businesses provide a variety of commercial solutions, including hardware and software equipment, cameras, encoders, streaming media servers and so on. This article will explain how to use a series of free tools to create a live video program.
Video Live Broadcasting Process
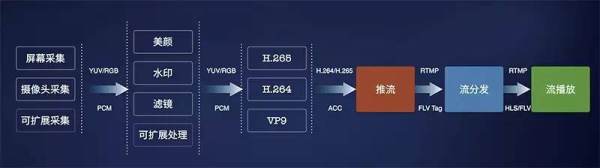
The process of live video broadcasting can be divided into the following steps:
Acquisition - > Processing - > Encoding and Encapsulation - > Push to Server - > Server Stream Distribution - > Player Stream Playback
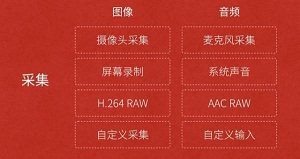
1. Acquisition
Acquisition is the first step in the whole video push process. It obtains the original video data from the acquisition equipment of the system and outputs it to the next step. Video acquisition involves two aspects of data acquisition: audio acquisition and image acquisition, which correspond to two completely different input sources and data formats.
-
Audio acquisition
Audio data can not only be combined with images to form video data, but also can be collected and played in pure audio mode. The latter plays a very important role in many mature application scenarios, such as online radio and voice radio. Audio acquisition process mainly collects analog signals in the environment into PCM coded raw data, and then compresses the coded data into MP3 format and distributes them. Common audio compression formats are: MP3, AAC, HE-AAC, Opus, FLAC, Vorbis (Ogg), Speex and AMR.
The main challenges of audio acquisition and coding are: delay sensitivity, Carton sensitivity, Denoise, AEC, VAD and various mixtures. algorithm And so on. -
Image acquisition
The results of image acquisition are combined into a series of continuous playing animations, that is to say, the content of the video can be viewed by naked eyes. The image acquisition process is mainly taken by cameras and other devices as YUV-encoded raw data, and then compressed into H.264 format by encoding data distribution. Common video encapsulation formats are MP4, 3GP, AVI, MKV, WMV, MPG, VOB, FLV, SWF, MOV, RMVB and WebM.
Image is the main part of video content because it has the strongest intuition and larger volume. The main challenges of image acquisition and coding are: poor compatibility, delay sensitivity, Carton sensitivity and various image processing operations such as beauty and watermarking.
The main sources of video acquisition are camera acquisition, screen recording and streaming from video files.
2. Processing
Video or audio data is collected after the original data is collected. In order to enhance some on-site effects or add some additional effects, we usually process it before coding and compression, such as time stamping or Logo watermarking, freckle beauty and voice confusion. In the broadcast and audience Lianmai scenario, the host needs to have a dialogue with one or more audiences, and share the results of the dialogue to all other audiences in real time. Even the processing of Mai is partly completed at the push end.
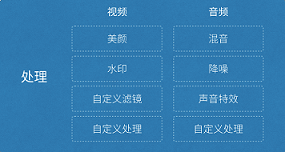
As shown in the figure above, the processing link is divided into audio and video processing. Audio processing includes mixing, noise reduction and sound effects. Video processing includes beauty, watermarking, and various custom filters.
3. Coding and encapsulation
(1) Coding
If the whole streaming media is compared to a logistics system, then the encoding and decoding is the process of loading and loading. This process is very important. Its speed and compression ratio is of great significance to the logistics system, which affects the overall speed and cost of the logistics system. Similarly, for streaming media transmission, coding is also very important. Its coding performance, coding speed and coding compression ratio will directly affect the user experience and transmission cost of the entire streaming media transmission.
-
Significance of Video Coding
The storage space of original video data is large. A 1080P 7 s video needs 817 MB.
The bandwidth of the original video data transmission is large. It takes 11 minutes to transmit the above 7 s video with 10 Mbps bandwidth.
After H.264 coding and compression, the video size is only 708 k, and the bandwidth of 10 Mbps is only 500 ms, which can meet the needs of real-time transmission. Therefore, the original video collected from the video acquisition sensor must be encoded by video. -
Fundamentals
Why can huge raw video be coded into very small video? What are the techniques? The core idea is to remove redundant information:
1) Spatial Redundancy: There is a strong correlation between adjacent pixels of an image.
2) Time redundancy: content similarity between adjacent images of video sequences
3) Coding redundancy: different pixel values have different probability of occurrence.
4) Visual Redundancy: Human visual system is insensitive to some details.
5) Knowledge Redundancy: Regular structure can be obtained from prior knowledge and background knowledge. -
Selection of Encoder
Video encoder has experienced decades of development. It has evolved from only supporting intra coding to a new generation of encoder represented by H.265 and VP9. Here are some common video encoders:
1)H.264/AVC
2)HEVC/H.265
3)VP8
4)VP9
5)FFmpeg
Note: Audio coders include Mp3, AAC, etc.
(2) Packaging
Following the previous analogy, encapsulation can be understood as what kind of truck to transport, that is, media containers.
The so-called container is a standard that encapsulates the multimedia content (video, audio, subtitles, chapter information, etc.) generated by the encoder together. Containers make it easy for different multimedia content to play synchronously. Another function of containers is to provide indexing for multimedia content. That is to say, if there is no container, you can only see a movie from the beginning to the end, you can't drag the progress bar, and if you don't load audio manually by yourself, there will be no sound. Here are several common packaging formats:
1) AVI format (suffix. avi)
2) DV-AVI format (suffix. avi)
3) QuickTime File Format (suffix. mov)
4) MPEG format (file suffix can be. mpg. mpeg. mpe. dat. vob. asf. 3gp. mp4, etc.)
5) WMV format (suffix. wmv. asf)
6) Real Video format (suffix. rm. rmvb)
7) Flash Video format (suffix. flv)
8) Matroska format (suffix. mkv)
9) MPEG2-TS format (suffix. ts)
At present, FLV and MPEG2-TS formats are mainly used in streaming media transmission, especially in live broadcasting. They are used in RTMP/HTTP-FLV and HLS protocols, respectively.
4. Push to server
Push streaming is the first kilometer of live broadcasting. The push streaming of live broadcasting has a great impact on this link. If the network of push streaming is unstable, no matter how we optimize it, the audience's experience will be very bad. So it is also the first step for us to investigate the problems. How to solve these problems systematically requires us to have a basic understanding of the relevant theories.
There are three main types of push protocols:
- RTSP (Real Time Streaming Protocol): Real-time streaming protocol is a multimedia streaming protocol used to control sound or image, which was proposed by Real Networks and Netscape.
- RTMP(Real Time Messaging Protocol): Real-time messaging protocol is an open protocol developed by Adobe for audio, video and data transmission between Flash players and servers.
- HLS(HTTP Live Streaming): is an HTTP-based streaming media transmission protocol implemented by Apple Inc.
RTMP protocol, based on TCP, is a network protocol designed for real-time data communication. It is mainly used for audio-video and data communication between flash/AIR platform and streaming media/interactive server supporting RTMP protocol. Software supporting the protocol includes Adobe Media Server/Ultrant Media Server/red5, etc.
It has three varieties:
- RTMP works on TCP and uses port 1935.
- RTMPT is encapsulated in HTTP requests and can traverse firewalls.
- RTMPS is similar to RTMPT, but it uses HTTPS connection.
RTMP is the current mainstream streaming media transmission protocol, which is widely used in the field of live broadcasting. It can be said that most of the live products on the market adopt this protocol.
RTMP protocol is like a container used to pack data packets, which can be data in AMF format or video/audio data in FLV. A single connection can transmit multiple network flows over different channels. Packets in these channels are transmitted according to fixed size packages. 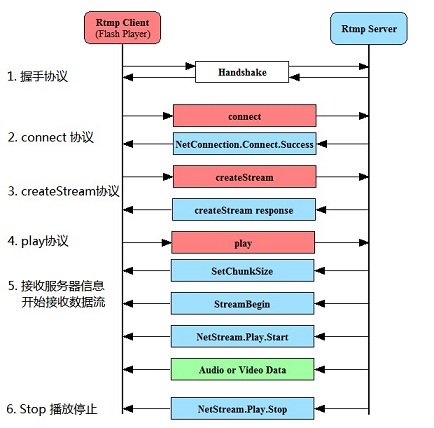
5. Server Stream Distribution
Streaming media server is responsible for the publishing and redistribution of live streams.
Streaming media servers have many options, such as the commercial version of Wowza. But I chose Nginx, which is an excellent free Web server. I'll describe how to build Nginx server in detail later.
6. Player streaming
It mainly realizes the display of live programs on the terminal. Because the transport protocol I use here is RTMP, players that support RTMP streaming protocols can be used, for example:
- Computer end: VLC, etc.
- Mobile: Vitamio and ijkplayer, etc.
In general, we call the first four steps of the above process the first part, which is the operation of the video host. After video acquisition and processing, it is pushed to streaming media server. The first part is completed. The second part is the streaming media server, which is responsible for processing and distributing the stream received from the first part to the audience. The third part is the audience, just need to have a player that supports streaming protocols. 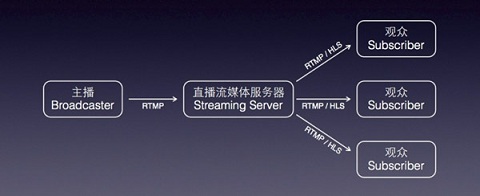
Part I: Collecting push-flow SDK
At present, there are many SDKs that integrate video capture, encoding, encapsulation and streaming in the market, such as the commercial version of NodeMedia, but NodeMedia SDK is authorized by package name, and no package name application is authorized to use copyright prompt information.
I'm using a free SDK shared on github. Download address.
Next, I'll analyze the process of live streaming.
First look at the entry interface: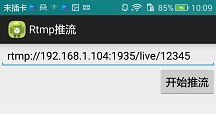
Simply, one input box lets you fill in the push address of the server, and another button opens the push.
public class StartActivity extends Activity {
    public static final String RTMPURL_MESSAGE = "rtmppush.hx.com.rtmppush.rtmpurl";
    private Button _startRtmpPushButton = null;
    private EditText _rtmpUrlEditText = null;

    private View.OnClickListener _startRtmpPushOnClickedEvent = new View.OnClickListener() {
        @Override
        public void onClick(View arg0) {
            Intent i = new Intent(StartActivity.this, MainActivity.class);
            String rtmpUrl = _rtmpUrlEditText.getText().toString();
            i.putExtra(StartActivity.RTMPURL_MESSAGE, rtmpUrl);
            StartActivity.this.startActivity(i);
        }
    };

    private void InitUI(){
        _rtmpUrlEditText = (EditText)findViewById(R.id.rtmpUrleditText);
        _startRtmpPushButton = (Button)findViewById(R.id.startRtmpButton);
        _rtmpUrlEditText.setText("rtmp://192.168.1.104:1935/live/12345");
        _startRtmpPushButton.setOnClickListener(_startRtmpPushOnClickedEvent);
    }

    @Override
    protected void onCreate(Bundle savedInstanceState) {
        super.onCreate(savedInstanceState);
        setContentView(R.layout.activity_start);
        InitUI();
    }
}- 1
- 2
- 3
- 4
- 5
- 6
- 7
- 8
- 9
- 10
- 11
- 12
- 13
- 14
- 15
- 16
- 17
- 18
- 19
- 20
- 21
- 22
- 23
- 24
- 25
- 26
- 27
- 28
- 29
- 1
- 2
- 3
- 4
- 5
- 6
- 7
- 8
- 9
- 10
- 11
- 12
- 13
- 14
- 15
- 16
- 17
- 18
- 19
- 20
- 21
- 22
- 23
- 24
- 25
- 26
- 27
- 28
- 29
The main push-flow process is in MainActivity. Similarly, look at the interface first: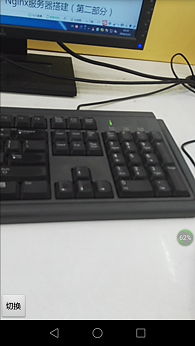
Layout file:
<RelativeLayout xmlns:android="http://schemas.android.com/apk/res/android"
    xmlns:tools="http://schemas.android.com/tools"
    android:id="@+id/cameraRelative"
    android:layout_width="match_parent"
    android:layout_height="match_parent"
    android:paddingBottom="@dimen/activity_vertical_margin"
    android:paddingLeft="@dimen/activity_horizontal_margin"
    android:paddingRight="@dimen/activity_horizontal_margin"
    android:paddingTop="@dimen/activity_vertical_margin"
    android:theme="@android:style/Theme.NoTitleBar.Fullscreen">

<SurfaceView
        android:id="@+id/surfaceViewEx"
        android:layout_width="match_parent"
        android:layout_height="match_parent"/>
    <Button
        android:id="@+id/SwitchCamerabutton"
        android:layout_width="wrap_content"
        android:layout_height="wrap_content"
        android:layout_alignBottom="@+id/surfaceViewEx"
        android:text="@string/SwitchCamera" />
</RelativeLayout>- 1
- 2
- 3
- 4
- 5
- 6
- 7
- 8
- 9
- 10
- 11
- 12
- 13
- 14
- 15
- 16
- 17
- 18
- 19
- 20
- 21
- 22
- 1
- 2
- 3
- 4
- 5
- 6
- 7
- 8
- 9
- 10
- 11
- 12
- 13
- 14
- 15
- 16
- 17
- 18
- 19
- 20
- 21
- 22
In fact, it uses a Surface View to display the camera to take pictures, and provides a button to switch the front and rear cameras. From the point of view of the entry function:
    @Override
    protected void onCreate(Bundle savedInstanceState) {
        requestWindowFeature(Window.FEATURE_NO_TITLE);
        getWindow().setFlags(WindowManager.LayoutParams.FLAG_FULLSCREEN,
                WindowManager.LayoutParams.FLAG_FULLSCREEN);
        this.getWindow().setFlags(WindowManager.LayoutParams.FLAG_KEEP_SCREEN_ON, WindowManager.LayoutParams.FLAG_KEEP_SCREEN_ON);
        super.onCreate(savedInstanceState);

        setContentView(R.layout.activity_main);
        setRequestedOrientation(ActivityInfo.SCREEN_ORIENTATION_PORTRAIT);

        Intent intent = getIntent();
        _rtmpUrl = intent.getStringExtra(StartActivity.RTMPURL_MESSAGE);

        InitAll();

        PowerManager pm = (PowerManager) getSystemService(Context.POWER_SERVICE);
        _wakeLock = pm.newWakeLock(PowerManager.SCREEN_DIM_WAKE_LOCK, "My Tag");
}- 1
- 2
- 3
- 4
- 5
- 6
- 7
- 8
- 9
- 10
- 11
- 12
- 13
- 14
- 15
- 16
- 17
- 18
- 19
- 1
- 2
- 3
- 4
- 5
- 6
- 7
- 8
- 9
- 10
- 11
- 12
- 13
- 14
- 15
- 16
- 17
- 18
- 19
Firstly, set up full-screen display, often bright, vertical screen, get the push url of the server, and then initialize everything.
    private void InitAll() {
        WindowManager wm = this.getWindowManager();

        int width = wm.getDefaultDisplay().getWidth();
        int height = wm.getDefaultDisplay().getHeight();
        int iNewWidth = (int) (height * 3.0 / 4.0);

        RelativeLayout rCameraLayout = (RelativeLayout) findViewById(R.id.cameraRelative);
        RelativeLayout.LayoutParams layoutParams = new RelativeLayout.LayoutParams(RelativeLayout.LayoutParams.MATCH_PARENT,
                RelativeLayout.LayoutParams.MATCH_PARENT);
        int iPos = width - iNewWidth;
        layoutParams.setMargins(iPos, 0, 0, 0);

        _mSurfaceView = (SurfaceView) this.findViewById(R.id.surfaceViewEx);
        _mSurfaceView.getHolder().setFixedSize(HEIGHT_DEF, WIDTH_DEF);
        _mSurfaceView.getHolder().setType(SurfaceHolder.SURFACE_TYPE_PUSH_BUFFERS);
        _mSurfaceView.getHolder().setKeepScreenOn(true);
        _mSurfaceView.getHolder().addCallback(new SurceCallBack());
        _mSurfaceView.setLayoutParams(layoutParams);

        InitAudioRecord();

        _SwitchCameraBtn = (Button) findViewById(R.id.SwitchCamerabutton);
        _SwitchCameraBtn.setOnClickListener(_switchCameraOnClickedEvent);

        RtmpStartMessage();//Start pushing
}- 1
- 2
- 3
- 4
- 5
- 6
- 7
- 8
- 9
- 10
- 11
- 12
- 13
- 14
- 15
- 16
- 17
- 18
- 19
- 20
- 21
- 22
- 23
- 24
- 25
- 26
- 27
- 1
- 2
- 3
- 4
- 5
- 6
- 7
- 8
- 9
- 10
- 11
- 12
- 13
- 14
- 15
- 16
- 17
- 18
- 19
- 20
- 21
- 22
- 23
- 24
- 25
- 26
- 27
First set the screen scale to 3:4, set some parameters to SurfaceView and add callbacks, then initialize AudioRecord, and finally start pushing. Audio is initialized here, so where is the camera initialized? In fact, in the callback function of SurfaceView.
        @Override
        public void surfaceCreated(SurfaceHolder holder) {
            _iDegrees = getDisplayOritation(getDispalyRotation(), 0);
            if (_mCamera != null) {
                InitCamera(); //Initialization Camera
                return;
            }
            //Huawei i7 Shared Camera
            if (Camera.getNumberOfCameras() == 1) {
                _bIsFront = false;
                _mCamera = Camera.open(Camera.CameraInfo.CAMERA_FACING_BACK);
            } else {
                _mCamera = Camera.open(Camera.CameraInfo.CAMERA_FACING_FRONT);
            }
            InitCamera();
        }

        @Override
        public void surfaceDestroyed(SurfaceHolder holder) {
        }
}- 1
- 2
- 3
- 4
- 5
- 6
- 7
- 8
- 9
- 10
- 11
- 12
- 13
- 14
- 15
- 16
- 17
- 18
- 19
- 20
- 21
- 1
- 2
- 3
- 4
- 5
- 6
- 7
- 8
- 9
- 10
- 11
- 12
- 13
- 14
- 15
- 16
- 17
- 18
- 19
- 20
- 21
Here is the initialization of the camera:
    public void InitCamera() {
        Camera.Parameters p = _mCamera.getParameters();

        Size prevewSize = p.getPreviewSize();
        showlog("Original Width:" + prevewSize.width + ", height:" + prevewSize.height);

        List<Size> PreviewSizeList = p.getSupportedPreviewSizes();
        List<Integer> PreviewFormats = p.getSupportedPreviewFormats();
        showlog("Listing all supported preview sizes");
        for (Camera.Size size : PreviewSizeList) {
            showlog("  w: " + size.width + ", h: " + size.height);
        }

        showlog("Listing all supported preview formats");
        Integer iNV21Flag = 0;
        Integer iYV12Flag = 0;
        for (Integer yuvFormat : PreviewFormats) {
            showlog("preview formats:" + yuvFormat);
            if (yuvFormat == android.graphics.ImageFormat.YV12) {
                iYV12Flag = android.graphics.ImageFormat.YV12;
            }
            if (yuvFormat == android.graphics.ImageFormat.NV21) {
                iNV21Flag = android.graphics.ImageFormat.NV21;
            }
        }

        if (iNV21Flag != 0) {
            _iCameraCodecType = iNV21Flag;
        } else if (iYV12Flag != 0) {
            _iCameraCodecType = iYV12Flag;
        }
        p.setPreviewSize(HEIGHT_DEF, WIDTH_DEF);
        p.setPreviewFormat(_iCameraCodecType);
        p.setPreviewFrameRate(FRAMERATE_DEF);

        showlog("_iDegrees="+_iDegrees);
        _mCamera.setDisplayOrientation(_iDegrees);
        p.setRotation(_iDegrees);
        _mCamera.setPreviewCallback(_previewCallback);
        _mCamera.setParameters(p);
        try {
            _mCamera.setPreviewDisplay(_mSurfaceView.getHolder());
        } catch (Exception e) {
            return;
        }
        _mCamera.cancelAutoFocus();//Only when this sentence is added will the autofocus be achieved.
        _mCamera.startPreview();
}- 1
- 2
- 3
- 4
- 5
- 6
- 7
- 8
- 9
- 10
- 11
- 12
- 13
- 14
- 15
- 16
- 17
- 18
- 19
- 20
- 21
- 22
- 23
- 24
- 25
- 26
- 27
- 28
- 29
- 30
- 31
- 32
- 33
- 34
- 35
- 36
- 37
- 38
- 39
- 40
- 41
- 42
- 43
- 44
- 45
- 46
- 47
- 48
- 1
- 2
- 3
- 4
- 5
- 6
- 7
- 8
- 9
- 10
- 11
- 12
- 13
- 14
- 15
- 16
- 17
- 18
- 19
- 20
- 21
- 22
- 23
- 24
- 25
- 26
- 27
- 28
- 29
- 30
- 31
- 32
- 33
- 34
- 35
- 36
- 37
- 38
- 39
- 40
- 41
- 42
- 43
- 44
- 45
- 46
- 47
- 48
Do you remember that the push function started after the initialization was completed?
    private void RtmpStartMessage() {
        Message msg = new Message();
        msg.what = ID_RTMP_PUSH_START;
        Bundle b = new Bundle();
        b.putInt("ret", 0);
        msg.setData(b);
        mHandler.sendMessage(msg);
}- 1
- 2
- 3
- 4
- 5
- 6
- 7
- 8
- 1
- 2
- 3
- 4
- 5
- 6
- 7
- 8
Handler processing:
    public Handler mHandler = new Handler() {
        public void handleMessage(android.os.Message msg) {
            Bundle b = msg.getData();
            int ret;
            switch (msg.what) {
                case ID_RTMP_PUSH_START: {
                    Start();
                    break;
                }
            }
        }
};- 1
- 2
- 3
- 4
- 5
- 6
- 7
- 8
- 9
- 10
- 11
- 12
- 1
- 2
- 3
- 4
- 5
- 6
- 7
- 8
- 9
- 10
- 11
- 12
The real push-flow realization was originally here:
    private void Start() {
        if (DEBUG_ENABLE) {
            File saveDir = Environment.getExternalStorageDirectory();
            String strFilename = saveDir + "/aaa.h264";
            try {
                if (!new File(strFilename).exists()) {
                    new File(strFilename).createNewFile();
                }
                _outputStream = new DataOutputStream(new FileOutputStream(strFilename));
            } catch (Exception e) {
                e.printStackTrace();
            }
        }
        //_rtmpSessionMgr.Start("rtmp://192.168.0.110/live/12345678");
        _rtmpSessionMgr = new RtmpSessionManager();
        _rtmpSessionMgr.Start(_rtmpUrl); //------point 1

        int iFormat = _iCameraCodecType;
        _swEncH264 = new SWVideoEncoder(WIDTH_DEF, HEIGHT_DEF, FRAMERATE_DEF, BITRATE_DEF);
        _swEncH264.start(iFormat); //------point 2

        _bStartFlag = true;

        _h264EncoderThread = new Thread(_h264Runnable);
        _h264EncoderThread.setPriority(Thread.MAX_PRIORITY);
        _h264EncoderThread.start(); //------point 3

        _AudioRecorder.startRecording();
        _AacEncoderThread = new Thread(_aacEncoderRunnable);
        _AacEncoderThread.setPriority(Thread.MAX_PRIORITY);
        _AacEncoderThread.start(); //------point 4
}- 1
- 2
- 3
- 4
- 5
- 6
- 7
- 8
- 9
- 10
- 11
- 12
- 13
- 14
- 15
- 16
- 17
- 18
- 19
- 20
- 21
- 22
- 23
- 24
- 25
- 26
- 27
- 28
- 29
- 30
- 31
- 32
- 1
- 2
- 3
- 4
- 5
- 6
- 7
- 8
- 9
- 10
- 11
- 12
- 13
- 14
- 15
- 16
- 17
- 18
- 19
- 20
- 21
- 22
- 23
- 24
- 25
- 26
- 27
- 28
- 29
- 30
- 31
- 32
There are four main functions in it. I have marked them separately. Now let's look at them one by one. The first is point 1, which is already in SDK.
    public int Start(String rtmpUrl){
        int iRet = 0;

        _rtmpUrl = rtmpUrl;
        _rtmpSession = new RtmpSession();

        _bStartFlag = true;
        _h264EncoderThread.setPriority(Thread.MAX_PRIORITY);
        _h264EncoderThread.start();

        return iRet;
}- 1
- 2
- 3
- 4
- 5
- 6
- 7
- 8
- 9
- 10
- 11
- 12
- 1
- 2
- 3
- 4
- 5
- 6
- 7
- 8
- 9
- 10
- 11
- 12
Actually, it starts a thread, which is a little complicated.
    private Thread _h264EncoderThread = new Thread(new Runnable() {

        private Boolean WaitforReConnect(){
            for(int i=0; i < 500; i++){
                try {
                    Thread.sleep(10);
                } catch (InterruptedException e) {
                    e.printStackTrace();
                }
                if(_h264EncoderThread.interrupted() || (!_bStartFlag)){
                    return false;
                }
            }
            return true;
        }
        @Override
        public void run() {
            while (!_h264EncoderThread.interrupted() && (_bStartFlag)) {
                if(_rtmpHandle == 0) {
                    _rtmpHandle = _rtmpSession.RtmpConnect(_rtmpUrl);
                    if(_rtmpHandle == 0){
                        if(!WaitforReConnect()){
                            break;
                        }
                        continue;
                    }
                }else{
                    if(_rtmpSession.RtmpIsConnect(_rtmpHandle) == 0){
                        _rtmpHandle = _rtmpSession.RtmpConnect(_rtmpUrl);
                        if(_rtmpHandle == 0){
                            if(!WaitforReConnect()){
                                break;
                            }
                            continue;
                        }
                    }
                }

                if((_videoDataQueue.size() == 0) && (_audioDataQueue.size()==0)){
                    try {
                        Thread.sleep(30);
                    } catch (InterruptedException e) {
                        e.printStackTrace();
                    }
                    continue;
                }
                //Log.i(TAG, "VideoQueue length="+_videoDataQueue.size()+", AudioQueue length="+_audioDataQueue.size());
                for(int i = 0; i < 100; i++){
                    byte[] audioData = GetAndReleaseAudioQueue();
                    if(audioData == null){
                        break;
                    }
                    //Log.i(TAG, "###RtmpSendAudioData:"+audioData.length);
                    _rtmpSession.RtmpSendAudioData(_rtmpHandle, audioData, audioData.length);
                }

                byte[] videoData = GetAndReleaseVideoQueue();
                if(videoData != null){
                    //Log.i(TAG, "$$$RtmpSendVideoData:"+videoData.length);
                    _rtmpSession.RtmpSendVideoData(_rtmpHandle, videoData, videoData.length);
                }
                try {
                    Thread.sleep(1);
                } catch (InterruptedException e) {
                    e.printStackTrace();
                }
            }
            _videoDataQueueLock.lock();
            _videoDataQueue.clear();
            _videoDataQueueLock.unlock();
            _audioDataQueueLock.lock();
            _audioDataQueue.clear();
            _audioDataQueueLock.unlock();

            if((_rtmpHandle != 0) && (_rtmpSession != null)){
                _rtmpSession.RtmpDisconnect(_rtmpHandle);
            }
            _rtmpHandle  = 0;
            _rtmpSession = null;
        }
});- 1
- 2
- 3
- 4
- 5
- 6
- 7
- 8
- 9
- 10
- 11
- 12
- 13
- 14
- 15
- 16
- 17
- 18
- 19
- 20
- 21
- 22
- 23
- 24
- 25
- 26
- 27
- 28
- 29
- 30
- 31
- 32
- 33
- 34
- 35
- 36
- 37
- 38
- 39
- 40
- 41
- 42
- 43
- 44
- 45
- 46
- 47
- 48
- 49
- 50
- 51
- 52
- 53
- 54
- 55
- 56
- 57
- 58
- 59
- 60
- 61
- 62
- 63
- 64
- 65
- 66
- 67
- 68
- 69
- 70
- 71
- 72
- 73
- 74
- 75
- 76
- 77
- 78
- 79
- 80
- 81
- 1
- 2
- 3
- 4
- 5
- 6
- 7
- 8
- 9
- 10
- 11
- 12
- 13
- 14
- 15
- 16
- 17
- 18
- 19
- 20
- 21
- 22
- 23
- 24
- 25
- 26
- 27
- 28
- 29
- 30
- 31
- 32
- 33
- 34
- 35
- 36
- 37
- 38
- 39
- 40
- 41
- 42
- 43
- 44
- 45
- 46
- 47
- 48
- 49
- 50
- 51
- 52
- 53
- 54
- 55
- 56
- 57
- 58
- 59
- 60
- 61
- 62
- 63
- 64
- 65
- 66
- 67
- 68
- 69
- 70
- 71
- 72
- 73
- 74
- 75
- 76
- 77
- 78
- 79
- 80
- 81
Look at the 18 lines, it's mainly a while loop. Every other time, we take data from _audioDataQueue and _videoDataQueue buffer arrays and send it to the server. The sending methods _rtmpSession.RtmpSendAudioData and _rtmpSession.RtmpSendVideoData are both Native methods. Calling the contents of the library files through jni, how long is the time interval? Look at line 4, it was 5 seconds, that is to say, our video data will be stored in the buffer for 5 seconds before being sent to the server. All live broadcasts will have 5 seconds delay. We can modify this block to control the live broadcast delay.
It said that we would take data from _audioDataQueue and _videoDataQueue Buffer s. When did the data go in? Look at point 2,3,4 above. The first is point 2, which also goes into SDK:
    public boolean start(int iFormateType){
        int iType = OpenH264Encoder.YUV420_TYPE;

        if(iFormateType == android.graphics.ImageFormat.YV12){
            iType = OpenH264Encoder.YUV12_TYPE;
        }else{
            iType = OpenH264Encoder.YUV420_TYPE;
        }
        _OpenH264Encoder = new OpenH264Encoder();
        _iHandle = _OpenH264Encoder.InitEncode(_iWidth, _iHeight, _iBitRate, _iFrameRate, iType);
        if(_iHandle == 0){
            return false;
        }

        _iFormatType = iFormateType;
        return true;
}- 1
- 2
- 3
- 4
- 5
- 6
- 7
- 8
- 9
- 10
- 11
- 12
- 13
- 14
- 15
- 16
- 17
- 1
- 2
- 3
- 4
- 5
- 6
- 7
- 8
- 9
- 10
- 11
- 12
- 13
- 14
- 15
- 16
- 17
In fact, this is the initialization encoder, the specific initialization process is also called in so file, jni. point 3,4 actually opens two threads. Let's look at the implementation in threads.
    private Thread _h264EncoderThread = null;
    private Runnable _h264Runnable = new Runnable() {
        @Override
        public void run() {
            while (!_h264EncoderThread.interrupted() && _bStartFlag) {
                int iSize = _YUVQueue.size();
                if (iSize > 0) {
                    _yuvQueueLock.lock();
                    byte[] yuvData = _YUVQueue.poll();
                    if (iSize > 9) {
                        Log.i(LOG_TAG, "###YUV Queue len=" + _YUVQueue.size() + ", YUV length=" + yuvData.length);
                    }

                    _yuvQueueLock.unlock();
                    if (yuvData == null) {
                        continue;
                    }

                    if (_bIsFront) {
                        _yuvEdit = _swEncH264.YUV420pRotate270(yuvData, HEIGHT_DEF, WIDTH_DEF);
                    } else {
                        _yuvEdit = _swEncH264.YUV420pRotate90(yuvData, HEIGHT_DEF, WIDTH_DEF);
                    }
                    byte[] h264Data = _swEncH264.EncoderH264(_yuvEdit);
                    if (h264Data != null) {
                        _rtmpSessionMgr.InsertVideoData(h264Data);
                        if (DEBUG_ENABLE) {
                            try {
                                _outputStream.write(h264Data);
                                int iH264Len = h264Data.length;
                                //Log.i(LOG_TAG, "Encode H264 len="+iH264Len);
                            } catch (IOException e1) {
                                e1.printStackTrace();
                            }
                        }
                    }
                }
                try {
                    Thread.sleep(1);
                } catch (InterruptedException e) {
                    // TODO Auto-generated catch block
                    e.printStackTrace();
                }
            }
            _YUVQueue.clear();
        }
};- 1
- 2
- 3
- 4
- 5
- 6
- 7
- 8
- 9
- 10
- 11
- 12
- 13
- 14
- 15
- 16
- 17
- 18
- 19
- 20
- 21
- 22
- 23
- 24
- 25
- 26
- 27
- 28
- 29
- 30
- 31
- 32
- 33
- 34
- 35
- 36
- 37
- 38
- 39
- 40
- 41
- 42
- 43
- 44
- 45
- 46
- 47
- 1
- 2
- 3
- 4
- 5
- 6
- 7
- 8
- 9
- 10
- 11
- 12
- 13
- 14
- 15
- 16
- 17
- 18
- 19
- 20
- 21
- 22
- 23
- 24
- 25
- 26
- 27
- 28
- 29
- 30
- 31
- 32
- 33
- 34
- 35
- 36
- 37
- 38
- 39
- 40
- 41
- 42
- 43
- 44
- 45
- 46
- 47
It's also a circular thread. Line 9 takes the data captured by the camera from _YUVQueue and rotates the video. Line 24 encodes the data and then executes 26 lines, Insert Video Data:
    public void InsertVideoData(byte[] videoData){
        if(!_bStartFlag){
            return;
        }
        _videoDataQueueLock.lock();
        if(_videoDataQueue.size() > 50){
            _videoDataQueue.clear();
        }
        _videoDataQueue.offer(videoData);
        _videoDataQueueLock.unlock();
}- 1
- 2
- 3
- 4
- 5
- 6
- 7
- 8
- 9
- 10
- 11
- 1
- 2
- 3
- 4
- 5
- 6
- 7
- 8
- 9
- 10
- 11
Sure enough, insert the Buffer of the _videoDataQueue mentioned earlier. Video data is inserted here. What about audio data? In another thread, the content is roughly the same
private Runnable _aacEncoderRunnable = new Runnable() {
        @Override
        public void run() {
            DataOutputStream outputStream = null;
            if (DEBUG_ENABLE) {
                File saveDir = Environment.getExternalStorageDirectory();
                String strFilename = saveDir + "/aaa.aac";
                try {
                    if (!new File(strFilename).exists()) {
                        new File(strFilename).createNewFile();
                    }
                    outputStream = new DataOutputStream(new FileOutputStream(strFilename));
                } catch (Exception e1) {
                    e1.printStackTrace();
                }
            }

            long lSleepTime = SAMPLE_RATE_DEF * 16 * 2 / _RecorderBuffer.length;

            while (!_AacEncoderThread.interrupted() && _bStartFlag) {
                int iPCMLen = _AudioRecorder.read(_RecorderBuffer, 0, _RecorderBuffer.length); // Fill buffer
                if ((iPCMLen != _AudioRecorder.ERROR_BAD_VALUE) && (iPCMLen != 0)) {
                    if (_fdkaacHandle != 0) {
                        byte[] aacBuffer = _fdkaacEnc.FdkAacEncode(_fdkaacHandle, _RecorderBuffer);
                        if (aacBuffer != null) {
                            long lLen = aacBuffer.length;

                            _rtmpSessionMgr.InsertAudioData(aacBuffer);
                            //Log.i(LOG_TAG, "fdk aac length="+lLen+" from pcm="+iPCMLen);
                            if (DEBUG_ENABLE) {
                                try {
                                    outputStream.write(aacBuffer);
                                } catch (IOException e) {
                                    // TODO Auto-generated catch block
                                    e.printStackTrace();
                                }
                            }
                        }
                    }
                } else {
                    Log.i(LOG_TAG, "######fail to get PCM data");
                }
                try {
                    Thread.sleep(lSleepTime / 10);
                } catch (InterruptedException e) {
                    e.printStackTrace();
                }
            }
            Log.i(LOG_TAG, "AAC Encoder Thread ended ......");
        }
    };
private Thread _AacEncoderThread = null;- 1
- 2
- 3
- 4
- 5
- 6
- 7
- 8
- 9
- 10
- 11
- 12
- 13
- 14
- 15
- 16
- 17
- 18
- 19
- 20
- 21
- 22
- 23
- 24
- 25
- 26
- 27
- 28
- 29
- 30
- 31
- 32
- 33
- 34
- 35
- 36
- 37
- 38
- 39
- 40
- 41
- 42
- 43
- 44
- 45
- 46
- 47
- 48
- 49
- 50
- 51
- 52
- 1
- 2
- 3
- 4
- 5
- 6
- 7
- 8
- 9
- 10
- 11
- 12
- 13
- 14
- 15
- 16
- 17
- 18
- 19
- 20
- 21
- 22
- 23
- 24
- 25
- 26
- 27
- 28
- 29
- 30
- 31
- 32
- 33
- 34
- 35
- 36
- 37
- 38
- 39
- 40
- 41
- 42
- 43
- 44
- 45
- 46
- 47
- 48
- 49
- 50
- 51
- 52
This is to insert audio data into the _audioDataQueue Buffer through a loop.
Above is the code analysis of video capture and streaming. There is no video processing in Demo, but camera capture, coding and streaming to the server.
Part II: Nginx Server Construction
Streaming media servers have many options, such as the commercial version of Wowza. But I chose Nginx (nginx-rtmp-module) for free. Nginx itself is a very excellent HTTP server. It can build a relatively complete streaming media server through nginx module nginx-rtmp-module. This streaming media server can support RTMP and HLS.
The principle of Nginx cooperating with SDK as streaming media server is that Nginx provides RTMP service through RTMP module, SDK pushes a RTMP stream to Nginx, and then the client accesses Nginx to watch real-time video stream. HLS is the same principle, but the end client is accessed by HTTP protocol, but SDK push stream is still rtmp.
Below is a windows version of Nginx that has integrated rtmp modules. After downloading, you can use it directly.
Download link: https://github.com/illuspas/nginx-rtmp-win32
1. rtmp port configuration
The configuration file is in/conf/nginx.conf
RTMP listens on port 1935, enabling live and hls application s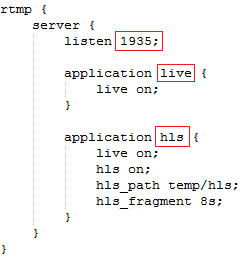
So your streaming server url can be written as: rtmp:/(server IP address): 1935/live/xxx or rtmp:/(server IP address): 1935/hls/xxx.
For example, we wrote rtmp://192.168.1.104:1935/live/12345 above.
HTTP listens on port 8080.
- 8080/stat View stream Status
- 8080/index.html is a live broadcast and live release tester
- 8080/vod.html is a tester supporting RTMP and HLS on demand
2. Start nginx service
Double-click the nginx.exe file or run nginx.exe under the dos window to start the nginx service:
1) Start the task manager and you can see the nginx.exe process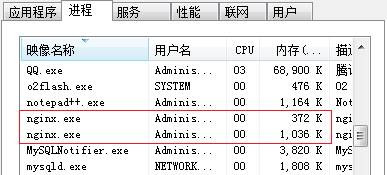
2) Open Web Input http://localhot:8080 The following picture appears: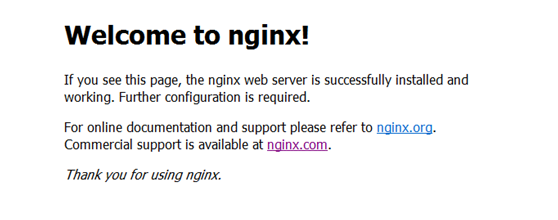
Display the above interface to show that the startup was successful.
Part III: Broadcasting of Live Stream
Host interface: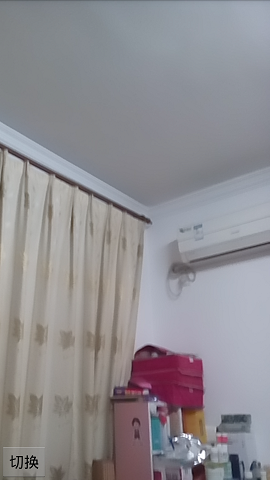
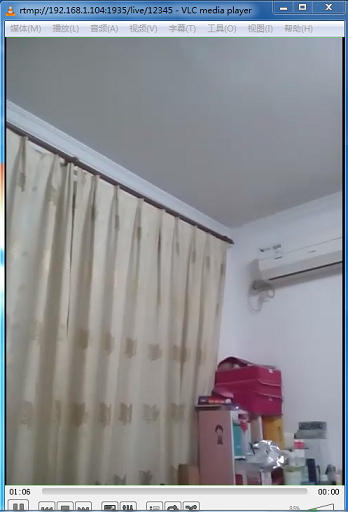
As mentioned above, as long as players supporting RTMP streaming protocols can see our live broadcasts. Here are two examples:
(1) Windows Player VLC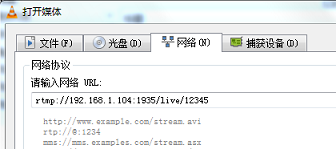
(2)Android End Player ijkplayer
For the use of ijkplayer, please refer to Analysis of Android ijkplayer
    private void initPlayer() {
        player = new PlayerManager(this);
        player.setFullScreenOnly(true);
        player.setScaleType(PlayerManager.SCALETYPE_FILLPARENT);
        player.playInFullScreen(true);
        player.setPlayerStateListener(this);
        player.play("rtmp://192.168.1.104:1935/live/12345");
}- 1
- 2
- 3
- 4
- 5
- 6
- 7
- 8
- 1
- 2
- 3
- 4
- 5
- 6
- 7
- 8