1. Status Bar Components
1. Basic Introduction
Above:

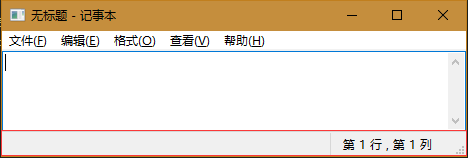
In the red box is the status bar.
He can be divided into several blocks, for example, the former is divided into two blocks, and the proportion is fixed, which can be specified at the time of creation.
Each block can display information and update the contents of each block in real time by binding events.
Because the status bar itself has components, in addition to displaying text messages, it can also add other components, such as progress bars (commonly used), buttons, edit boxes, and so on.
This is what I have learned and used at present, and I hope I can tell you in the comments that I have not mentioned, thank you.
2. Basic creation process (two)
1. Create a status bar object and add it to the window frame
The basic process code is as follows:

First, create a status bar object (id = 1 means ID is automatically randomly generated by the system), and then set it's ____________
Number of partitions: There seems to be a lot of settings. Must be greater than 0, otherwise error will be reported.
Block Ratio: The parameter is a tuple, the number of blocks is several, and the elements in the tuple are several.
[-n, -m], when the negative number is expressed, the block is n:m.
[n, m], when an integer is expressed, the block size is a fixed value, the length of the 0th block is n, and the 1st block is m, which will not change with the change of the window box.
Content displayed in blocks: Settings are generally done in real events, with two parameters, the first being content and the second being block index (starting from 0).
Finally, add it to the window box
2. Instantiate and operate a status bar object from the window box body

Control the status bar by accepting the status bar object returned by the window box. CreateStatusBar() method
Consistent control setup process
3. Other
1. When you do not need to display the status bar, you can call the. Show() method of the status bar object to set it up.

The parameters are:
True for display,
False is hidden.
It's usually less used, but it's necessary to know.
2. Add a progress bar to the status bar component
The method is simple:
Declare a progress bar for this status bar for the parent.
Then, according to the related size parameters of the parent, adjust and set its own equivalent position and size.
General window binds window size change events to achieve real-time progress bar matching parent size. (The following code does not bind events)
 1 # coding: utf-8
 2 # author: Twobox
 3
 4 import wx
 5
 6 class MyWin(wx.Frame):
 7     def __init__(self, parent, title):
 8         super(MyWin, self).__init__(parent = parent, title = title)
 9         self.initUI()
10         self.Show()
11
12     def initUI(self):
13         statusBar = self.CreateStatusBar(id = -1)
14         statusBar.SetFieldsCount(2)
15
16         print(statusBar.GetSize())
17         gauge = wx.Gauge(statusBar, range = 100, pos = (2, 2), size = (statusBar.GetSize()[0]/2-13, 22), style=wx.GA_HORIZONTAL)
18         gauge.SetValue(50) # Setting the current schedule is usually updated in real time in events
19
20 def main():
21     app = wx.App()
22     MyWin(None, "Windows - test")
23     app.MainLoop()
24
25 if __name__ == '__main__':
26     main()
4. State Bar Component Learning Code
 1 #coding:utf-8
 2 #author:Twobox
 3
 4 import wx
 5
 6 class Mywin(wx.Frame):
 7     """2 Kinds of methods"""
 8     def __init__(self, parent, title):
 9         super(Mywin, self).__init__(parent = parent, title = title)
10         self.initUI_2()
11         self.Show()
12
13     def initUI_1(self):
14         """By creating a StatusBar Object, which is then added to the current window."""
15         self.statusBar1 = wx.StatusBar(self, -1)                #Instantiate a status bar object
16         self.statusBar1.SetFieldsCount(2)                       #Set the number of status bar blocks
17         self.statusBar1.SetStatusWidths([-4,-1])                #Set the proportion of status bar blocks
18         self.statusBar1.SetStatusText("  First lines , The first column", 1)  #Set the content in the status bar, with the index starting at 0
19         self.SetStatusBar(self.statusBar1)                      #Add the status bar object to the window box body
20
21     def initUI_2(self):
22         """StatusBar2 Use it directly as an object created by the current window."""
23         self.statusBar2 = self.CreateStatusBar()                #Create a status bar object from the current window box
24         self.statusBar2.SetFieldsCount(2)                       #Same as above
25         self.statusBar2.SetStatusWidths([-4,-1])
26         self.statusBar2.SetStatusText("  First elements , The first column",1)
27         self.statusBar2.Show(True)                             #Can be set to hide(Invisible)
28
29 def main():
30     app = wx.App()
31     Mywin(None, "StatusBar - Test")
32     app.MainLoop()
33
34 if __name__ == '__main__':
35     main()
2. Message Dialog Box Components
1. Basic Introduction
Above:

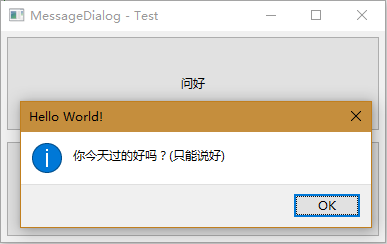
This information box is in contact with people almost every day, such as when you close a software, it will pop up a box to ask if you really close it, or when you install a software, ask if you run it immediately, and so on.
The general composition of message boxes:
Title: The "Hello World" on the left of the X-button
Message icon: Above is an exclamation mark
Message Content: Text in Pure White Box~
It can be multi-line, and O.O. should be able to have 10,000 newline characters.
Several buttons: The picture above is one. There are four kinds of buttons:
YES ,NO ,CANCEL ,OK .
Clicking returns the following four corresponding representations, so you can use them to determine which button was pressed.
wx.ID_YES, wx.ID_NO, wx.ID_CANCEL, wx.ID_OK.
2. General use process
The following events are bound to a button and clicked to trigger the event function:

First create a message box object:
message: message box content
caotion: Title of message box
Style: Specify button type and message box icon style (see below for the list of acceptable parameters for style)
A judgment statement:
The judgment statement first executes the. ShowModal() method of the information box (that is, the information box pops up).
This method returns an identifier when we stand alone with related buttons.
Finally, we perform the different operations we need according to the different representations we receive.
3. Other (style acceptable parameter description)

Where wx.ICON_*** is the icon style of the information box.
The other is the button style of the information box.
4. Information Box Learning Code (Interesting)
 1 # coding: utf-8
 2 # author: Twobox
 3
 4 import wx
 5
 6 class MyWin(wx.Frame):
 7     def __init__(self, parent, title):
 8         super(MyWin, self).__init__(parent=parent, title=title)
 9         self.initUI()
10
11     def initUI(self):
12         panel = wx.Panel(self)
13         vbox = wx.BoxSizer(wx.VERTICAL)
14
15         # Add two Button
16         self.bt1 = wx.Button(parent=panel, label=u"Say hello to you.")
17         self.bt2 = wx.Button(parent=panel, label=u"Close")
18         self.bt1.Bind(wx.EVT_BUTTON, self.eventButtonOne)
19         self.bt2.Bind(wx.EVT_BUTTON, self.eventButtonTwo)
20
21         vbox.Add(self.bt1, proportion=1, flag=wx.EXPAND | wx.ALL, border=5)
22         vbox.Add(self.bt2, proportion=1, flag=wx.EXPAND | wx.ALL, border=5)
23
24         panel.SetSizer(vbox)
25
26         self.Center()
27         self.Show()
28
29     def eventButtonOne(self, event):
30         msgDialog = wx.MessageDialog(parent=None, message = u"How are you today?(I can only say yes.)", caption = u"Hello World!", style = wx.OK)
31         if msgDialog.ShowModal() == wx.ID_OK:
32             self.bt1.SetLabel(u"Answer: Good day.")
33         else:
34             self.bt1.SetLabel(u"Answer: Today is not very good.")
35
36     def eventButtonTwo(self, event):
37         msgDialog = wx.MessageDialog(parent = None, message = u"Confirm to close the window?", caption = u"Hello World!", style = wx.YES_NO|wx.ICON_AUTH_NEEDED)
38         if msgDialog.ShowModal() == wx.ID_YES:
39             self.Close()
40         self.bt2.SetLabel(u"Option: Do not close")
41
42 def main():
43     app = wx.App()
44     MyWin(None, "MessageDialog - Test")
45     app.MainLoop()
46
47 if __name__ == '__main__':
48     main()
3, feeling
O.O. is tired and tired. If you finish it slowly, you'll miss lunch. First of all, I strongly condemn the unchanged food in the school canteen. It's much easier.
The main function of this article is to summarize the basic usage of these two components, so that we can see them later.
O.O.wxpython has a little less systematic information on the Internet, scattered, find it. Oh.
4, later statement
Reference essays for information boxes: http://www.cnblogs.com/dyx1024/archive/2012/07/07/2580380.html
For reprinting, please indicate the source (): http://www.cnblogs.com/Twobox/
2017-08-23 12:35:23