Reprinted from: http://blog.csdn.net/guolin_blog/article/details/17656437
After studying the first three articles, we have almost mastered the use of Volley, but I am afraid many friends are not very clear about the working principle of Volley. So in this article, let's read Volley's source code and sort out its workflow as a whole. This is also the last article in the Volley series.
In fact, Volley's official document itself contains a Volley's working flow chart, as shown in the following figure.
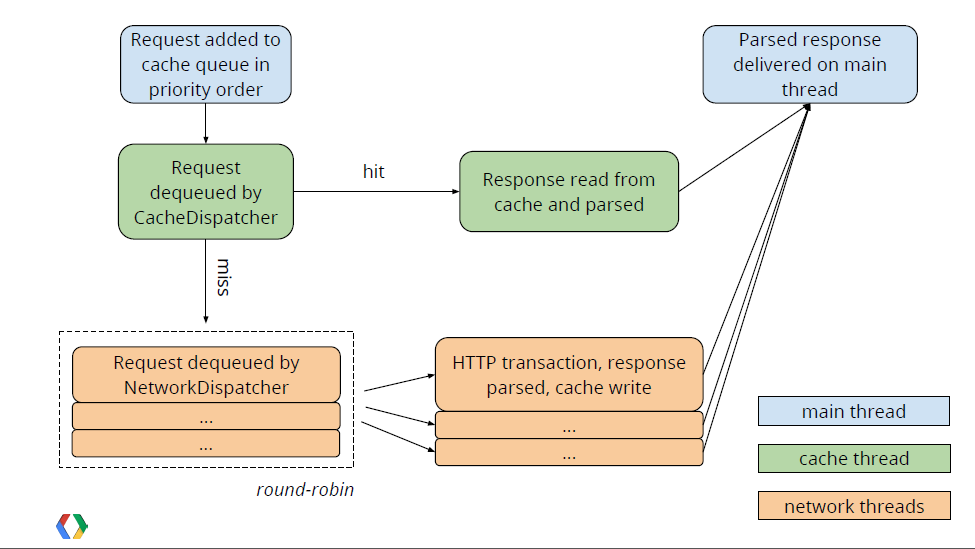
Most of my friends suddenly see a picture like this. Should it be like me and feel confused? Yes, we don't have a conceptual understanding of the working principle behind Volley at present, so it's hard to look directly at this picture. But that's OK. Now let's analyze Volley's source code, and then look at this picture again, it will be much better to understand.
Speaking of source code analysis, where should we start? Let's go back to the use of Volley. Remember, the first step in using Volley is to call the Volley.newRequestQueue(context) method to get a RequestQueue object, so naturally we need to start with this method. The code is as follows:
This method has only one line of code, just calls the method of newRequestQueue() to overload and passes null to the second parameter. Let's look at the code in the newRequestQueue() method with two parameters, as follows:
As you can see, in line 10, if stack is equal to null, create an HttpStack object. In this case, if the version number of the mobile phone system is greater than 9, create an instance of HurlStack, or else create an instance of HttpClientStack. In fact, HurlStack uses HttpURLConnection for network communication, while HttpClientStack uses HttpClient for network communication. Why do you choose this? You can refer to an article I translated earlier. Android accesses the network, using HttpURLConnection or HttpClient?
After creating HttpStack, a Network object is created to process network requests based on the incoming HttpStack object. Next, a new RequestQueue object is generated, and its start() method is called to start it. Then the RequestQueue is returned, so that the method of new RequestQueue () is finished.
So what exactly does the start() method of RequestQueue execute internally? Let's follow up and see:
Here we first create an instance of CacheDispatcher, then call its start() method, then create an instance of NetworkDispatcher in a for loop, and call their start() methods separately. Cache Dispatcher and Network Dispatcher are both inherited from Thread. By default, the for loop executes four times. That is to say, after calling Volley. new RequestQueue (context), five threads are running in the background, waiting for the arrival of network requests. Cache Dispatcher is a cache thread and Network Dispatcher is a network request thread.
After obtaining the RequestQueue, we only need to construct the corresponding Request, and then call the add() method of RequestQueue to pass in the Request to complete the network request operation. Needless to say, there must be very complex logic inside the add() method. Let's take a look at it together:
As you can see, the current request can be cached at line 11, and if it cannot be cached, it can be added directly to the network request queue at line 12, or to the cache queue at line 33 If it can be cached. By default, each request can be cached, and of course we can call the setShouldCache(false) method of Request to change this default behavior.
OK, then since by default every request is cacheable, it is naturally added to the cache queue, so the cache thread that has been waiting in the background is about to start running. Let's look at the run() method in Cache Dispatcher. The code is as follows:
The code is a bit long, so we'll just focus on it. Firstly, you can see a while(true) loop in line 11, which shows that the cache thread is always running. Then, on line 23, you try to extract the response from the cache. If it is empty, you can add the request to the network request queue. If it is not empty, you can judge whether the cache has expired or if it has expired, you can add the request to the network request as well. In the queue, otherwise, it is considered that there is no need to retransmit the network request, and the data in the cache can be used directly. Next, the parseNetworkResponse() method of Request is called on line 39 to parse the data, and then the parsed data is called back. This part of the code is skipped first because its logic is basically the same as that of the latter half of the NetworkDispatcher. So let's just merge it later. Let's first look at what is in the NetworkDispatcher. How to handle the network request queue, the code is as follows:
Similarly, in line 7 we see a similar while(true) loop, indicating that the network request thread is also running continuously. At line 28, the Network's performRequest() method is called to send network requests, and Network is an interface. The specific implementation here is Basic Network. Let's look at its performRequest() method, as follows:
Most of these methods are about the details of network requests. We don't need to pay much attention to them. We need to note that line 14 calls the performRequest() method of HttpStack, where HttpStack calls the new RequestQueue () method from the beginning to create an instance. By default, if the system version number is greater than 9, the HulStack object will be created, otherwise the H_ttpStack object will be created. TtpClientStack object. As mentioned earlier, the internal reality of these two objects is to use HttpURLConnection and HttpClient to send network requests respectively. We will no longer follow up to read them, and then assemble the data returned by the server into a NetworkResponse object for return.
The parseNetworkResponse() method of Request is called to parse the data in NetworkResponse and write the data to the cache after the return value of NetworkResponse is received in NetworkDispatcher. This method is implemented by subclasses of Request, because different kinds of Request parsing methods are certainly different. Remember the way we learned about custom Request in the last article? The parseNetworkResponse() method has to be rewritten.
After parsing the data in NetworkResponse, Executor Delivery's postResponse() method is called to call back the parsed data. The code is as follows:
In the execute() method of mResponsePoster, a ResponseDelivery Runnable object is introduced to ensure that the run() method in the object runs in the main thread. Let's see what the code in the run() method looks like:
Although the code is not much, we do not need to read line by line, just focus on it. The delivery Response () method of Request is called in line 22. Do you feel familiar with it? Yes, this is another method we need to rewrite when we customize the Request. The response of each network request is called back to this method. Finally, in this method, we can call back the response data to the onResponse() method of Response.Listener.
Well, at this point, we've sorted out the whole process of Volley's execution. Do you already feel very clear? By the way, remember the flowchart at the beginning of the article, which was not understood just now. Now let's look at it again.
The blue part represents the main thread, the green part represents the cache thread, and the orange part represents the network thread. We call the add() method of RequestQueue in the main thread to add a network request, which is first added to the cache queue. If we find that the corresponding cache results can be found, we read the cache directly and parse it, and then call back to the main thread. If no result is found in the cache, add the request to the network request queue, then process the sending HTTP request, parse the response result, write to the cache, and call back the main thread.
Well, do you think it's easy to understand this picture now? Okay, so far we've learned all about Volley's usage and source code. I'm sure you are familiar with Volley and can apply it to practical projects. So this is the end of Volley's full analysis series. Thank you for your patience to see the end.