I. Preface
There are many on-line implementation of this demand, but too many fancy functions are not used, and their own project needs are not suitable for use, but it is too difficult to change the source code, they wrote a.
Two. Steps
Rewrite either recyclerview or item. I choose to rewrite item here.
2.1 Implementing item layout
As shown in the figure below, you need to make the layout of item as follows.
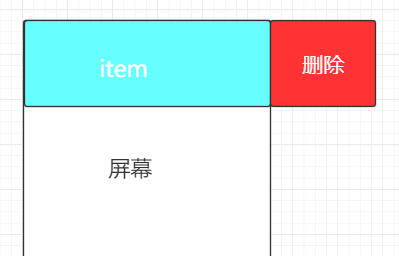
The layout file is:
<?xml version="1.0" encoding="utf-8"?>
<LinearLayout xmlns:android="http://schemas.android.com/apk/res/android"
    android:layout_width="match_parent"
    android:layout_height="match_parent"
    android:orientation="vertical" >

    <!--Dividing line  -->
    <View
        android:layout_width="match_parent"
        android:layout_height="10dp"
        />

    <com.maxence.tvfocusdemo.ItemView
        android:id="@+id/itemview"
        android:layout_width="wrap_content"
        android:layout_height="wrap_content"
           android:scrollbars="none"
        >
        <LinearLayout
            android:layout_width="match_parent"
            android:layout_height="60dp"
            android:orientation="horizontal"
            >
            <TextView
                android:id="@+id/tv1"
                android:layout_width="match_parent"
                android:layout_height="match_parent"
                android:text="I am item"
                android:textColor="@android:color/white"
		android:background="#0000ff"
                android:gravity="center"
                />
               <TextView
                android:id="@+id/tv2"
                android:layout_width="60dp"
                android:layout_height="60dp"
                android:text="delete"
                android:textColor="@android:color/white"
		android:background="#ff0000"
                android:gravity="center"
                />
        </LinearLayout>
    </com.maxence.tvfocusdemo.ItemView>

</LinearLayout>
I'm here to rewrite Horizontal ScrollView.
public class ItemView extends HorizontalScrollView {2.1.1 Gets the width of the screen, then prepares to dynamically set the view on the left of item to fill the screen, and then the deleted view on the right is squeezed out of the screen:
public ItemView(Context context, AttributeSet attrs) {
		super(context, attrs);
		mContext = context;
		init();
	}
private void init() {
WindowManager wm = (WindowManager) mContext.getSystemService(Context.WINDOW_SERVICE);
Display display = wm.getDefaultDisplay();
DisplayMetrics metrics = new DisplayMetrics();
display.getMetrics(metrics);
int pixels = metrics.widthPixels;
mScreenWidth = pixels;
}2.1.2 Fill the full screen on the left side of onmeasure dynamic setting item:
        @Override
	protected void onMeasure(int widthMeasureSpec, int heightMeasureSpec) {

		if (!islayout) {  //Here's a judgment because onMeasure onlayout executes many times
			vg = (LinearLayout) getChildAt(0);
			//view on the left
			view = (TextView) vg.getChildAt(0);
			//view on the right, not here for the time being
		//	View view1 = vg.getChildAt(1);
			//Set the view width on the left to fill the barbarian screen
			android.widget.LinearLayout.LayoutParams params = new LinearLayout.LayoutParams(mScreenWidth, LinearLayout.LayoutParams.MATCH_PARENT);
			view.setLayoutParams(params);
			islayout = true;
		}
		super.onMeasure(widthMeasureSpec, heightMeasureSpec);
	}
2.1.3 Gets the width of the deleted item on the right, which is convenient for judging the sliding distance and automatically opening or closing the item in the back sliding.
        @Override
	protected void onMeasure(int widthMeasureSpec, int heightMeasureSpec) {

		if (!islayout) {  //Here's a judgment because onMeasure onlayout executes many times

			vg = (LinearLayout) getChildAt(0);  //Horizontal ScrollView can only have one child control. In the layout file, I use Linear Layout
			//view on the left
			view = (TextView) vg.getChildAt(0);
			//view on the right, not here for the time being
		//	View view1 = vg.getChildAt(1);
			//Set the view width on the left to fill the barbarian screen
			android.widget.LinearLayout.LayoutParams params = new LinearLayout.LayoutParams(mScreenWidth, LinearLayout.LayoutParams.MATCH_PARENT);
			view.setLayoutParams(params);
			islayout = true;
		}
		super.onMeasure(widthMeasureSpec, heightMeasureSpec);
	}
2.2 It can automatically hide and open in the process of left-slip and right-slip.
To monitor onTouchEvent, we only need to monitor up and cancel states:
        @Override
	public boolean onTouchEvent(MotionEvent ev) {
		switch (ev.getAction()) {
		//Used to record current
		case MotionEvent.ACTION_DOWN:
			if(mylistener!=null){
				mylistener.onlick(this);
			}
			return true;
		case MotionEvent.ACTION_CANCEL:
		case MotionEvent.ACTION_UP:
			int scrollX = getScrollX();
			if(scrollX>=viewWidth/2){
				openMenu();
			}else{
				closeMenu();
			}
			//The smoothScrollTo method does not work if the direct break
			return true;
		default:
			break;
		}
		return super.onTouchEvent(ev);
	}
Here's the difference between scrollto and scrollBy:
scrollTo: slides to the specified coordinates, invalid settings many times
scrollBy: Addition or subtraction of sliding coordinate values, the origin of which is the last sliding coordinate.
	/**
	 * Display full right view
	 */
	public void openMenu(){
		smoothScrollTo(viewWidth,0);
		mylistener.open(this);
		//adapter.setOpenView(this);
	}
	/**
	 * Close the right view
	 */
	public void closeMenu(){
		smoothScrollTo(0, 0);
	}
2.3 When clicking on other items, close the item that is being opened
We have a callback function implementation here:
	interface Mylistener{
		void onlick(ItemView v);
		void open(ItemView v);
	}
Then, in action_down, decide if you need to close:
                //Used to record current
		case MotionEvent.ACTION_DOWN:
			if(mylistener!=null){
				mylistener.onlick(this);
			}
			return true;
Externally, that is, the adpater page provides a listening method:
public  void setOnMyListener(Mylistener l){
		mylistener=l;
	}
apadter implementation:
	holder.itView.setOnMyListener(new Mylistener() {
			@Override
			public void onlick(ItemView v) {
				if(mItemView!=null&&mItemView!=v){
					mItemView.closeMenu();
				}
			}
			@Override
			public void open(ItemView v) {
				mItemView=v;
			}

		});
2.4 Implement click delete item:
Monitoring in adapter
holder.tv_r.setOnClickListener(new View.OnClickListener() {
			@Override
			public void onClick(View v) {
				holder.itView.closeMenu();
				String string = aList.get(position);
				aList.remove(position);
				aList.add(0,string);
				notifyDataSetChanged();
			}
		});
In this way, we will basically accomplish:
Attach the complete adapter code:
public class MyAdapter  extends RecyclerView.Adapter<Holder> {

	private  Context mContext;
	private ArrayList<String> aList;
	private ItemView mItemView;
	private  MyAdapter adapter;
	public MyAdapter(Context context) {
		mContext=context;
		aList=new ArrayList<String>();
		for(int x=0;x<20;x++){
			aList.add(x+"");
		}
	}

	@Override
	public int getItemCount() {
		return aList.size();
	}
	@Override
	public void onBindViewHolder(final Holder holder, final int position) {

		holder.tv_l.setText("This is the entry:"+aList.get(position));

		holder.tv_r.setOnClickListener(new View.OnClickListener() {

			@Override
			public void onClick(View v) {
				holder.itView.closeMenu();
				String string = aList.get(position);
				aList.remove(position);
				aList.add(0,string);
				notifyDataSetChanged();
			}
		});
		holder.itView.setOnMyListener(new Mylistener() {

			@Override
			public void onlick(ItemView v) {
				if(mItemView!=null&&mItemView!=v){
					mItemView.closeMenu();
				}
			}
			@Override
			public void open(ItemView v) {
				mItemView=v;
			}

		});
	}
	@Override
	public Holder onCreateViewHolder(ViewGroup parent, int arg1) {
		LayoutInflater inflater = LayoutInflater.from(mContext);
		View view = inflater.inflate(R.layout.activity_main1,parent,false);
		return new Holder(view);
	}
	class Holder extends RecyclerView.ViewHolder{
		TextView tv_l;
		TextView tv_r;
		ItemView itView;
		public Holder(View itemView) {
			super(itemView);
			tv_l = (TextView) itemView.findViewById(R.id.tv1);
			tv_r = (TextView) itemView.findViewById(R.id.tv2);
			itView=(ItemView) itemView.findViewById(R.id.itemview);
		}

	}
}
Simple calls in action are enough:
Code portal eclipse versionrecyclerView = (RecyclerView) findViewById(R.id.rl_view); recyclerView.setLayoutManager(new LinearLayoutManager(this)); MyAdapter adapter =new MyAdapter(this); recyclerView.setAdapter(adapter);