For a better reading experience, you can go to my personal website: Windy'Journal
Catalog
About Full Screen
Full screen is a broad definition of the design of mobile phones with super high screen ratio in the mobile phone industry. Literally speaking, the front of the mobile phone is all screen, and the four border positions are all designed without border, pursuing nearly 100% screen proportion. However, due to the current technology, the mobile phone with 100% front screen can not be achieved. Now the industry said that the full-screen mobile phone refers to the real screen proportion can reach more than 80%, with ultra-narrow border design of mobile phones.
The ratio of screen width to screen height of full screen mobile phone is special, which is no longer 16:9 as before. Samsung's Galaxy S8, for example, has a screen resolution of 2960 x 1440 and a corresponding screen ratio of 18.5:9. The screen resolution of VIVO X20 mobile phone is 2160x1080, corresponding to the screen ratio: 18:9. How can app developers optimize their apps to display better screen proportions on these phones? Next, from the following two aspects to explore APP perfect fit for a full-screen mobile phone.
- Larger screen height-width ratio
- Virtual Navigation Bar
Larger screen height-width ratio
Declare the max_aspect value in Android Manifest. XML
Because the aspect ratio of full-screen mobile phone is larger than before, if not suitable, Android defaults to the maximum aspect ratio of 1.86, which is smaller than the aspect ratio of full-screen mobile phone. Therefore, when opening part of App on full-screen mobile phone, there will be room up and down, showing as black bar. This has a great impact on the visual experience, and the extra space provided by the full screen has not been utilized, so such applications need to be adapted accordingly.
To solve this problem, Android officially provides an adaptation scheme, that is, to improve the maximum screen aspect ratio supported by App, which is relatively simple to implement. In Android Manifest. xml, the following configuration can be done:
<meta-data android:name="android.max_aspect" android:value="ratio_float"/>- 1
Among them, ratio_float is a floating point number, and the official recommendation is 2.1 or larger, because 18.5:9 = 2.0555555... If there is a phone with a larger aspect ratio in the future, this value will need to be set to a larger one.
Therefore, it is recommended that developers add the following code under the Application tag of their App Android Manifest:
<meta-data android:name="android.max_aspect" android:value="2.1" />- 1
Additionally, adding android: resizeable activity = "true" to the Activity tag in Android Manifest can also achieve full-screen display, but this setting only works for Activity, and adding this attribute will also support split-screen display.
For more details on this adaptation, you can refer to the official google documentation:
Update your app to take advantage of the larger aspect ratio on new Android flagship devices
The max_aspect value can also be set dynamically in Java code by the following methods:
public void setMaxAspect() {
        ApplicationInfo applicationInfo = null;
        try {
            applicationInfo = getPackageManager().getApplicationInfo(getPackageName(), PackageManager.GET_META_DATA);
        } catch (PackageManager.NameNotFoundException e) {
            e.printStackTrace();
        }
        if(applicationInfo == null){
            throw new IllegalArgumentException(" get application info = null, has no meta data! ");
        }
        applicationInfo.metaData.putString("android.max_aspect", "2.1");
    }
Replace part of the stretched image resource file
The screen ratio has changed from 16:9 to 18:9. For full-screen images, stretching often results in distortion, such as the image on Taobao Start Page below, which has some stretched patterns. To solve this problem, developers need to add some new image resources to adapt to different screen ratios.

To solve this problem, we take the VIVO X20Plus mobile phone with resolution of 2160 X1080 and pixel density of 480 DPI as an example. We can add a folder under the resource directory, drawable-h642dp-port-xxxhdpi, and put the resource picture with resolution of 2160 X1080 in this directory. The system can automatically use this kind of picture without stretching. Detailed usage of H < N > DP is also described in the google Developer Document.
https://developer.android.com/guide/practices/screens_support.html
Suggestions for Optimizing Layout Files
In layout files, we usually use DP as a unit. Let's first look at the definition of dp:
Density-independent pixel (dp) independent pixel density. The standard is 160 dpi, i.e. 1 DP corresponds to 1 pixel. The calculation formula is as follows:
px = dp * (dpi / 160), the greater the screen density, the more pixels corresponding to 1dp.
There is a DPI in the formula above. The dpi for DPI is Dots Per Inch (the number of dots printed per inch), which is 1px=1dp when the dpi for the device is 160.
It's very convenient to use dp for layout, but dp can't solve all the adaptation problems.
- The rendering effect will still be different, just similar.
- When the physical size of the equipment is different, the dp seems powerless. The UI for a 4.3-inch screen, running on a 5.0-inch screen, is likely to have a lot of blanks on the right and lower sides. A 5.0-inch UI running on a 4.3-inch device is likely to fail to display.
In conclusion, dp allows the same value to show roughly the same size at different resolutions. However, when the size of the equipment varies greatly, the display effect is unsatisfactory.
Compared with the traditional size of mobile phones, the screen size of full-screen mobile phones is quite different, so using dp to lay out the interface is not good at displaying the effect on full-screen mobile phones.
Is there a better layout than dp?
Yes, that's the percentage layout scheme.
For example, in Linear Layout, layout_weight is used to allocate sub-views proportionally, so that no matter how high the screen is, because each sub-view has the same proportion in the screen, it looks the same on mobile phones with different resolutions.
If you use Relative Layout or FrameLayut to lay out, it is recommended to use the android-percent-support library, which google officially has a project to introduce. android-percent-support-lib-sample.
In android studio, only add the following dependencies in build.gradle:
compile 'com.android.support:percent:23.0.1'- This library provides two layouts for you to use:
PercentRelativeLayout,PercentFrameLayout,
As you can see by name, this is inherited from two container classes, FrameLayout and RelativeLayout.
The attributes supported are:
layout_widthPercent,layout_heightPercent, layout_marginPercent,layout_marginLeftPercent, layout_marginTopPercent,layout_marginRightPercent,layout_marginBottomPercent,
layout_marginStartPercent,layout_marginEndPercent
Specific methods of use are not described in detail in this article, you can refer to the official sample: android-percent-support-lib-sample
Or this blog: Percentage Layout Support Library
Another layout method is more powerful and useful than the two layout methods mentioned above. That is Constraint Layout. Every time you create a default project with android studio, the default layout is Constraint Layout. That is to say, google is also vigorously promoting Constraint Layout. Why?
Because Constraint Layout has three advantages:
- It can greatly reduce the nesting of layout and improve the rendering performance of interface.
- You can write Android layout files visually, which is very convenient.
- Compared with the layout described above, it is more convenient to achieve percentage layout, and there is no pressure to adapt to the full screen.
Therefore, we strongly recommend that you learn and use Constraint Layout. No Constraint Layout, then you OUT.
Virtual Navigation Bar Adaptation
Judging the existence of virtual navigation keys
Because different mobile phone manufacturers have made different modifications to the system, the processing methods of Navigation Bar at the bottom of the system interface are also different. Some mobile phone systems have Navigation Bar, some mobile phones do not have it, and some mobile phones are setting up additional switches to allow users to choose whether to enable Navigation Bar or not. Therefore, it is a challenge for APP developers to match virtual navigation keys perfectly.
First, let's see if the android source provides a common API to determine whether the current system has Navigation Bar.
Analysis source code
By looking at the Android source code, we found that under Windows Manager Service. Java there is a method called hasNavigation Bar:
    @Override
    public boolean hasNavigationBar() {
        return mPolicy.hasNavigationBar();
}- However, Windows Manager Service is a system service, and we cannot call this method directly. Then I will continue to see the concrete implementation of this method.
What is mPolicy? Look at the source code: final Windows Manager Policy mPolicy; Windows Manager Policy is just an interface, where is the specific implementation?
Its implementation class is Phone Windows Manager, so it is finally transferred to hasNavigation Bar () of Phone Windows Manager.
    // Use this instead of checking config_showNavigationBar so that it can be consistently
    // overridden by qemu.hw.mainkeys in the emulator.
    @Override
    public boolean hasNavigationBar() {
        return mHasNavigationBar;
    }
- Look at where the mHasNavigation Bar is assigned in Phone Windows Manager:
public void setInitialDisplaySize(Display display, int width, int height, int density) {
        ...
        ...
        mHasNavigationBar = res.getBoolean(com.android.internal.R.bool.config_showNavigationBar);

        // Allow a system property to override this. Used by the emulator.
        // See also hasNavigationBar().
        String navBarOverride = SystemProperties.get("qemu.hw.mainkeys");
        if ("1".equals(navBarOverride)) {
            mHasNavigationBar = false;
        } else if ("0".equals(navBarOverride)) {
            mHasNavigationBar = true;
        }
        ...
        ...
}- As you can see from the above code, the settings of mHasNavigationBar are determined in two places:
1. Firstly, config_show Navigation Bar is selected from the system's resource file. The file path set by this value is frameworks/base/core/res/values/config.xml.
    <!-- Whether a software navigation bar should be shown. NOTE: in the future this may be
         autodetected from the Configuration. -->
<bool name="config_showNavigationBar">false</bool> - 2. The system then obtains the value of "qemu.hw.mainkeys", which may override the value of mHasNavigationBar obtained above. If the value "qemu. hw. mainkeys" gets is not empty, whether true or false, it should be set according to the following situation.
So the above two settings together determine the display and hiding of Navigation Bar.
A Method to Realize the Judgment of Navigation Bar
Through the analysis of the source code above, we can imitate the method of assigning value to mHasNavigation Bar by Phone Windows Manager, and implement a method of judging Navigation Bar by ourselves. The specific code is as follows:
    //Judging whether Navigation Bar exists
    public static boolean hasNavigationBar(Context context) {
        boolean hasNavigationBar = false;
        Resources rs = context.getResources();
        int id = rs.getIdentifier("config_showNavigationBar", "bool", "android");
        if (id > 0) {
            hasNavigationBar = rs.getBoolean(id);
        }
        try {
            //Reflect to get the System Properties class and call its get method
            Class systemPropertiesClass = Class.forName("android.os.SystemProperties");
            Method m = systemPropertiesClass.getMethod("get", String.class);
            String navBarOverride = (String) m.invoke(systemPropertiesClass, "qemu.hw.mainkeys");
            if ("1".equals(navBarOverride)) {
                hasNavigationBar = false;
            } else if ("0".equals(navBarOverride)) {
                hasNavigationBar = true;
            }
        } catch (Exception e) {
            e.printStackTrace();
        }
        return hasNavigationBar;
}- In fact, if we can get the proxy of Windows Manager Service in the application process, it would be easier to call its hasNavigation Bar method directly. But the question is how to get the proxy of Windows Manager Service in the application process?
Looking at the source code, we found that there is a static method in Android. view. Windows Manager Global to obtain the local proxy implementation of Windows Manager Service:
    public static IWindowManager getWindowManagerService() {
        synchronized (WindowManagerGlobal.class) {
            if (sWindowManagerService == null) {
                sWindowManagerService = IWindowManager.Stub.asInterface(
                        ServiceManager.getService("window"));
                try {
                    if (sWindowManagerService != null) {
                        ValueAnimator.setDurationScale(
                                sWindowManagerService.getCurrentAnimatorScale());
                    }
                } catch (RemoteException e) {
                    throw e.rethrowFromSystemServer();
                }
            }
            return sWindowManagerService;
        }
}- Therefore, we can get the IWindows Manager by invoking this method through reflection, and then call the hasNavigation Bar method of IWindows Manager to determine whether the Navigation Bar exists or not. See the code specifically:
    /**
     * Determine whether the Navigation Bar exists in the device
     *
     * @return true Existence, false does not exist
     */
    public static boolean deviceHasNavigationBar() {
        boolean haveNav = false;
        try {
            //1. Obtain Windows Manager Service through Windows Manager Global
            // Reflection method: I Windows Manager Windows Manager Service = Windows Manager Global. get Windows Manager Service ();
            Class<?> windowManagerGlobalClass = Class.forName("android.view.WindowManagerGlobal");
            Method getWmServiceMethod = windowManagerGlobalClass.getDeclaredMethod("getWindowManagerService");
            getWmServiceMethod.setAccessible(true);
            //GetWindows ManagerService is a static method, so invoke null
            Object iWindowManager = getWmServiceMethod.invoke(null);

            //2. Get the hasNavigationBar method return value of Windows MangerService
            // Reflection method: haveNav = windows Manager Service. hasNavigation Bar ();
            Class<?> iWindowManagerClass = iWindowManager.getClass();
            Method hasNavBarMethod = iWindowManagerClass.getDeclaredMethod("hasNavigationBar");
            hasNavBarMethod.setAccessible(true);
            haveNav = (Boolean) hasNavBarMethod.invoke(iWindowManager);
        } catch (Exception e) {
            e.printStackTrace();
        }
        return haveNav;
}Since there are no physical keys such as Home and Back at the bottom of the full-screen mobile phone, most full-screen mobile phones support virtual navigation keys, that is, the return value obtained by hasNavigation Bar through the above method is true.
However, the Navigation Bar at the bottom takes up some screen space and always shows that it loses the meaning of the full screen and the user experience is not good. Therefore, in VIVO X20 and VIVO X20Plus full-screen mobile phones, the switch whether Navigation Bar is enabled or not is added in the settings. The path of the switch is: Settings - > Navigation Key.
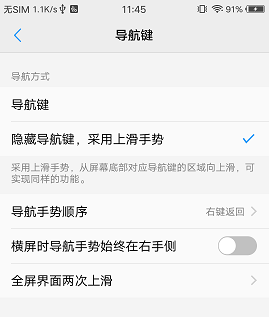
When hiding virtual navigation keys, users can realize the same function of navigation keys by sliding on the bottom, which is very convenient.
But for APP developers, it's a bit of a hassle to adapt. On a VIVO full-screen mobile phone, it is impossible to accurately judge whether the Navigation Bar exists or not by simply using the hasNavigation Bar given above. The hasNavigation Bar method always returns true.
Is there any other way to judge that? Must have! That is to get the value of this gesture navigation switch in Setting, see the code:
    private static final String NAVIGATION_GESTURE = "navigation_gesture_on";
    private static final int NAVIGATION_GESTURE_OFF = 0;

    /**
     * Get the "navigation_gesture_on" value in vivo mobile settings to determine whether the current system uses navigation keys or gesture navigation operations
     * @param context app Context
     * @return false Represents using the Navigation Bar, true indicates using gestures, and the default is false.
     */
    public static boolean vivoNavigationGestureEnabled(Context context) {
        int val = Settings.Secure.getInt(context.getContentResolver(), NAVIGATION_GESTURE, NAVIGATION_GESTURE_OFF);
        return val != NAVIGATION_GESTURE_OFF;
}- In this way, to judge whether the current system exists and opens Navigation Bar, we need to combine the two methods given above to judge accurately:
    //VivoNavigation Gesture Enabled () returns false if it cannot get the value from the settings, so it will not affect the judgment on other mobile phones.
    boolean hasNavigationBar = hasNavigationBar(this) && !vivoNavigationGestureEnabled(this);
Configuring properties of virtual navigation keys
For most applications of video playback classes, when playing videos, you definitely want to be able to hide Navigation Bar and StatusBar. For this requirement, there is also good support in Android 4.1 or more systems. google gives the following examples officially:
View decorView = getWindow().getDecorView();
// Hide both the navigation bar and the status bar.
// SYSTEM_UI_FLAG_FULLSCREEN is only available on Android 4.1 and higher, but as
// a general rule, you should design your app to hide the status bar whenever you
// hide the navigation bar.
int uiOptions = View.SYSTEM_UI_FLAG_HIDE_NAVIGATION | View.SYSTEM_UI_FLAG_FULLSCREEN;
decorView.setSystemUiVisibility(uiOptions);- But it's flawed. Google gives five things to note:
- Although Navigation Bar is temporarily hidden in this way, flag s will be cleared anywhere on the user's touch screen, that is to say, your settings will fail after the user touches the screen.
- Once your flags are cleared, if you want to hide Navigation Bar again, you need to reset it, which requires listening for an event.
- Setting UI tags in different places is different. If you hide the system bar in the activity's onCreate() method, the system bar will be redisplayed when the user presses the home key. When the user reopens the activity, onCreate() will not be called, so the system bar will remain visible. If you want the system UI to remain unchanged when switching between different activities, you need to set UI labels in onReasume() and onWindows FocusChaned ().
- SetSystem UiVisibility () takes effect only when the called View is displayed.
- When navigating from View to another place, the tags set with setSystem UiVisibility () are cleared.
Detailed considerations can be found in the google Developer Document: Hiding the Navigation Bar
Obviously, the two attributes of View.SYSTEM_UI_FLAG_HIDE_NAVIGATION and View.SYSTEM_UI_FLAG_FULLSCREEN can't satisfy the need of hiding Navigation Bar in application at all. So what?
Fortunately, in Android 4.4, google brought us the concept of Immersive Mode, or "Immersive Full Screen".
What does immersive full screen mean? It's the application that supports immersive full-screen display on Android 4.4 mobile phones. There won't be annoying virtual keys. When we need virtual keys, we can call up virtual keys just by slightly sliding at the bottom of the screen, and the virtual keys are displayed in a transparent state. According to Google, it gives users an "immersive" experience.
Android 4.4 provides View.SYSTEM_UI_FLAG_IMMERSIVE and View.SYSTEM_UI_FLAG_IMMERSIVE_STICKY tags, both of which must be used with View.SYSTEM_UI_FLAG_HIDE_NAVIGATION and View.SYSTEM_UI_FLAG_FULLSCREEN in order to achieve immersion mode.
There are three ways to introduce usage:
1. Use only SYSTEM_UI_FLAG_HIDE_NAVIGATION and SYSTEM_UI_FLAG_FULLSCREEN
In this case, after entering full-screen mode, the user has any operation, SYSTEM_UI_FLAG_HIDE_NAVIGATION and SYSTEM_UI_FLAG_FULLSCREEN will be cleared. The status bar and virtual keys will always be visible. Unless SYSTEM_UI_FLAG_HIDE_NAVIGATION and SYSTEM_UI_FLAG_FULLSCREEN are set again. View. OnSystem UiVisibility ChangeListener is called when the status bar and virtual keys display changes.
2. SYSTEM_UI_FLAG_IMMERSIVE with SYSTEM_UI_FLAG_HIDE_NAVIGATION and SYSTEM_UI_FLAG_FULLSCREEN
User actions will not clear SYSTEM_UI_FLAG_HIDE_NAVIGATION and SYSTEM_UI_FLAG_FULLSCREEN, and will remain in full screen mode. View. OnSystem UiVisibility ChangeListener is also triggered when the display is switched. Another difference is that in full-screen mode, sliding from the original status bar or virtual key position to the inside of the screen will clear SYSTEM_UI_FLAG_HIDE_NAVIGATION and SYSTEM_UI_FLAG_FULLSCREEN, keep the visible state, and trigger OnSystem UiVisibility Change Listener.
3. SYSTEM_UI_FLAG_IMMERSIVE_STICKY with SYSTEM_UI_FLAG_HIDE_NAVIGATION and SYSTEM_UI_FLAG_FULLSCREEN
User actions do not clear SYSTEM_UI_FLAG_HIDE_NAVIGATION and SYSTEM_UI_FLAG_FULLSCREEN. Full screen mode will always be maintained. View. OnSystem UiVisibilityChangeListener is also triggered when the display is switched. In full screen mode, the status bar and virtual key bar will be temporarily visible and automatically hidden after a period of time when sliding inside the screen from the original status bar or virtual key position. Unlike SYSTEM_UI_FLAG_IMMERSIVE, OnSystem Ui Visibility ChangeListener is not triggered because it is a temporary display.
The switching between full-screen and non-full-screen in SYSTEM_UI_FLAG_IMMERSIVE_STICKY mode can be realized simply by the following two methods:
public void showBar(){
    int uiOptions = getWindow().getDecorView().getSystemUiVisibility();
    int newUiOptions = uiOptions;
    boolean isImmersiveModeEnabled =
            ((uiOptions | View.SYSTEM_UI_FLAG_IMMERSIVE_STICKY) == uiOptions);
    if (isImmersiveModeEnabled) {
        Log.i(TAG, "Turning immersive mode mode off. ");
        //First take the right and then take the wrong, then put the corresponding position.1 Set up0,Originally for0Or0
        if (Build.VERSION.SDK_INT >= 14) {
            newUiOptions &= ~View.SYSTEM_UI_FLAG_HIDE_NAVIGATION;
        }
        if (Build.VERSION.SDK_INT >= 16) {
            newUiOptions &= ~View.SYSTEM_UI_FLAG_FULLSCREEN;
        }
        if (Build.VERSION.SDK_INT >= 18) {
            newUiOptions &= ~View.SYSTEM_UI_FLAG_IMMERSIVE_STICKY;
        }
        getWindow().getDecorView().setSystemUiVisibility(newUiOptions);
    }
}


public void hideBar() {
    // The UI options currently enabled are represented by a bitfield.
    // getSystemUiVisibility() gives us that bitfield.
    int uiOptions = getWindow().getDecorView().getSystemUiVisibility();
    int newUiOptions = uiOptions;
    boolean isImmersiveModeEnabled =
            ((uiOptions | View.SYSTEM_UI_FLAG_IMMERSIVE_STICKY) == uiOptions);
    if (!isImmersiveModeEnabled) {
        Log.i(TAG, "Turning immersive mode mode on. ");
        if (Build.VERSION.SDK_INT >= 14) {
            newUiOptions |= View.SYSTEM_UI_FLAG_HIDE_NAVIGATION;
        }
        if (Build.VERSION.SDK_INT >= 16) {
            newUiOptions |= View.SYSTEM_UI_FLAG_FULLSCREEN;
        }
        if (Build.VERSION.SDK_INT >= 18) {
            newUiOptions |= View.SYSTEM_UI_FLAG_IMMERSIVE_STICKY;
        }
        getWindow().getDecorView().setSystemUiVisibility(newUiOptions);
    }
} - The idea of switching between full-screen and non-full-screen is given in google's official Example.
googlesamples/android-ImmersiveMode
The code is as follows:
/**
 * Detects and toggles immersive mode (also known as "hidey bar" mode).
 */
public void toggleHideyBar() {

    // BEGIN_INCLUDE (get_current_ui_flags)
    // The UI options currently enabled are represented by a bitfield.
    // getSystemUiVisibility() gives us that bitfield.
    int uiOptions = getActivity().getWindow().getDecorView().getSystemUiVisibility();
    int newUiOptions = uiOptions;
    // END_INCLUDE (get_current_ui_flags)
    // BEGIN_INCLUDE (toggle_ui_flags)
    boolean isImmersiveModeEnabled =
            ((uiOptions | View.SYSTEM_UI_FLAG_IMMERSIVE_STICKY) == uiOptions);
    if (isImmersiveModeEnabled) {
        Log.i(TAG, "Turning immersive mode mode off. ");
    } else {
        Log.i(TAG, "Turning immersive mode mode on.");
    }

    // Navigation bar hiding:  Backwards compatible to ICS.
    if (Build.VERSION.SDK_INT >= 14) {
        newUiOptions ^= View.SYSTEM_UI_FLAG_HIDE_NAVIGATION;
    }

    // Status bar hiding: Backwards compatible to Jellybean
    if (Build.VERSION.SDK_INT >= 16) {
        newUiOptions ^= View.SYSTEM_UI_FLAG_FULLSCREEN;
    }

    // Immersive mode: Backward compatible to KitKat.
    // Note that this flag doesn't do anything by itself, it only augments the behavior
    // of HIDE_NAVIGATION and FLAG_FULLSCREEN.  For the purposes of this sample
    // all three flags are being toggled together.
    // Note that there are two immersive mode UI flags, one of which is referred to as "sticky".
    // Sticky immersive mode differs in that it makes the navigation and status bars
    // semi-transparent, and the UI flag does not get cleared when the user interacts with
    // the screen.
    if (Build.VERSION.SDK_INT >= 18) {
        newUiOptions ^= View.SYSTEM_UI_FLAG_IMMERSIVE_STICKY;
    }

    getActivity().getWindow().getDecorView().setSystemUiVisibility(newUiOptions);
    //END_INCLUDE (set_ui_flags)
}
For more detailed usage of immersive full screen, you can refer to the google Developer Document:
Using Immersive Full-Screen Mode
summary
This is a summary of APP adapting to full screen mobile phones. If the passenger officer encounters the relevant app adapter full screen problem, you can refer to some of the above methods to solve the problem, if it can bring some help, It is my pleasure.