Preface
Last year, I learned a little about SpringBoot in various channels, how convenient and fast it is to develop web projects. But I didn't study hard at that time. After all, I felt that I was not very proficient in Struts and Spring MVC. But after reading many introductions about Spring Boot, it was not as difficult as I imagined, so I began to prepare to learn Spring Boot. In my spare time, after reading SpringBoot's actual combat and some God's blogs about SpringBoot, I started to write my first SpringBoot project. After some simple development of Restful style interface for SpringBoot to implement CRUD function, this blog article came out.
Introduction to SpringBoot
Spring Boot is a new framework provided by the Pivotal team, designed to simplify the initial build and development process of new Spring applications. The framework uses a specific way to configure, so that developers no longer need to define templated configurations.
Simply put, with just a few jar s and some simple configurations, you can quickly develop projects.
If I want to simply develop an external interface, then I just need the following code.
A main program starts spring Boot
@SpringBootApplicationpublic class Application {    public static void main(String[] args) {
        SpringApplication.run(Application.class, args);
    }
}
Control layer
@RestControllerpublic class HelloWorldController {    @RequestMapping("/hello")    public String index() {
        return "Hello World";
    }
 }
After successfully starting the main program, write the control layer and enter it in the browser. http://localhost:8080//hello You can view the information.
Feel like using SpringBoot to develop programs is not very simple!?
In the words of SpringBoot in action:
There's no configuration, no web.xml, no build instructions, no application server, but that's the whole application. SpringBoot does all the logistics required to execute an application, and you just need to do the code for the application.
Developing a Restful Service Based on SpringBook
I. Development preparation
1.1 Databases and Tables
First, we need to create a database and a table in MySql
The database name is spring boot and the table name is t_user
The script is as follows:
CREATE DATABASE `springboot`;USE `springboot`;

DROP TABLE IF EXISTS `t_user`;

CREATE TABLE `t_user` (
  `id` int(11) NOT NULL AUTO_INCREMENT COMMENT 'id',
  `name` varchar(10) DEFAULT NULL COMMENT 'Full name',
  `age` int(2) DEFAULT NULL COMMENT 'Age',
  PRIMARY KEY (`id`)
) ENGINE=InnoDB AUTO_INCREMENT=12 DEFAULT CHARSET=utf8;
1.2 maven-related dependencies
Because we created it using Maven, we need to add SpringBook related packages.
Here Maven is configured as follows:
The core jar of Spring Book
spring-boot-starter: core modules, including automatic configuration support, log and YAML;
<parent>
        <groupId>org.springframework.boot</groupId>
        <artifactId>spring-boot-starter-parent</artifactId>
        <version>1.5.9.RELEASE</version>
        <relativePath/>
    </parent>

     <properties>
        <project.build.sourceEncoding>UTF-8</project.build.sourceEncoding>
        <java.version>1.7</java.version>

        <mybatis-spring-boot>1.2.0</mybatis-spring-boot>
        <mysql-connector>5.1.39</mysql-connector>

    </properties>

    <dependencies>
        <dependency>
            <groupId>org.springframework.boot</groupId>
            <artifactId>spring-boot-starter-web</artifactId>
        </dependency>
        <dependency>
            <groupId>org.springframework.boot</groupId>
            <artifactId>spring-boot-starter-thymeleaf</artifactId>
        </dependency>
        <dependency>
            <groupId>org.springframework.boot</groupId>
            <artifactId>spring-boot-starter-data-jpa</artifactId>
        </dependency>

        <dependency>
            <groupId>org.springframework.boot</groupId>
            <artifactId>spring-boot-devtools</artifactId>
            <optional>true</optional>
        </dependency>

        <dependency>
            <groupId>org.springframework.boot</groupId>
            <artifactId>spring-boot-starter-test</artifactId>
            <scope>test</scope>
        </dependency>

          <!-- Spring Boot Mybatis rely on -->
        <dependency>
            <groupId>org.mybatis.spring.boot</groupId>
            <artifactId>mybatis-spring-boot-starter</artifactId>
            <version>${mybatis-spring-boot}</version>
        </dependency>

        <!-- MySQL Connection Driven Dependency -->
        <dependency>
            <groupId>mysql</groupId>
            <artifactId>mysql-connector-java</artifactId>
            <version>${mysql-connector}</version>
        </dependency>

    </dependencies>

    <build>
        <plugins>
        <!--Application SpringBoot Plug-in unit  Use spring-boot-devtools Application of Module,When classpath When the files in the file are changed, they will be restarted automatically! ___________ -->
            <plugin>
                <groupId>org.springframework.boot</groupId>
                <artifactId>spring-boot-maven-plugin</artifactId>
                <configuration>
                    <fork>true</fork>
                </configuration>
            </plugin>
        </plugins>
    </build>
II. Engineering description
After successfully creating the database and downloading the corresponding packages.
Let's formally develop the SpringBook project.
2.1 Engineering Structural Drawings:
First of all, determine the structure of the project, here I will briefly explain.
com.pancm.web - Controller layer com.pancm.dao - Data operation layer DAOcom.pancm.bean - Entity class com.pancm.service - Business logic layer Application - Application startup class application.properties - Application configuration file, application startup automatically reads configuration
[Image-e4fd8e-1555314438351]
2.2 Custom Profile
Usually we need some custom configurations, such as jdbc connection configurations, where we can configure with application.properties. The actual configuration of data sources is subject to your preference.
## Data source configuration spring. datasource. url = jdbc: mysql://localhost:3306/springBoot? UseUnicode = true & characterEncoding = utf8spring. datasource. username = root
 Spring. datasource. password = 123456 spring. datasource. driver-class-name = com. mysql. jdbc. Driver Mybatis configuration configuration com.pancm.bean to point to the entity package path. mybatis.typeAliasesPackage=com.pancm.bean is configured under the mapper package under the classpath path path,* represents scanning all xml files. Mybatis. mapperLocations = classpath: mapper/*. xml
3. Coding
After creating the relevant project catalogue, we started to write the corresponding code.
3.1 Entity Class Writing
Since we are only testing here and only create a t_user table in the database, we only create a User entity class where the fields correspond to the fields of the t_user table.
The sample code is as follows:
 public class User {
     /** Numbering*/
     private int id;     /** Name*/
     private String name;
     /** Age*/
     private int age;     public User(){
     }   public class User {
     /** Numbering*/
     private int id;     /** Name*/
     private String name;
     /** Age*/
     private int age;     public User(){
     }//getter and setter outlines _____________
3.2 Dao Layer Writing
In the previous Dao layer, both hibernate and mybatis could use annotations or mapper configuration files. Here we use spring's JPA to complete the basic add-delete check.
Explain:
Generally, there are two ways to implement CRUD with database:
The first is the mapper configuration of xml.
The second is to use annotations, @Insert, @Select, @Update, @Delete. The second is used in this paper.
import org.apache.ibatis.annotations.Delete;import org.apache.ibatis.annotations.Insert;import org.apache.ibatis.annotations.Mapper;import org.apache.ibatis.annotations.Result;import org.apache.ibatis.annotations.Results;import org.apache.ibatis.annotations.Select;import org.apache.ibatis.annotations.Update;import org.springframework.data.repository.query.Param;import com.pancm.bean.User;@Mapperpublic interface UserDao {    /**
     * User Data Added
     */
     @Insert("insert into t_user(id,name,age) values (#{id},#{name},#{age})")      void addUser(User user);

     /**
      * User Data Modification
      */
     @Update("update t_user set name=#{name},age=#{age} where id=#{id}")      void updateUser(User user);     /**
      * User data deletion
     */
     @Delete("delete from t_user where id=#{id}")     void deleteUser(int id);      /**
     * Query User Information Based on User Name
     *
     */
    @Select("SELECT id,name,age FROM t_user where name=#{userName}")    User findByName(@Param("userName") String userName);   /**
     * Query all
     */
    @Select("SELECT id,name,age FROM t_user")
    List<User> findAll();

}
Explain:
mapper: This annotation is added to the interface to indicate that the interface is a CRUD based on annotations.
Results: The returned map result set, property represents the fields of the User class, and column represents the fields of the corresponding database.
Param: The field of the SQL condition.
Insert, Select, Update, Delete: add, check, change and delete corresponding databases.
3.3 Service Business Logic Layer
This is basically the same as hibernate and mybatis.
The code is as follows:
Interface
import com.pancm.bean.User;/**
 *
* Title: UserService
* Description:User interface
* Version:1.0.0
* @author pancm
* @date 2018 January 9th 2013
 */public interface UserService {    /**
     * New users
     * @param user
     * @return
     */
    boolean addUser(User user);    /**
     * Modify user
     * @param user
     * @return
     */
    boolean updateUser(User user);    /**
     * delete user
     * @param id
     * @return
     */
    boolean deleteUser(int id);     /**
     * Query User Information Based on User Name
     * @param userName
     */
    User findUserByName(String userName);    /**
     * Query all
     * @return
     */
    List<User> findAll();
}
Implementation class
import org.springframework.beans.factory.annotation.Autowired;import org.springframework.stereotype.Service;import com.pancm.bean.User;import com.pancm.dao.UserDao;import com.pancm.service.UserService;/**
 *
* Title: UserServiceImpl
* Description:
* User Operations Implementation Class
* Version:1.0.0
* @author pancm
* @date 2018 January 9th 2013
 */@Servicepublic class UserServiceImpl implements UserService {    @Autowired
    private UserDao userDao;    @Override
    public boolean addUser(User user) {        boolean flag=false;        try{
            userDao.addUser(user);
            flag=true;
        }catch(Exception e){
            e.printStackTrace();
        }        return flag;
    }    @Override
    public boolean updateUser(User user) {        boolean flag=false;        try{
            userDao.updateUser(user);
            flag=true;
        }catch(Exception e){
            e.printStackTrace();
        }        return flag;
    }    @Override
    public boolean deleteUser(int id) {        boolean flag=false;        try{
            userDao.deleteUser(id);
            flag=true;
        }catch(Exception e){
            e.printStackTrace();
        }        return flag;
    }    @Override
    public User findUserByName(String userName) {        return userDao.findByName(userName);
    }    @Override
    public List<User> findAll() {        return userDao.findAll();
    }
}
3.4 Controller Control Layer
The control layer is similar to spring MVC, but it's much simpler.
Explain:
RestController: The methods in the default class are returned in json format.
RequestMapping: Interface path configuration.
method: Request format.
RequestParam: Request parameters.
The concrete realization is as follows:
import org.springframework.beans.factory.annotation.Autowired;import org.springframework.web.bind.annotation.RequestMapping;import org.springframework.web.bind.annotation.RequestMethod;import org.springframework.web.bind.annotation.RequestParam;import org.springframework.web.bind.annotation.RestController;import com.pancm.bean.User;import com.pancm.service.UserService;/**
 *
* Title: UserRestController
* Description:
* User Data Operating Interface
* Version:1.0.0
* @author pancm
* @date 2018 January 9th 2013
 */@RestController@RequestMapping(value = "/api/user")
public class UserRestController {
    @Autowired
    private UserService userService;

    @RequestMapping(value = "/user", method = RequestMethod.POST)
    public boolean addUser( User user) {        System.out.println("Start adding...");        return userService.addUser(user);
    }

    @RequestMapping(value = "/user", method = RequestMethod.PUT)
    public boolean updateUser( User user) {        System.out.println("Start updating...");        return userService.updateUser(user);
    }

    @RequestMapping(value = "/user", method = RequestMethod.DELETE)
    public boolean delete(@RequestParam(value = "userName", required = true) int userId) {        System.out.println("Start deletion...");        return userService.deleteUser(userId);
    }

    @RequestMapping(value = "/user", method = RequestMethod.GET)
    public User findByUserName(@RequestParam(value = "userName", required = true) String userName) {        System.out.println("Start query...");        return userService.findUserByName(userName);
    }

    @RequestMapping(value = "/userAll", method = RequestMethod.GET)
    public List<User> findByUserAge() {        System.out.println("Start querying all data...");        return userService.findAll();
    }
}
3.5 Application Main Program
Spring Application is a class used to start Spring applications from the main method.
By default, it performs the following steps:
1. Create an appropriate Application Context instance (depending on the classpath).
2. Register a CommandLine Property Source to use command line parameters as Spring properties.
3. Refresh the application context and load all the singleton beans.
4. Activate all CommandLineRunner beans.
Start this class directly with main, and SpringBoot is automatically configured.
ps: Even now I still think it's too powerful.
Some annotations for this class. :
Spring Boot Application: Open component scanning and automatic configuration.
MapperScan: mapper interface class scan package configuration
The code is as follows:
import org.mybatis.spring.annotation.MapperScan;import org.springframework.boot.SpringApplication;import org.springframework.boot.autoconfigure.SpringBootApplication;/**
 *
* Title: Application
* Description:
* springBoot Main program
* Version:1.0.0
* @author pancm
* @date 2018 January 5th 2013
 */@SpringBootApplication@MapperScan("com.pancm.dao")public class Application {    public static void main(String[] args) {        //Start embedded Tomcat and initialize the Spring environment and its Spring components
        SpringApplication.run(Application.class, args);
        System.out.println("The program is running...");
    }
}
4. Code testing
After the code is written, we test the code.
After the Application is started, the postman tool is used to test the interface.
Posman's usage tutorial can see my blog: http://www.panchengming.com/2017/04/24/pancm12/
The test results are as follows:
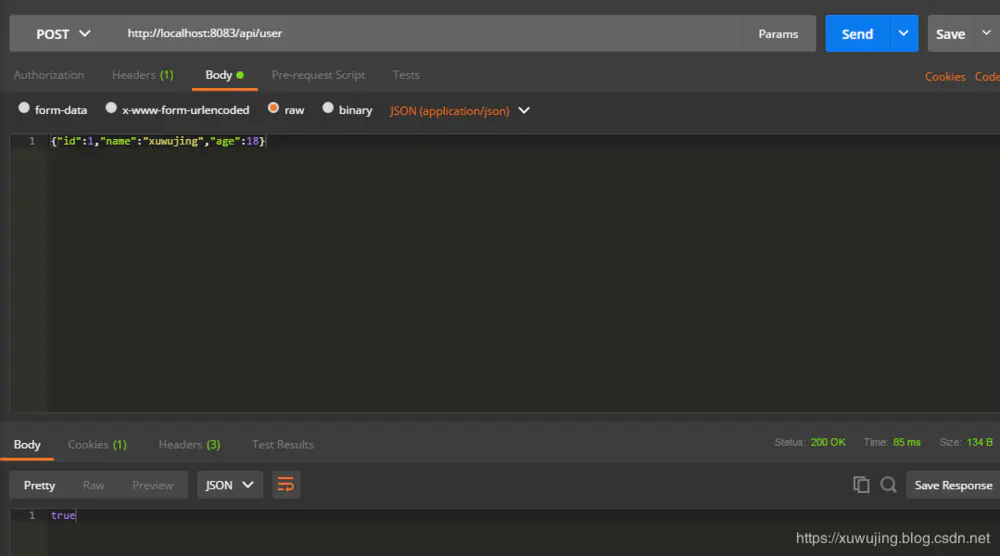
Insert a picture description here
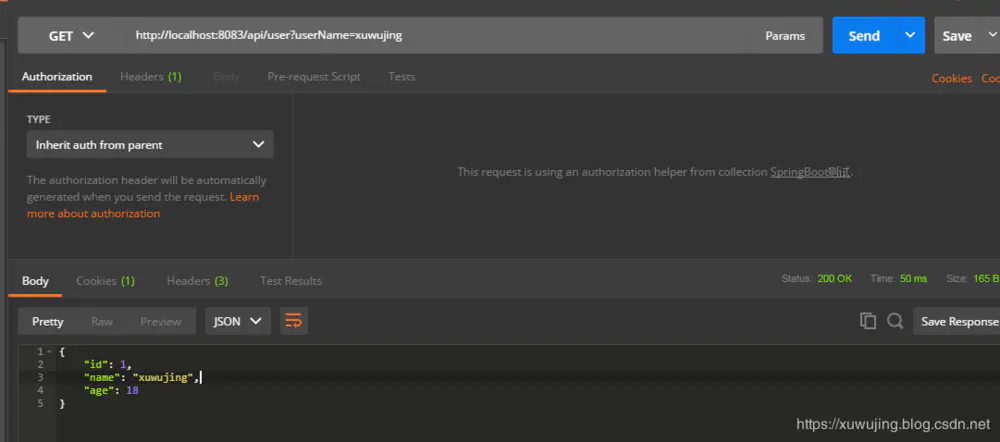
Insert a picture description here