Preface
In the process of development, we often encounter the following requirements: displaying circular user portraits on the interface, which is very common and difficult to implement. There are many related tutorials on the Internet, so this paper mainly summarizes several ideas and methods of implementation, which can be consulted whenever necessary in the future.
Two Core Approaches
For the realization of circular head image, in fact, Bitmap of rectangular head image is processed to achieve the effect of transforming into circular head image. We naturally think of using Canvas and Paint to process, using them we can achieve a lot of visual effects. Because Canvas is actually a kind of canvas, we can draw Bitmap on it and cooperate with other technologies to meet our needs. Here, we mainly use the following two categories:
1. Porter DuffXfermode layer mixing technology. There are many layers on a Canvas, drawing different patterns on different layers, and then drawing different layers to the same Canvas. Because a rule is used to mix layers, different final rendering results can be obtained.
2. BitmapShader Image Render, which is a subclass of Shader Render, can render another image at the same time when drawing one image. For example, if we draw a circle and render the square head, we can realize the circular head.
Both of the above classes can be invoked by the brush Paint's mPaint.setXfermode() and mPaint.setShader(), and the effect of a circular head can be achieved by using only one of them.
Next, we use the above two methods to achieve a round head.
Idea 1: Starting from View
First of all, when we get a visual requirement, we can consider whether we can solve the problem from the perspective of customized View. Generally, customized View can solve many visual requirements. Simply put, the core of custom View lies in two things: vision and interaction. Vision is accomplished by onMeasure, onLayout and onDraw, while interaction is controlled by dispatch Touch Event, onIntercept Touch Event and onTouch Event. As long as these methods are properly handled, we can realize customized views with different shapes.
So, back to the question discussed in this article: What needs to be done to achieve a circular head?
First of all, we need to adjust the width of the View in the onMeasure method, because the width of the round head is equal.
Secondly, we need to implement the logic of circular head in onDraw method. In order to realize the logic of circular head image, we need to get the original head image first. We can inherit ImageView directly, so that we can get the image set to ImageView directly. After we get Bitmap, we can deal with it. Let's first see how the code is implemented.
(1) Using PorterDuffXfermode technology to achieve
Customize a CircleImage View that inherits from AppCompatImage View:
public class CircleImageView extends AppCompatImageView {

    private int mSize;
    private Paint mPaint;
    private Xfermode mPorterDuffXfermode;

    public CircleImageView(Context context) {
        this(context,null);
    }

    public CircleImageView(Context context,AttributeSet attrs) {
        this(context, attrs,0);
    }

    public CircleImageView(Context context,AttributeSet attrs, int defStyleAttr) {
        super(context, attrs, defStyleAttr);
        init();
    }

    private void init(){
        mPaint = new Paint();
        mPaint.setDither(true);
        mPaint.setAntiAlias(true);

        mPorterDuffXfermode = new PorterDuffXfermode(PorterDuff.Mode.SRC_IN);
    }

    @Override
    protected void onMeasure(int widthMeasureSpec, int heightMeasureSpec) {
        super.onMeasure(widthMeasureSpec, heightMeasureSpec);
        int width = getMeasuredWidth();
        int height = getMeasuredHeight();
        mSize = Math.min(width,height);  //Minimum width and height
        setMeasuredDimension(mSize,mSize);    //Set CircleImage View to Equal Width and Height
    }

    @Override
    protected void onDraw(Canvas canvas) {
        //Get the sourceBitmap, which is the image set in through xml or java
        Drawable drawable = getDrawable();
        if (drawable == null) return;

        Bitmap sourceBitmap = ((BitmapDrawable)getDrawable()).getBitmap();
        if (sourceBitmap != null){
            //Scale the image to fit the size of the control
            Bitmap bitmap = resizeBitmap(sourceBitmap,getWidth(),getHeight());
            drawCircleBitmapByXfermode(canvas,bitmap);    //(1) Implementation by PorterDuffXfermode
            //DrawCircleBitmapByShader (canvas, bitmap); //(2) Implementation with BitmapShader
        }
    }

    private Bitmap resizeBitmap(Bitmap sourceBitmap,int dstWidth,int dstHeight){
        int width = sourceBitmap.getWidth();
        int height = sourceBitmap.getHeight();

        float widthScale = ((float)dstWidth) / width;
        float heightScale = ((float)dstHeight) / height;

        //Take the maximum zoom ratio
        float scale = Math.max(widthScale,heightScale);
        Matrix matrix = new Matrix();
        matrix.postScale(scale,scale);

        return Bitmap.createBitmap(sourceBitmap,0,0,width,height,matrix,true);
    }

    private void drawCircleBitmapByXfermode(Canvas canvas,Bitmap bitmap){
        final int sc = canvas.saveLayer(0,0,getWidth(),getHeight(),null,Canvas.ALL_SAVE_FLAG);
        //Draw dst layer
        canvas.drawCircle(mSize / 2,mSize / 2,mSize / 2,mPaint);
        //Set the layer blending mode to SRC_IN
        mPaint.setXfermode(mPorterDuffXfermode);
        //Draw src layer
        canvas.drawBitmap(bitmap,0,0,mPaint);
        canvas.restoreToCount(sc);
    }
}
Now let's analyze the logic of the above code implementation:
When we get a Bitmap, we first zoom it, because it is probably not suitable for the width of our current control. The resize() method above uses Matrix to scale the original Bitmap in equal columns to generate a new Bitmap. The new Bitmap is the same width or height as the control, that is, the original Bitmap is about the same size (at least width or height).
Next, let's look at the drawCircleBitmapByXfermode() method, which is implemented using PorterDuffxfermode technology. First, a transparent Bitmap is generated by calling the canvas.saveLayer method, and then the DST layer is drawn below. Then the layer mixing mode is set to SRC_IN mode, which shows the intersection of SRC and DST layers after mixing. Then the SRC layer is drawn, which realizes the circular head image. Because after mixing the layers of the round and square head images, the intersection part is the part of the round head.
(2) Implementation by BitmapShader
We can add one more method at the end of the above code:
    private void drawCircleBitmapByShader(Canvas canvas,Bitmap bitmap){
        BitmapShader shader = new BitmapShader(bitmap,BitmapShader.TileMode.CLAMP,BitmapShader.TileMode.CLAMP);
        mPaint.setShader(shader);
        canvas.drawCircle(mSize / 2,mSize /2 ,mSize / 2,mPaint);
    }
The code above is very simple. It generates a BitmapShader and binds it to the brush Paint, so that the Bitmap can be rendered on the circle as well as on the circle.
When we run the program, we will find that the effect of the two methods is the same, as shown below.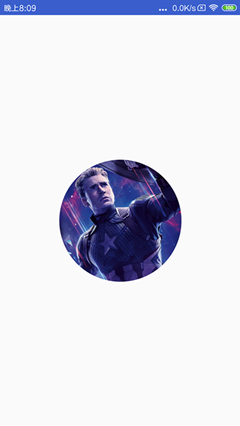
Idea 2: Start with a custom Drawable
We know that Drawable can be used as an image source for ImageView. Drawable, from the name, means that it can be drawn. In fact, it has a draw(canvas) method inside. After we get the canvas object, we can draw what we want on the canvas. In fact, the core principle is similar to that above. It draws a Bitmap through canvas and paint, at the same time, through renderer or layer mixing technology. Realize the effect of round head.
We create a new CircleImage Drawable that inherits from Drawable. The code is as follows:
public class CircleImageDrawable extends Drawable {

    private Bitmap mBitmap;
    private Paint mPaint;
    private BitmapShader mBitmapShader;
    private int mSize;
    private int mRadius;

    private static final String TAG = "CircleImageDrawable";

    public CircleImageDrawable(Bitmap bitmap) {
        this.mBitmap = bitmap;
        mBitmapShader = new BitmapShader(bitmap,Shader.TileMode.CLAMP,Shader.TileMode.CLAMP);
        mPaint = new Paint(Paint.ANTI_ALIAS_FLAG);
        mPaint.setShader(mBitmapShader);
        mSize = Math.min(bitmap.getWidth(),bitmap.getHeight());
        mRadius = mSize / 2;
    }

    @Override
    public void draw(@NonNull Canvas canvas) {
        canvas.drawCircle(mRadius,mRadius,mRadius,mPaint);
    }

    @Override
    public void setAlpha(int alpha) {
        mPaint.setAlpha(alpha);
    }

    @Override
    public void setColorFilter(@Nullable ColorFilter colorFilter) {
        mPaint.setColorFilter(colorFilter);
    }

    @Override
    public int getOpacity() {
        return PixelFormat.TRANSLUCENT;
    }

    @Override
    public int getIntrinsicWidth() {
        return mSize;
    }

    @Override
    public int getIntrinsicHeight() {
        return mSize;
    }
}
In the construction method, we set up BitmapShader for Paint, which is the same as the code of Idea 1. The way to use PorterDuffXfermode is done in draw(canvas), which is not discussed here.
Idea 3: Using Picasso's Transformation to Realize
Usually when we load pictures, we use a picture loading framework to help us deal with the asynchronous loading process, as well as the caching mechanism, such as Picass and Glide, which support many functions. In fact, when loading, we can also add a converter Transformation to transform the image to achieve rich and colorful effects such as rounded corners, Gauss blur. Its core principle is actually to use Canvas and Paint, redraw a picture, plus other effects, through this form to achieve the Transformation of graphics, and the realization of rounded corner pictures is very simple, let's practice it!
Create a new CircleImage Transformer that inherits from Transformation, with the following code:
public class CircleImageTransformer implements Transformation {


    @Override
    public Bitmap transform(Bitmap source) {
        //Get rid of the minimum width and height of the image and turn it into a square image.
        int size = Math.min(source.getWidth(),source.getHeight());

        Bitmap bitmap = Bitmap.createBitmap(size,size,source.getConfig());
        Canvas canvas = new Canvas(bitmap);
        Paint paint = new Paint();

        BitmapShader shader = new BitmapShader(source,BitmapShader.TileMode.CLAMP,BitmapShader.TileMode.CLAMP);
        paint.setShader(shader);
        paint.setAntiAlias(true);

        float r = size / 2f;
        canvas.drawCircle(r,r,r,paint);
        source.recycle();
        return bitmap;
    }

    @Override
    public String key() {
        return "Circle-Image";
    }
}
When used, it can be as follows:
Picasso.with(this)
       .load(R.drawable.ic_captain_america)
       .transform(new CircleImageTransformer())
       .into(imageView3);
Next, let's take a look at the effects of the three ideas mentioned above.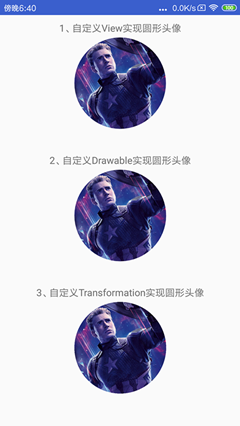
As you can see, all three effects are good.
summary
When we need to process a Bitmap to achieve different effects, we should first think of using Canvas and Paint to process, and then combine the various libraries provided by Android to achieve the desired effects. The above three ideas are to achieve circular avatar effect from three perspectives: custom View, custom Drawable and custom converter. The core of them is the same. They are all implemented by using BitmapShader or Porter Duff Xfer mode. The main purpose of this paper is to give a general idea and implementation method, but in fact there are still many areas that can be optimized, such as image compression and cutting, face detection, etc. There are still many details to be paid attention to in order to complete the realization of a circular head, but the concrete analysis of specific problems, ideas, the solution to the problem is not far away. Okay, that's the end of this article. I hope it will help you.~