For reprinting, please indicate the source:
http://blog.csdn.net/gane_cheng/article/details/52244277
http://www.ganecheng.tech/blog/52244277.html (Browse better)
Recently, I started using CSDN to write blogs. As soon as I came to catch up with MarkDown editor, the WYSIWYG writing method was very popular with me. When I wrote the first article, I still felt a little uncomfortable. Now I have written 10 articles, and I am getting used to it.
But the first time I wrote it, I felt two things unhappy. I'm not so easy to get used to it. Don't think I'll really get used to it.
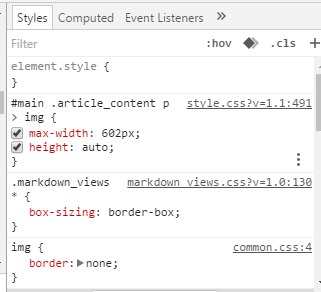
- Inserted pictures can be fully displayed in preview, but the maximum width of the article details page is 602px.
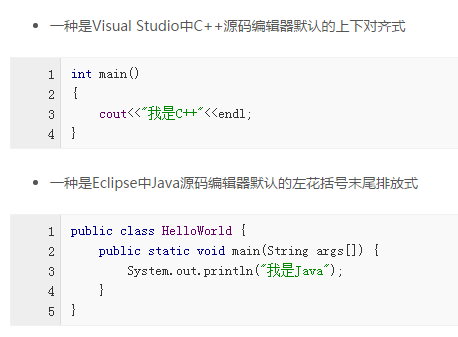
- Code display is basically the same as plain text, not highlighted enough
Can't bear it! Change it then! ____________

Put a beautified picture first.
If you can't wait now, you can download the plug-in directly to experience it. http://download.csdn.net/detail/gane_cheng/9607031
After downloading the crx file, open the extension page of Google Browser, and then drag the crx file in, refreshing the blog page will produce results.
Does it feel much better? What did I do? Instead of fonts and color matching, the font uses Consolas and other wide fonts with highlighted keywords and the same style as IDE.
Of course, this article will not introduce such a simple thing, it needs a little depth. What's in depth? Let's write a Google Browser plug-in ourselves, and then follow me step by step.
Step 1 Read the Google Browser Plug-in Development Document
It's hard to get started, and I didn't think my first Google Browser plug-in was born before this afternoon. Although this article was born to beautify the CSDN blog, when you go to the last step, you will find that as long as it is a web page, you can't change it.
Development documentation: http://open.chrome.360.cn/extension_dev/overview.html
Actually, don't look at it. Go straight to the second step.
Step 2 Edit the manifest.json file
Create a new file manifest.json. Add the following code to the file.
{
  // Required fields
  "name": "CSDNBigPicture",
  "version": "1.0.0.0",
  "manifest_version": 2,
  // Recommended fields
  "icons":
  {
    "16": "CSDN.png",
    "48": "CSDN.png",
    "128": "CSDN.png"
  },
  "description": "Make the pictures 100% width , which is in the content of CSDN Blog . Always updating site: https://github.com/ganecheng/CSDNBigPicture",
  "content_scripts": [
    {
      "matches": ["http://blog.csdn.net/*"],
      "css": ["marxico.css"],
      "js": ["jquery-3.1.0.min.js", "myscript.js"]
    }
  ]
}- 1
- 2
- 3
- 4
- 5
- 6
- 7
- 8
- 9
- 10
- 11
- 12
- 13
- 14
- 15
- 16
- 17
- 18
- 19
- 20
- 21
Three fields must be selected:
- Name: The name of your plug-in
- Version: The version number of your plug-in
- manifest_version: After chrome 18, the requirement must be 2. Whether it will be added in the future, I don't know yet.
There are many optional fields. Here are two:
- Icons: plug-in icons, divided into 16, 28, 128 specifications, unit is px, the best format is PNG, because transparency support is the best.
- Description: The description information of the plug-in, which can write down the main functions of the plug-in
Here comes the heavy header field, content_scripts, Content Scripts is running in the Web page JavaScript Script. By using standard DOM, they can get detailed information about the pages visited by browsers and modify it. This is how the plug-in is implemented.
- matches: Pages applicable to plug-ins
- Css: The CSS introduced into the page will be injected in the defined order before the DOM tree of the page is created and displayed.
- js: JavaScript is introduced into the page. By default, after the DOM of the page is loaded, it is injected in the order defined.
Step 3 Editing CSS Files
Create the marxico.css file in the same directory as manifest.json. Write the style you want in the CSS file. It should be noted that if the original page has the same definition, then the CSS style of the original page will cover the CSS style you wrote.
.hljs-light .hljs {
    background-color: #f0f0f0
}

.hljs-light .hljs, .hljs-light .hljs-subst, .hljs-light .hljs-tag .hljs-title,
    .hljs-light .lisp .hljs-title, .hljs-light .clojure .hljs-built_in,
    .hljs-light .nginx .hljs-title {
    color: #000
}

.hljs-light .hljs-string, .hljs-light .hljs-title, .hljs-light .hljs-constant,
    .hljs-light .hljs-parent, .hljs-light .hljs-tag .hljs-value,
    .hljs-light .hljs-rules .hljs-value, .hljs-light .hljs-rules .hljs-value .hljs-number,
    .hljs-light .hljs-preprocessor, .hljs-light .hljs-pragma, .hljs-light .haml .hljs-symbol,
    .hljs-light .ruby .hljs-symbol, .hljs-light .ruby .hljs-symbol .hljs-string,
    .hljs-light .hljs-aggregate, .hljs-light .hljs-template_tag,
    .hljs-light .django .hljs-variable, .hljs-light .smalltalk .hljs-class,
    .hljs-light .hljs-addition, .hljs-light .hljs-flow, .hljs-light .hljs-stream,
    .hljs-light .bash .hljs-variable, .hljs-light .apache .hljs-tag,
    .hljs-light .apache .hljs-cbracket, .hljs-light .tex .hljs-command,
    .hljs-light .tex .hljs-special, .hljs-light .erlang_repl .hljs-function_or_atom,
    .hljs-light .asciidoc .hljs-header, .hljs-light .markdown .hljs-header,
    .hljs-light .coffeescript .hljs-attribute {
    color: white
}

.hljs-light .smartquote, .hljs-light .hljs-comment, .hljs-light .hljs-annotation,
    .hljs-light .hljs-template_comment, .hljs-light .diff .hljs-header,
    .hljs-light .hljs-chunk, .hljs-light .asciidoc .hljs-blockquote,
    .hljs-light .markdown .hljs-blockquote {
    color: #888
}

.hljs-light .hljs-number, .hljs-light .hljs-date, .hljs-light .hljs-regexp,
    .hljs-light .hljs-literal, .hljs-light .hljs-hexcolor, .hljs-light .smalltalk .hljs-symbol,
    .hljs-light .smalltalk .hljs-char, .hljs-light .go .hljs-constant,
    .hljs-light .hljs-change, .hljs-light .lasso .hljs-variable,
    .hljs-light .makefile .hljs-variable, .hljs-light .asciidoc .hljs-bullet,
    .hljs-light .markdown .hljs-bullet, .hljs-light .asciidoc .hljs-link_url,
    .hljs-light .markdown .hljs-link_url {
    color: #080
}

.hljs-light .hljs-label, .hljs-light .hljs-javadoc, .hljs-light .ruby .hljs-string,
    .hljs-light .hljs-decorator, .hljs-light .hljs-filter .hljs-argument,
    .hljs-light .hljs-localvars, .hljs-light .hljs-array, .hljs-light .hljs-attr_selector,
    .hljs-light .hljs-important, .hljs-light .hljs-pseudo, .hljs-light .hljs-pi,
    .hljs-light .haml .hljs-bullet, .hljs-light .hljs-doctype, .hljs-light .hljs-deletion,
    .hljs-light .hljs-envvar, .hljs-light .hljs-shebang, .hljs-light .apache .hljs-sqbracket,
    .hljs-light .nginx .hljs-built_in, .hljs-light .tex .hljs-formula,
    .hljs-light .erlang_repl .hljs-reserved, .hljs-light .hljs-prompt,
    .hljs-light .asciidoc .hljs-link_label, .hljs-light .markdown .hljs-link_label,
    .hljs-light .vhdl .hljs-attribute, .hljs-light .clojure .hljs-attribute,
    .hljs-light .asciidoc .hljs-attribute, .hljs-light .lasso .hljs-attribute,
    .hljs-light .coffeescript .hljs-property, .hljs-light .hljs-phony {
    color: #88f
}

.hljs-light .hljs-keyword, .hljs-light .hljs-id, .hljs-light .hljs-title,
    .hljs-light .hljs-built_in, .hljs-light .hljs-aggregate, .hljs-light .css .hljs-tag,
    .hljs-light .hljs-javadoctag, .hljs-light .hljs-phpdoc, .hljs-light .hljs-yardoctag,
    .hljs-light .smalltalk .hljs-class, .hljs-light .hljs-winutils,
    .hljs-light .bash .hljs-variable, .hljs-light .apache .hljs-tag,
    .hljs-light .go .hljs-typename, .hljs-light .tex .hljs-command,
    .hljs-light .asciidoc .hljs-strong, .hljs-light .markdown .hljs-strong,
    .hljs-light .hljs-request, .hljs-light .hljs-status {
    font-weight: bold
}

.hljs-light .asciidoc .hljs-emphasis, .hljs-light .markdown .hljs-emphasis
    {
    font-style: italic
}

.hljs-light .coffeescript .javascript, .hljs-light .javascript .xml,
    .hljs-light .lasso .markup, .hljs-light .tex .hljs-formula, .hljs-light .xml .javascript,
    .hljs-light .xml .vbscript, .hljs-light .xml .css, .hljs-light .xml .hljs-cdata
    {
    opacity: .5
}

.hljs-dark {
    background: #f6f6f6
}

.hljs-dark .hljs {
    background: #23241f
}

.hljs-dark .hljs, .hljs-dark .hljs-tag, .hljs-dark .css .hljs-rules,
    .hljs-dark .css .hljs-value, .hljs-dark .css .hljs-function .hljs-preprocessor,
    .hljs-dark .hljs-pragma {
    color: #E6DB74
}

.hljs-dark .hljs-strongemphasis, .hljs-dark .hljs-strong, .hljs-dark .hljs-emphasis
    {
    color: #a8a8a2
}

.hljs-dark .hljs-bullet, .hljs-dark .hljs-blockquote, .hljs-dark .hljs-horizontal_rule,
    .hljs-dark .hljs-number, .hljs-dark .hljs-regexp, .hljs-dark .alias .hljs-keyword,
    .hljs-dark .hljs-literal, .hljs-dark .hljs-hexcolor {
    color: #ae81ff
}

.hljs-dark .hljs-tag .hljs-value, .hljs-dark .hljs-code, .hljs-dark .hljs-title,
    .hljs-dark .css .hljs-class, .hljs-dark .hljs-class .hljs-title:last-child
    {
    color: #a6e22e
}

.hljs-dark .hljs-strong, .hljs-dark .hljs-strongemphasis {
    font-weight: bold
}

.hljs-dark .hljs-emphasis, .hljs-dark .hljs-strongemphasis, .hljs-dark .hljs-class .hljs-title:last-child
    {
    font-style: italic
}

.hljs-dark .hljs-keyword, .hljs-dark .hljs-function, .hljs-dark .hljs-change,
    .hljs-dark .hljs-winutils, .hljs-dark .hljs-flow, .hljs-dark .lisp .hljs-title,
    .hljs-dark .clojure .hljs-built_in, .hljs-dark .nginx .hljs-title,
    .hljs-dark .tex .hljs-special, .hljs-dark .hljs-header, .hljs-dark .hljs-attribute,
    .hljs-dark .hljs-symbol, .hljs-dark .hljs-symbol .hljs-string,
    .hljs-dark .hljs-tag .hljs-title, .hljs-dark .hljs-value, .hljs-dark .alias .hljs-keyword:first-child,
    .hljs-dark .css .hljs-tag, .hljs-dark .css .unit, .hljs-dark .css .hljs-important
    {
    color: #AE81FF
}

.hljs-dark .hljs-function .hljs-keyword, .hljs-dark .hljs-class .hljs-keyword:first-child,
    .hljs-dark .hljs-constant, .hljs-dark .css .hljs-attribute {
    color: #66d9ef
}

.hljs-dark .hljs-variable, .hljs-dark .hljs-params, .hljs-dark .hljs-class .hljs-title
    {
    color: #f8f8f2
}

.hljs-dark .hljs-string, .hljs-dark .css .hljs-id, .hljs-dark .hljs-subst,
    .hljs-dark .haskell .hljs-type, .hljs-dark .ruby .hljs-class .hljs-parent,
    .hljs-dark .hljs-built_in, .hljs-dark .sql .hljs-aggregate, .hljs-dark .django .hljs-template_tag,
    .hljs-dark .django .hljs-variable, .hljs-dark .smalltalk .hljs-class,
    .hljs-dark .django .hljs-filter .hljs-argument, .hljs-dark .smalltalk .hljs-localvars,
    .hljs-dark .smalltalk .hljs-array, .hljs-dark .hljs-attr_selector,
    .hljs-dark .hljs-pseudo, .hljs-dark .hljs-addition, .hljs-dark .hljs-stream,
    .hljs-dark .hljs-envvar, .hljs-dark .apache .hljs-tag, .hljs-dark .apache .hljs-cbracket,
    .hljs-dark .tex .hljs-command, .hljs-dark .hljs-prompt, .hljs-dark .hljs-link_label,
    .hljs-dark .hljs-link_url {
    color: #e6db74
}

.hljs-dark .hljs-comment, .hljs-dark .hljs-javadoc, .hljs-dark .java .hljs-annotation,
    .hljs-dark .python .hljs-decorator, .hljs-dark .hljs-template_comment,
    .hljs-dark .hljs-pi, .hljs-dark .hljs-doctype, .hljs-dark .hljs-deletion,
    .hljs-dark .hljs-shebang, .hljs-dark .apache .hljs-sqbracket,
    .hljs-dark .tex .hljs-formula {
    color: #75715e
}

.hljs-dark .coffeescript .javascript, .hljs-dark .javascript .xml,
    .hljs-dark .tex .hljs-formula, .hljs-dark .xml .javascript, .hljs-dark .xml .vbscript,
    .hljs-dark .xml .css, .hljs-dark .xml .hljs-cdata, .hljs-dark .xml .php,
    .hljs-dark .php .xml {
    opacity: .5
}

.hljs-keyword{
    font-weight: bold;
}

code {
    color: white;
    font-family: Consolas;
}- 1
- 2
- 3
- 4
- 5
- 6
- 7
- 8
- 9
- 10
- 11
- 12
- 13
- 14
- 15
- 16
- 17
- 18
- 19
- 20
- 21
- 22
- 23
- 24
- 25
- 26
- 27
- 28
- 29
- 30
- 31
- 32
- 33
- 34
- 35
- 36
- 37
- 38
- 39
- 40
- 41
- 42
- 43
- 44
- 45
- 46
- 47
- 48
- 49
- 50
- 51
- 52
- 53
- 54
- 55
- 56
- 57
- 58
- 59
- 60
- 61
- 62
- 63
- 64
- 65
- 66
- 67
- 68
- 69
- 70
- 71
- 72
- 73
- 74
- 75
- 76
- 77
- 78
- 79
- 80
- 81
- 82
- 83
- 84
- 85
- 86
- 87
- 88
- 89
- 90
- 91
- 92
- 93
- 94
- 95
- 96
- 97
- 98
- 99
- 100
- 101
- 102
- 103
- 104
- 105
- 106
- 107
- 108
- 109
- 110
- 111
- 112
- 113
- 114
- 115
- 116
- 117
- 118
- 119
- 120
- 121
- 122
- 123
- 124
- 125
- 126
- 127
- 128
- 129
- 130
- 131
- 132
- 133
- 134
- 135
- 136
- 137
- 138
- 139
- 140
- 141
- 142
- 143
- 144
- 145
- 146
- 147
- 148
- 149
- 150
- 151
- 152
- 153
- 154
- 155
- 156
- 157
- 158
- 159
- 160
- 161
- 162
- 163
- 164
- 165
- 166
- 167
- 168
- 169
- 170
- 171
- 172
- 173
- 174
- 175
- 176
- 177
- 178
Step 4 Editing JavaScript Files
The main function is actually done in JavaScript. This plug-in uses JavaScript code to change the default width of the picture, so that the maximum width can reach the maximum width of the document, that is 100%, so that the large picture will not say that the display is not big enough. JavaScript is also used to make some changes to the code style.
Because the code is based on jQuery So the jQuery package is also referenced.
Create myscript.js and add the following code:
$("#main").css("box-shadow","0px 2px 30px #888");

$(".prettyprint").addClass("hljs-light");

$(".hljs-preprocessor").css("color","#A29A4E");

$("code").css("font-family","Consolas");

if($(".hljs-dark").length>0){
    $(".hljs-dark").css("color","white");
}

if($(".hljs-light").length>0){
    $(".hljs-light").css("color","black");
    $(".hljs-string").css("color","blue");
    $(".hljs-title").css("color","blue");
}

$("#article_content").find("img").each(function(i){
    var obj=$(this);
    obj.css("max-width","100%");
    if(obj.parent().text().length==0){
        obj.parent().css("text-align","center");
    }
});
- 1
- 2
- 3
- 4
- 5
- 6
- 7
- 8
- 9
- 10
- 11
- 12
- 13
- 14
- 15
- 16
- 17
- 18
- 19
- 20
- 21
- 22
- 23
- 24
- 25
- 26
- 27
So far, our main functions have been realized.
Step 5 Packaging to Generate CRX Files
Put these files in a folder.
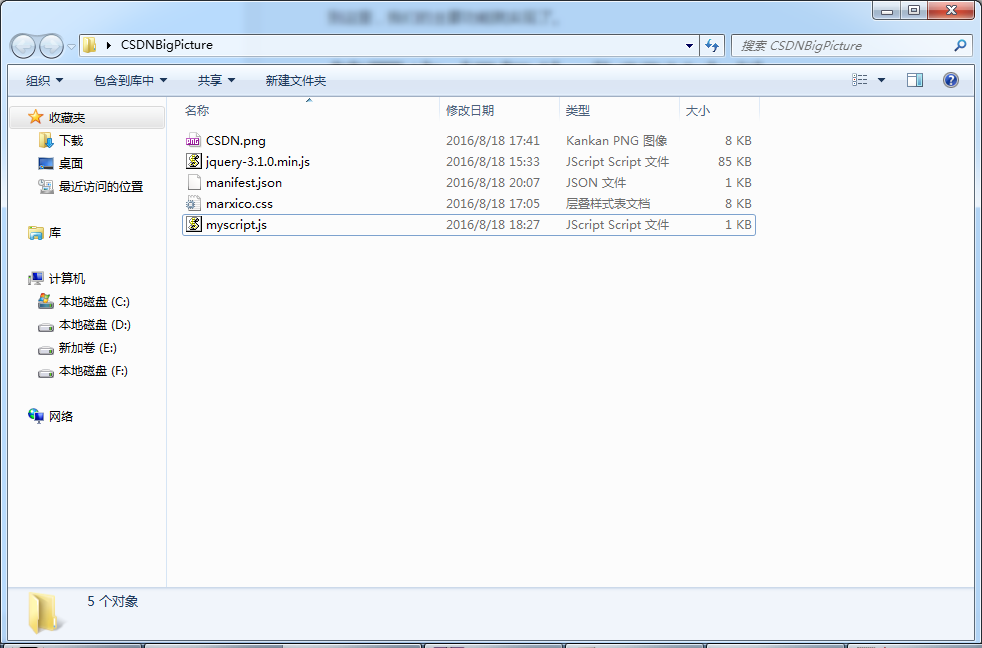
Then open the extension page of Google Browser. Check the developer mode in the upper right corner to enable Developer functionality. Click Package Extension.

In the pop-up dialog box, select the folder above and click on the package extender, which generates your plug-in. The generated plug-in and the folder are at the same level.

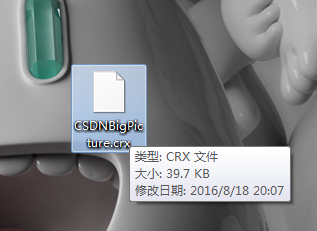
Step 6 Install CRX File to Browser
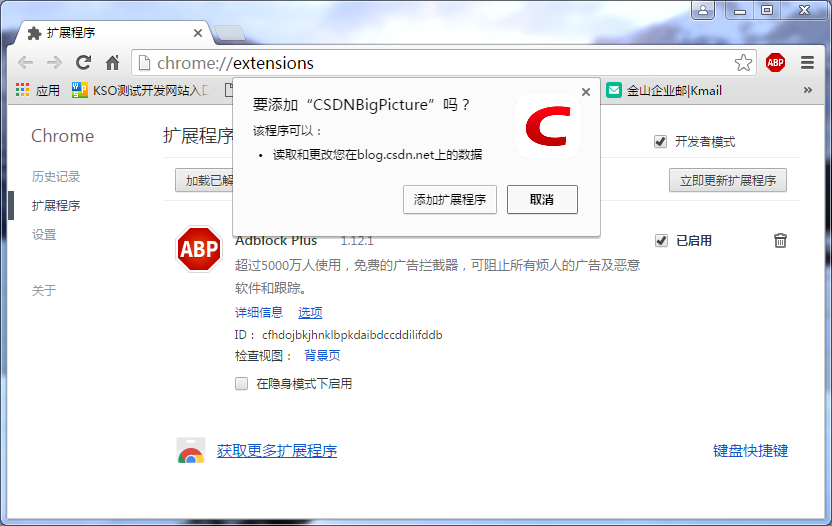
After the CRX file is generated, drag the file into the Google Browser Extension page.
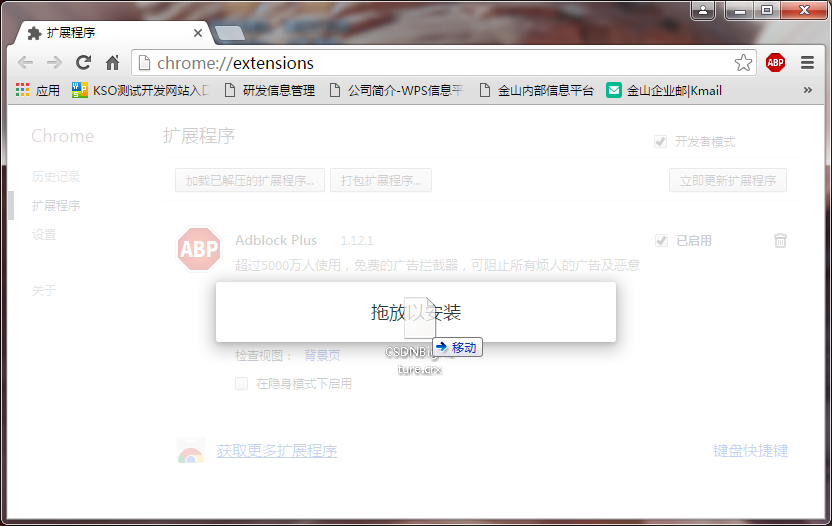
Click Add Extensions.
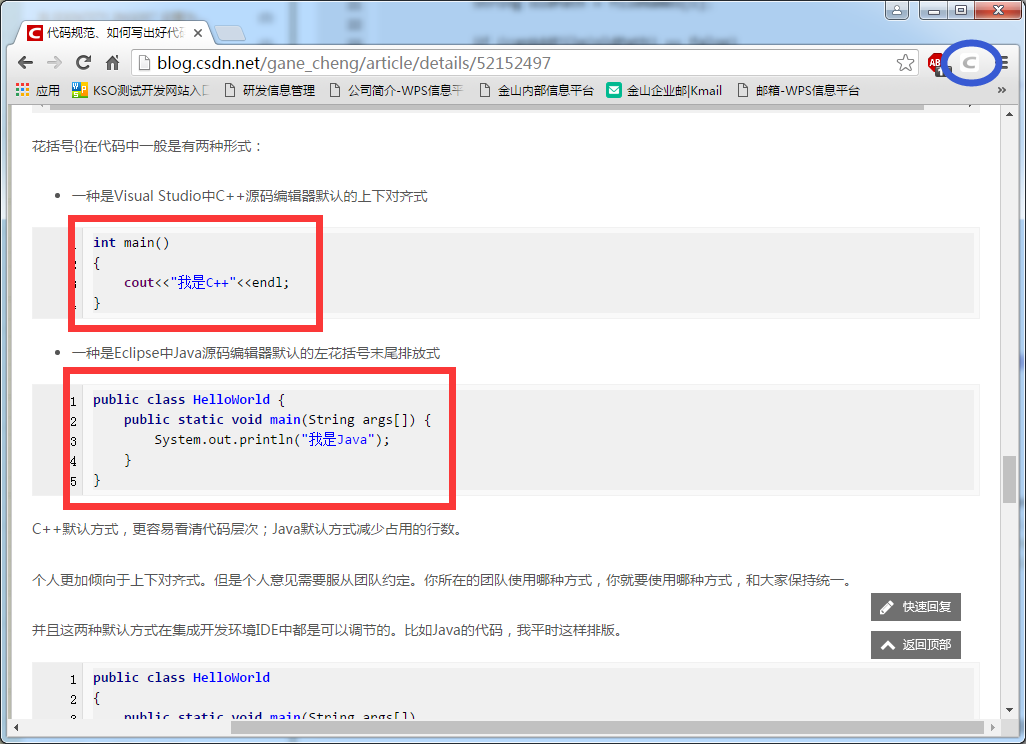
Effect Preview:
summary
The whole process is actually not difficult, just for the CSDN blog page to make some changes. Make more satisfied with their own aesthetic view.
Code has been source, you can visit this site to get the source code, do some more aesthetic changes, since you can inject JavaScript code into the web page, then you can do anything you want to do:
https://github.com/ganecheng/CSDNBigPicture