- Swift:TangramKit: https://github.com/youngsoft/TangramKit
- OC:MyLayout: https://github.com/youngsoft/MyLinearLayout
brief introduction
MyLayout Is a set of iOS interface view layout framework. Its core is based on overloading the layoutSubviews method of UIView and setting the bounds and center attributes of subviews. MyLayout is powerful and easy to use. It integrates five layouts of iOS Autolayout and Size Classes, android, floating positioning technology of HTML/CSS and interface layout functions of mainstream platforms such as flex-box and bootstrap frameworks. At the same time, it provides a very simple and complete solution for multi-screen size adaptation. MyLayout also provides Swift version TangramKit
MyLayout's Advantages
- MyLayout's implementation kernel is based on frame settings, not AutoLayout encapsulation. Therefore, it will not be restricted by any operating system version.
- Some articles have shown that the performance of frame layout is better than that of AutoLayout layout, especially when the number of views in the interface increases.
- AutoLayout's idea is to complete the layout through constraint dependencies between views, but the result of constraint dependencies is that the coupling between views is high and the cost of interface updating is increased. MyLayout not only provides constraint dependencies, but also provides the function of automatically creating constraints according to the order of view addition, which reduces the problem of establishing display dependencies. The end result is to simplify the layout code and reduce the amount of code modification when the layout is updated.
- AutoLayout is only a relatively constrained layout, while MyLayout provides not only a relatively layout with the same capabilities as AutoLayout, but also seven layout systems: linear layout, frame layout, table layout, streaming layout, floating layout and path layout. You can choose the simplest layout container according to your interface requirements to realize your functions. MyLayout also supports the Size classes mechanism and provides some ways to achieve perfect screen size matching.
- MyLayout is primarily a code-based layout solution, but frameworks can support a combination of XIB and SB layout. It also provides powerful functions such as automatically triggering layout, UITableview Cell dynamic height, tag cloud implementation, adaptive left and right content width, proportional distribution of size and spacing, overall parking control and so on when hiding and displaying views.
Performance comparison of AutoLayout and frame layouts

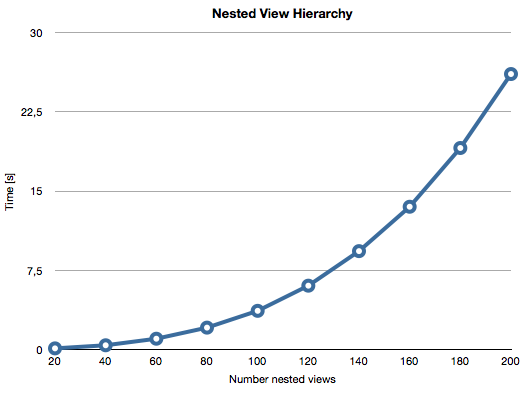
Reference article address: http://floriankugler.com/2013/04/22/auto-layout-performance-on-ios/
Application scenario
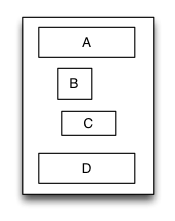
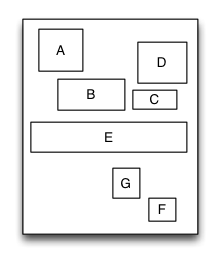
For example, the following application scenario:
- There is a container view S whose width is 100 and its height is the sum of the heights of four sub-views A, B, C and D arranged from top to bottom.
- The left margin of view A takes up 20% of the width of the parent view, while the right margin takes up 30% of the width of the parent view, and the height equals its own width.
- The left margin of view B is 40, and the width takes up the remaining width of the parent view, and the height is 40.
- The width of view C takes up all the widths of the parent view, and the height is 40.
- View D has a right margin of 20, a width of 50% of the parent view's width and a height of 40%.
The final results are as follows:

 MyLinearLayout *S = [MyLinearLayout linearLayoutWithOrientation:MyLayoutViewOrientation_Vert];
    S.subviewMargin = 10;
    S.myWidth = 100;

    UIView *A = UIView.new;
    A.leftPos.equalTo(@0.2);
    A.rightPos.equalTo(@0.3);
    A.heightDime.equalTo(A.widthDime);
    [S addSubview:A];

    UIView *B = UIView.new;
    B.leftPos.equalTo(@40);
    B.widthDime.equalTo(@60);
    B.heightDime.equalTo(@40);
    [S addSubview:B];

    UIView *C = UIView.new;
    C.widthDime.equalTo(S.widthDime);
    C.heightDime.equalTo(@40);
    [S addSubview:C];

    UIView *D = UIView.new;
    D.rightPos.equalTo(@20);
    D.widthDime.equalTo(S.widthDime).multiply(0.5);
    D.heightDime.equalTo(@40);
    [S addSubview:D];
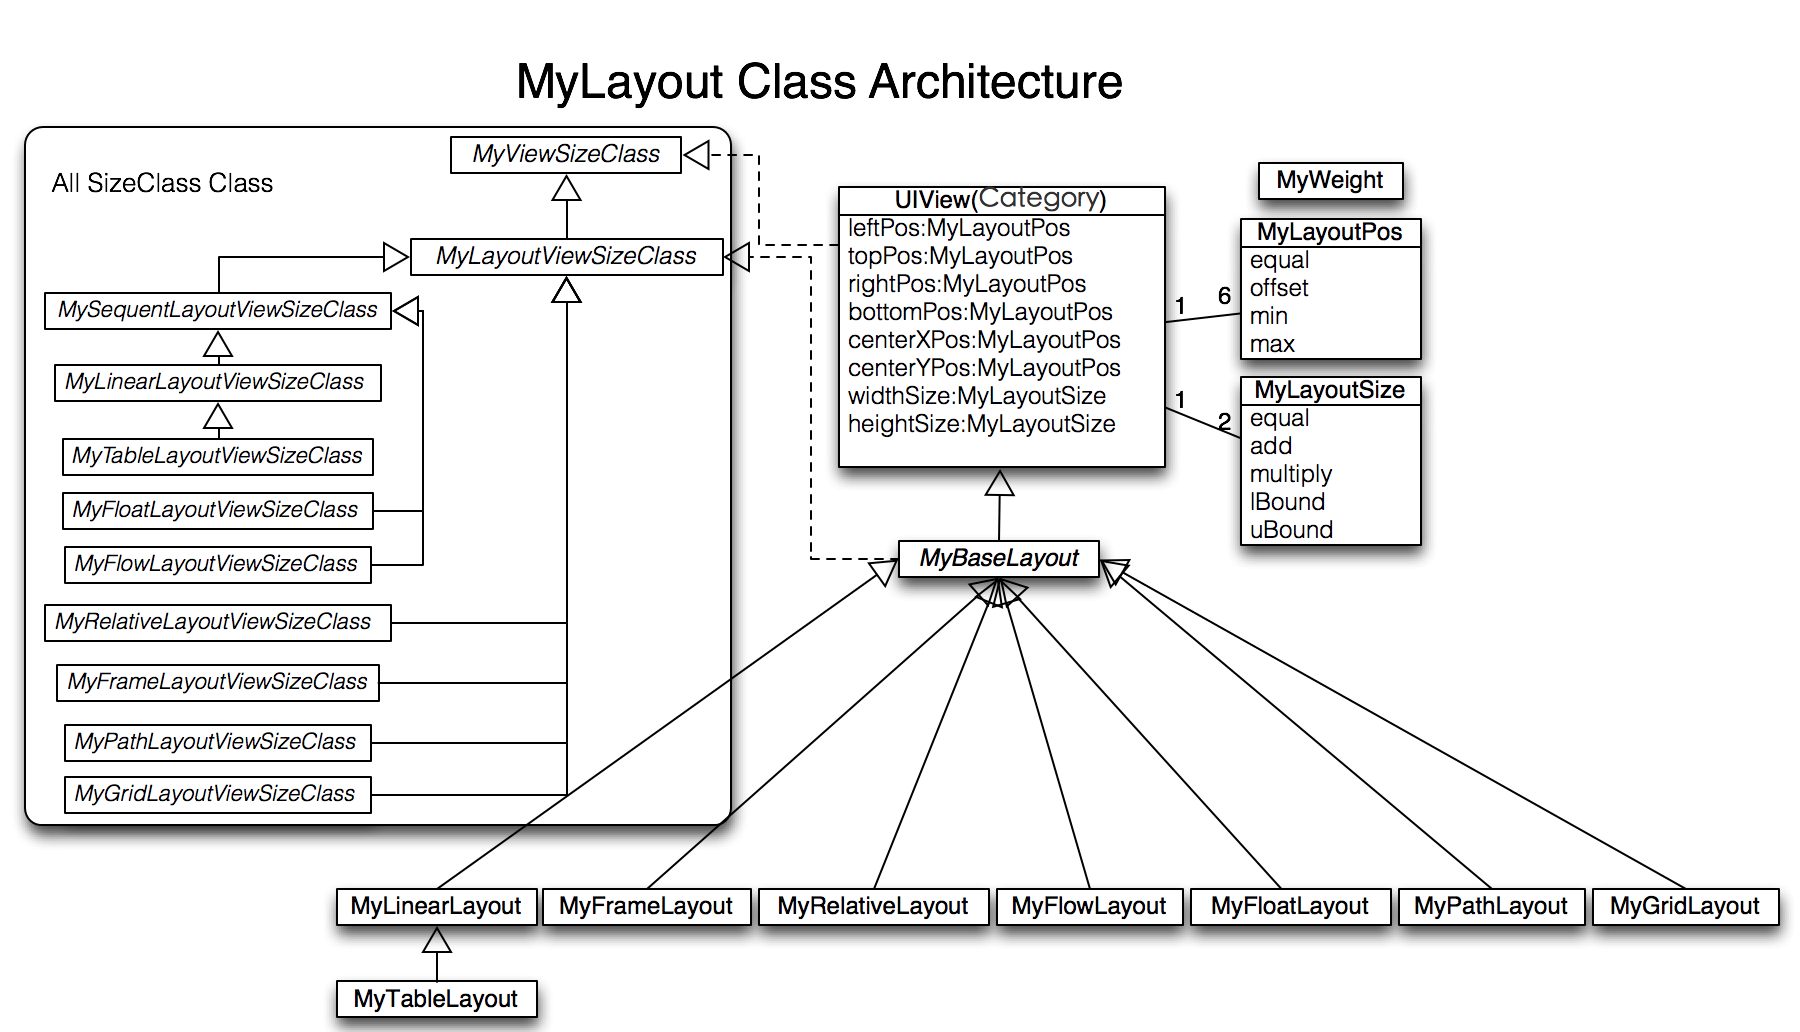
System structure
Layout Pos Layout Class
The MyLayoutPos class is used to describe the location of a view. In UIView, six variables, leftPos, topPos, bottomPos, rightPos, centerXPos and centerYPos, are extended to realize the positioning of views. You can use the equalTo method of these variables to set the margins and spacing between views. The equalTo method can set the values of NSNumber, MyLayoutPos, NSArray < MyLayoutPos*> for different scenarios. At the same time, the system provides six simple variables myLeft Margin, myTop Margin, myBottom Margin, myRight Margin, myCenterXOffset, mY CenterYOffset to set the value of NSNumber type, such as A.leftPos.equalTo(@10); equivalent to A. myLeft Margin = 10;.
Layout Size
The MyLayoutSize class is a class that describes the size of a view. WidthDime and heightDime are extended in UIView to realize the setting of view width and height size. You can use the equalTo method to set the width and height of the view. The equalTo method can set NSNumber, MyLayoutSize, NSArray < MyLayoutSize*> values for different scenarios. At the same time, the system provides two simple variables myWidth and myHeight to set the value of NSNumber type, such as A.widthDime.equalTo(@10); equivalent to A.myWidth = 10;.
Linear layout MyLinear Layout
UIStackView equivalent to iOS and Linar Layout layout equivalent to android.
Linear layout is a single-column (single-row) layout view in which the sub-views are arranged from top to bottom or left to right in the order of addition, so the sub-views in it establish constraints and dependencies through the order of addition. The linear layout view with sub-views arranged from top to bottom is called vertical linear layout view, while the linear layout view with sub-views arranged from left to right is called horizontal linear layout.
Sample code:
-(void)loadView
{
    [super loadView];

    MyLinearLayout *S = [MyLinearLayout linearLayoutWithOrientation:MyLayoutViewOrientation_Vert];
    S.myWidth = 120;
    S.subviewMargin = 10;

    UIView *A = [UIView new];
    A.myLeftMargin = A.myRightMargin = 5;
    A.myHeight = 40;
    [S addSubview:A];

    UIView *B = [UIView new];
    B.myLeftMargin = 20;
    B.myWidth = B.myHeight = 40;
    [S addSubview:B];

    UIView *C = [UIView new];
    C.myRightMargin = 40;
    C.myWidth = 50;
    C.myHeight = 40;
    [S addSubview:C];

    UIView *D = [UIView new];
    D.myLeftMargin = D.myRightMargin = 10;
    D.myHeight = 40;
    [S addSubview:D];

    [self.view addSubview:S];
    S.backgroundColor = [UIColor redColor];
    A.backgroundColor = [UIColor greenColor];
    B.backgroundColor = [UIColor blueColor];
    C.backgroundColor = [UIColor orangeColor];
    D.backgroundColor = [UIColor cyanColor];
 }
Relative Layout
Relative Layout layout equivalent to iOS AutoLayout and Android.
Relative layout is a layout view in which sub-views are laid out and positioned through mutual constraints and dependencies. The location of the sub-views in the relative layout is independent of the order in which they are added, but positioned and laid out by setting the relative dependencies of the sub-views.
Sample code:
-(void)loadView
{
    [super loadView];

    MyRelativeLayout *S = [MyRelativeLayout new];
    S.widthDime.equalTo(@170);
    S.heightDime.equalTo(@280);

    UIView *A = [UIView new];
    A.leftPos.equalTo(@20);
    A.topPos.equalTo(@20);
    A.widthDime.equalTo(@40);
    A.heightDime.equalTo(A.widthDime);
    [S addSubview:A];

    UIView *B = [UIView new];
    B.leftPos.equalTo(A.centerXPos);
    B.topPos.equalTo(A.bottomPos).offset(10);
    B.widthDime.equalTo(@60);
    B.heightDime.equalTo(A.heightDime);
    [S addSubview:B];

    UIView *C = [UIView new];
    C.leftPos.equalTo(B.rightPos).offset(10);
    C.bottomPos.equalTo(B.bottomPos);
    C.widthDime.equalTo(@40);
    C.heightDime.equalTo(B.heightDime).multiply(0.5);
    [S addSubview:C];

    UIView *D = [UIView new];
    D.bottomPos.equalTo(C.topPos).offset(10);
    D.rightPos.equalTo(@15);
    D.heightDime.equalTo(A.heightDime);
    D.widthDime.equalTo(D.heightDime);
    [S addSubview:D];

    UIView *E = [UIView new];
    E.centerYPos.equalTo(@0);
    E.centerXPos.equalTo(@0);
    E.heightDime.equalTo(@40);
    E.widthDime.equalTo(S.widthDime).add(-20);
    [S addSubview:E];
    //.. F, G

    [self.view addSubview:S];
    S.backgroundColor = [UIColor redColor];
    A.backgroundColor = [UIColor greenColor];
    B.backgroundColor = [UIColor blueColor];
    C.backgroundColor = [UIColor orangeColor];
    D.backgroundColor = [UIColor cyanColor];
    E.backgroundColor = [UIColor magentaColor];
}
Frame Layout
FrameLayout layout equivalent to Android.
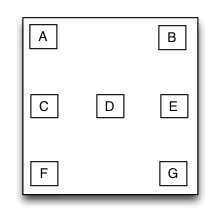
Frame layout is a layout view in which the child views are docked in the specific orientation of the parent view and can overlap. The placement position of the child view in the frame layout is independent of the order of addition, and only depends on the layout constraints of the parent view. The frame layout divides the vertical direction into three directions: upper, middle and lower, while the horizontal direction is divided into three directions: left, middle and right. Any sub-view can only be located in one direction in the vertical direction and horizontal direction.
Sample code:
 -(void)loadView
{
    [super loadView];

    MyFrameLayout *S = [MyFrameLayout new];
    S.mySize = CGSizeMake(320,500);

    UIView *A = [UIView new];
    A.mySize = CGSizeMake(40,40);
    [S addSubview:A];

    UIView *B = [UIView new];
    B.mySize = CGSizeMake(40,40);
    B.myRightMargin = 0;
    [S addSubview:B];

    UIView *C = [UIView new];
    C.mySize = CGSizeMake(40,40);
    C.myCenterYOffset = 0;
    [S addSubview:C];

    UIView *D = [UIView new];
    D.mySize = CGSizeMake(40,40);
    D.myCenterOffset = CGPointZero;
    [S addSubview:D];

    //..E,F,G

    [self.view addSubview:S];
    S.backgroundColor = [UIColor redColor];
    A.backgroundColor = [UIColor greenColor];
    B.backgroundColor = [UIColor blueColor];
    C.backgroundColor = [UIColor orangeColor];
    D.backgroundColor = [UIColor cyanColor];
  }
Table layout MyTable Layout
TableLayout layout equivalent to Android and HTML table elements.
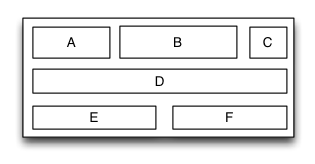
Table layout is a layout view in which sub-views can be arranged in multiple rows and columns like tables. Before adding a subview to a table layout view, you must first create and add a row view, and then add a subview to the row view. If the row view is arranged from top to bottom in the table layout, the table layout is vertical table layout, and the subviews in the vertical table layout are arranged from left to right in the row view; if the row view is arranged from left to right in the table layout, the table layout is horizontal table layout, and the subviews in the horizontal table layout are from top to bottom in the row view. Arranged.
Sample code:
-(void)loadView
{
    [super loadView];

    MyTableLayout *S = [MyTableLayout tableLayoutWithOrientation:MyLayoutViewOrientation_Vert];
    S.wrapContentWidth = YES;
    S.rowSpacing = 10;
    S.colSpacing = 10;

    [S addRow:MTLSIZE_WRAPCONTENT colSize:MTLSIZE_WRAPCONTENT];

    UIView *A = [UIView new];
    A.mySize = CGSizeMake(50,40);
    [S addSubview:A];

    UIView *B = [UIView new];
    B.mySize = CGSizeMake(100,40);
    [S addSubview:B];

    UIView *C = [UIView new];
    C.mySize = CGSizeMake(30,40);
    [S addSubview:C];

    [S addRow:MTLSIZE_WRAPCONTENT colSize:MTLSIZE_WRAPCONTENT];

    UIView *D = [UIView new];
    D.mySize = CGSizeMake(200,40);
    [S addSubview:D];

    //...E,F


    [self.view addSubview:S];
    S.backgroundColor = [UIColor redColor];
    A.backgroundColor = [UIColor greenColor];
    B.backgroundColor = [UIColor blueColor];
    C.backgroundColor = [UIColor orangeColor];
    D.backgroundColor = [UIColor cyanColor];
}
Flow Layout
Flexible-box equivalent to CSS3.
Streaming layout is a layout view in which the sub-views are arranged in order of addition, and when some constraint restriction is encountered, a new row is rearranged and displayed in multiple rows. There are two main constraints: quantitative constraints and content size constraints, and the direction of line change is divided into vertical and horizontal directions. Therefore, there are vertical quantitative constraints, vertical content constraints, horizontal quantitative constraints and horizontal content constraints in flow layout. Streaming layout is mainly used in scenarios where sub-views are arranged regularly and can be used as a substitute for UICollectionView to some extent.

Sample code:
-(void)loadView
{
    [super loadView];

    MyFlowLayout *S = [MyFlowLayout flowLayoutWithOrientation:MyLayoutViewOrientation_Vert arrangedCount:4];
    S.wrapContentHeight = YES;
    S.myWidth = 300;
    S.padding = UIEdgeInsetsMake(10, 10, 10, 10);
    S.gravity = MyMarginGravity_Horz_Fill;
    S.subviewMargin = 10;

    for (int i = 0; i < 10; i++)
    {
        UIView *A = [UIView new];
        A.heightDime.equalTo(A.widthDime);
        [S addSubview:A];

        A.backgroundColor = [UIColor greenColor];

    }


    [self.view addSubview:S];
    S.backgroundColor = [UIColor redColor];
}
Floating layout MyFloat Layout
It is equivalent to float location in css.
Floating layout is a kind of layout view in which the sub-views float and dock in the agreed direction. When the size is not enough to be accommodated, the layout view automatically finds the best position for floating docking. The concept of floating layout originates from the floating positioning technology in HTML/CSS, so floating layout can be used to implement irregular layout or layout surrounded by graphics and text. According to the direction of floating, floating layout can be divided into left and right floating layout and up and down floating layout.

Sample code:
-(void)loadView
{
    [super loadView];

    MyFloatLayout *S  = [MyFloatLayout floatLayoutWithOrientation:MyLayoutViewOrientation_Vert];
    S.wrapContentHeight = YES;
    S.padding = UIEdgeInsetsMake(10, 10, 10, 10);
    S.subviewMargin = 10;
    S.myWidth = 300;

    UIView *A = [UIView new];
    A.mySize = CGSizeMake(80,70);
    [S addSubview:A];

    UIView *B = [UIView new];
    B.mySize = CGSizeMake(150,40);
    [S addSubview:B];

    UIView *C = [UIView new];
    C.mySize = CGSizeMake(70,40);
    [S addSubview:C];

    UIView *D = [UIView new];
    D.mySize = CGSizeMake(100,140);
    [S addSubview:D];

    UIView *E = [UIView new];
    E.mySize = CGSizeMake(150,40);
    E.reverseFloat = YES;
    [S addSubview:E];

    UIView *F = [UIView new];
    F.mySize = CGSizeMake(120,60);
    [S addSubview:F];


    [self.view addSubview:S];
    S.backgroundColor = [UIColor redColor];
    A.backgroundColor = [UIColor greenColor];
    B.backgroundColor = [UIColor blueColor];
    C.backgroundColor = [UIColor orangeColor];
    D.backgroundColor = [UIColor cyanColor];
    E.backgroundColor = [UIColor blackColor];
    F.backgroundColor = [UIColor whiteColor];
}
Path Layout
Layout libraries are unique
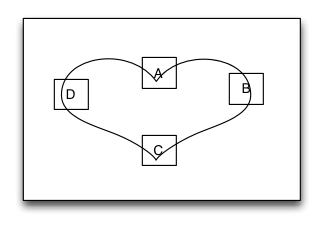
Path layout is a layout view in which sub-views are laid out according to the path formed by a specific curve function you provide. You need to provide a function to implement the curve path, a specific coordinate system, and a specific sub-view distance setting on the curve to achieve the three elements of the interface layout. When the curve path is formed, the sub-views will be arranged around the curve according to the same distance. Path layout is mainly applied to those irregular arrangements with specific rules, and the effect is very cool interface layout.
Sample code:
 -(void)loadView
{
    [super loadView];

    MyPathLayout *S = [MyPathLayout new];
    S.mySize = CGSizeMake(320,320);
    S.coordinateSetting.isReverse = YES;
    S.coordinateSetting.origin = CGPointMake(0.5, 0.2);

    S.polarEquation = ^(CGFloat angle)
    {
        return 80 * (1 + cos(angle));
    };

    for (int i = 0; i < 4; i++)
    {
        UIView *A = [UIView new];
        A.mySize = CGSizeMake(40,40);
        [S addSubview:A];

        A.backgroundColor = [UIColor greenColor];
    }

    [self.view  addSubview:S];
    S.backgroundColor = [UIColor redColor];
 }
Support for Size Classes
Size Classes Equivalent to iOS
MyLayout layouts provide support for Size Classes in order to adapt devices of different screen sizes. You can use Size Classes with the six layouts mentioned above in order to achieve the perfect adaptation of various device interfaces. The system provides two UIView extensions:
-(instancetype)fetchLayoutSizeClass:(MySizeClass)sizeClass;
-(instancetype)fetchLayoutSizeClass:(MySizeClass)sizeClass copyFrom:(MySizeClass)srcSizeClass;
Implement support for Size Classes. For example, the following example:
//Default settings for all devices.
 MyLinearLayout *rootLayout = [MyLinearLayout linearLayoutWithOrientation:MyLayoutViewOrientation_Vert];
    rootLayout.padding = UIEdgeInsetsMake(10, 10, 10, 10);
    rootLayout.wrapContentHeight = NO;
    rootLayout.gravity = MyMarginGravity_Horz_Fill;

//MySizeClass_wAny | MySizeClass_hCompact It shows that iPhone Horizontal screen of equipment.
 MyLinearLayout *lsc = [rootLayout fetchLayoutSizeClass:MySizeClass_wAny | MySizeClass_hCompact copyFrom:MySizeClass_wAny | MySizeClass_hAny];

    lsc.orientation = MyLayoutViewOrientation_Horz;
    lsc.wrapContentWidth = NO;
    lsc.gravity = MyMarginGravity_Vert_Fill;
Usage method
direct copy
- Copy all files under the Lib folder in the github project to your project.
- Put the # import "MyLayout.h" header file into your pch file, or in the source code location where you need to use the interface layout.
CocoaPods Installation
If you haven't installed cocoapods, please execute the following command first:
$ gem install cocoapods
To integrate MyLayout into your Xcode project with CocoaPods, create the following PDF file:
source 'https://github.com/CocoaPods/Specs.git'
platform :ios, '7.0'

pod 'MyLayout', '~> 1.3.4'
Then run the following command:
$ pod install
Demonstration effect
Links:
Welcome to visit me github Site, and pay attention to @ Brother Ouyang
- Swift:TangramKit: https://github.com/youngsoft/TangramKit
- OC:MyLayout: https://github.com/youngsoft/MyLinearLayout