Design sketch
Add dependency
Because of the use of Drawer Layout under v4 package, Toolbar under v7 package and Navigation View under android.support.design, the following configuration needs to be made in gradle:
v4 Packet system introduced by default
compile 'com.android.support:appcompat-v7:25.3.1'
compile 'com.android.support:design:25.3.1'
DrawerLayout
If we want the entire interface to slide sideways, we can use Drawer Layout as the root layout of the entire interface.
<android.support.v4.widget.DrawerLayout xmlns:android="http://schemas.android.com/apk/res/android"
    android:id="@+id/dl_layout"
    android:layout_width="match_parent"
    android:layout_height="match_parent" >
	<!--Content Interface Layout-->
	<!--Left menu interface layout-->
	<!--Right menu interface layout-->
</android.support.v4.widget.DrawerLayout>
Drawer Layout defines the placement order of three layouts in order to identify or intelligently control the content layout, left menu layout and right menu layout, requiring the content layout to be placed in front of the other two layouts.
If the menu layout is placed in front of the content layout, the runner will report an exception to type conversion, which also indicates that it limits the placement order. At the same time, it needs to add in the left menu root layout:
Android: layout_gravity = start or left controls it on the left. Drawer Layout identifies it as a left menu layout. Similarly, if there is a right menu interface, the right menu root layout needs to be added:
Android: layout_gravity = end or right controls it on the right, and Drawer Layout recognizes it as the right menu layout.
<android.support.v4.widget.DrawerLayout xmlns:android="http://schemas.android.com/apk/res/android"
    android:id="@+id/dl_layout"
    android:layout_width="match_parent"
    android:layout_height="match_parent" >

   <!--Content Interface Layout-->
    <LinearLayout
        android:id="@+id/ll_content"
        android:layout_width="match_parent"
        android:layout_height="match_parent"
        android:orientation="vertical" >

    </LinearLayout>

    <!--Left menu interface layout-->
    <RelativeLayout
        android:id="@+id/rl_left_menu"
        android:layout_width="300dp"
        android:layout_height="match_parent"
        android:layout_gravity="start"
        android:background="#ffffff" >


    </RelativeLayout>

    <!--Right menu interface layout-->
    <RelativeLayout
        android:id="@+id/rl_right_menu"
        android:layout_width="300dp"
        android:layout_height="match_parent"
        android:layout_gravity="end"
        android:background="#ffffff" >


    </RelativeLayout>

</android.support.v4.widget.DrawerLayout>
Add a click event to the button to control the opening and closing of the sidebar:
mLeftIb.setOnClickListener(new OnClickListener() {

			@Override
			public void onClick(View v) {
				//Determine if the left menu is open, if not, open, or close the left menu
				if(!mDrawerL.isDrawerOpen(Gravity.LEFT)){
					Toast.makeText(MainActivity.this, "Open the left menu", Toast.LENGTH_SHORT).show();
					mDrawerL.openDrawer(Gravity.LEFT);
				}else{
					mDrawerL.closeDrawer(Gravity.LEFT);
				}
			}
		});
NavigationView
When we make drawer menus, the layout of the part sliding out on the left is defined by ourselves. If we write it, we can make a nice side-pull menu with some time, but it always takes time. So after 5.0, Google launched NavitationView, which is the menu sliding out on the left. The menu is divided into two parts as a whole. The top part is called Header Layout, and the clicks below are menu. This effect can be written if we want to write it by ourselves, but it is not necessary. Now that Google provides this control, let's see how to use it.
In the same way as the usual side-pull menu, everything is first placed in a Drawer Layout, but this time we replaced the layout of the left sliding menu with a Navigation View. The code is as follows:
<?xml version="1.0" encoding="utf-8"?>
<FrameLayout xmlns:android="http://schemas.android.com/apk/res/android"
    xmlns:app="http://schemas.android.com/apk/res-auto"
    android:layout_width="match_parent"
    android:layout_height="match_parent"
    android:fitsSystemWindows="true">
<android.support.v4.widget.DrawerLayout
        android:id="@+id/drawer_layout"
        android:layout_width="match_parent"
        android:layout_height="match_parent">
<android.support.design.widget.CoordinatorLayout
            android:layout_width="match_parent"
            android:layout_height="match_parent">                                                                            <android.support.design.widget.AppBarLayout
                android:id="@+id/appbar_layout"
                android:layout_width="match_parent"
                android:layout_height="wrap_content"
                android:theme="@style/AppTheme.AppBarOverlay"> <android.support.v7.widget.Toolbar
                    android:id="@+id/toolbar"
                    android:layout_width="match_parent"
                    android:layout_height="?actionBarSize"
                    android:background="?attr/colorPrimary"
                    app:popupTheme="@style/AppTheme.PopupOverlay" /> </android.support.design.widget.AppBarLayout>
<!--content -Switchable Fragment-->
<LinearLayout
                android:layout_width="match_parent"
                android:layout_height="match_parent"
                android:orientation="vertical"
                app:layout_behavior="@string/appbar_scrolling_view_behavior"> <TextView
                    android:id="@+id/message"
                    android:layout_width="wrap_content"
                    android:layout_height="wrap_content" /> <Button
                    android:id="@+id/nextButton"
                    android:layout_width="wrap_content"
                    android:layout_height="wrap_content"
                    android:layout_gravity="center_horizontal"
                    android:text="test" />
</LinearLayout>
</android.support.design.widget.CoordinatorLayout>
<!--Left navigation menu-->
<android.support.design.widget.NavigationView
            android:id="@+id/navigation_view"
            android:layout_width="wrap_content"
            android:layout_height="match_parent"
            android:layout_gravity="start"
            android:background="@color/windowBackground"
            app:headerLayout="@layout/navigation_header"
            app:menu="@menu/drawer" />
</android.support.v4.widget.DrawerLayout>
</FrameLayout>
Explain the meaning of several attributes here:
1. The android:layout_gravity="left" attribute indicates that the View is a sliding menu on the left. The meaning of this attribute is needless to say, it is the knowledge point in DrawerLayout's usage. Navigation View needs to set android:layout_gravity="start"
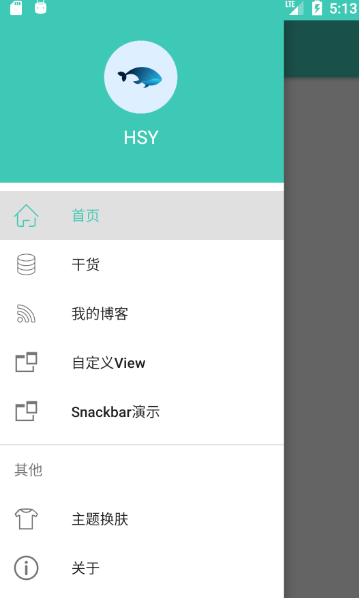
2.app:headerLayout="@layout/header_layout" refers to a header layout file, which is the background image we saw above, including the control that displays the user name on the background image, and so on.
3.app:menu="@menu/main" means referring to a menu as the following click item
Header layout file:
<?xml version="1.0" encoding="utf-8"?>
<LinearLayout xmlns:android="http://schemas.android.com/apk/res/android"
    xmlns:app="http://schemas.android.com/apk/res-auto"
    android:id="@+id/ll_navigation_header"
    android:layout_width="match_parent"
    android:layout_height="192dp"
    android:background="?attr/colorPrimary"
    android:gravity="center"
    android:orientation="vertical"
    android:padding="16dp"
    android:theme="@style/ThemeOverlay.AppCompat.Dark">
<ImageView
        android:id="@+id/profile_image"
        android:layout_width="72dp"
        android:layout_height="72dp"
        android:layout_marginTop="20dp"
        android:src="@mipmap/logo"
         />
<TextView
        android:layout_width="match_parent"
        android:layout_height="wrap_content"
        android:layout_marginTop="10dp"
        android:gravity="center"
        android:text="HSY"
        android:textColor="#ffffff"
        android:textAppearance="@style/TextAppearance.AppCompat.Body1"
        android:textSize="18sp" />
</LinearLayout>
Look at the menu file again:
<?xml version="1.0" encoding="utf-8"?>
<menu xmlns:android="http://schemas.android.com/apk/res/android"
    xmlns:tools="http://schemas.android.com/tools">
<group android:checkableBehavior="single">
<item
            android:checked="true"
            android:id="@+id/navigation_item_home"
            android:icon="@drawable/iconfont_home"
            android:title="home page" />
<item
            android:id="@+id/navigation_item_ganhuo"
            android:icon="@drawable/iconfont_source"
            android:title="Dried food" />
<item
            android:id="@+id/navigation_item_blog"
            android:icon="@drawable/iconfont_blog"
            android:title="My blog" />
<item
            android:id="@+id/navigation_item_custom_view"
            android:icon="@drawable/iconfont_custom_view"
            android:title="custom View" />
<item
            android:id="@+id/navigation_item_snackbar"
            android:icon="@drawable/iconfont_custom_view"
            android:title="Snackbar Demonstration" />
<item android:title="Other">
<menu>
<item
                    android:id="@+id/navigation_item_switch_theme"
                    android:checkable="true"
                    android:icon="@drawable/iconfont_skin"
                    android:title="Theme skin replacement" />
<item
                    android:id="@+id/navigation_item_about"
                    android:checkable="true"
                    android:icon="@drawable/iconfont_about"
                    android:title="about" />
</menu>
</item>
</group>
</menu>
1. Add the attribute app:itemIconTint="@color/blue" in the layout file to indicate that the color of the picture is all blue. What if I want the picture to show its own color? stay Java The following method is called in the code:
NavigationView navigationView = (NavigationView) findViewById(R.id.navigation_view);
        navigationView.setItemIconTintList(null);
There are also two commonly used API s:
1. app: itemBackground="@color/color Accent" sets the background color of each item
 2.app:itemTextColor="" Sets the background color of item
2. What if I want to add a separator between Navigation View items? Simply put the item into a group in menu and give it an id. The code is as follows:
<?xml version="1.0" encoding="utf-8"?>
<menu xmlns:android="http://schemas.android.com/apk/res/android">
<group android:id="@+id/g1">
<item
            android:id="@+id/favorite"
            android:icon="@mipmap/ic_launcher"
            android:title="Collection"/>
<item
            android:id="@+id/wallet"
            android:icon="@mipmap/ic_launcher"
            android:title="wallet"/>
</group>
<group android:id="@+id/g2">
<item
            android:id="@+id/photo"
            android:icon="@mipmap/ic_launcher"
            android:title="Album"/>
</group>
<item
        android:id="@+id/file"
        android:icon="@mipmap/ic_launcher"
        android:title="file"/>
</menu>
3. Hiding a menu list item, the company project will control the display and hiding of a menu list item according to whether you are an administrator, so this problem arises.
MenuItem menuItem = navigationView.getMenu().findItem(R.id.some_menu_item);
menuItem.setVisible(false); // true for display, false for hiding
4. Processing of transparent status bar when using Navigation View
Android App Immersive Status Bar Solution
Event monitoring in Navigation View
1. Head Click Event
To deal with the header click event, we need to get the header control first. In Java code, we can get the header control in the following way.
//Get the header layout file
View headerView = navigationView.getHeaderView(0);
Then, by calling the findViewById method in headerView, we can find the control of the header and set the click event.
2.item Click Events
navigationView.setNavigationItemSelectedListener(new NavigationView.OnNavigationItemSelectedListener() {
   @Override
   public boolean onNavigationItemSelected(MenuItem item) {
   //Processing item click events here
   return true;
}
});