Abstract:
Elastic search, which eats a lot of memory. It's normal to use the default settings as before, but as long as you modify the contents of elasticsearch.yml, errors may persist. So, here's someone who told you that you really need patience... Ha-ha, I am still too weak, just started to take a lot of detours.
Let's first configure elastic search's access to the external network
In the previous section, we did an elastic search demo. But at that time, we just queried the results in the terminal, and some people would wonder if this would be too limited. Yes, we have other ideas.
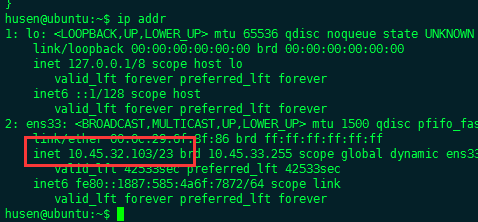
1. First, enter ip addr or ifconfig in the terminal to view the local area network IP address. If it is a remote server and knows ip, this step can be omitted.

2. Then we modify the configuration file of elastic search
Modify the / config / elasticsearch. YML file under the elasticsearch folder. My complete path here is / home / Husen / Desktop / elasticsearch - 5.5.1 / config / elasticsearch. YML
Modify the two positions at about line 50
- Add a line network.host: 0.0.0.0 after # network.host: 192.168.0.1
- Remove the # http. port: the # before the line 9200

3. Then run back to the elastic search directory and run elastic search
cd /home/husen/Desktop/elasticsearch-5.5.1/
./bin/elasticsearch
4. Open the browser on another machine at this time (I'm here an elastic search run by centos of the virtual machine, so I use the browser to access it directly in wimdows). Enter
http://10.45.32.103:9200/_search?prettyYou can see content output, but it's all zero, because we haven't exported content from logstash yet.

5. Then we try to run logstash and prepare the configuration file, which is saved as logstash.conf and placed in the directory of logstash file.
input{
    stdin{}
}

output{
    # Output to elastic search
    elasticsearch {
            hosts  => "10.45.32.103:9200" ##Fill in your host ip
        }
}

6. Enter the following commands in the logstash directory to run logstash
./bin/logstash -f logstash.conf 
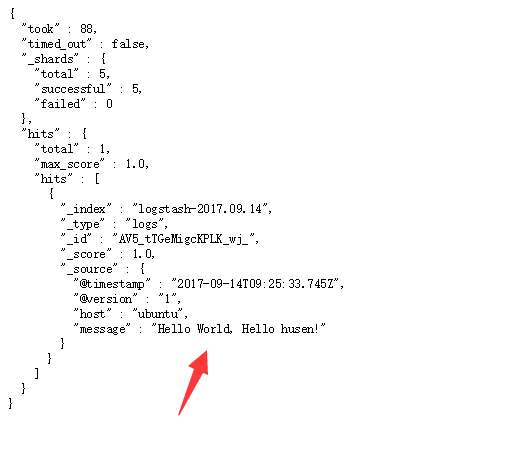
7. After successful operation, enter Hello World, Hello husen in logstash terminal!

Refresh just browser interface, you can see the following output, do!

Common Error 1
ERROR: [1] bootstrap checks failed
[1]: max virtual memory areas vm.max_map_count [65530] is too low, increase to at least [262144]
Solution
- Temporary Modification (Failure after Restart) Input at Terminal
[root@localhost elasticsearch-5.5.1]# sysctl -w vm.max_map_count=262144
- Permanent modification
##backups
[root@localhost elasticsearch-5.5.1]# cd /etc/
[root@localhost etc]# cp sysctl.conf sysctl.conf_bk

##Increase variables
[root@localhost etc]# echo "vm.max_map_count=262144" >> /etc/sysctl.conf

##Check to see if it works
[root@localhost etc]# sysctl -p
vm.max_map_count = 262144
Common Error 2
[WARN ][o.e.b.ElasticsearchUncaughtExceptionHandler] [] uncaught exception in thread [main]
org.elasticsearch.bootstrap.StartupException: java.lang.RuntimeException: can not run elasticsearch as root
Solution
This one can't be run with root account. After elastic search 5, it can't be run with root. Don't ask me why uuuuuuuuuu .
Common Error 3
max file descriptors [4096] for elasticsearch process likely too low, increase to at least [65536]Solution
##Switch to root user
[husen@localhost ~]$ su
Password:

##backups
[root@localhost husen]# cp /etc/security/limits.conf /etc/security/limits.conf_bk

##Add the following two lines, where husen runs elastic search for me
##Here elastic search can't run with root, so you have to create a new user for elastic search
[root@localhost husen]# echo "husen hard nofile 65536" >> /etc/security/limits.conf
[root@localhost husen]# echo "husen soft nofile 65536" >> /etc/security/limits.conf
See other blogs for more common errors
centos7 Virtual Machine Installation Elastic Search 5.0.x - Installation Chapter
Elastic search 5.0 installation problem highlights