Reprinted from: http://blog.csdn.net/lovexieyuan520/article/details/50594271
In the layout of android development, a large number of domestic use of the bottom menu, which is not in line with the norms of android, I personally hate, but the product is designed in this way, can only do so. In this blog, I will combine the information on the Internet and my own experience to achieve a bottom menu, which solves various problems raised by many netizens. In this article, I only post part of the implementation code and effect map, so as not to occupy a large amount of space, so that you can not enjoy it. In the end, I will give the whole demo source code!!!
Design of bottom menu
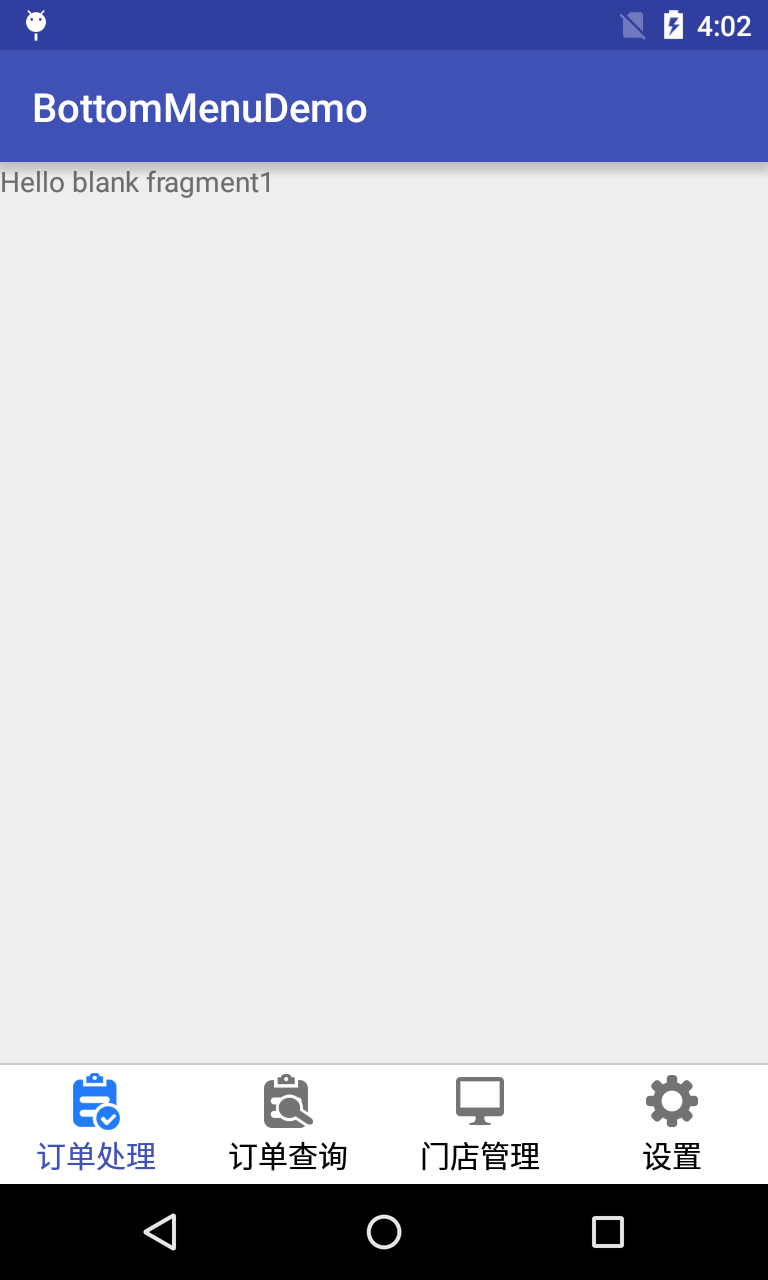
Generally speaking, the bottom menu is to do five more tabs, in which I made four tabs, which are more in line with the needs. The main ways to achieve this are tabhost, direct TextView, RadioButton and so on. I use RadioButton here. I think RadioButton is relatively simple to control and can achieve our needs well. The activity_main.xml code of the bottom menu is as follows:
<RelativeLayout xmlns:android="http://schemas.android.com/apk/res/android"
                xmlns:tools="http://schemas.android.com/tools"
                android:layout_width="match_parent"
                android:layout_height="match_parent"
                tools:context=".MainActivity">


    <FrameLayout
        android:id="@+id/container"
        android:layout_width="match_parent"
        android:layout_height="match_parent"
        android:layout_above="@+id/divide"
        android:layout_alignParentTop="true">

    </FrameLayout>

    <View
        android:id="@+id/divide"
        android:layout_width="match_parent"
        android:layout_height="1dp"
        android:layout_above="@+id/activity_group_radioGroup"
        android:background="#cccccc"/>

    <RadioGroup
        android:id="@+id/activity_group_radioGroup"
        android:layout_width="fill_parent"
        android:layout_height="wrap_content"
        android:layout_alignParentBottom="true"
        android:background="#ffffff"
        android:checkedButton="@+id/order_process"
        android:gravity="center"
        android:orientation="horizontal"
        android:paddingBottom="3dp"
        android:paddingTop="3dp">

        <RadioButton
            android:id="@+id/order_process"
            style="@style/main_tab_bottom"
            android:layout_width="fill_parent"
            android:layout_height="match_parent"
            android:layout_weight="1.0"
            android:drawableTop="@drawable/main_tab_1"
            android:gravity="center"
            android:text="Order processing"/>

        <RadioButton
            android:id="@+id/order_query"
            style="@style/main_tab_bottom"
            android:layout_width="fill_parent"
            android:layout_height="match_parent"
            android:layout_weight="1.0"
            android:checked="false"
            android:drawableTop="@drawable/main_tab_2"
            android:gravity="center"
            android:text="Order inquiry"/>

        <RadioButton
            android:id="@+id/merchant_manager"
            style="@style/main_tab_bottom"
            android:layout_width="fill_parent"
            android:layout_height="match_parent"
            android:layout_weight="1.0"
            android:checked="false"
            android:drawableTop="@drawable/main_tab_3"
            android:gravity="center"
            android:text="Store management"/>

        <RadioButton
            android:id="@+id/setting"
            style="@style/main_tab_bottom"
            android:layout_width="fill_parent"
            android:layout_height="match_parent"
            android:layout_weight="1.0"
            android:checked="false"
            android:drawableTop="@drawable/main_tab_4"
            android:gravity="center"
            android:text="Set up"/>
    </RadioGroup>


</RelativeLayout>- 1
- 2
- 3
- 4
- 5
- 6
- 7
- 8
- 9
- 10
- 11
- 12
- 13
- 14
- 15
- 16
- 17
- 18
- 19
- 20
- 21
- 22
- 23
- 24
- 25
- 26
- 27
- 28
- 29
- 30
- 31
- 32
- 33
- 34
- 35
- 36
- 37
- 38
- 39
- 40
- 41
- 42
- 43
- 44
- 45
- 46
- 47
- 48
- 49
- 50
- 51
- 52
- 53
- 54
- 55
- 56
- 57
- 58
- 59
- 60
- 61
- 62
- 63
- 64
- 65
- 66
- 67
- 68
- 69
- 70
- 71
- 72
- 73
- 74
- 75
- 76
- 77
- 78
- 79
- 80
- 81
This should be well understood, that is, at the bottom of a RadioGroup, RadioButton inside to achieve, above a FrameLayout to put content, this is the xml part.
Java Code Controls Fragment Switching
During tab switching, I use show() and hide() to handle it, so that the status of Fragment can be saved. The core code is as follows
            public void onCheckedChanged(RadioGroup group, int checkedId) {
                FragmentManager fm = getSupportFragmentManager();
                FragmentTransaction ft = fm.beginTransaction();
                Fragment fragment1 = fm.findFragmentByTag(fragment1Tag);
                Fragment fragment2 = fm.findFragmentByTag(fragment2Tag);
                Fragment fragment3 = fm.findFragmentByTag(fragment3Tag);
                Fragment fragment4 = fm.findFragmentByTag(fragment4Tag);
                if (fragment1 != null) {
                    ft.hide(fragment1);
                }
                if (fragment2 != null) {
                    ft.hide(fragment2);
                }
                if (fragment3 != null) {
                    ft.hide(fragment3);
                }
                if (fragment4 != null) {
                    ft.hide(fragment4);
                }
                switch (checkedId) {
                    case R.id.order_process:
                        if (fragment1 == null) {
                            fragment1 = new Fragment1();
                            ft.add(R.id.container, fragment1, fragment1Tag);
                        } else {
                            ft.show(fragment1);
                        }
                        break;
                    case R.id.order_query:
                        if (fragment2 == null) {
                            fragment2 = new Fragment2();
                            ft.add(R.id.container, fragment2, fragment2Tag);
                        } else {
                            ft.show(fragment2);
                        }
                        break;
                    case R.id.merchant_manager:
                        if (fragment3 == null) {
                            fragment3 = new Fragment3();
                            ft.add(R.id.container, fragment3,
                                    fragment3Tag);
                        } else {
                            ft.show(fragment3);
                        }
                        break;
                    case R.id.setting:
                        if (fragment4 == null) {
                            fragment4 = new Fragment4();
                            ft.add(R.id.container, fragment4, fragment4Tag);
                        } else {
                            ft.show(fragment4);
                        }
                        break;
                    default:
                        break;
                }
                ft.commit();
            }
});- 1
- 2
- 3
- 4
- 5
- 6
- 7
- 8
- 9
- 10
- 11
- 12
- 13
- 14
- 15
- 16
- 17
- 18
- 19
- 20
- 21
- 22
- 23
- 24
- 25
- 26
- 27
- 28
- 29
- 30
- 31
- 32
- 33
- 34
- 35
- 36
- 37
- 38
- 39
- 40
- 41
- 42
- 43
- 44
- 45
- 46
- 47
- 48
- 49
- 50
- 51
- 52
- 53
- 54
- 55
- 56
- 57
- 58
- 59
The switch is perfect. Let's see the effect:
problem
1. The bottom menu above is a good way to switch Fragments and save the state before Fragments. But there's a big problem. We put apps back in the background and play with other apps. After a while, our apps have been destroyed. We switch back by pressing multi-task keys, and find that multiple fragments appear on the interface. The overlap is due to multiple fragments showing overlap at the same time. The solution is as follows: override the onRestoreInstanceState method of Activity
    @Override
    protected void onRestoreInstanceState(Bundle savedInstanceState) {
        super.onRestoreInstanceState(savedInstanceState);
        for (int i = 0; i < radioGroup.getChildCount(); i++) {
            RadioButton mTab = (RadioButton) radioGroup.getChildAt(i);
            FragmentManager fm = getSupportFragmentManager();
            Fragment fragment = fm.findFragmentByTag((String) mTab.getTag());
            FragmentTransaction ft = fm.beginTransaction();
            if (fragment != null) {
                if (!mTab.isChecked()) {
                    ft.hide(fragment);
                }
            }
            ft.commit();
        }
}- 1
- 2
- 3
- 4
- 5
- 6
- 7
- 8
- 9
- 10
- 11
- 12
- 13
- 14
- 15
- 16
It solves the problem of Fragment overlap very well.
2. If there is a menu for manipulating toolbar in Fragment, besides setting setHasOptionsMenu(true) in Fragment, it is also necessary to override the onHiddenChanged method in Fragment:
    @Override
    public void onHiddenChanged(boolean hidden) {
        super.onHiddenChanged(hidden);
        if (!hidden) {
            ((AppCompatActivity) getActivity()).setSupportActionBar(mToolbar);
            ((AppCompatActivity)getActivity()).getSupportActionBar().setDisplayShowTitleEnabled(false);
            setHasOptionsMenu(true);
        }
    }