First, what is server-side rendering (SSR)?
Roughly speaking, the server splices the static pages requested by users and returns them directly to the client. The client activates these static pages to make them dynamic and responsive to subsequent data changes.
Second, why use server-side rendering (SSR)?
1. Better SEO, because search engine crawler crawler tools can directly view fully rendered pages.
2. Generate a better user experience, faster time-to-content, especially for slow network conditions or slow devices. You don't have to wait until all JavaScript is downloaded and executed to display the server rendered tags, so your users will see the full rendered pages faster.
Basic usage
First, vue-ssr needs an important plug-in, so we need to install it.
npm install vue vue-server-renderer --save
3.1 Rendering a Simple Example (Official Website)
// Step 1: Create a Vue instance
const Vue = require('vue')
const app = new Vue({
  template: `<div>Hello World</div>`
})

// Step 2: Create a renderer
const renderer = require('vue-server-renderer').createRenderer()

// Step 3: Render the Vue instance to HTML
renderer.renderToString(app, (err, html) => {
  if (err) throw err
  console.log(html)
  // => <div data-server-rendered="true">Hello World</div>
})

// At 2.5.0+, if no callback function is passed in, Promise is returned:
renderer.renderToString(app).then(html => {
  console.log(html)
}).catch(err => {
  console.error(err)
})
3.2 Case of Server Integration (Official Network)
First install npm install express --save
const Vue = require('vue')
const server = require('express')()
const renderer = require('vue-server-renderer').createRenderer()

server.get('*', (req, res) => {
  const app = new Vue({
    data: {
      url: req.url
    },
    template: `<div>Visiting URL Yes, {{ url }}</div>`
  })

  renderer.renderToString(app, (err, html) => {
    if (err) {
      res.status(500).end('Internal Server Error')
      return
    }
    res.end(`
      <!DOCTYPE html>
      <html lang="en">
        <head><title>Hello</title></head>
        <body>${html}</body>
      </html>
    `)
  })
})

server.listen(8080)
3.3 Use a page template
// index.html
<!DOCTYPE html>
<html lang="en">
  <head><title>Hello</title></head>
  <body>
    <!--vue-ssr-outlet-->
  </body>
</html>
Note the annotations -- this will be where the application HTML tags are injected.
const renderer = createRenderer({
  template: require('fs').readFileSync('./index.template.html', 'utf-8')
})

renderer.renderToString(app, (err, html) => {
  console.log(html) // html will be the complete page for injecting application content
})
Of course, the above content is only the foundation of the foundation. Ultimately, we need to integrate vue-cli, and combine the configuration of node, express, webpack, etc. to generate a more flexible vue-ssr application. It took nearly four days to look at the api, check the information, and finally build a static single-page application vue-ssr. Share it while it's hot. After all, you're old and you don't have a good memory.
4. Vue 2.0+node+express+webpack to realize vue-ssr single page application
First, we need to install vue-cli, specific installation, you can refer to the first article in my Vue series, if the previous global installation, then just need init.
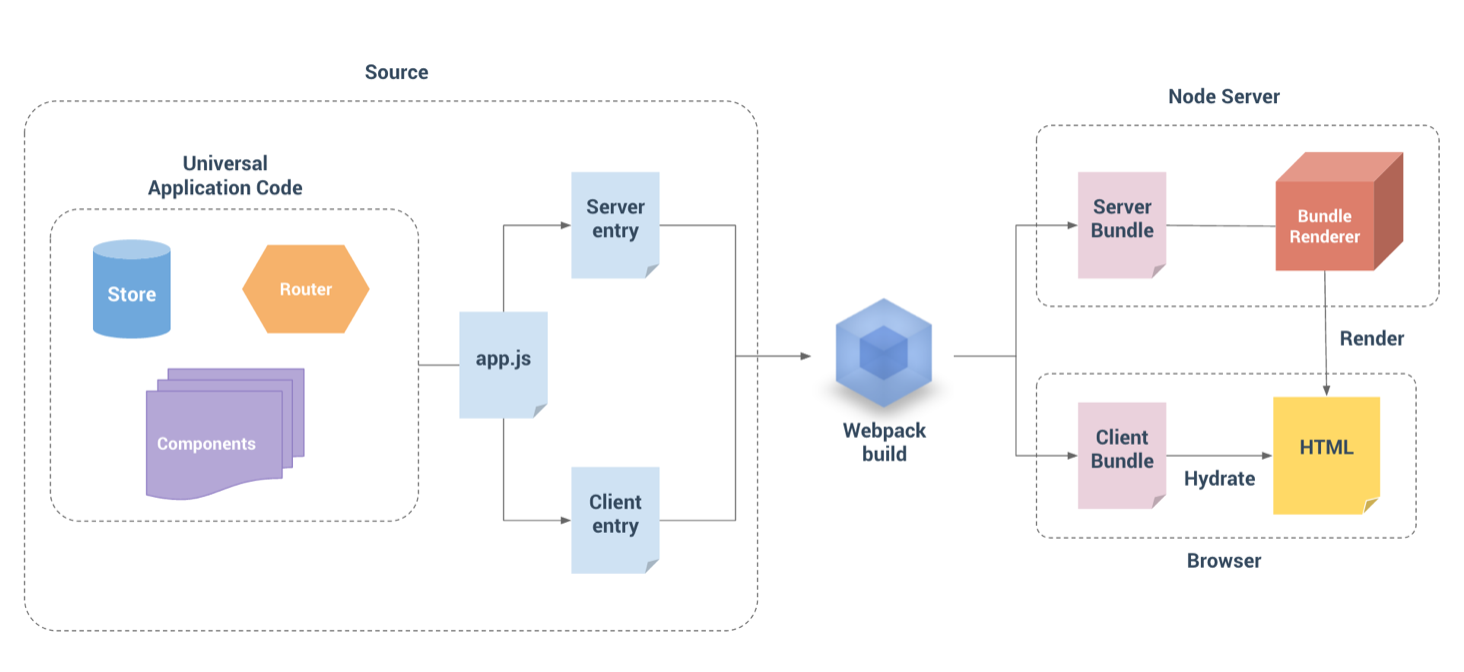
At first, I couldn't understand the map on the official website. Later, after building it, I found that the official one was official, just as clear as the Beijing Metro Map. To learn from others, ssr has two entrance files, client.js and server.js, which contain application code. Web pack is packaged into server bundles for server side and for client side through two entrance files respectively. When the server receives a request from the client, it creates a renderer, bundleRenderer, which reads the server bundle file generated above and executes its code, then sends a generated html to the browser. After the client loads the client bundle, it hyds the DOM generated by the server. Ration (Determine whether the DOM is the same as the DOM you are about to generate, and if it is the same, mount the client's vue instance on the DOM, otherwise a warning will be raised).
Based on the above, we first build a simple vue-ssr without data requests.
How to build?
1. Create a vue instance
2. Configuring routing and corresponding view components
3. Creating Client Entry Files
4. Create Server Entry File
5. Configure webpack, sub-server packaging configuration and client packaging configuration
6. Create server-side renderer and render vue instances into html
Create a Vue instance: Create a new root Vue instance for each request. This is similar to the example where each user uses a new application in his own browser. If we use a shared instance among multiple requests, it is easy to pollute the status of cross-requests, so we should expose a factory function that can be executed repeatedly to create new application instances for each request.
//  app.js
import Vue from 'vue'
import App from './App.vue'
import createRouter  from './router'

Vue.config.productionTip = false

export function createApp () {
  const router = createRouter()
  const app = new Vue({
    // el: '#app',
    router,
    render: h => h(App)
  })
  return { app, router }
}
Configure routing and the corresponding view components: Note that, similar to createApp, we also need to give each request a new router instance, so the file exports a createRouter function.
// router/index.js

import Vue from 'vue'
import Router from 'vue-router'
import home from '@/components/home'
import about from '@/components/about'

Vue.use(Router)

export default function createRouter() {
  return new Router({
    mode:'history',
    routes: [
      {
        path: '/',
        name: 'home',
        component: home
      },
      {
        path: '/about',
        name: 'about',
        component: about
      }
    ]
  })
}
Create the client entry file: entry-client.js client entry simply creates the application and mounts it into the DOM
import { createApp } from './app'

// Client-specific boot logic...

const { app, router } = createApp()

// This assumes that the root element in the App.vue template has `id= `app'.
router.onReady(() => {
  app.$mount('#app')
})
Create server-side entry file: implement server-side routing logic in entry-server.js
import { createApp } from './app'

export default (context) => {
  // Because it may be an asynchronous routing hook function or component, we will return a Promise.
  // So that the server can wait for all the content before rendering.
  // It's ready.
  return new Promise((resolve, reject) => {
    const { app, router } = createApp(context)

    const { url } = context
    const { fullPath } = router.resolve(url).route
    if (fullPath !== url) {
      return reject({ url: fullPath })
    }
    // Setting the location of server-side router
    router.push(context.url)
    // Wait until router parses the possible asynchronous components and hook functions
    router.onReady(() => {
      const matchedComponents = router.getMatchedComponents()
      if (!matchedComponents.length) {
        return reject({ code: 404 })
      }
      // Promise should resolve the application instance so that it can render
      resolve(app)

    }, reject)
  })
}
After the creation, our project can not start yet. We need to configure webpack to generate server bundle s for service side and client bundle s for client side.
Client bundles are easy to create. We introduce const vueSSRClient = require('vue-server-renderer/client-plugin') in webpack.dev.conf.js under the build folder under vue-cli, and then create a new vueSSRClient() in the place where plugins are configured below. At this time, our client bundle s have been quietly generated.
The server bundle on the server side requires us to create a new webpack.server.conf.js under the build folder, which is configured as follows
const webpack = require('webpack')
const merge = require('webpack-merge')
const baseWebpackConfig = require('./webpack.base.conf')
const VueSSRServerPlugin = require('vue-server-renderer/server-plugin')
const nodeExternals = require('webpack-node-externals')

module.exports = merge(baseWebpackConfig,{
    entry: './src/entry-server.js',
    devtool:'source-map',
    target:'node',
    output:{
        filename:'server-bundle.js',
        libraryTarget:'commonjs2'
    },
    externals: [nodeExternals({
        // do not externalize CSS files in case we need to import it from a dep
        whitelist: /\.css$/
    })],
    plugins:[
        new webpack.DefinePlugin({
            'process.env.NODE_ENV': JSON.stringify(process.env.NODE_ENV || 'development'),
            'process.env.VUE_ENV': '"server"'
          }),

        new VueSSRServerPlugin()
    ]
})
Now we can generate server bundles for server and client bundle s for client through webpack, but we need to create a renderer bundleRenderer, which reads the server bundle file generated above and executes its code, then sends a generated html to browser, so we build the folder. Next, create a new dev-server.js file, which reads as follows (note)
// dev-server.js

const webpack = require('webpack')
const baseWebpackConfig = require('./webpack.server.conf')
const clientConfig = require('./webpack.base.conf')
const fs = require('fs')
const path = require('path')
// Read Memory Files
const Mfs = require('memory-fs')
const axios = require('axios')

module.exports = (cb) => {
    // Used to read memory files
    var mfs = new Mfs()
    const webpackComplier = webpack(baseWebpackConfig)
    webpackComplier.outputFileSystem = mfs
    const readFile = (fs, file) => {
        try {
          return fs.readFileSync(path.join(clientConfig.output.path, file), 'utf-8')
        } catch (e) {}
    }


    webpackComplier.watch({},async (err,stats) => {
        if(err) {
            return console.log(err)
        }
        stats = stats.toJson();
        stats.errors.forEach(err => {console.log(err)});
        stats.warnings.forEach(err => {console.log(err)});
        // The default name of the JSON file for getting the server bundle generated by vue-server-renderer/server-plugin is vue-ssr-server-bundle.json
        let serverBundle = JSON.parse(readFile(mfs, 'vue-ssr-server-bundle.json'))
        // Get the JSON file of the client bundle generated by vue-server-renderer/client-plugin with the default name vue-ssr-client-manifest.json
        let clientBundle =  await axios.get('http://localhost:8080/vue-ssr-client-manifest.json')
        // Obtain the template file and notice that the template file contains <!--vue-ssr-outlet-->.
        let template = fs.readFileSync(path.join(__dirname,'..','index.html'), 'utf-8')
        cb(serverBundle, clientBundle, template)
    })
}
Now it's time to call our dev-server, use bundleRenderer to generate our html, and return to the page. Then we create a new server.js in the root directory, integrate all resources, and make it the entrance of our client.
// server.js
const devServer = require('./build/dev-server.js')
const server = require('express')()
const { createBundleRenderer } = require('vue-server-renderer')
// In the server processing function...
server.get('*', (req, res) => {
  const context = { url: req.url }
    res.status(200)
    devServer((serverBundle, clientBundle, template) => {
        let renderer = createBundleRenderer(serverBundle, {
            runInNewContext: false, // Recommend
            template, // (optional) page template
            clientManifest:clientBundle.data // (optional) client build manifest
        })

        renderer.renderToString(context,(err,html) => {
            res.send(html)
        })

    })

})

const port = process.env.PORT || 5001;
server.listen(port, () => {
    console.log(`server started at localhost:${port}`)
    console.log('Startup success')
})
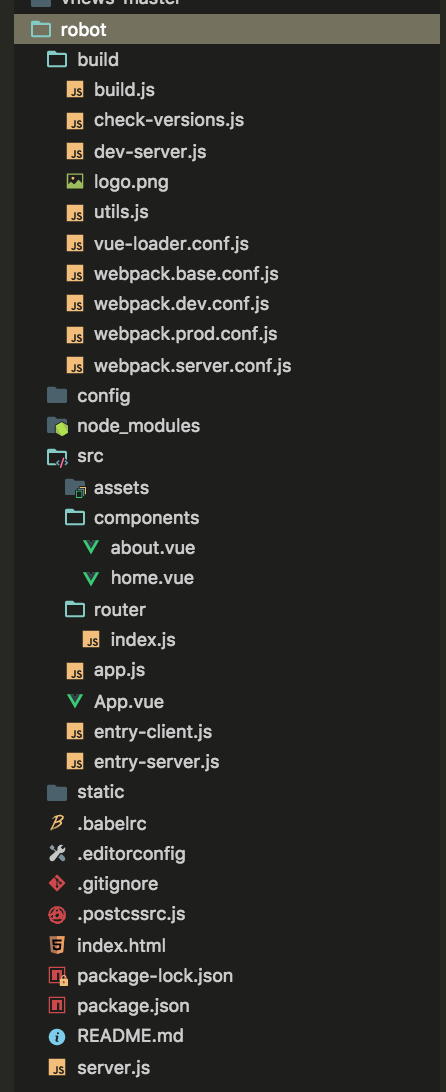
Finally, our project catalogue is as follows:
In order to start our project on the server side, add a line of code "server" to the scripts of package.json: "node server. js"
Now, we run npm run dev to start the client rendering, run npm run server to start the server rendering, the front page rendering is the same, but when you look at the page source code, you will find the difference.
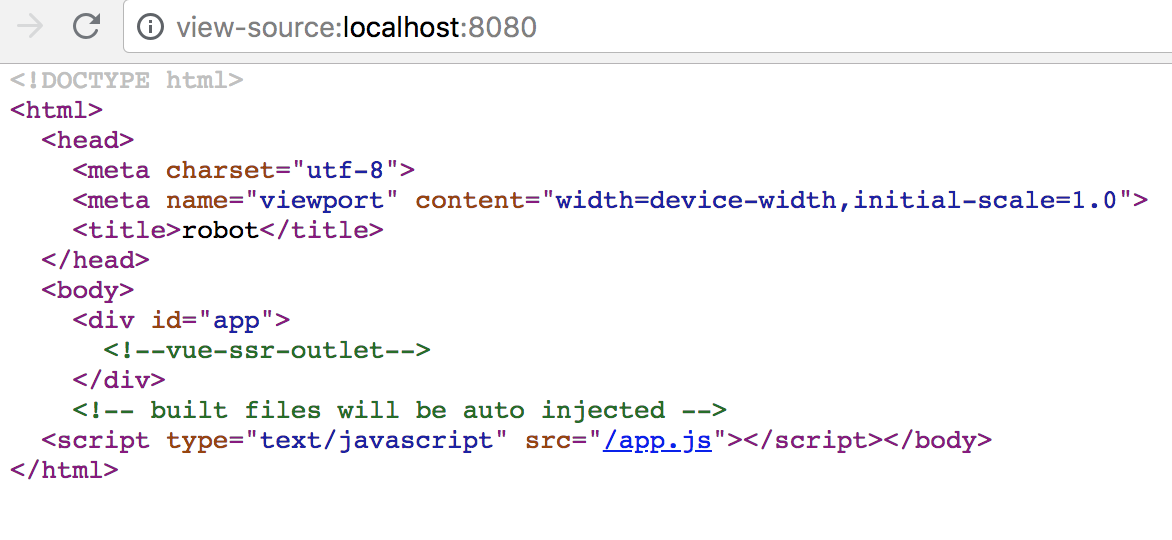
npm run dev starts port 8080 by default
View client source code
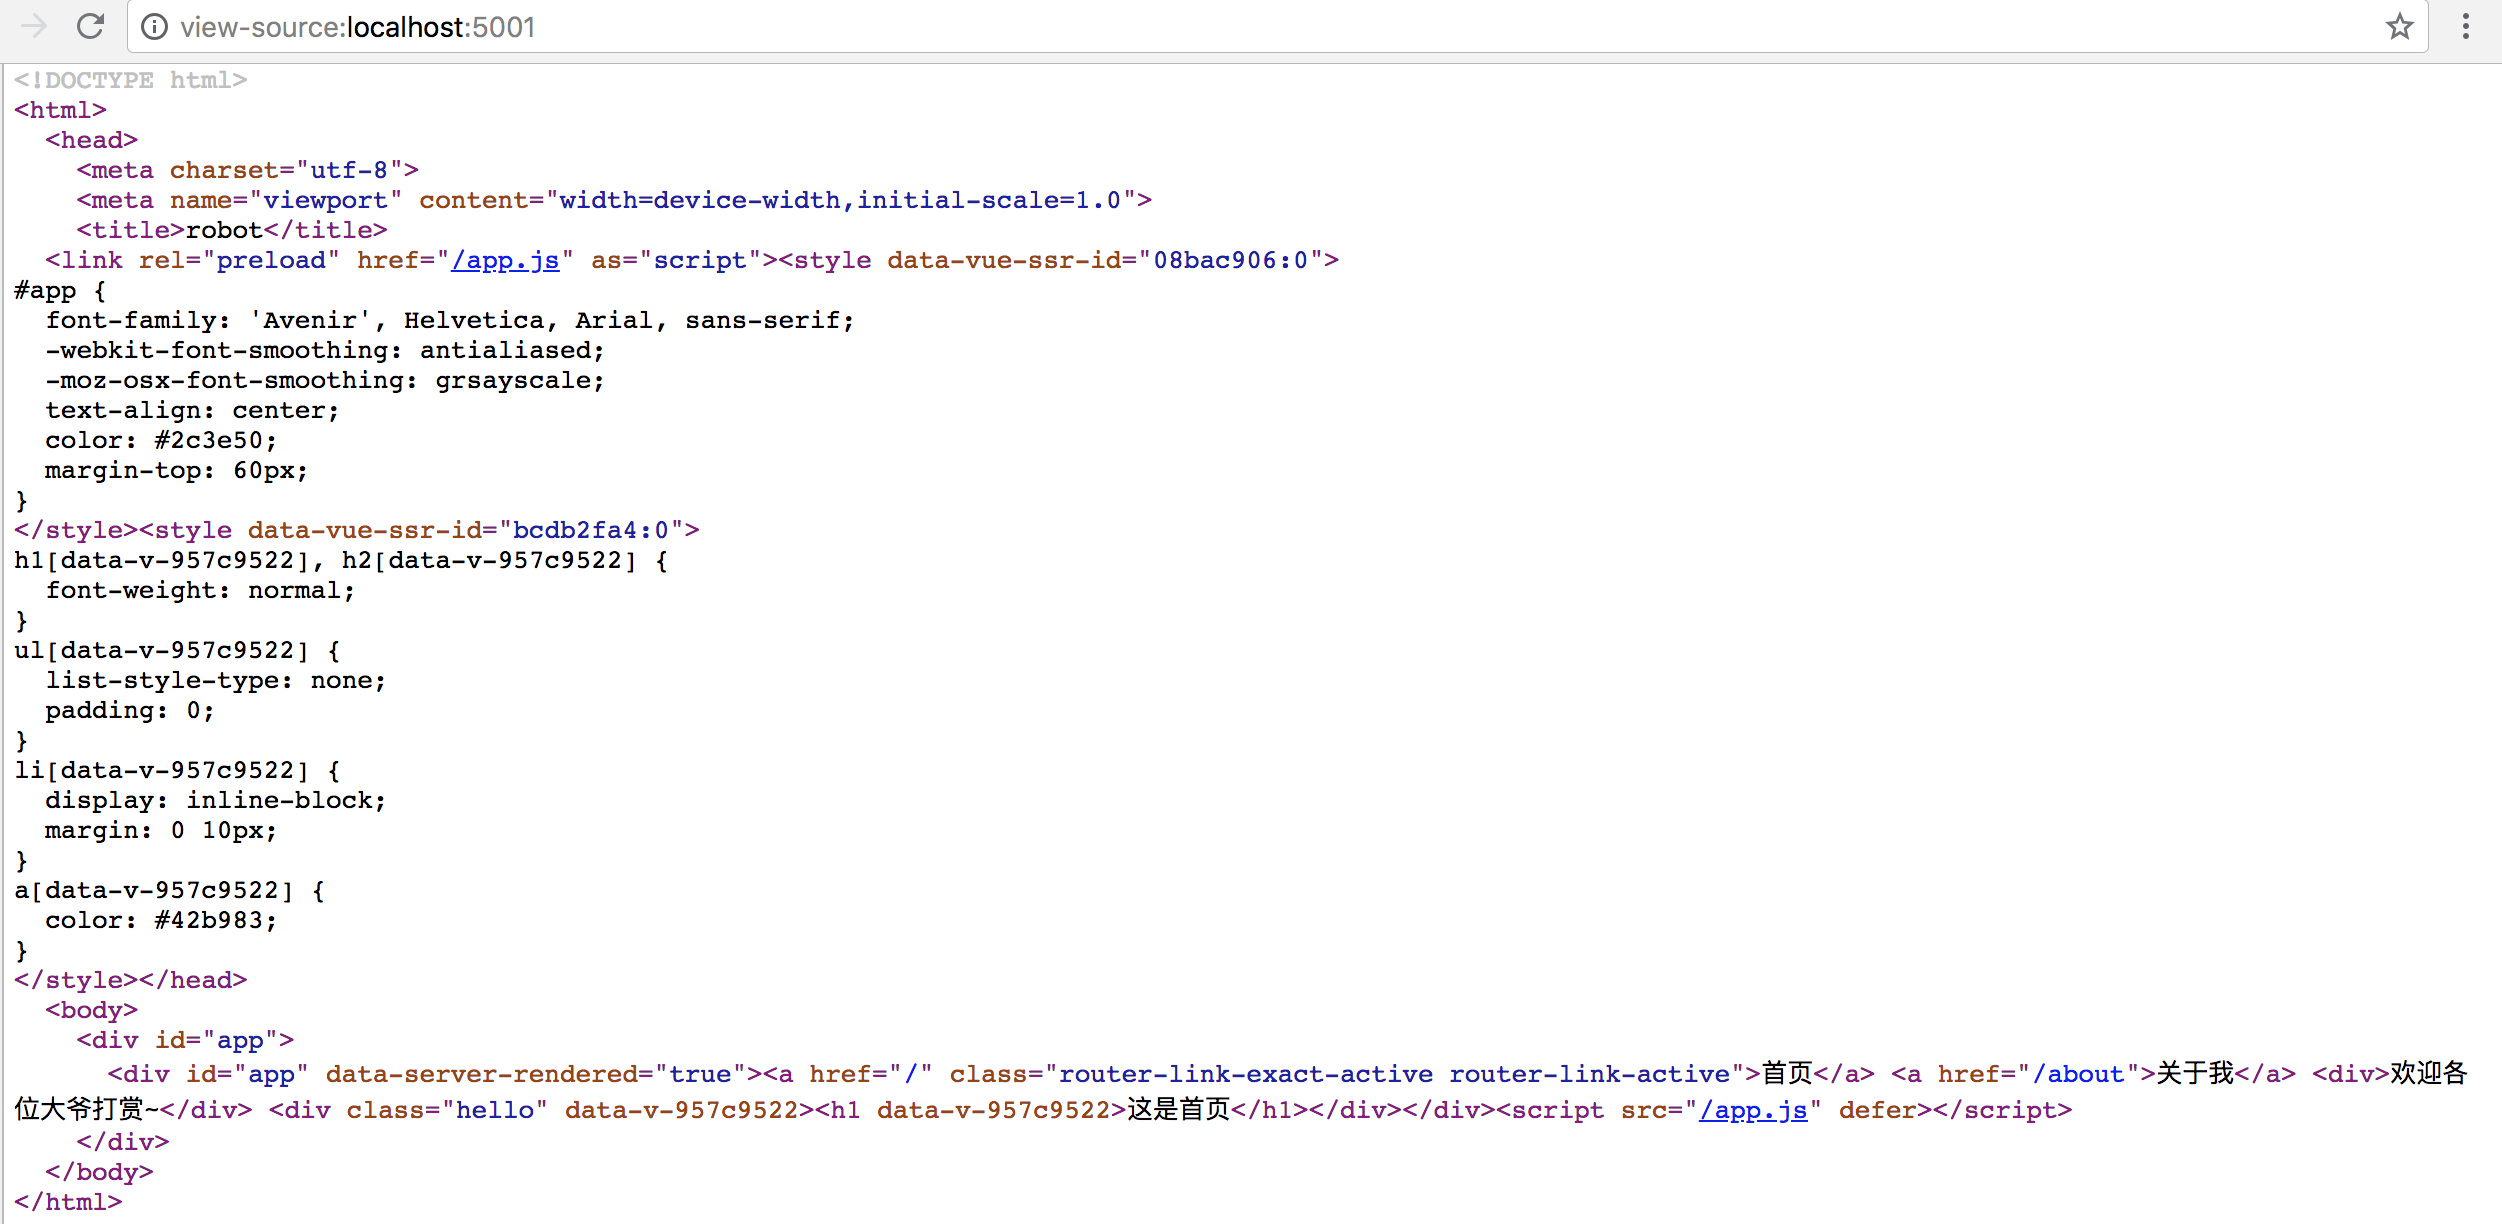
npm run server starts port 5001 by default
Looking at the source code on the server side, there's an obvious data-server-rendered="true"
Now that our simple case is complete, we will eventually integrate vuex to dynamically display the data, so let's drop the set.
Code words are not easy, you are welcome to appreciate them and cherish them.