1. Learning plan
First day
1. Introduction to Spring MVC
2. Initial Procedures
3. Explanation of Spring MVC Architecture
a) Frame structure
b) Component description
4. Spring MVC Integrates MyBatis
5. Parameter binding
a) Types of Spring MVC default support
b) Simple data types
c) Pojo type
d) Pojo packaging type
e) Custom parameter binding
6. The difference between Spring MVC and Struts2
Second days
1. Advanced parameter binding
a) Array type parameter binding
b) List type bindings
2. Use of @RequestMapping annotations
3. Controller method return value
4. Exception handling in Spring MVC
5. Picture upload processing
6. Json Data Interaction
7. Spring MVC Implementing RESTful
8. Interceptor
2. Introduction to Spring
2.1. What is Springmvc
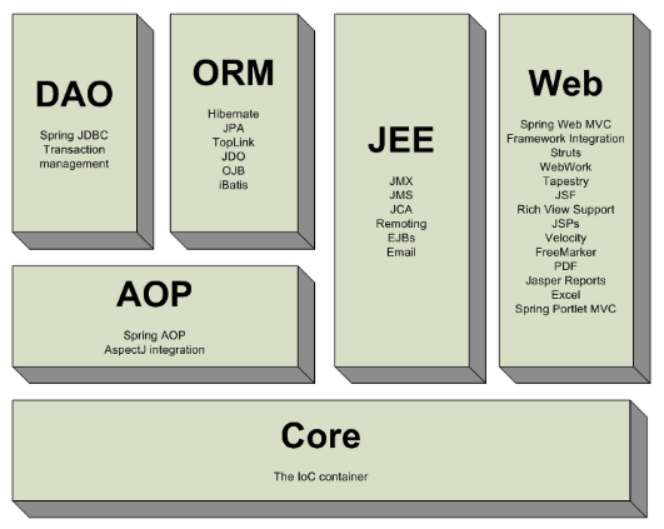
Spring web mvc and Struts2 belong to the framework of the presentation layer. They are part of the Spring framework. We can see from the overall structure of Spring as follows:
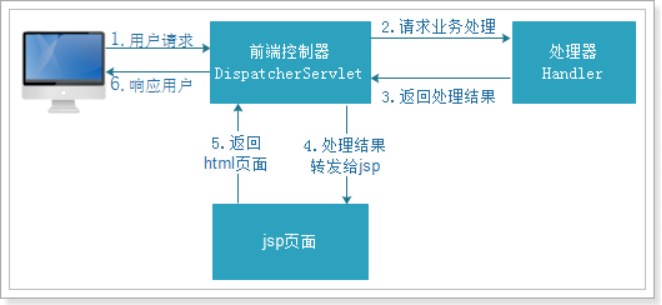
2.2. Springmvc process
As shown in the following figure:
2.3. Introduction procedures
Requirements: Use browsers to display lists of items
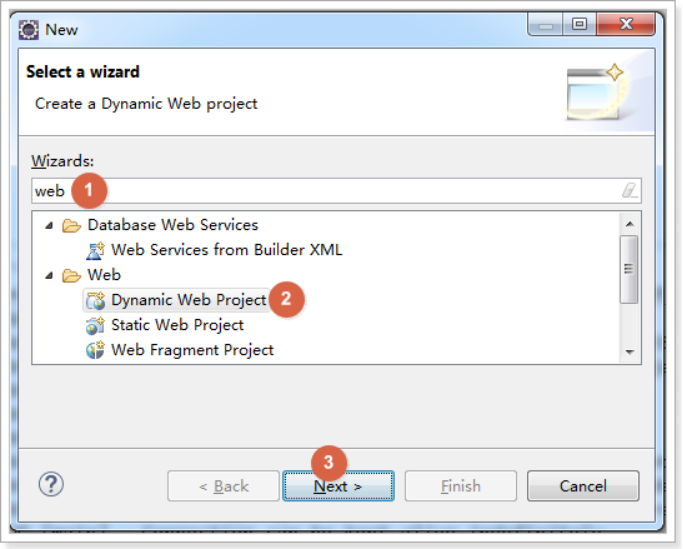
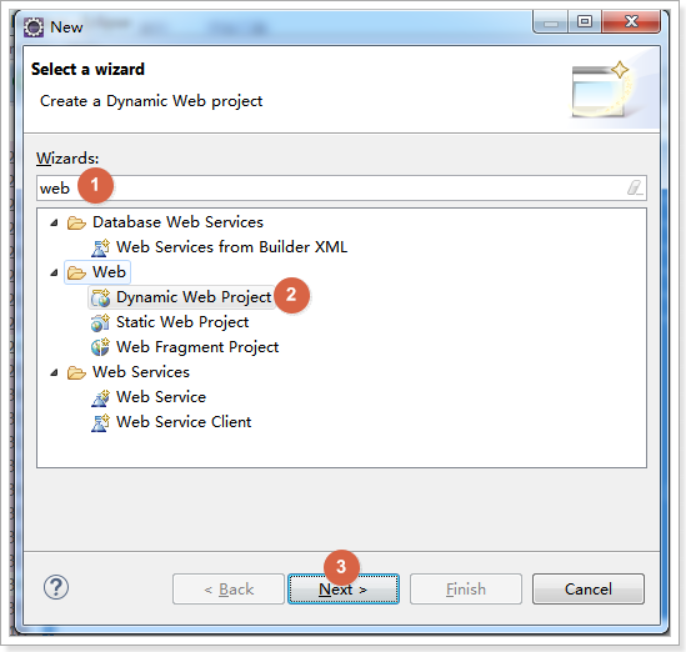
2.3.1. Creating a web Project
Spring MVC is the framework of presentation layer, which needs to build web Engineering development.
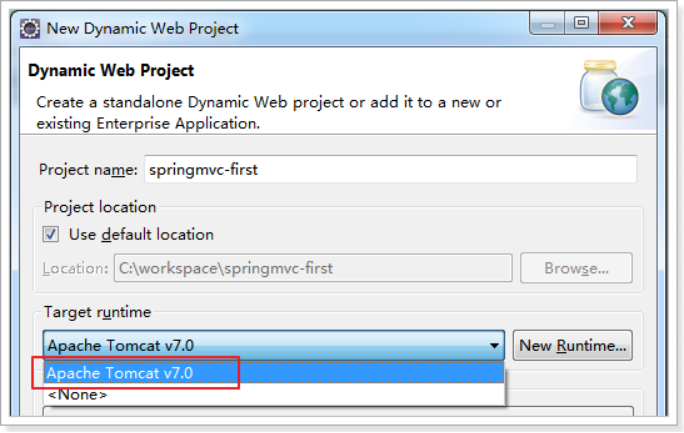
Create a dynamic web project as follows:
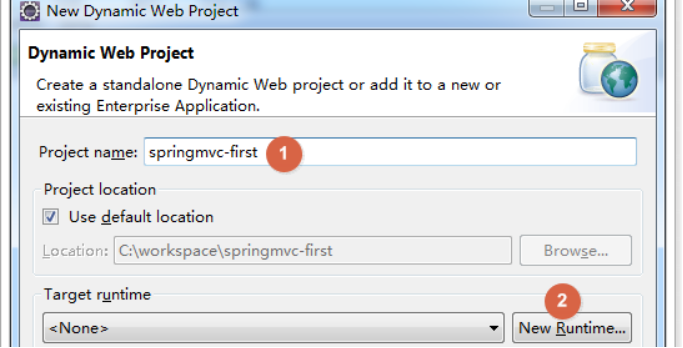
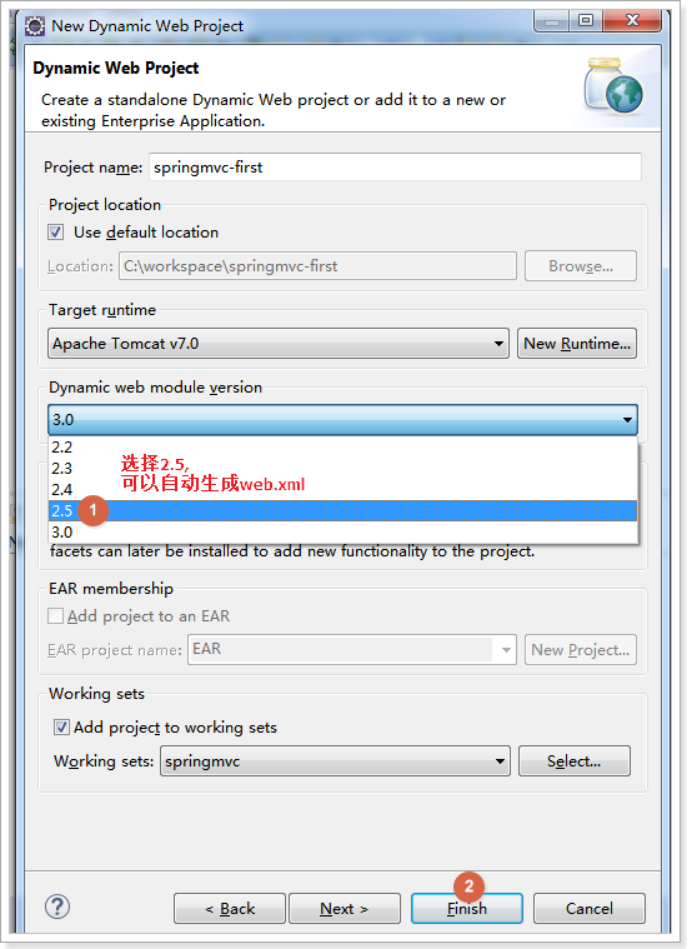
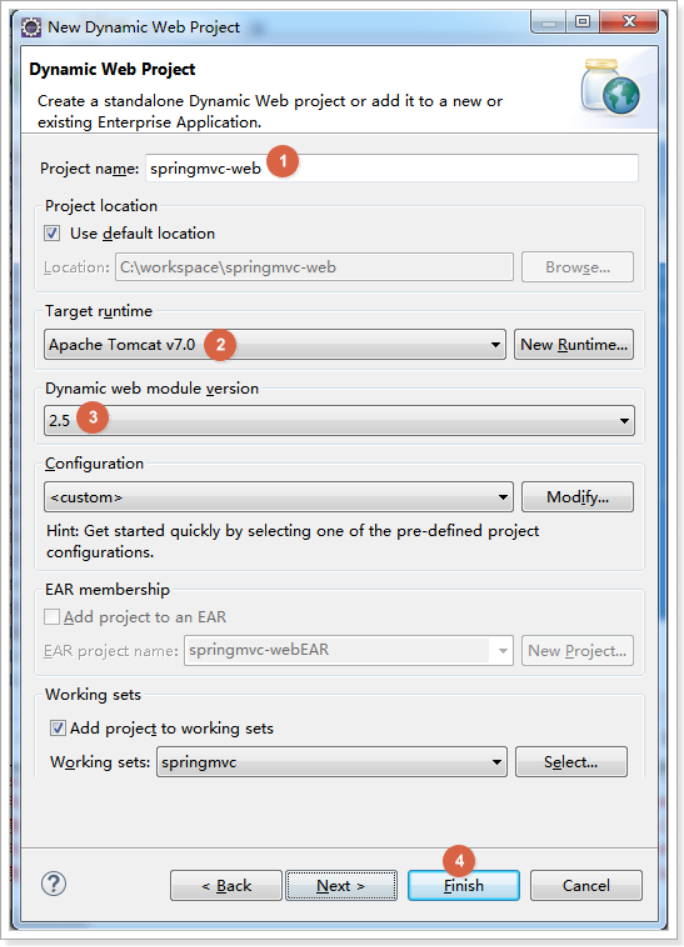
Enter the project name and choose to configure Tomcat (if available), as follows:
Configure Tomcat as follows:
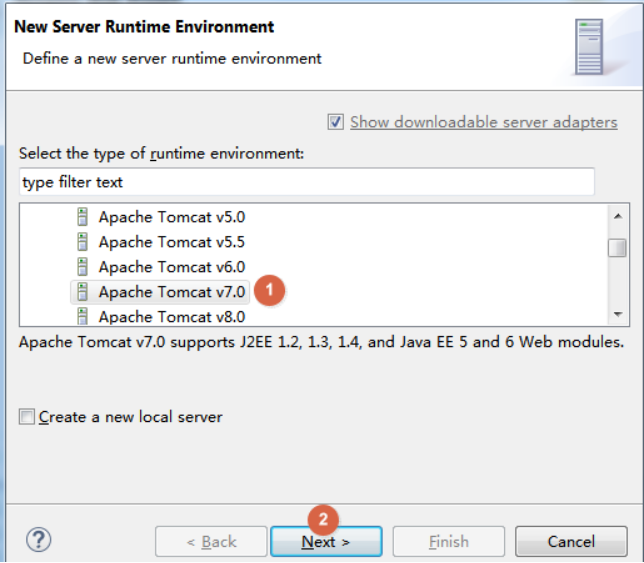
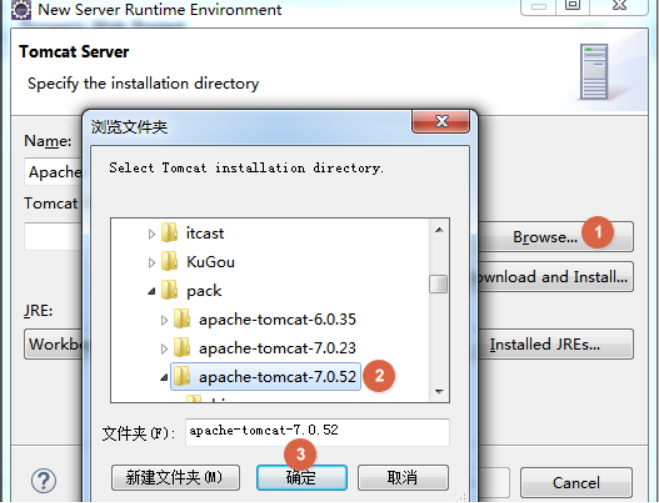
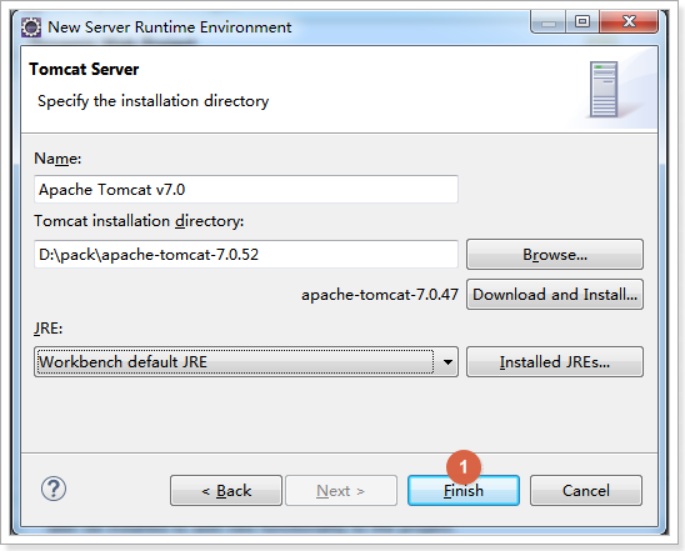
Choose Tomcat ready, Tomcat 7 here, as shown below:
Select Success and click Finish as follows:
Select Tomcat that has just been set up successfully, as shown below:
Selecting the version of Web as 2.5 as shown below, you can automatically generate the web.xml configuration file.
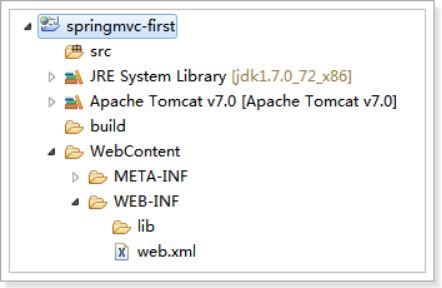
The effect is as follows:
2.3.2. Import jar packages
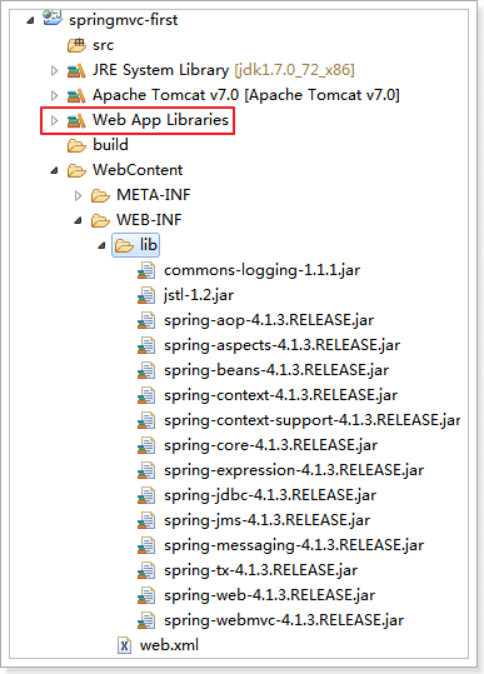
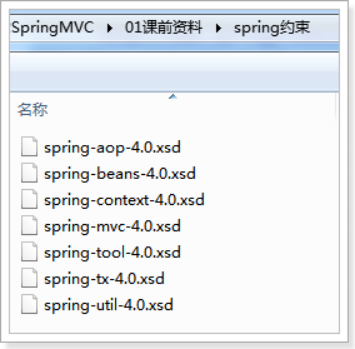
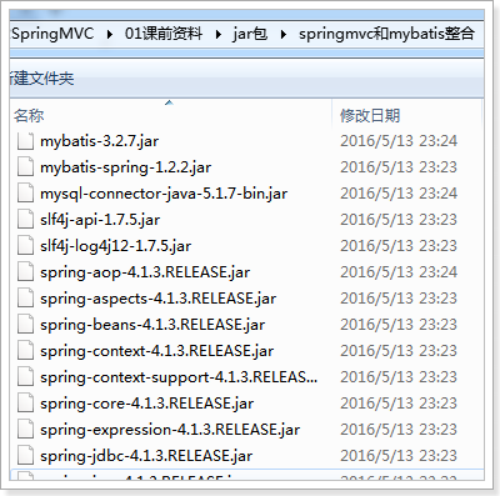
The jar package of spring MVC is imported from the pre-class materials. The location is as follows:

Copy the jar to the lib directory, and the project loads the jar package directly, as follows:
2.3.3. Add configuration files
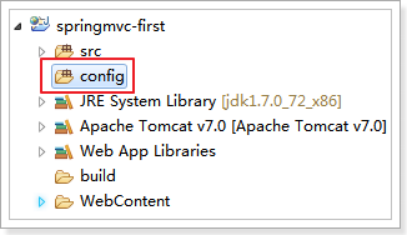
Create the config resource folder and store the configuration file as follows:
2.3.3.1. Create spring mvc.xml
Create the core configuration file for Spring MVC
Spring MVC itself is a sub-project of Spring, which is compatible with Spring and does not require much configuration.
Only one Controller scan can be configured to allow Spring to manage the page control layer Controller.
Create spring mvc. XML
<?xml version="1.0" encoding="UTF-8"?>
<beans xmlns="http://www.springframework.org/schema/beans"
    xmlns:xsi="http://www.w3.org/2001/XMLSchema-instance" xmlns:p="http://www.springframework.org/schema/p"
    xmlns:context="http://www.springframework.org/schema/context"
    xmlns:mvc="http://www.springframework.org/schema/mvc"
    xsi:schemaLocation="http://www.springframework.org/schema/beans http://www.springframework.org/schema/beans/spring-beans-4.0.xsd
        http://www.springframework.org/schema/mvc http://www.springframework.org/schema/mvc/spring-mvc-4.0.xsd
        http://www.springframework.org/schema/context http://www.springframework.org/schema/context/spring-context-4.0.xsd">

    <!-- To configure controller Scanning package -->
    <context:component-scan base-package="cn.itcast.springmvc.controller" />

</beans>
The constraints required by the configuration file are located in the following figure:
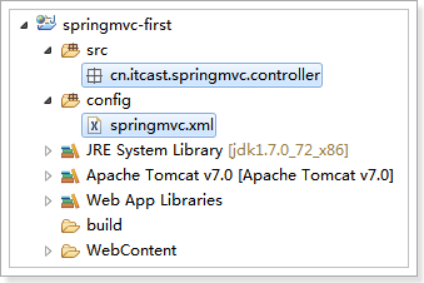
Create package cn. itcast. spring mvc. controller
The effect is as follows:
2.3.3.2. Configuration of front-end controllers
Configure Spring MVC's front-end controller Dispatcher Servlet
In web.xml
<?xml version="1.0" encoding="UTF-8"?>
<web-app xmlns:xsi="http://www.w3.org/2001/XMLSchema-instance"
    xmlns="http://java.sun.com/xml/ns/javaee"
    xsi:schemaLocation="http://java.sun.com/xml/ns/javaee http://java.sun.com/xml/ns/javaee/web-app_2_5.xsd"
    id="WebApp_ID" version="2.5">
    <display-name>springmvc-first</display-name>
    <welcome-file-list>
        <welcome-file>index.html</welcome-file>
        <welcome-file>index.htm</welcome-file>
        <welcome-file>index.jsp</welcome-file>
        <welcome-file>default.html</welcome-file>
        <welcome-file>default.htm</welcome-file>
        <welcome-file>default.jsp</welcome-file>
    </welcome-file-list>

    <!-- To configure SpringMVC Front-end controller -->
    <servlet>
        <servlet-name>springmvc-first</servlet-name>
        <servlet-class>org.springframework.web.servlet.DispatcherServlet</servlet-class>
        <!-- Appoint SpringMVC configuration file -->
        <!-- SpringMVC The default path for configuration files is/WEB-INF/${servlet-name}-servlet.xml -->
        <init-param>
            <param-name>contextConfigLocation</param-name>
            <param-value>classpath:springmvc.xml</param-value>
        </init-param>
    </servlet>

    <servlet-mapping>
        <servlet-name>springmvc-first</servlet-name>
        <!-- Set all to action Ending Request Entry SpringMVC -->
        <url-pattern>*.action</url-pattern>
    </servlet-mapping>
</web-app>
2.3.4. Join the jsp page
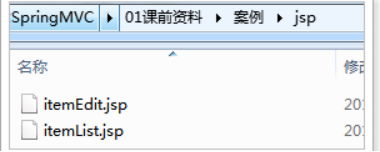
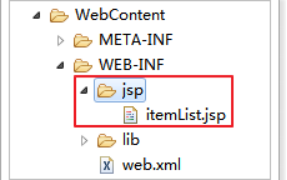
Copy itemList.jsp from Resources to the project's / WEB-INF/jsp directory, as follows:
2.3.5. Implement the display of commodity list page
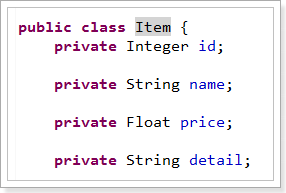
2.3.5.1. Create pojo
Analyse the page and view the data needed by the page, as follows:

Create commodity pojo
public class Item {
    // commodity id
    private int id;
    // Trade name
    private String name;
    // commodity price
    private double price;
    // Commodity creation time
    private Date createtime;
    // Commodity Description
    private String detail;

//Create a constructor with parameters
set/get. . .
}
2.3.5.2. Create ItemController
ItemController is a common java class that does not need to implement any interfaces.
You need to add the @Controller annotation on the class to leave Controller to Spring management
On the method side, add the @RequestMapping annotation, which specifies the url of the request. Among them, ". action" can be added or not.
@Controller
public class ItemController {

    // @RequestMapping: It's filled with requests. url,And user requests url Matching
    // action Write or not
    @RequestMapping("/itemList.action")
    public ModelAndView queryItemList() {
        // Create the commodity data that the page needs to display
        List<Item> list = new ArrayList<>();
        list.add(new Item(1, "1 Huawei Glory 8", 2399, new Date(), "Quality! One"));
        list.add(new Item(2, "2 Huawei Glory 8", 2399, new Date(), "Quality! Two"));
        list.add(new Item(3, "3 Huawei Glory 8", 2399, new Date(), "Quality! Three"));
        list.add(new Item(4, "4 Huawei Glory 8", 2399, new Date(), "Quality! Four"));
        list.add(new Item(5, "5 Huawei Glory 8", 2399, new Date(), "Quality! Five"));
        list.add(new Item(6, "6 Huawei Glory 8", 2399, new Date(), "Quality! Six"));

        // Establish ModelAndView,Used to store data and views
        ModelAndView modelAndView = new ModelAndView();
        // Setting data into the model
        modelAndView.addObject("list", list);
        // Set view jsp,You need to set the physical address of the view
        modelAndView.setViewName("/WEB-INF/jsp/itemList.jsp");

        return modelAndView;
    }
}
2.3.6. Start project testing
Start the project, browser access address
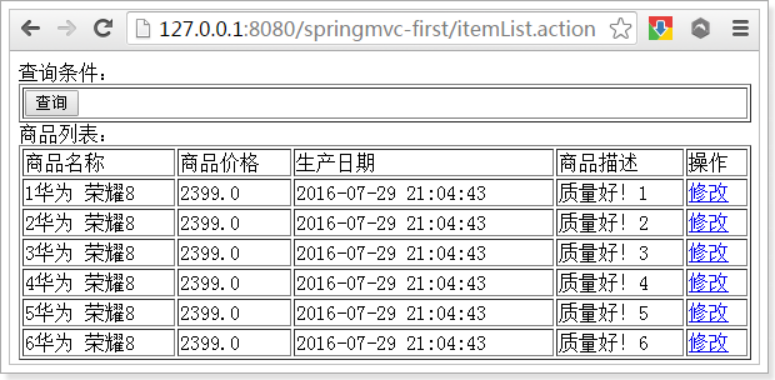
http://127.0.0.1:8080/springmvc-first/itemList.action
The effect is as follows:
Why can it be used? We need to analyze the architecture of spring MVC.
3. Springmvc architecture
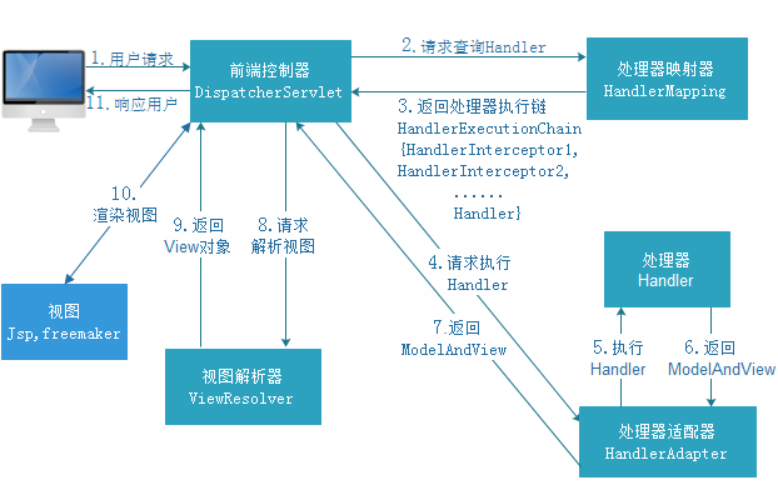
3.1. Frame structure
The frame structure is as follows:
3.2. Architectural process
1. Users send requests to the front-end controller Dispatcher Servlet
2. Dispatcher Servlet receives a request to call Handler Mapping processor mapper.
3. The processor mapper finds the specific processor according to the request url, generates the processor object and the processor interceptor (if any) and returns them to Dispatcher Servlet.
4. Dispatcher Servlet calls the processor through the Handler Adapter processor adapter
5. Execution processor (Controller, also called back-end controller).
6. Controller Execution Completion Returns to ModelAndView
7. Handler Adapter returns the controller execution result Model AndView to Dispatcher Servlet
8. Dispatcher Servlet passes Model AndView to ViewReslover View Parser
9. ViewReslover parses and returns to the specific View
10. Dispatcher Servlet renders the View (i.e. filling the model data into the View).
11. Dispatcher Servlet responds to users
3.3. Component description (one center, three basic points)
The following components are usually implemented using frameworks:
Yellow is the three main components, green is what we want to write, and white is the center.
u Dispatcher Servlet: Front-end Controller
The user request arrives at the front-end controller, which is equivalent to c in mvc mode. dispatcher servlet is the center of the whole process control. It calls other components to process the user's request. The existence of dispatcher servlet reduces the coupling between components.
u Handler Mapping: Processor Mapper
Handler Mapping is responsible for finding handler or processor according to user request url. Spring MVC provides different mappers to implement different mapping methods, such as configuration file, interface, annotation, etc.
u Handler: Processor
Handler is the back-end controller following the front-end controller of Dispatcher Servlet. Under the control of Dispatcher Servlet, Handler processes specific user requests.
Since Handler involves specific user business requests, programmers are generally required to develop Handler according to business requirements.
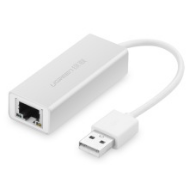
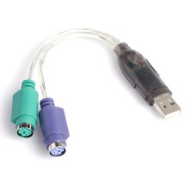
u HandlAdapter: Processor adapter
Processors are executed through the Handler Adapter, which is an application of the adapter pattern. More types of processors can be executed by extending the adapter.
The following figure shows a number of different adapters that can ultimately be connected using the usb interface
u ViewResolver: View Resolver
View Resolver is responsible for generating View view from processing results. View Resolver first parses the logical view name into physical view name, that is, specific page address, and regenerates the View view object. Finally, View is rendered to display the processing results to users through the page.
u View: View
The spring MVC framework provides support for many View types, including jstlView, freemarkerView, pdfView, and so on. The most common View we use is jsp.
Generally, the model data need to be displayed to users through page label or page template technology. Programmers need to develop specific pages according to business needs.
|
Description: In each component of spring mvc, processor mapper, processor adapter and view parser are called three components of spring mvc. The components that need user development are handler, view |
3.4. Components loaded by default
We can use these components without any configuration.
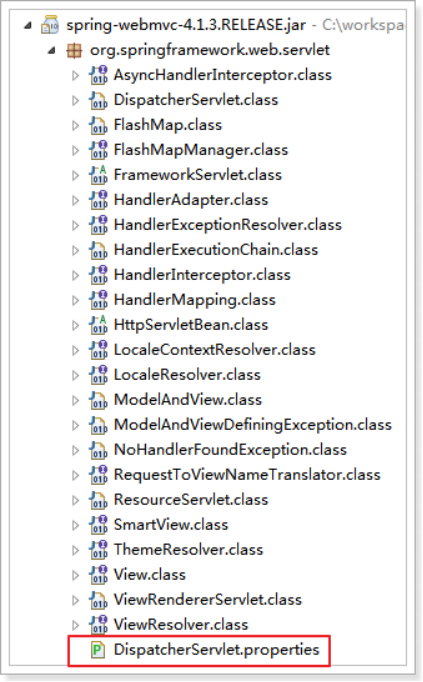
Because the framework has loaded these components by default, the configuration file location is as follows:
# Default implementation classes for DispatcherServlet's strategy interfaces.
# Used as fallback when no matching beans are found in the DispatcherServlet context.
# Not meant to be customized by application developers.

org.springframework.web.servlet.LocaleResolver=org.springframework.web.servlet.i18n.AcceptHeaderLocaleResolver

org.springframework.web.servlet.ThemeResolver=org.springframework.web.servlet.theme.FixedThemeResolver

org.springframework.web.servlet.HandlerMapping=org.springframework.web.servlet.handler.BeanNameUrlHandlerMapping,\
    org.springframework.web.servlet.mvc.annotation.DefaultAnnotationHandlerMapping

org.springframework.web.servlet.HandlerAdapter=org.springframework.web.servlet.mvc.HttpRequestHandlerAdapter,\
    org.springframework.web.servlet.mvc.SimpleControllerHandlerAdapter,\
    org.springframework.web.servlet.mvc.annotation.AnnotationMethodHandlerAdapter

org.springframework.web.servlet.HandlerExceptionResolver=org.springframework.web.servlet.mvc.annotation.AnnotationMethodHandlerExceptionResolver,\
    org.springframework.web.servlet.mvc.annotation.ResponseStatusExceptionResolver,\
    org.springframework.web.servlet.mvc.support.DefaultHandlerExceptionResolver

org.springframework.web.servlet.RequestToViewNameTranslator=org.springframework.web.servlet.view.DefaultRequestToViewNameTranslator

org.springframework.web.servlet.ViewResolver=org.springframework.web.servlet.view.InternalResourceViewResolver

org.springframework.web.servlet.FlashMapManager=org.springframework.web.servlet.support.SessionFlashMapManager
3.5. Component scanner
Using component scanners eliminates the tedious task of configuring each Controller class in the spring container.
Controller classes with <context: component-scan> automatic scanning tag @Controller are used.
Configuration in the springmvc.xml configuration file is as follows:
<! - Configure the controller scanner package to separate mu lt iple packages.
<context:component-scan base-package="cn.itcast.springmvc.controller" />
3.6. Annotation mappers and adapters
3.6.1. Configuration of processor mappers
Annotative processor mapper maps methods marked @ResquestMapping in the class. According to the method of matching the @ResquestMapping tag with the url defined by @ResquestMapping, the matching successfully returns the HandlerMethod object to the front-end controller.
The Method method corresponding to the encapsulation url in the HandlerMethod object.
Since Spring 3.1, Default Annotation Handler Mapping has been abolished. Request Mapping Handler Mapping is recommended for annotated processor mapping.
Configuration in the springmvc.xml configuration file is as follows:
<!-- Configuration processor mapper -->
<bean
    class="org.springframework.web.servlet.mvc.method.annotation.RequestMappingHandlerMapping" />
Note Description:
RequestMapping: Defines the mapping of the request url to the processor's functional methods
3.6.2. Configuration of processor adapters
Annotated processor adapter adapts the method of marking @ResquestMapping.
Since Spring 3.1, Annotation Method Handler Adapter has been abolished and Request Mapping Handler Adapter is recommended for annotated processor adaptation.
Configuration in the springmvc.xml configuration file is as follows:
<!-- Configuration of processor adapters -->
<bean
    class="org.springframework.web.servlet.mvc.method.annotation.RequestMappingHandlerAdapter" />
3.6.3. Annotation Driver
Configuring processor mappers and processor adapters directly is cumbersome and can be loaded using annotation drivers.
Spring MVC automatically loads Request Mapping Handler Mapping and Request Mapping Handler Adapter using <mvc: annotation-driven>.
You can use <mvc: annotation-driven> instead of annotation processor and adapter configurations in the spring mvc.xml configuration file.
<! - Annotation Driven - >
<mvc:annotation-driven />
3.7. View parser
The view parser uses the default Internal ResourceViewResolver of the Spring MVC framework, which supports JSP view parsing
Configuration in the springmvc.xml configuration file is as follows:
    <!-- Example: prefix="/WEB-INF/jsp/", suffix=".jsp", viewname="test" ->
        "/WEB-INF/jsp/test.jsp" -->
    <!-- Configuration view parser -->
    <bean
        class="org.springframework.web.servlet.view.InternalResourceViewResolver">
        <!-- Configure prefixes for logical views -->
        <property name="prefix" value="/WEB-INF/jsp/" />
        <!-- Configure suffixes for logical views -->
        <property name="suffix" value=".jsp" />
    </bean>
The logical view name needs to return the Model AndView specified in the controller, such as the logical view name ItemList, and the jsp view address that will eventually be returned:
"WEB-INF/jsp/itemList.jsp"
Final jsp physical address: prefix + logical view name + suffix
3.7.1. Modify ItemController
Modify the code for setting views in ItemController
// @RequestMapping: It's filled with requests. url,And user requests url Matching
// action Write or not
@RequestMapping("/itemList.action")
public ModelAndView queryItemList() {
    // Create the commodity data that the page needs to display
    List<Item> list = new ArrayList<>();
    list.add(new Item(1, "1 Huawei Glory 8", 2399, new Date(), "Quality! One"));
    list.add(new Item(2, "2 Huawei Glory 8", 2399, new Date(), "Quality! Two"));
    list.add(new Item(3, "3 Huawei Glory 8", 2399, new Date(), "Quality! Three"));
    list.add(new Item(4, "4 Huawei Glory 8", 2399, new Date(), "Quality! Four"));
    list.add(new Item(5, "5 Huawei Glory 8", 2399, new Date(), "Quality! Five"));
    list.add(new Item(6, "6 Huawei Glory 8", 2399, new Date(), "Quality! Six"));

    // Establish ModelAndView,Used to store data and views
    ModelAndView modelAndView = new ModelAndView();
    // Setting data into the model
    modelAndView.addObject("itemList", list);
    // Set view jsp,You need to set the physical address of the view
    // modelAndView.setViewName("/WEB-INF/jsp/itemList.jsp");
    // Configure the view parser prefix and suffix, just set up the logical view.
    // View parser according to prefix+Logical view name+Physical Path Spliced by Suffixes
    modelAndView.setViewName("itemList");

    return modelAndView;
}
3.7.2. Effect
The effect is the same as before, as follows:

4. Integrating mybatis
In order to better learn the integrated development method of spring MVC and mybatis, it is necessary to integrate spring MVC and mybatis.
Integration goal: Spring MVC is used in control layer and mybatis is used in persistence layer.
4.1. Create database tables
The sql script is located in the following figure:
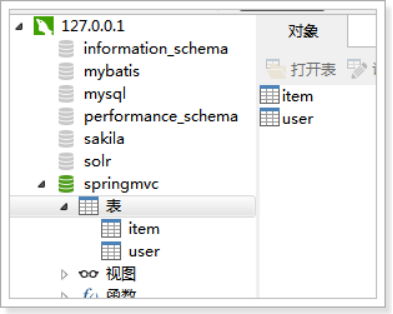
Create the database table spring MVC and import it into the database as follows:
4.2. Required jar packages
- Spring (including spring mvc)
- mybatis
- mybatis-spring integration package
- Database Driver
- Third party connection pool.
The location of the jar package is as follows:
4.3. Integration
Dao level:
1. SqlMapConfig.xml, empty file, but need file header.
2,applicationContext-dao.xml
a) Database connection pool
b) SqlSessionFactory objects, which require spring and mybatis integration packages.
c) Configure mapper file scanner.
Service layer:
1. applicationContext-service.xml package scanner, scanning for classes annotated by @service.
2. Application Context-trans.xml configures transactions.
Controller layer:
1,Springmvc.xml
a) Packet scanner, which scans the classes annotated by @Controller.
b) Configuration annotation driver
c) Configuring View Parser
Web.xml file:
1. Configuring spring
2. Configure the front-end controller.
4.4. Creating Engineering
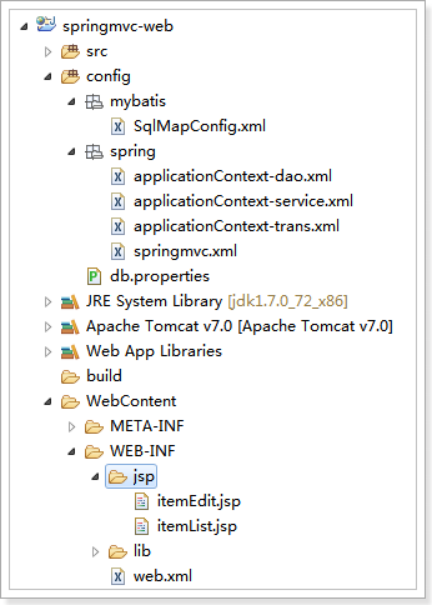
Create springmvc-web, a dynamic web project, as follows:
4.5. Join the jar package
Copy the jar package to / WEB-INF/lib
Engineering auto-loading jar package
4.6. Add configuration files
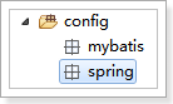
Create resource folder config
Create mybatis and spring folders under them to store configuration files, as shown below:
4.6.1. sqlMapConfig.xml
Using reverse engineering to generate Mapper-related code, no aliases need to be configured.
Create SqlMapConfig.xml under config/mybatis
<?xml version="1.0" encoding="UTF-8"?>
<!DOCTYPE configuration
PUBLIC "-//mybatis.org//DTD Config 3.0//EN"
"http://mybatis.org/dtd/mybatis-3-config.dtd">
<configuration>

</configuration>
4.6.2. applicationContext-dao.xml
Configure data source, SqlSession Factory, mapper scanner.
<?xml version="1.0" encoding="UTF-8"?>
<beans xmlns="http://www.springframework.org/schema/beans"
    xmlns:context="http://www.springframework.org/schema/context" xmlns:p="http://www.springframework.org/schema/p"
    xmlns:aop="http://www.springframework.org/schema/aop" xmlns:tx="http://www.springframework.org/schema/tx"
    xmlns:xsi="http://www.w3.org/2001/XMLSchema-instance"
    xsi:schemaLocation="http://www.springframework.org/schema/beans http://www.springframework.org/schema/beans/spring-beans-4.0.xsd
    http://www.springframework.org/schema/context http://www.springframework.org/schema/context/spring-context-4.0.xsd
    http://www.springframework.org/schema/aop http://www.springframework.org/schema/aop/spring-aop-4.0.xsd http://www.springframework.org/schema/tx http://www.springframework.org/schema/tx/spring-tx-4.0.xsd
    http://www.springframework.org/schema/util http://www.springframework.org/schema/util/spring-util-4.0.xsd">

    <!-- Load configuration file -->
    <context:property-placeholder location="classpath:db.properties" />

    <!-- Database connection pool -->
    <bean id="dataSource" class="org.apache.commons.dbcp.BasicDataSource"
        destroy-method="close">
        <property name="driverClassName" value="${jdbc.driver}" />
        <property name="url" value="${jdbc.url}" />
        <property name="username" value="${jdbc.username}" />
        <property name="password" value="${jdbc.password}" />
        <property name="maxActive" value="10" />
        <property name="maxIdle" value="5" />
    </bean>

    <!-- To configure SqlSessionFactory -->
    <bean id="sqlSessionFactory" class="org.mybatis.spring.SqlSessionFactoryBean">
        <!-- Database connection pool -->
        <property name="dataSource" ref="dataSource" />
        <!-- Load mybatis Global Profile -->
        <property name="configLocation" value="classpath:mybatis/SqlMapConfig.xml" />
    </bean>

    <!-- To configure Mapper scanning -->
    <bean class="org.mybatis.spring.mapper.MapperScannerConfigurer">
        <!-- To configure Mapper Scanning package -->
        <property name="basePackage" value="cn.itcast.ssm.mapper" />
    </bean>

</beans>
4.6.3. db.properties
Configure database related information
jdbc.driver=com.mysql.jdbc.Driver
jdbc.url=jdbc:mysql://localhost:3306/springmvc?characterEncoding=utf-8
jdbc.username=root
jdbc.password=root
4.6.4. applicationContext-service.xml
<?xml version="1.0" encoding="UTF-8"?>
<beans xmlns="http://www.springframework.org/schema/beans"
    xmlns:context="http://www.springframework.org/schema/context" xmlns:p="http://www.springframework.org/schema/p"
    xmlns:aop="http://www.springframework.org/schema/aop" xmlns:tx="http://www.springframework.org/schema/tx"
    xmlns:xsi="http://www.w3.org/2001/XMLSchema-instance"
    xsi:schemaLocation="http://www.springframework.org/schema/beans http://www.springframework.org/schema/beans/spring-beans-4.0.xsd
    http://www.springframework.org/schema/context http://www.springframework.org/schema/context/spring-context-4.0.xsd
    http://www.springframework.org/schema/aop http://www.springframework.org/schema/aop/spring-aop-4.0.xsd http://www.springframework.org/schema/tx http://www.springframework.org/schema/tx/spring-tx-4.0.xsd
    http://www.springframework.org/schema/util http://www.springframework.org/schema/util/spring-util-4.0.xsd">

    <!-- To configure service scanning -->
    <context:component-scan base-package="cn.itcast.ssm.service" />

</beans>
4.6.5. applicationContext-trans.xml
<?xml version="1.0" encoding="UTF-8"?>
<beans xmlns="http://www.springframework.org/schema/beans"
    xmlns:context="http://www.springframework.org/schema/context" xmlns:p="http://www.springframework.org/schema/p"
    xmlns:aop="http://www.springframework.org/schema/aop" xmlns:tx="http://www.springframework.org/schema/tx"
    xmlns:xsi="http://www.w3.org/2001/XMLSchema-instance"
    xsi:schemaLocation="http://www.springframework.org/schema/beans http://www.springframework.org/schema/beans/spring-beans-4.0.xsd
    http://www.springframework.org/schema/context http://www.springframework.org/schema/context/spring-context-4.0.xsd
    http://www.springframework.org/schema/aop http://www.springframework.org/schema/aop/spring-aop-4.0.xsd http://www.springframework.org/schema/tx http://www.springframework.org/schema/tx/spring-tx-4.0.xsd
    http://www.springframework.org/schema/util http://www.springframework.org/schema/util/spring-util-4.0.xsd">

    <!-- Transaction Manager -->
    <bean id="transactionManager"
        class="org.springframework.jdbc.datasource.DataSourceTransactionManager">
        <!-- data source -->
        <property name="dataSource" ref="dataSource" />
    </bean>

    <!-- notice -->
    <tx:advice id="txAdvice" transaction-manager="transactionManager">
        <tx:attributes>
            <!-- Communication behavior -->
            <tx:method name="save*" propagation="REQUIRED" />
            <tx:method name="insert*" propagation="REQUIRED" />
            <tx:method name="delete*" propagation="REQUIRED" />
            <tx:method name="update*" propagation="REQUIRED" />
            <tx:method name="find*" propagation="SUPPORTS" read-only="true" />
            <tx:method name="get*" propagation="SUPPORTS" read-only="true" />
            <tx:method name="query*" propagation="SUPPORTS" read-only="true" />
        </tx:attributes>
    </tx:advice>

    <!-- section -->
    <aop:config>
        <aop:advisor advice-ref="txAdvice"
            pointcut="execution(* cn.itcast.ssm.service.*.*(..))" />
    </aop:config>

</beans>
Or use annotated transaction development:

4.6.6. springmvc.xml
<?xml version="1.0" encoding="UTF-8"?>
<beans xmlns="http://www.springframework.org/schema/beans"
    xmlns:xsi="http://www.w3.org/2001/XMLSchema-instance" xmlns:p="http://www.springframework.org/schema/p"
    xmlns:context="http://www.springframework.org/schema/context"
    xmlns:mvc="http://www.springframework.org/schema/mvc"
    xsi:schemaLocation="http://www.springframework.org/schema/beans http://www.springframework.org/schema/beans/spring-beans-4.0.xsd
        http://www.springframework.org/schema/mvc http://www.springframework.org/schema/mvc/spring-mvc-4.0.xsd
        http://www.springframework.org/schema/context http://www.springframework.org/schema/context/spring-context-4.0.xsd">

    <!-- To configure controller Scanning package -->
    <context:component-scan base-package="cn.itcast.ssm.controller" />

    <!-- Annotation driven -->
    <mvc:annotation-driven />

    <!-- Example: prefix="/WEB-INF/jsp/", suffix=".jsp", viewname="test" ->
        "/WEB-INF/jsp/test.jsp" -->
    <!-- Configuration view parser -->
    <bean
    class="org.springframework.web.servlet.view.InternalResourceViewResolver">
        <!-- Configure prefixes for logical views -->
        <property name="prefix" value="/WEB-INF/jsp/" />
        <!-- Configure suffixes for logical views -->
        <property name="suffix" value=".jsp" />
    </bean>

</beans>
4.6.7. web.xml
<?xml version="1.0" encoding="UTF-8"?>
<web-app xmlns:xsi="http://www.w3.org/2001/XMLSchema-instance"
    xmlns="http://java.sun.com/xml/ns/javaee"
    xsi:schemaLocation="http://java.sun.com/xml/ns/javaee http://java.sun.com/xml/ns/javaee/web-app_2_5.xsd"
    id="WebApp_ID" version="2.5">
    <display-name>springmvc-web</display-name>
    <welcome-file-list>
        <welcome-file>index.html</welcome-file>
        <welcome-file>index.htm</welcome-file>
        <welcome-file>index.jsp</welcome-file>
        <welcome-file>default.html</welcome-file>
        <welcome-file>default.htm</welcome-file>
        <welcome-file>default.jsp</welcome-file>
    </welcome-file-list>

    <!-- To configure spring -->
    <context-param>
        <param-name>contextConfigLocation</param-name>
        <param-value>classpath:spring/applicationContext*.xml</param-value>
    </context-param>

    <!-- Loading with listeners Spring configuration file -->
    <listener>
        <listener-class>org.springframework.web.context.ContextLoaderListener</listener-class>
    </listener>

    <!-- To configure SrpingMVC Front-end controller -->
    <servlet>
        <servlet-name>springmvc-web</servlet-name>
        <servlet-class>org.springframework.web.servlet.DispatcherServlet</servlet-class>
        <init-param>
            <param-name>contextConfigLocation</param-name>
            <param-value>classpath:spring/springmvc.xml</param-value>
        </init-param>
    </servlet>

    <servlet-mapping>
        <servlet-name>springmvc-web</servlet-name>
        <!-- Configure all action Ending Request Entry SpringMVC -->
        <url-pattern>*.action</url-pattern>
    </servlet-mapping>

</web-app>
4.7. Join the jsp page
Reproduce itemList.jsp and itemEdit.jsp of learning materials to projects
4.8. effect
The configuration effect is as follows:
5. Implementing List Display of Commodities
5.1. demand
Implement commodity query list and query commodity information from mysql database.
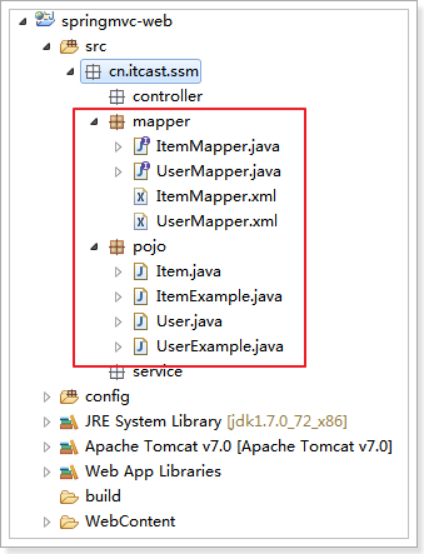
5.2. DAO Development
Using reverse engineering to generate code
Pay attention to modifying the reverse engineering configuration file, refer to MyBatis the next day
Reverse engineering generates code as follows:
5.3. ItemService interface
public interface ItemService {

    /**
     * Query the list of goods
     *
     * @return
     */
    List<Item> queryItemList();

}
5.4. ItemService Impl implementation class
@Service
public class ItemServiceImpl implements ItemService {

    @Autowired
    private ItemMapper itemMapper;

    @Override
    public List<Item> queryItemList() {
        // Query commodity data from database
        List<Item> list = this.itemMapper.selectByExample(null);

        return list;
    }

}
5.5. ItemController
@Controller
public class ItemController {

    @Autowired
    private ItemService itemService;

    /**
     * Show a list of items
     *
     * @return
     */
    @RequestMapping("/itemList")
    public ModelAndView queryItemList() {
        // Access to commodity data
        List<Item> list = this.itemService.queryItemList();

        ModelAndView modelAndView = new ModelAndView();
        // Put commodity data into the model
        modelAndView.addObject("itemList", list);
        // Setting up logical views
        modelAndView.setViewName("itemList");

        return modelAndView;
    }

}
5.6. test
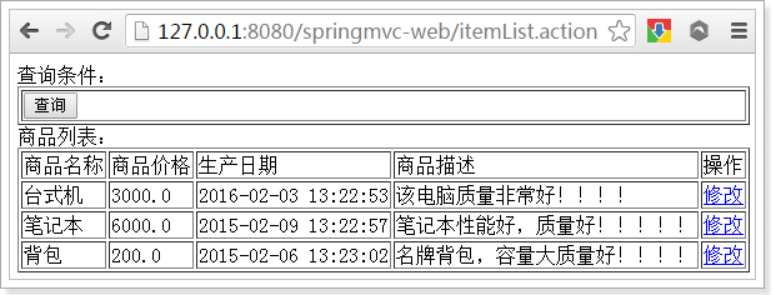
Visit url:
http://127.0.0.1:8080/springmvc-web/itemList.action
The effect is as follows:
6. Parameter binding
6.1. Parameter types supported by default
6.1.1. Demand
Open the merchandise editing page and display the merchandise information.
6.1.2. Demand analysis
To edit commodity information, first of all, display the details of the commodity.
You need to query the commodity information according to the commodity id, and then display it on the page.
Request url:/itemEdit.action
Parameter: ID (commodity id)
Response results: Product editing page, showing the details of the product.
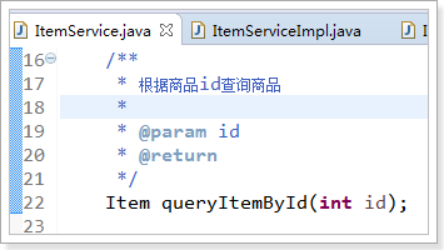
6.1.3. ItemService interface
Write the ItemService interface as follows:
6.1.4. ItemService Impl implementation class
@Override
public Item queryItemById(int id) {
    Item item = this.itemMapper.selectByPrimaryKey(id);

    return item;
}
6.1.5. ItemController
Click the Modification button on the page to initiate the request
http://127.0.0.1:8080/springmvc-web/itemEdit.action?id=1
The id of the request needs to be extracted from the parameters of the request.
Id is included in the Request object. You can take id from the Request object.
To get the Request object, you just need to add a parameter to the parameter of the Controller method. The Springmvc framework automatically passes the Request object to the method.
code implementation
/**
 * Search for goods based on id
 *
 * @param request
 * @return
 */
@RequestMapping("/itemEdit")
public ModelAndView queryItemById(HttpServletRequest request) {
    // from request Get request parameters in
    String strId = request.getParameter("id");
    Integer id = Integer.valueOf(strId);

    // according to id Query commodity data
    Item item = this.itemService.queryItemById(id);

    // Pass the results to the page
    ModelAndView modelAndView = new ModelAndView();
    // Put commodity data in the model
    modelAndView.addObject("item", item);
    // Setting up logical views
    modelAndView.setViewName("itemEdit");

    return modelAndView;
}
6.1.6. Parameter types supported by default
Adding the following types of parameter processing adapters to the processor parameters will identify and assign values by default.
6.1.6.1. HttpServletRequest
Getting request information through request object
6.1.6.2. HttpServletResponse
Processing response information through response
6.1.6.3. HttpSession
Get the object stored in session through session object
6.1.7. Model/ModelMap
6.1.7.1. Model
In addition to Model AndView, you can also use Model to pass data to pages.
Model is an interface, which can be declared directly in the parameters.
If you use Model, you can not use ModelAndView objects, Model objects can pass data to pages, and View objects can be replaced by String return values.
Whether it's Model or Model AndView, its essence is to use Request objects to pass data to jsp.
Code implementation:
/**
 * Use Model to query products based on id
 *
 * @param request
 * @param model
 * @return
 */
@RequestMapping("/itemEdit")
public String queryItemById(HttpServletRequest request, Model model) {
    // from request Get request parameters in
    String strId = request.getParameter("id");
    Integer id = Integer.valueOf(strId);

    // according to id Query commodity data
    Item item = this.itemService.queryItemById(id);

    // Pass the results to the page
    // ModelAndView modelAndView = new ModelAndView();
    // Put commodity data in the model
    // modelAndView.addObject("item", item);
    // Setting up logical views
    // modelAndView.setViewName("itemEdit");

    // Put commodity data in the model
    model.addAttribute("item", item);

    return "itemEdit"
6.1.7.2. ModelMap
ModelMap is an implementation class of Model interface, and it can also transfer data to pages through ModelMap.
As with Model and ModelMap, Spring MVC instantiates ModelMap if it is used directly.
Code implementation:
/**
 * Use ModelMap to query products based on id
 *
 * @param request
 * @param model
 * @return
 */
@RequestMapping("/itemEdit")
public String queryItemById(HttpServletRequest request, ModelMap model) {
    // from request Get request parameters in
    String strId = request.getParameter("id");
    Integer id = Integer.valueOf(strId);

    // according to id Query commodity data
    Item item = this.itemService.queryItemById(id);

    // Pass the results to the page
    // ModelAndView modelAndView = new ModelAndView();
    // Put commodity data in the model
    // modelAndView.addObject("item", item);
    // Setting up logical views
    // modelAndView.setViewName("itemEdit");

    // Put commodity data in the model
    model.addAttribute("item", item);

    return "itemEdit";
}
6.2. Binding simple types
When the request parameter name is consistent with the processor parameter name, the request parameter is bound to the parameter.
In this way, the method of extracting parameters from Request can be further simplified.
/**
 * Query the commodity according to id, bind the simple data type
 *
 * @param id
 * @param model
 * @return
 */
@RequestMapping("/itemEdit")
public String queryItemById(int id, ModelMap model) {
    // according to id Query commodity data
    Item item = this.itemService.queryItemById(id);

    // Put commodity data in the model
    model.addAttribute("item", item);

    return "itemEdit";
}
6.2.1. Supported data types
The wrapped data type is recommended for parameter types because the underlying data type cannot be null
Plastic: Integer, int
String: String
Single precision: Float, float
Double precision: Double, double
Boolean: Boolean, Boolean
Note: For Boolean parameters, the requested parameter values are true or false. Or 1 or 0
Request url:
http://localhost:8080/xxx.action?id=2&status=false
Processor method:
public String editItem(Model model,Integer id,Boolean status)
6.2.2. @RequestParam
Using @RequestParam is often used to handle simple types of bindings.
Value: The parameter name, that is, the name of the request parameter that is entered, such as value= "itemId", represents the parameter of the request. The value of the parameter whose name is itemId in the area will be passed in.
required: Is it necessary, the default is true, indicating that the request must have the appropriate parameters, otherwise the error will be reported
TTP Status 400 - Required Integer parameter 'XXXX' is not present
defaultValue: Default value indicating the default value if no parameter of the same name is present in the request
Definitions are as follows:
@RequestMapping("/itemEdit")
public String queryItemById(@RequestParam(value = "itemId", required = true, defaultValue = "1") Integer id,
        ModelMap modelMap) {
    // according to id Query commodity data
    Item item = this.itemService.queryItemById(id);

    // Put commodity data in the model
    modelMap.addAttribute("item", item);

    return "itemEdit";
}
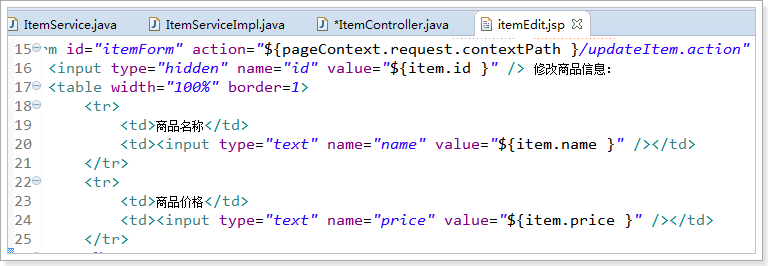
6.3. Binding pojo types
6.3.1. Demand
Store the modified product information in the database.
6.3.2. Demand analysis
Request url:/updateItem.action
Parameters: Data in the form.
Response Content: Update Success Page
6.3.3. Use pojo to receive form data
If you submit a lot of parameters, or submit a lot of content in the form, you can use simple type to accept data, you can also use pojo to receive data.
Requirements: The name of the property in the pojo object is identical to the name attribute of the input in the form.
The page definition is as follows:
Pojo (Reverse Engineering Generation) is shown below:
The parameter name of the request is the same as the property name of the pojo, and the request parameter is automatically assigned to the property of the pojo.
6.3.4. ItemService interface
Writing Interface Method in ItemService
/**
 * Update commodities according to id
 *
 * @param item
 */
void updateItemById(Item item);
6.3.5. ItemService Impl implementation class
Implementation of Interface Method in ItemService Impl
Using updateByPrimaryKeySelective(item) method, ignoring null parameters
@Override
public void updateItemById(Item item) {
    this.itemMapper.updateByPrimaryKeySelective(item);
}
6.3.6. ItemController
/**
 * Update merchandise, bind pojo type
 *
 * @param item
 * @param model
 * @return
 */
@RequestMapping("/updateItem")
public String updateItem(Item item) {
    // Call the service to update the commodity
    this.itemService.updateItemById(item);

    // Return to logical view
    return "success";
}
Be careful:
Do not submit data of date type in the form, otherwise 400 errors will be reported. If you want to submit data of date type, you need to use the content of the later custom parameter binding.
6.3.7. Write the success page
Create a success.jsp page as shown below

Page code:
<%@ page language="java" contentType="text/html; charset=UTF-8"
    pageEncoding="UTF-8"%>
<!DOCTYPE html PUBLIC "-//W3C//DTD HTML 4.01 Transitional//EN" "http://www.w3.org/TR/html4/loose.dtd">
<html>
<head>
<meta http-equiv="Content-Type" content="text/html; charset=UTF-8">
<title>Insert title here</title>
</head>
<body>

<h1>Successful revision of commodities!</h1>

</body>
</html>
6.3.8. Solving post scrambling
Submit discovery, save successfully, but save scrambled code
Add:
    <!-- Solve post Garbled problem -->
    <filter>
        <filter-name>encoding</filter-name>
        <filter-class>org.springframework.web.filter.CharacterEncodingFilter</filter-class>
        <!-- Set the encoding parameter to be UTF8 -->
        <init-param>
            <param-name>encoding</param-name>
            <param-value>UTF-8</param-value>
        </init-param>
    </filter>
    <filter-mapping>
        <filter-name>encoding</filter-name>
        <url-pattern>/*</url-pattern>
    </filter-mapping>
The above can solve the post request scrambling problem.
There are two ways to solve the disorder of Chinese parameters in get requests:
Modify the tomcat configuration file to add code that is consistent with the engineering code, as follows:
<Connector URIEncoding="utf-8" connectionTimeout="20000" port="8080" protocol="HTTP/1.1" redirectPort="8443"/>
Another method is to recode the parameters:
String userName new
String(request.getParamter("userName").getBytes("ISO8859-1"),"utf-8")
ISO8859-1 is the default encoding of tomcat, which needs to be encoded in utf-8.
6.4. Binding packaging pojo
6.4.1. Demand
Use packaged pojo to receive inquiry conditions for merchandise information.
6.4.2. Demand analysis
The wrapper object is defined as follows:
public class QueryVo {
    private Item item;
set/get. . .
}
The page definition is as follows:

6.4.3. Receiving query conditions
    // Binding wrapper data type
    @RequestMapping("/queryItem")
    public String queryItem(QueryVo queryVo) {
        System.out.println(queryVo.getItem().getId());
        System.out.println(queryVo.getItem().getName());

        return "success";
    }
6.5. Custom parameter binding
6.5.1. Demand
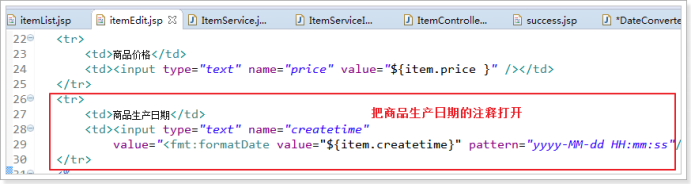
In the commodity modification page, you can modify the production date of the commodity, and customize the date format according to the business requirements.
6.5.2. Demand analysis
Because date data has many formats, spring MVC can't convert strings into date types. So you need to customize parameter binding.
After receiving the request, the front-end controller finds the annotated processor adapter, adapts the method of RequestMapping tag, and binds the parameters of the method. Converter can be customized to bind parameters on Spring MVC processor adapter.
The <mvc: annotation-driven/> annotation driver is commonly used to load processor adapters, which can be configured on this label.
6.5.3. Modify jsp pages
Modify the itemEdit.jsp page to display the time as shown below
6.5.4. Custom Converter
//Converter<S, T>
//S:source,Types of sources to be converted
//T:target,Target types that need to be transformed
public class DateConverter implements Converter<String, Date> {

    @Override
    public Date convert(String source) {
        try {
            // Converting strings to date types
            SimpleDateFormat simpleDateFormat = new SimpleDateFormat("yyy-MM-dd HH:mm:ss");
            Date date = simpleDateFormat.parse(source);

            return date;
        } catch (ParseException e) {
            // TODO Auto-generated catch block
            e.printStackTrace();
        }
        // If the conversion exception returns null
        return null;
    }
}
6.5.5. Configure Converter
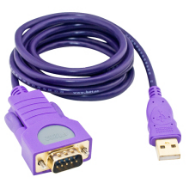
We can configure multiple converters at the same time.
Similar to the usb device shown below, multiple usb devices can be accessed

<! - Configure Annotation Driver - >
<! - If you configure this label, you don't need to configure it... - >
<mvc:annotation-driven conversion-service="conversionService" />

<! - Converter Configuration - >
<bean id="conversionService" class="org.springframework.format.support.FormattingConversionServiceFactoryBean">
    <property name="converters">
        <set>
            <bean class="cn.itcast.springmvc.converter.DateConverter" />
        </set>
    </property>
</bean>
6.5.6. Configuration 2 (Understanding)
<!--Annotation adapter -->
<bean class="org.springframework.web.servlet.mvc.method.annotation.RequestMappingHandlerAdapter">
    <property name="webBindingInitializer" ref="customBinder"></property>
</bean>

<!-- custom webBinder -->
<bean id="customBinder" class="org.springframework.web.bind.support.ConfigurableWebBindingInitializer">
    <property name="conversionService" ref="conversionService" />
</bean>

<!-- Converter configuration -->
<bean id="conversionService" class="org.springframework.format.support.FormattingConversionServiceFactoryBean">
    <property name="converters">
        <set>
            <bean class="cn.itcast.springmvc.convert.DateConverter" />
        </set>
    </property>
</bean>
Note: This method requires independent configuration of processor mappers and adapters.
No longer use <mvc:annotation-driven/>
7. Spring MVC is different from struts 2
1. The entry of spring MVC is a servlet, i.e. a front-end controller, while the entry of struts 2 is a filter filter.
2. Spring MVC is based on method development (a url corresponds to a method). Request parameters can be passed to method parameters, which can be designed as singletons or more (suggested singletons). Struts 2 is based on class development. Transfer parameters can only be designed as multiple instances through class attributes.
3. Struts uses value stack to store request and response data, accesses data through OGNL, springmvc parses request request content through parameter parser, assigns method parameters, encapsulates data and views into ModelAndView objects, and finally transfers model data in ModelAndView to pages through request domain. The Jsp view parser defaults to jstl.