- For communication or more, please pay attention to my public number: nezha_blog
- My technology blog: https://nezha.github.io

1. Spring Book Learning Notes - Full Annotation
2. Prigboot Chinese Help Document
Chinese Translation of Spring Boot Reference Guide Explanation: The translation version of this document: 1.4.1.RELEASE.
3. Common Notes
-
@RestController
Returns results in the form of json for easy front-end and back-end separation. It's a combination of @ResponseBody and @Controller -
@RequestMapping
Configure url mapping - @EnableAutoConfiguration
- @Configuration
- @ComponentScan
- @SpringBootApplication
Many Spring Book developers always annotate their main classes with @Configuration, @Enable AutoConfiguration and @ComponentScan. Because these annotations are used together so frequently (especially when you follow the best practices above), Spring Boot provides a convenient @Spring Boot Application choice.
The @SpringBootApplication annotation is equivalent to using @Configuration, @Enable AutoConfiguration and @ComponentScan with default properties.
import org.springframework.boot.SpringApplication;
import org.springframework.boot.autoconfigure.SpringBootApplication;
@SpringBootApplication // same as @Configuration @EnableAutoConfiguration @ComponentScan
public class Application {
    public static void main(String[] args) {
        SpringApplication.run(Application.class, args);
    }
}
- @ConfigurationProperties
Property injection, prefix refers to the configuration of injection from the connection object
@Component
@ConfigurationProperties(prefix="connection")
public class ConnectionSettings {
    private String username;
    private InetAddress remoteAddress;
    // ... getters and setters
}
connection:
  name: Zhao Wu
  age: 18
  job: Java R&D Engineer
To use @Configuration Properties beans, you can inject them in the same way as any other beans
@Service
public class MyService {
    @Autowired
    private ConnectionSettings connection;
    //...
    @PostConstruct
    public void openConnection() {
        Server server = new Server();
        this.connection.configure(server);
    }
}
- @EnableConfigurationProperties
-
Component and Bean
Bean s are mainly used in methods to explicitly declare the generated classes - @Profiles
Spring Profiles provides a way to isolate application configurations and make them work only in specific environments.
spring:
  profiles:
    active: dev
- @Value
Used to retrieve configuration items under configuration files
people:
  name: Zhao Wu
  age: 18
  job: Java R&D Engineer
    @Value("${people.name}")
    private String name;
- @Controller
@PathVariable,@RequestParam
GetMapping, @PostMapping: Requests in Get or Post mode, Combination mode
Use @PathVariable to get request parameters
@RequestMapping(value="/hello/{id}",method = RequestMethod.GET)
public String sayhello(@PathVariable("id")Integer myid){
    return "id:"+myid;
}
Use of @RequestParam to get parameters in traditional ways
@RequestMapping(value="/hi",method = RequestMethod.GET)
public String sayhi(@RequestParam(value = "id",required = false,defaultValue = "100")Integer myid){
    return "id:"+myid;
}
4. spring data JPA -- single data source
Specific implementation code demo: Spring-Boot-Restful-JPA demo Program
The criteria for object persistence are defined, mainly for the integration of Hibernate.
At this stage, it is found that the direct operation of mybatis is very consistent. It is possible to centralize the management of database connection and release. JPA wants to compare with mybatis to build tables automatically. I don't know whether it is an advantage or not. In my opinion, it is not. After all, table structure is basically something that database engineers do.
1. Adding dependencies
<dependency>
    <groupId>org.springframework.data</groupId>
    <artifactId>spring-boot-starter-data-jpa</artifactId>
</dependency>
<dependency>
    <groupId>mysql</groupId>
    <artifactId>mysql-connector-java</artifactId>
</dependency>
2. Configure database and JPA
ddl-auto: How to Create
spring:
  datasource:
    driver-class-name: com.mysql.jdbc.Driver
    url: jdbc:mysql://127.0.0.1:3306/coder
    username: root
    password: root
  jpa:
    hibernate:
      ddl-auto: create
    show-sql: true
3. Create Mapper objects
Entity: persistence instance
Table: Name of custom table
@Entity
//@Table(name = "programmer")
public class Coder {
    @Id
    @GeneratedValue(strategy = GenerationType.AUTO)
    private Integer id;
    private String name;
    private Integer age;
    public Coder(){

    }

    public Integer getId() {
        return id;
    }

    public void setId(Integer id) {
        this.id = id;
    }

    public String getName() {
        return name;
    }

    public void setName(String name) {
        this.name = name;
    }

    public Integer getAge() {
        return age;
    }

    public void setAge(Integer age) {
        this.age = age;
    }
}
4. Integrated Jpa Repository
Basically based on Hibernate
public interface CoderRepository extends JpaRepository<Coder,Integer> {
    //This is an extended query
    public List<Coder> findByAge(Integer age);
}
5. Implement a CoderController to add, delete and modify.
@RestController
public class CoderController {
    @Autowired
    private CoderRepository coderRepository;

    //1.Get mode request, query all programmer information
    @GetMapping(value = "/coders")
    public List<Coder> coderList(){
        return coderRepository.findAll();
    }
    //2.Post mode, add programmers
    @PostMapping(value = "/coders")
    public Coder CoderAdd(@RequestParam("name")String name,@RequestParam("age")Integer age){
        Coder coder = new Coder();
        coder.setAge(age);
        coder.setName(name);
        return  coderRepository.save(coder);
    }
    //3. Query a person by id
    @GetMapping(value = "/coders/{id}")
    public Coder CoderFindOne(@PathVariable("id")Integer id){
        return coderRepository.findOne(id);
    }
    //4. Delete a person by id
    @DeleteMapping(value = "/coders/{id}")
    public void CoderDelete(@PathVariable("id")Integer id){
        coderRepository.delete(id);
    }
    //5. Update a person and use Postman to simulate. Note: Use x-www-form-urlencoded
    @PutMapping(value = "/coders/{id}")
    public Coder CoderUpdateOne(@PathVariable("id")Integer id, @RequestParam("name") String name, @RequestParam("age")Integer age){
        Coder coder = new Coder();
        coder.setId(id);
        coder.setName(name);
        coder.setAge(age);
        return coderRepository.save(coder);
    }
    //6. Extend the Jpa interface to look up by age
    @GetMapping(value = "/coder/age/{age}")
    public List<Coder> CoderFindAll(@PathVariable("age")Integer age){
        return coderRepository.findByAge(age);
    }

}
6. Implementing mysql transactions
- First, create a new Service class: CoderService
@Service
public class CoderService {
    @Autowired
    CoderRepository coderRepository;

    @Transactional
    public void insertTwo(){
        Coder coderA = new Coder();
        coderA.setAge(101);
        coderA.setName("1");
        coderRepository.save(coderA);

        Coder coderB = new Coder();
        coderB.setAge(102);
        coderB.setName("102");
        coderRepository.save(coderB);

    }
}
- Automatically load coderService in CoderController
@Autowired
private CoderService coderService;
- Call service in CoderController.
//7. Use transactions and insert data for two people at the same time
@PostMapping(value = "coder/two")
public void coderTwo(){
    coderService.insertTwo();
}
7. Implementing custom sql queries with @Query
- Implement the following code in CoderRepository
@Query("select p from Coder p where p.id = (select max(p2.id) from Coder p2)")
    Coder getMaxIdCoder();
- Using getMaxIdCoder method in CoderController
//8. Custom sql statement query
@GetMapping(value = "/coder/find")
public Coder CoderFindByTask(){
    return coderRepository.getMaxIdCoder();
}
5. Spring Boot MyBatis -- Single Data Source
Annotation-based Mybatis is actually very similar to JPA, but mybatis does not provide automatic table creation. JPA is better at this point.
My demo program, on my github: spring-boot-mybatis-mysql
Quote blogs:
Spring Boot + MyBatis + MySQL Integration FlySheep_ly
Programmer DD: Spring Boot Integrates MyBatis
[Spring Boot configuration details using MyBatis annotations] (http://blog.didispace.com/mybatisinfo/)
1. Introducing dependencies
<!-- Add to MyBatis -->
<dependency>
    <groupId>org.mybatis.spring.boot</groupId>
    <artifactId>mybatis-spring-boot-starter</artifactId>
    <version>1.2.0</version>
</dependency>
<!-- Add to MySQL -->
<dependency>
    <groupId>mysql</groupId>
    <artifactId>mysql-connector-java</artifactId>
    <version>5.1.41</version>
</dependency>
2. Configure mysql connection configuration in application. properties
spring.datasource.url=jdbc:mysql://localhost:3306/test01
spring.datasource.username=root
spring.datasource.password=root
spring.datasource.driver-class-name=com.mysql.jdbc.Driver
3. Create mapping object User
As for the implementation of serialization, it's better to implement it.
import java.io.Serializable;

public class User implements Serializable{
    private static final long serialVersionUID = -5554561712056198940L;

    private Long id;
    private String name;
    private Integer age;

    public User(){
    }

    public Long getId() {
        return id;
    }

    public void setId(Long id) {
        this.id = id;
    }

    public String getName() {
        return name;
    }

    public void setName(String name) {
        this.name = name;
    }

    public Integer getAge() {
        return age;
    }

    public void setAge(Integer age) {
        this.age = age;
    }

}
4. Operation of creating User Mapper
For more on Mapper, please refer to mybatis website
/**
 * Created by nezha on 2017/4/26.
 */

@Mapper
public interface UserMapper {
    /**
     * Add operation, return ID of new element
     * @param User
     */
    @Insert("insert into person(name,age) values(#{name},#{age})")
    @Options(useGeneratedKeys = true, keyColumn = "id", keyProperty = "id")
    void insert(User user);
    /**
     * Query all
     * @return
     */
    @Select("select id,name,age from person")
    List<User> selectAll();

    @Select("SELECT * FROM USER WHERE NAME = #{name}")
    User findByName(@Param("name") String name);
}
5. Call test
It's a good habit to find Restful style. It's easy to use and practical.
@EnableTransactionManagement
@RestController
public class TestController {

    @Autowired
    private UserMapper userMapper;

    @GetMapping(value = "/test/{name}")
    public User findOne(@PathVariable("name")String name){
        return userMapper.findByName(name);
    }
}
Potential problems:
mybatis+spring boot, mapper prompts Cannot autowire. Always prompts that it cannot be loaded
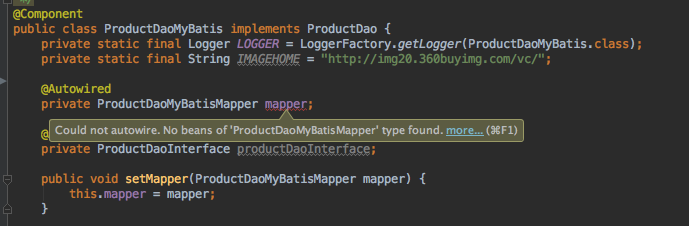
- Solution
Modify the idea configuration to set spring severity to "warning", as follows:
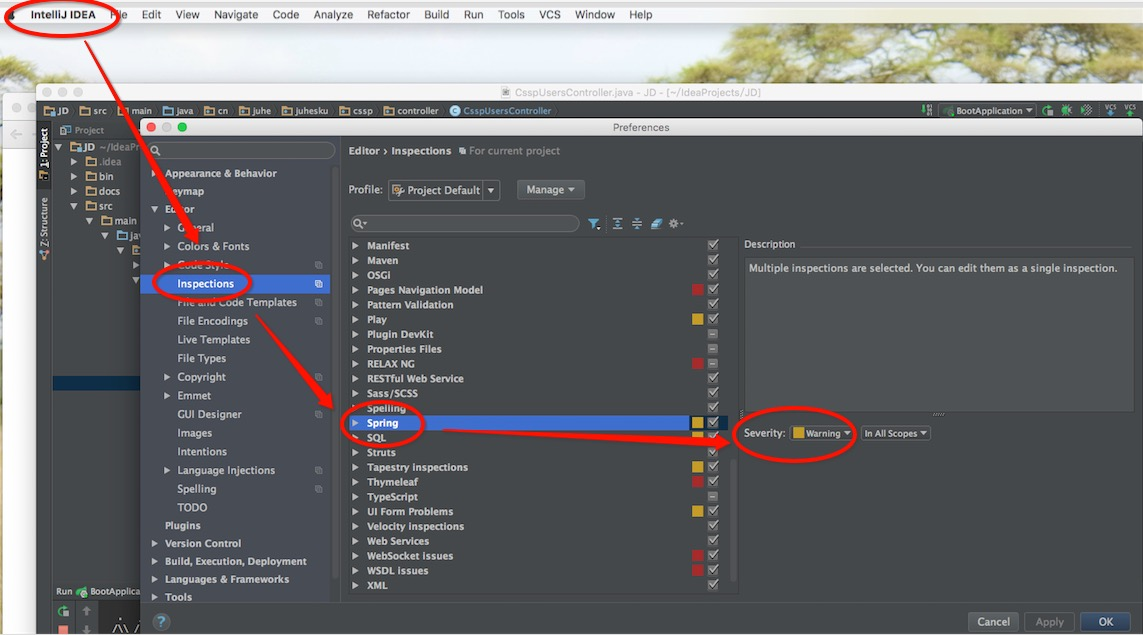
If you want to further narrow down the scope of the modification:
Alt + Enter quick fix or change settings
Settings - Editor - Inspections - Spring - Spring Core - Code - Autowiring for Bean Class - warning
On multi-source configuration:
1.Spring Boot Integrates Mybatis to Realize Druid Multi-Data Source Explanation
2.The Simplest Solution for springboot+mybatis Multiple Data Sources
6. Spring Boot RabbitMQ
My demo program: spring-boot-RabbitMQ
Introduction to Spring Boot RabbitMQ This article is well written and talks well about RabbitMQ's three Exchange methods. But the code is not very concise.
Installation and configuration
Three Exchange Ways of RabbitMQ
1.Direct Exchange
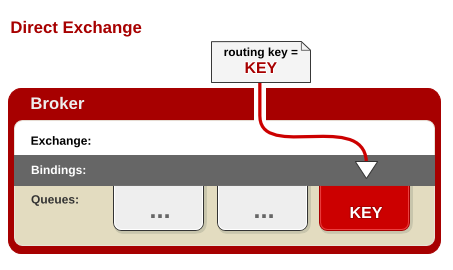
If the routing key matches, the Message is passed to the corresponding queue. In fact, when queue is created, it automatically binds that exchange with queue's name as routing key.
2.Fanout Exchange
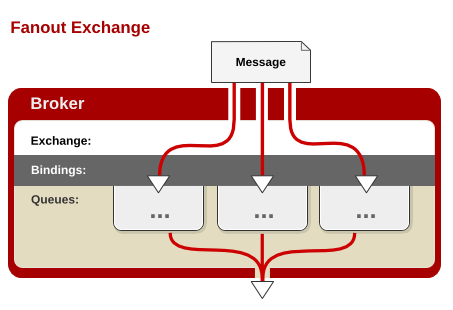
Simply bind the queue to the switch. A message sent to the switch is forwarded to all queues bound to the switch. Much like subnet broadcasting, hosts in each subnet receive a replicated message. Fanout switches forward messages the fastest.
3.Topic Exchange
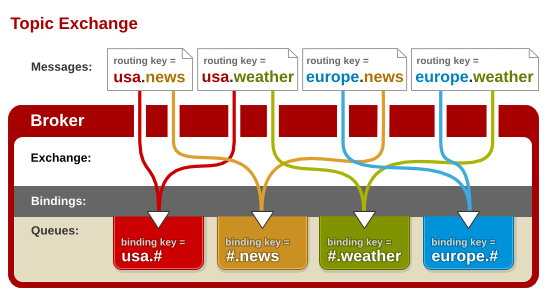
Match the routing key with a pattern. At this point, the queue needs to be bound to a schema. Symbol "" matches one or more words, and symbol "" matches not more than one word. Therefore, "audit. #" can match "audit.irs.corporate", but "audit.".
Example explanation
There are three main documents in three ways:
1.sender configuration
2. Configuration of receiver
3. Rabbit Config Configuration
Next, we integrate RabbitMQ in Spring Book application and implement a simple example of sending and receiving messages to get an intuitive feeling and understanding of RabbitMQ.
Integrating RabbitMQ in Spring Boot is a very easy task, because we have introduced Starter POMs before. AMQP module in Spring Boot can support RabbitMQ very well. Let's talk about the integration process in detail.
1.pom dependency introduction
<dependency>
    <groupId>org.springframework.boot</groupId>
    <artifactId>spring-boot-starter-amqp</artifactId>
</dependency>
2. Connection configuration
spring.application.name=rabbitmq-hello
spring.rabbitmq.host=localhost
spring.rabbitmq.port=5672
spring.rabbitmq.username=guest
spring.rabbitmq.password=guest
3. Create message producer Sender
Create a message producer Sender. By injecting an instance of AmqpTemplate interface to send messages, the AmqpTemplate interface defines a set of basic operations for AMQP protocol. Specific implementations are injected into Spring Boot according to configuration. In this producer, we generate a string and send it to a queue named hello.
@Component
public class Sender {
    @Autowired
    AmqpTemplate amqpTemplate;
    public void send() {
        String context = "hello " + new Date();
        System.out.println("Sender : " + context);
        this.amqpTemplate.convertAndSend("hello", context);
    }
}
4. Create Message Consumer Receiver
Create a message consumer Receiver. The @RabbitListener annotation defines this class of listeners for hello queues and specifies the processing method for messages with the @RabbitHandler annotation. Therefore, the consumer consumes the hello queue and consumes the string content of the output message.
@Component
@RabbitListener(queues = "hello")
public class Receiver {
    @RabbitHandler
    public void process(String hello) {
        System.out.println("Receiver1 : " + hello);
    }
}
5. Create RabbitMQ configuration class RabbitConfig
Create RabbitConfig configuration class for RabbitMQ to configure advanced information such as queues, switches, routes, etc. Here we focus on introductory, first of all to minimize the configuration to define, in order to complete a basic production and consumption process.
@Configuration
public class RabbitConfig {


    //1. Configure a one-to-one message queue called hello
    @Bean
    public Queue helloQueue() {
        return new Queue("hello");
    }
}
5. Unit testing:
@RunWith(SpringJUnit4ClassRunner.class)
@SpringApplicationConfiguration(classes = HelloApplication.class)
public class HelloApplicationTests {
    @Autowired
    private Sender sender;
    @Test
    public void hello() throws Exception {
        sender.send();
    }
}
7. Spring Boot mongodb
spring boot mongodb demo program: spring-boot-mongodb
Installation and configuration
- Installation and configuration of mongodb: Installing MongoDB records through yum under CentOS 6.5
- User Management Reference: mongodb 3.2 User Rights Management Configuration
- Installation and configuration of mongodb under Mac: Install MongoDB on Mac
1. The shell that enters mongodb: mongo
2. Switching database: use admin
3. Adding users, specifying user roles and databases:
db.createUser(
  { user: "admin",
    customData: {description:"superuser"},
    pwd: "admin",
    roles: [ { role: "userAdminAnyDatabase", db: "admin" } ]
  }
)
user Fields, the name of the new user;
pwd Fields, user's password;
cusomData Fields, for any content, such as full name introduction for users;
roles Fields, specifying the user's role, can use an empty array to set the new user's empty role. stay roles field,You can specify built-in roles and user-defined roles.
4. View the created user: show users or db.system.users.find()
5. Enable user privileges:
Modify configuration file and add configuration:
$ vim /etc/mongod.conf
security:
  authorization: enabled
6. Restart mongodb
sudo service mongod restart
7. Log in and authenticate with user management account
use admin
db.auth('admin', 'admin')
8. Remote landing
mongo 123.xxx.xxx.xxx:27017/amdin -uadmin -padmin
First admin: An algebraic database
The second admin: refers to the user name
The third admin: referential password
spring boot integration mongodb
1. Introducing dependencies
<dependency>
    <groupId>org.springframework.boot</groupId>
    <artifactId>spring-boot-starter-data-mongodb</artifactId>
</dependency>
2. Creating Stored Entities
Create the User entity to store, including attributes: id, username, age
public class User {

    @Id
    private String id;

    private String username;
    private Integer age;

    public User(String username, Integer age) {
//        this.id = id;
        this.username = username;
        this.age = age;
    }

    public String getId() {
        return id;
    }

    public void setId(String id) {
        this.id = id;
    }

    public String getUsername() {
        return username;
    }

    public void setUsername(String username) {
        this.username = username;
    }

    public Integer getAge() {
        return age;
    }

    public void setAge(Integer age) {
        this.age = age;
    }

    @Override
    public String toString() {
        return "username:"+username+"--age:"+age;
    }
}
3. Implementing User's Data Access Object
Implementing User's Data Access Object: User Repository
public interface UserRepository extends MongoRepository<User, String> {

    User findByUsername(String username);

}
4. Configure the connection of mongodb
#Configuration of mongodb3.X
spring.data.mongodb.uri=mongodb://admin:admin@123.206.xxx.xxx:27017/test
#Configuration of mongodb2.x
spring.data.mongodb.host=localhost spring.data.mongodb.port=27017
5. Call in unit test
@RunWith(SpringRunner.class)
@SpringBootTest
public class Test05ApplicationTests{
    @Autowired
    private UserRepository userRepository;

    @Test
    public void test() {
        userRepository.deleteAll();
        // Create three Users and verify the total number of Users
        userRepository.save(new User("didi", 30));
        userRepository.save(new User("mama", 40));
        userRepository.save(new User("kaka", 50));
        Assert.assertEquals(3, userRepository.findAll().size());

        // Delete a User and verify the total number of Users
        User u = userRepository.findByUsername("didi");
        System.out.println(u.toString());
        userRepository.delete(u);
        Assert.assertEquals(2, userRepository.findAll().size());
    }

}
Problems arising
1. Find that the operation was successful, but the data could not be found.
It's mainly a misunderstanding. There are collections (equivalent to tables) under the mongodb Database. Then there may be multiple collections under each Database.
8. Spring Boot redis
redis demo program: nezha/spring-boot-redis
- Distribution of redis: Installation and Configuration of Redis under CentOS 6.5
- redis Opens Remote Connection redis Opens Remote Access
- Redis remote connection redis-cli-h 123.206.xxx.xxx-p 6379
1. Introducing dependencies
<dependency>
    <groupId>org.springframework.boot</groupId>
    <artifactId>spring-boot-starter-redis</artifactId>
</dependency>
2. Parameter Configuration
# REDIS (RedisProperties)
# Redis database index (default 0)
spring.redis.database=0
# Redis server address
spring.redis.host=123.206.xxx.xxx
# Redis Server Connection Port
spring.redis.port=6379
# Redis server connection password (default is empty)
spring.redis.password=
# Maximum number of connections in connection pool (no restrictions with negative values)
spring.redis.pool.max-active=-1
# Maximum blocking waiting time for connection pools (using negative values to indicate no restrictions)
spring.redis.pool.max-wait=-1
# Maximum idle connection in connection pool
spring.redis.pool.max-idle=16
# Minimum idle connections in connection pools
spring.redis.pool.min-idle=0
# Connection timeout time (milliseconds)
spring.redis.timeout=0
3. Test access
@RunWith(SpringRunner.class)
@SpringBootTest
public class Test04ApplicationTests {

    @Autowired
    StringRedisTemplate stringRedisTemplate;

    @Test
    public void test() throws Exception {
        // Save strings
        stringRedisTemplate.opsForValue().set("aaa", "111");
        Assert.assertEquals("111", stringRedisTemplate.opsForValue().get("aaa"));
    }

}
9. Spring Boot Timing Tasks
Timing task demo program: spring-boot-schedule
1.pom package configuration
This part of the basic spring boot startup is OK, there is no special dependency package
2. Startup Class Enablation Timing
@EnableScheduling
@SpringBootApplication
public class ScheduleApplication {

    public static void main(String[] args) {
        SpringApplication.run(ScheduleApplication.class, args);
    }
}
3. Creating Timing Task Implementation Classes
Timing Task 1
/**
 * Created by nezha on 2017/4/28.
 */
@Component
public class SchedulerTask {
    private int count = 0;

    @Scheduled(cron="*/6 * * * * ?")
    private void process(){
        System.out.println("this is scheduler task runing  "+(count++));
    }
}
Timing Task II
/**
 * Created by nezha on 2017/4/28.
 */
@Component
public class SchedulerTask2 {
    private static SimpleDateFormat dateFormat = new SimpleDateFormat("HH:mm:ss");

    @Scheduled(fixedRate = 6000)
    public void reportCurrentTime() {
        System.out.println("Now time:" + dateFormat.format(new Date()));
    }
}
4. Description of parameters
The @Scheduled parameter can accept two timing settings, one is our commonly used cron="*/6*****??" and the other is fixedRate = 6000, both of which represent printing content every six seconds.
Fixed Rate Description
- Scheduled(fixedRate = 6000): Execute 6 seconds after the last execution point
- Scheduled(fixedDelay = 6000): 6 seconds after the last execution point
- Scheduled (initial Delay = 1000, fixedRate = 6000): Execute after the first delay of 1 second, then execute every 6 seconds according to the fixedRate rule
10. Spring Boot related technologies
Custom icons
Spring Boot Custom Banner Custom icons
Deployment of spring projects
1. Direct Running in IntelliJ Idea
2.mvn spring-boot:run
3. MVN install >>>> generates jar files and executes jar files.
How to unit test when spring boot test
1. Use @SpringBootTest
File main real test directory
@RunWith(SpringRunner.class)
@SpringBootTest
public class Test05ApplicationTests{
    @Autowired
    private UserRepository userRepository;

    @Test
    public void test() {
        userRepository.deleteAll();
        // Create three Users and verify the total number of Users
        userRepository.save(new User("didi", 30));
        userRepository.save(new User("mama", 40));
        userRepository.save(new User("kaka", 50));
    }
}
2. Use @SpringBootApplication
com.nezha/
@SpringBootApplication
public class Application implements CommandLineRunner {
    @Autowired
    private CustomerRepository repository;
    public static void main(String[] args) {
        SpringApplication.run(Application.class, args);
    }
    @Override
    public void run(String... args) throws Exception {
        repository.deleteAll();
        // save a couple of customers
        repository.save(new Customer("Alice", "Smith"));
        repository.save(new Customer("Bob", "Smith"));
    }
}
3. Use RestController
This way is very convenient and easy to use. Sometimes I will use it.