1. Introduction to Linux Cluster
- linux cluster functions can be divided into: HA high availability, load balancing.
- High Availability: There are two machines, one for the main work and one for the redundant backup. When the main machine goes down, the redundant machine will take over and continue to provide services.
Open source high-availability software are: heartbeat, keepalived, where heartbeat has been unmaintained, now basically using keepalived.
- Load balancing cluster needs a server as distributor, which is responsible for distributing user requests to back-end servers for processing. In this cluster, besides distributors, it is servers that provide services to users, and the number of these servers is at least two.
Open source software for load balancing includes LVS, keepalived, haproxy and nginx. Commercial load balancing includes F5 and Netscaler, which have the advantages of stability, high concurrency support, but expensive.
2. Introduction of keepalived
- High Availability We focus on keeping alived. Heatbeat has been less used because of some problems on Centos6 and occasional untimely switching.
- Keeping alived achieves high availability through VRRP (Virtual Router Redundancy Protocl in Chinese: Virtual Routing Redundancy Protocol).
- HA High Availability: Similar to a group composed of multiple routers with the same function, there is a master role in the group, and N >= 1 backup role.
- Master will multicast vrrp packets to backup. When backup can't receive the packets sent by master, it will think that master is down and use backup to act as the new master.
- Keepalived has three modules: core, check and vrrp. The core module is the core of keeping alived. It is responsible for the initiation and maintenance of the main process and the loading and analysis of the global configuration file. The check module is responsible for the health check. The VRRP module is used to implement the VRRP protocol.
3. Keeping alived to configure highly available clusters
- First, prepare two machines and install keepalived: Yum install-y keepalived; keepalived, which actually contains a service, that is to say, the service is used to achieve high availability;
A Machine: ip:110
[root@aminglinux ~]# yum install -y keepalived
B Machine: ip:112
[root@localhost ~]# yum install -y keepalived
VIP :IP:115
- Here, nginx is used as a highly available object - > the reason why nginx is used as a demonstration object, because in the work of nginx, in the production environment, many enterprises make nginx a load balancer, assuming that once nginx hangs up, then all the back-end web, even if it is normal, can not be accessed;
- If machines A and B do not have nginx services installed, you can install them directly in yum
- If lnmp has installed nginx, it does not need to be installed (nginx installed in source packages)
A Machine: yum install
[root@aminglinux ~]# yum install -y nginx
[root@aminglinux ~]# systemctl start nginx
[root@aminglinux ~]# ps aux |grep nginx
root      2064  0.0  0.2 120812  2092 ?        Ss   22:41   0:00 nginx: master process /usr/sbin/nginx
nginx     2065  0.0  0.3 121276  3128 ?        S    22:41   0:00 nginx: worker process
nginx     2066  0.0  0.3 121276  3128 ?        S    22:41   0:00 nginx: worker process
root      2068  0.0  0.0 112720   984 pts/0    S+   22:41   0:00 grep --color=auto nginx
B Machine: Because it was installed before lnmp,No installation required
[root@localhost ~]# ps aux |grep nginx
root      1057  0.0  0.1  46040  1264 ?        Ss   21:05   0:00 nginx: master process /usr/local/nginx/sbin/nginx -c /usr/local/nginx/conf/nginx.conf
nobody    1058  0.0  0.3  48528  3904 ?        S    21:05   0:00 nginx: worker process
nobody    1059  0.0  0.3  48528  3904 ?        S    21:05   0:00 nginx: worker process
root      1667  0.0  0.0 112724   984 pts/0    S+   22:35   0:00 grep --color=auto nginx
** 3. Modify the keepalived configuration file on the master; ** The content address of the configuration file: https://coding.net/u/aminglinux/p/aminglinux-book/git/blob/master/D21Z/master_keepalived.conf
- The default configuration file path is / etc/keepalived/keepalived.conf
- Keyboard shortcuts for emptying files >! $
[root@aminglinux ~]# ls /etc/keepalived/keepalived.conf
/etc/keepalived/keepalived.conf
[root@aminglinux ~]# >!$// Clear the contents of the file directly
> /etc/keepalived/keepalived.conf
[root@aminglinux ~]# cat /etc/keepalived/keepalived.conf
[root@aminglinux ~]# Vim/etc/keepalived/keepalived.conf//go to the file address to download the content
Copy the copy in
//Just change the name of the network card and IP192.168.222.115.
####################### #  Global configuration #######################
global_defs {                            //global_defs global configuration identifier
   notification_email {               //notification_email is used to set the alarm mail address
   xou6363@163.com           //You can set up more than one, one for each line.
   }
   notification_email_from xou6363@163.com    //Setting the mail delivery address
   smtp_server 127.0.0.1                //Setting the smtp server address for mail
   smtp_connect_timeout 30            //Setting connection smtp sever timeout
   router_id LVS_DEVEL
}

###################### #  VRRP To configure ######################
vrrp_script chk_nginx {
    script "/usr/local/sbin/check_ng.sh"   //Check whether the service is normal or not, by writing scripts to achieve, scripts to check the health of the service
    interval 3                      //The time interval for inspection is 3 seconds.
}
vrrp_instance VI_1 {                        //VRRP configuration identifier VI_1 is the instance name
    state MASTER                           //Defining master correlation
    interface ens33                 //To communicate and broadcast through vrrp protocol. When configuring, pay attention to the name of your network card
    virtual_router_id 51                   //Define the router ID and configure it in accordance with the slave machine
    priority 100                              //Weight, the main role and the subordinate role have different weights
    advert_int 1                            //Set the time interval for synchronous inspection of MASTER and BACKUP hosts in seconds
    authentication {                       //Authentication-related information
        auth_type PASS                   //The type of authentication here is PASS.
        auth_pass aminglinux>com   //The form of a password is a string
    }
    virtual_ipaddress {                  //Setting Virtual IP Address (VIP), also known as Drift IP Address
        192.168.222.115   //Change to 192.168.222.115
    }
    track_script {               //Loading script
        chk_nginx
    }
}
- virtual_ipaddress: VIP for short, this vip, two machines, one master and one slave, the normal situation is that the master is in service, the master is out of service, from the start, from the start of the service, from the start of nginx, after the start, access to that IP? What about resolving domain names to that IP? If the master is parsed to the master, the master is out of order, so this requires defining a public IP (IP for the master, IP for the master), which can be summer-removed and configured at any time.
- Define monitoring script, script content address: http://coding.net/u/aminglinux/p/aminglinux-book/git/blob/master/D21Z/master_check_ng.sh
- The script path is defined in the keepalived configuration file, and the path is / usr/local/sbin/check_ng.sh
[root@aminglinux ~]# vim /usr/local/sbin/check_ng.sh
[root@aminglinux ~]# cat /usr/local/sbin/check_ng.sh
#!/bin/bash
#Time variable for logging
d=`date --date today +%Y%m%d_%H:%M:%S`
#Calculate the number of nginx processes
n=`ps -C nginx --no-heading|wc -l`
#If the process is 0, then start nginx and detect the number of nginx processes again.
#If it's still 0, it means that nginx can't start, and you need to turn off keepalived
if [ $n -eq "0" ]; then
        /etc/init.d/nginx start
        n2=`ps -C nginx --no-heading|wc -l`
        if [ $n2 -eq "0"  ]; then
                echo "$d nginx down,keepalived will stop" >> /var/log/check_ng.log
                systemctl stop keepalived
        fi
fi
- In the high availability (HA) system, when the heartbeat of two nodes is disconnected, the HA system, which is a whole and coordinated action, is split into two independent individuals. Because they lost contact with each other, they all thought that the other party had broken down. HA software on two nodes is like "split-brain person", competing for "shared resources" and "application services" will have serious consequences - or shared resources are partitioned, two sides of "services" can not get up; or both sides of "services" are up, but at the same time read and write "shared storage", resulting in data damage.
- How to judge cleft brain?
- If both servers have virtual IP, it will show that there is a brain fissure. This proves that there is a problem in the current communication between two servers. The original reason for this problem is that neither server can detect the status of other servers in the group (heartbeat request can not respond normally). If the other server is suspended, it will seize the virtual IP if it decides privately that the other server is suspended. The occurrence of fissures is not allowed. The solution to this problem is to check the firewall settings (close the firewall) or use serial communication.
- After the script is created, the script's permissions need to be changed (without changing the permissions, the script can't be loaded automatically, and the keepalived service can't be started)
[root@aminglinux ~]# chmod 755 /usr/local/sbin/check_ng.sh
- Start the keepalived service and see if it started successfully (PS: Start unsuccessfully, possibly because the firewall is not closed or rules restrict)
- System CTL stop firewalld closes firewalld
- iptables -nvL
- setenforce 0 temporarily closes selinux
- The getenforce command checks to see if it is Permissive
- Start keepalived again and you'll see the keepalived process service
[root@aminglinux ~]# systemctl start keepalived
[root@aminglinux ~]#  ps aux |grep keep
root      2121  0.1  0.1 118652  1396 ?        Ss   23:16   0:00 /usr/sbin/keepalived -D
root      2122  0.0  0.3 127516  3296 ?        S    23:16   0:00 /usr/sbin/keepalived -D
root      2124  0.3  0.2 127456  2836 ?        S    23:16   0:00 /usr/sbin/keepalived -D
root      2142  0.0  0.0 112720   980 pts/0    S+   23:16   0:00 grep --color=auto keep
- View the nginx service process;
[root@aminglinux ~]# ps aux |grep nginx
root      2064  0.0  0.2 120812  2092 ?        Ss   22:41   0:00 nginx: master process /usr/sbin/nginx
nginx     2065  0.0  0.3 121276  3128 ?        S    22:41   0:00 nginx: worker process
nginx     2066  0.0  0.3 121276  3128 ?        S    22:41   0:00 nginx: worker process
root      2457  0.0  0.0 112720   984 pts/0    S+   23:18   0:00 grep --color=auto nginx
- Close nginx to see if the nginx service is automatically restarted: because keepalived executes the check script in three seconds, and if the nginx process does not start automatically.
[root@aminglinux ~]# /etc/init.d/nginx stop
-bash: /etc/init.d/nginx: No file or directory
If the above prompt appears, there is no nginx configuration; add startup scripts and configuration files and change permissions; refer to: https://blog.csdn.net/xou6363/article/details/80875824 nginx installation
[root@aminglinux ~]# /etc/init.d/nginx stop
Stopping nginx (via systemctl):                            [  Sure?  ]
[root@aminglinux ~]# ps aux |grep nginx
root      3694  0.0  0.2 120812  2092 ?        Ss   23:28   0:00 nginx: master process /usr/sbin/nginx
nginx     3695  0.0  0.3 121276  3128 ?        S    23:28   0:00 nginx: worker process
nginx     3696  0.0  0.3 121276  3128 ?        S    23:28   0:00 nginx: worker process
root      3821  0.0  0.0 112720   980 pts/0    S+   23:29   0:00 grep --color=auto nginx
- Keep alived log file path: / var/log/messages
- Look at the IP address and use the ip add command instead of the ifconfig command, because the ifconfig command is unable to view the IP vip192.168.222.110
[root@aminglinux ~]# ip add
1: lo: <LOOPBACK,UP,LOWER_UP> mtu 65536 qdisc noqueue state UNKNOWN qlen 1
    link/loopback 00:00:00:00:00:00 brd 00:00:00:00:00:00
    inet 127.0.0.1/8 scope host lo
       valid_lft forever preferred_lft forever
    inet6 ::1/128 scope host
       valid_lft forever preferred_lft forever
2: ens33: <BROADCAST,MULTICAST,UP,LOWER_UP> mtu 1500 qdisc pfifo_fast state UP qlen 1000
    link/ether 00:0c:29:97:24:0e brd ff:ff:ff:ff:ff:ff
    inet 192.168.222.110/24 brd 192.168.222.255 scope global ens33
       valid_lft forever preferred_lft forever
    inet 192.168.222.110/32 scope global ens33
       valid_lft forever preferred_lft forever
    inet6 fe80::5206:ca54:f17f:91a3/64 scope link
       valid_lft forever preferred_lft forever
    inet6 fe80::effe:fc70:7a68:994c/64 scope link tentative dadfailed
       valid_lft forever preferred_lft forever
- Check whether the firewall and selinux are shut down under A and B machines. If they are not shut down, the experiment may fail.
- System CTL stop firewalld closes firewalld
- iptables -nvL
- setenforce 0 temporarily closes selinux
- The getenforce command checks to see if it is Permissive
12. Configure the keepalived configuration file of the backup machine; change the virtual IP to be the same as the master; and configure the content address of the configuration file: https://coding.net/u/aminglinux/p/aminglinux-book/git/blob/master/D21Z/backup_keepalived.conf
- First, close the firewall and empty the configuration files that come with the B machine keepalived.
[root@localhost ~]# systemctl stop firewalld
[root@localhost ~]# iptables -nvL
Chain INPUT (policy ACCEPT 0 packets, 0 bytes)
 pkts bytes target     prot opt in     out     source               destination

Chain FORWARD (policy ACCEPT 0 packets, 0 bytes)
 pkts bytes target     prot opt in     out     source               destination

Chain OUTPUT (policy ACCEPT 0 packets, 0 bytes)
 pkts bytes target     prot opt in     out     source               destination
[root@localhost ~]# setenforce 0
[root@localhost ~]# getenforce
Permissive
[root@localhost ~]# iptables -F
[root@localhost ~]# ls /etc/keepalived/keepalived.conf
/etc/keepalived/keepalived.conf
[root@localhost ~]# > !$
> /etc/keepalived/keepalived.conf
[root@localhost ~]# cat /etc/keepalived/keepalived.conf
[root@localhost ~]# vim /etc/keepalived/keepalived.conf
[root@localhost ~]# cat /etc/keepalived/keepalived.conf
global_defs {
   notification_email {
     xou6363@163.com
   }
   notification_email_from xou6363@163.com
   smtp_server 127.0.0.1
   smtp_connect_timeout 30
   router_id LVS_DEVEL
}

vrrp_script chk_nginx {
    script "/usr/local/sbin/check_ng.sh"  //Scripts for monitoring nginx services
    interval 3
}

vrrp_instance VI_1 {
    state BACKUP      //Here's a different name from master
    interface ens33  //The network card is the same as the current machine, otherwise the keepalived service cannot be started.
    virtual_router_id 51  //Consistent with the mainframe
    priority 90  //Weight, smaller than the host
    advert_int 1
    authentication {
        auth_type PASS
        auth_pass aminglinux>com
    }
    virtual_ipaddress {
        192.168.222.115  //virtual ip
    }

    track_script {
        chk_nginx
    }

}
- Define monitoring script, script content: https://coding.net/u/aminglinux/p/aminglinux-book/git/blob/master/D21Z/backup_check_ng.sh
[root@localhost ~]# vim /usr/local/sbin/check_ng.sh
#Time variable for logging
d=`date --date today +%Y%m%d_%H:%M:%S`
#Calculate the number of nginx processes
n=`ps -C nginx --no-heading|wc -l`
#If the process is 0, then start nginx and detect the number of nginx processes again.
#If it's still 0, it means that nginx can't start, and you need to turn off keepalived
if [ $n -eq "0" ]; then
        systemctl start nginx
        n2=`ps -C nginx --no-heading|wc -l`
        if [ $n2 -eq "0"  ]; then
                echo "$d nginx down,keepalived will stop" >> /var/log/check_ng.log
                systemctl stop keepalived
        fi
fi
- Change script permissions to 755 permissions
[root@localhost ~]# chmod 755 /usr/local/sbin/check_ng.sh
- B machine starts keepalived service system CTL start keepalived
[root@localhost ~]# systemctl start keepalived
[root@localhost ~]# ps aux |grep keepalived
root      1784  0.1  0.1 118652  1396 ?        Ss   00:13   0:00 /usr/sbin/keepalived -D
root      1785  0.1  0.3 120776  3112 ?        S    00:13   0:00 /usr/sbin/keepalived -D
root      1786  0.6  0.2 120776  2564 ?        S    00:13   0:00 /usr/sbin/keepalived -D
root      1825  0.0  0.0 112720   984 pts/0    S+   00:13   0:00 grep --color=auto keepalived
How to distinguish nginx between master and slave?
- Machine A is nginx installed in yum; the default index page is / usr/share/nginx/html/index.html
[root@aminglinux ~]# mv /usr/share/nginx/html/index.html /usr/share/nginx/html/index.html.bak
[root@aminglinux ~]# vim /usr/share/nginx/html/index.html

master
- B machine, nginx installed in source package
[root@localhost ~]# ls /usr/local/nginx/html/
1.php  50x.html  index.html
[root@localhost ~]# mv /usr/local/nginx/html/index.html /usr/local/nginx/html/index.html.bak
[root@localhost ~]# vim /usr/local/nginx/html/index.html

backup
Testing High Availability
- Simulate on-line production environment, host downtime environment, the most simple and direct way is to shut down the keepalived service directly.
- Close the keepalived service on the master machine (that is, machine A) and close it
[root@aminglinux ~]# ip add
1: lo: <LOOPBACK,UP,LOWER_UP> mtu 65536 qdisc noqueue state UNKNOWN qlen 1
    link/loopback 00:00:00:00:00:00 brd 00:00:00:00:00:00
    inet 127.0.0.1/8 scope host lo
       valid_lft forever preferred_lft forever
    inet6 ::1/128 scope host
       valid_lft forever preferred_lft forever
2: ens33: <BROADCAST,MULTICAST,UP,LOWER_UP> mtu 1500 qdisc pfifo_fast state UP qlen 1000
    link/ether 00:0c:29:97:24:0e brd ff:ff:ff:ff:ff:ff
    inet 192.168.222.110/24 brd 192.168.222.255 scope global ens33
       valid_lft forever preferred_lft forever
    inet6 fe80::5206:ca54:f17f:91a3/64 scope link
       valid_lft forever preferred_lft forever
    inet6 fe80::effe:fc70:7a68:994c/64 scope link tentative dadfailed
       valid_lft forever preferred_lft forever
- Look at the backup machine (that is, the B machine) listening for VIP
[root@localhost ~]# ip add
1: lo: <LOOPBACK,UP,LOWER_UP> mtu 65536 qdisc noqueue state UNKNOWN qlen 1
    link/loopback 00:00:00:00:00:00 brd 00:00:00:00:00:00
    inet 127.0.0.1/8 scope host lo
       valid_lft forever preferred_lft forever
    inet6 ::1/128 scope host
       valid_lft forever preferred_lft forever
2: ens33: <BROADCAST,MULTICAST,UP,LOWER_UP> mtu 1500 qdisc pfifo_fast state UP qlen 1000
    link/ether 00:0c:29:6d:7e:bf brd ff:ff:ff:ff:ff:ff
    inet 192.168.222.112/24 brd 192.168.222.255 scope global ens33
       valid_lft forever preferred_lft forever
    inet 192.168.222.110/32 scope global ens33
       valid_lft forever preferred_lft forever
    inet6 fe80::effe:fc70:7a68:994c/64 scope link
       valid_lft forever preferred_lft forever
- View machine B logs
[root@localhost ~]# tail /var/log/messages
Jul 22 00:42:58 localhost Keepalived_vrrp[1786]: Sending gratuitous ARP on ens33 for 192.168.222.110
Jul 22 00:43:03 localhost Keepalived_vrrp[1786]: Sending gratuitous ARP on ens33 for 192.168.222.110
Jul 22 00:43:03 localhost Keepalived_vrrp[1786]: VRRP_Instance(VI_1) Sending/queueing gratuitous ARPs on ens33 for 192.168.222.110
Jul 22 00:43:03 localhost Keepalived_vrrp[1786]: Sending gratuitous ARP on ens33 for 192.168.222.110
Jul 22 00:43:03 localhost Keepalived_vrrp[1786]: Sending gratuitous ARP on ens33 for 192.168.222.110
Jul 22 00:43:03 localhost Keepalived_vrrp[1786]: Sending gratuitous ARP on ens33 for 192.168.222.110
Jul 22 00:43:03 localhost Keepalived_vrrp[1786]: Sending gratuitous ARP on ens33 for 192.168.222.110
Jul 22 00:43:50 localhost systemd-logind: New session 6 of user root.
Jul 22 00:43:50 localhost systemd: Started Session 6 of user root.
Jul 22 00:43:50 localhost systemd: Starting Session 6 of user root.
- Start the keepalived service on Machine A and you will see V IP coming back immediately.
[root@localhost ~]# ip add
1: lo: <LOOPBACK,UP,LOWER_UP> mtu 65536 qdisc noqueue state UNKNOWN qlen 1
    link/loopback 00:00:00:00:00:00 brd 00:00:00:00:00:00
    inet 127.0.0.1/8 scope host lo
       valid_lft forever preferred_lft forever
    inet6 ::1/128 scope host
       valid_lft forever preferred_lft forever
2: ens33: <BROADCAST,MULTICAST,UP,LOWER_UP> mtu 1500 qdisc pfifo_fast state UP qlen 1000
    link/ether 00:0c:29:6d:7e:bf brd ff:ff:ff:ff:ff:ff
    inet 192.168.222.112/24 brd 192.168.222.255 scope global ens33
       valid_lft forever preferred_lft forever
    inet 192.168.222.110/32 scope global ens33
       valid_lft forever preferred_lft forever
    inet6 fe80::effe:fc70:7a68:994c/64 scope link
       valid_lft forever preferred_lft forever
1. Introduction of Load Balancing Cluster
- The main open source software of load balancing cluster are LVS, keepalived, haproxy and nginx, among which LVS belongs to four layers (network OSI layer 7 model), nginx belongs to seven layers, haproxy can be considered as either four layers or seven layers.
- LVS: Load balancing at Layer 4 can distribute communications on ports other than 80, such as MySQL port 3306, while nginx only supports http, https, mail;
- haproxy also supports MySQL. Compared with LVS, which is more stable and can withstand more requests, keepalived's load balancing function is actually lvs.
- The 7-tier nginx is more flexible and can achieve more personalized needs.
- Commercial load balancing solutions are stable, but expensive, so open source LVS is the main solution.
LVS introduction
- LVS was developed by Zhang Wensong
- As popular as apache's httpd, routing and forwarding based on TCP/IP has high stability and efficiency.
- The latest version of LVS is based on Linux kernel 2.6 and has not been updated for many years.
- LVS has three common modes: NAT mode, IP Tunnel mode and DR mode.
- One of the core roles in LVS architecture is called Load balance, which distributes user requests. There are also many Real Server s (rs) that process user requests.
LVS NAT mode
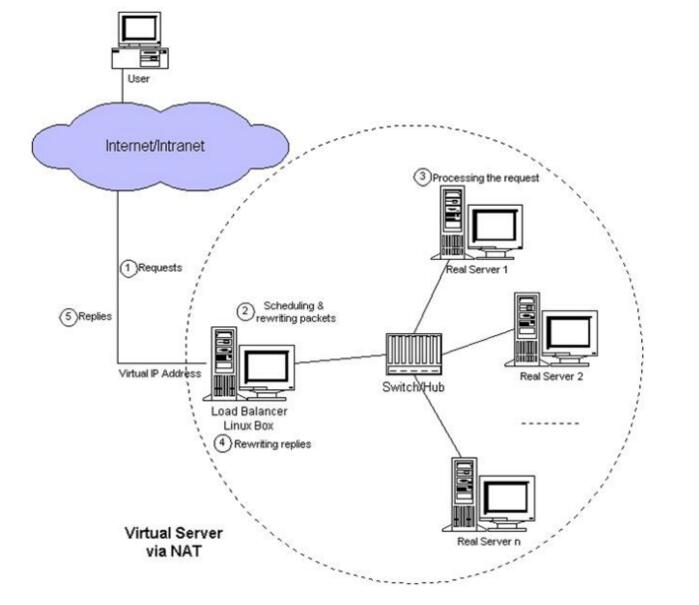
- LVS NAT mode is implemented by nat table of iptables
- After the user's request is sent to the distributor, the requested packet is forwarded to the rs on the back end through the preset iptables rule
- rs needs to set the gateway as the intranet ip of the distributor
- Packets requested by users and returned to users all pass through the distributor, so the distributor becomes a bottleneck.
- In nat mode, only the distributor has public network ip, so it saves public network IP resources.
- Load Balancer is a distributor, which distributes the user's requests to Real Server, Real Server, which receives the requests, processes the user's requests, and then throws them back to Load Balancer. Finally, Load Balancer returns to the user.
- The disadvantage of this model is that Load Balancer is under a lot of pressure when there are a lot of visits, requests and feedback.
- LVS scale, the general scale of up to 10 servers, more than 10 will be powerless;
- The structure of nat mode requires only one public network IP, and all other real server servers can be implemented in the intranet. Advantages, save a lot of resources
LVS IP Tunnel Mode
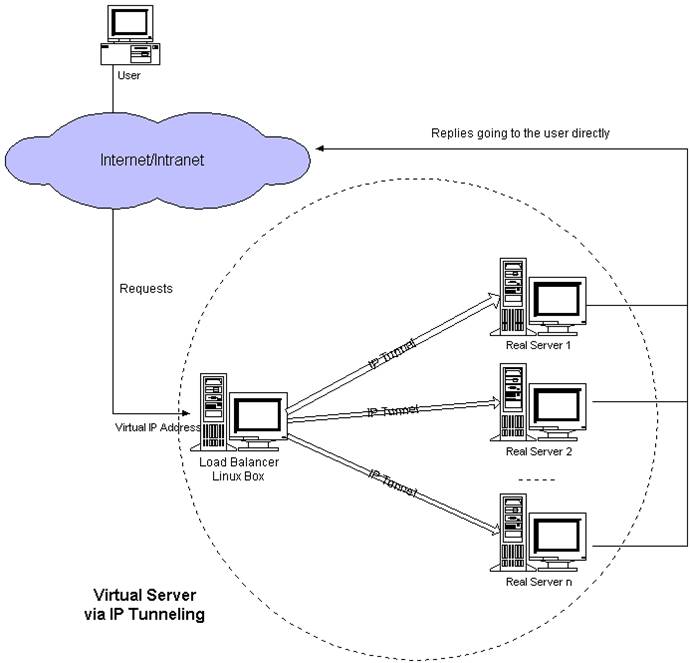
- LVS IP Tunnel mode requires a common IP configuration on the distributor and all rs. We call it vip.
- The target IP of client request is vip. When the distributor receives the request packet, it will process the packet and change the target IP to the IP of rs, so that the packet will go to rs.
- rs will restore the original packet after receiving the packet, so that the target IP is vip, because all rs is configured with this vip, so it will think it is itself.
- A virtual channel between load balancer and real server is set up, which is called ip tunnel. In fact, it changes the IP of the data package; requests to come through load balancer, through the real configured on real server; when the user requests, the packet is wrapped in the destination. When the packet arrives at the gate, the user will carry out a data packet purpose. Change, then send to the specific real server, through the lvs's own algorithm, to achieve the transmission to the real server; then real server unpack processing, and then directly return to the user through an VIP, which will omit the data back to the load balancer distribution process, so that load load has no bottleneck.
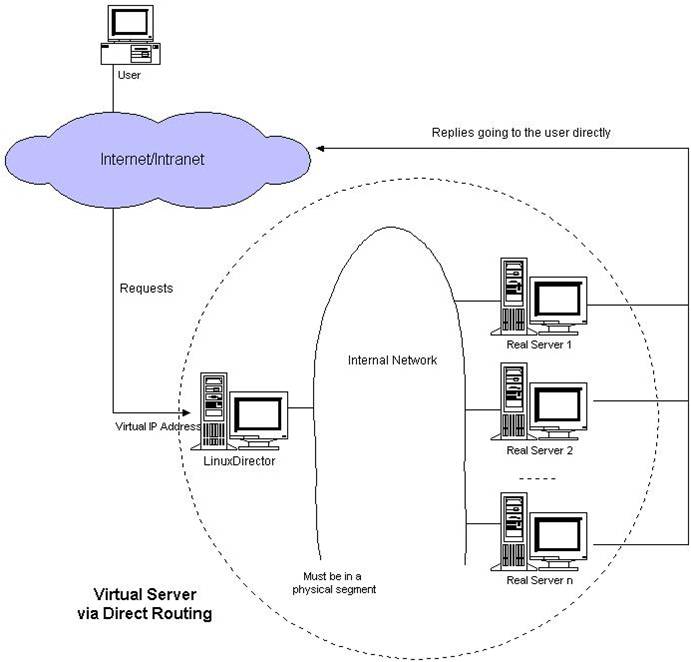
LVS DR mode
- LVS DR mode also requires a common IP configuration on the distributor and all rs, that is, vip.
- Unlike IP Tunnel, it changes the MAC address of the packet to rs's MAC address.
- rs will restore the original packet after receiving the packet, so that the target IP is vip, because all rs is configured with this vip, so it will think it is itself.
2, LVS scheduling algorithm
- The scheduler sends the requests from the client evenly to the real server at the back end, which is achieved by the preset scheduling algorithm. There are mainly 8 kinds of scheduling algorithms supported in LVS.
- 1, polling scheduling (Round-Robin-rr)
- A very simple scheduling algorithm is to send requests to the back-end server one time in sequence, regardless of the processing speed and the corresponding time of the back-end server. However, when the performance of the back-end server is inconsistent, this scheduling algorithm is not suitable.
- 2. Weighted Round-Robin-wrr
- Compared with the first algorithm, the higher the weight, the more requests are allocated to the server, so that when the performance of the back-end server is inconsistent, the lower the weight of the server can be given.
- 3. Least-Connection-lc
- This algorithm will decide who to assign new requests to according to the number of connections on real servers. The fewer connections, the more reasonable it is to assign new requests to idle servers.
- 4. Weighted Least-Connection-wlc
- On the basis of minimum connection scheduling, an additional weight setting is added, which can be used to artificially control which servers allocate more requests and which ones allocate less requests.
- 5. Locality-Based Least Connections-lblc
- It is a load balancing scheduling for the target IP address of the request message. At present, it is mainly used in the Cache cluster system, because the target IP address of the client requesting message changes in the Cache cluster. In order to improve the access locality and cache hit rate of each server, the Mubird algorithm is designed to schedule requests from the same target IP to the same server under the basic balance of server load.
- 6. Locality-Based Least Connections with Replication-lblcr with replication
- It also aims at the load balancing of the target IP address. It differs from the LBLC algorithm in that it maintains the mapping from a target IP address to a group of servers, while the LBLC algorithm maintains the mapping from a target IP address to a server. The LBLCR algorithm first changes the target IP address of the request to find the server group corresponding to the target IP address, and then selects a server from the server group according to the principle of "minimum connection". If the server is not overloaded, it sends the request to the server. If the server is overloaded, it selects a server from the whole cluster according to the principle of "minimum connection", and adds the server to the service. In the group, the request is sent to the server. At the same time, when the server group has not been modified for a period of time, the busiest servers are deleted from the server group to reduce the degree of replication.
- 7. Destination Hashing-dh
- The algorithm is also load balanced for the target IP address, but it is a static mapping algorithm, which maps a target IP address to a server through a hash function. The target address hash scheduling algorithm first finds the corresponding server from the static allocated hash table according to the target IP address of the request. If the server is available and not overloaded, it sends the request to the server, otherwise it returns to empty.
- 8. Source Hashing-sh
- This algorithm is just the opposite of the target address hash scheduling algorithm. It uses the source IP address of the request as a hash key to find the corresponding server from the static hash table. If the server is available and not overloaded, it sends the request to the server, otherwise it returns to empty. Its algorithm flow is basically similar to the target address hash scheduling algorithm, except that the target IP address of the request is replaced by the source IP address of the request.
** 3. Construction of LVS NAT Model**
- NAT mode is implemented through iptables, so some iptables rules must be configured
- Prepare three machines. One serves as a distributor, also known as a dispatcher, or dir for short. The other two servers are real server s, rs1 and rs2, which handle user requests.
1. Section configuration:
A sets up two network cards, ens33 for the intranet: 192.168.222.110, ens37 for the extranet (virtual machine only host mode): 192.168.209.130

B Set up a network card, ens33 for the intranet: 192.168.222.111, gateway must be A's intranet ip:192.168.222.110

C set up a network card, ens33 for the intranet: 192.168.222.112, gateway must be A's intranet ip:192.168.222.110
- The cloned host changes the computer name and IP;
- A Machine Added Network Card Settings:
- Add network card, set up only host mode;
- Open the virtual machine and use the ifconfig command to check whether the network card has been loaded.
- Copy the network card configuration file into the new network card, change the IP in the configuration file, delete the UUID, and change the mac
[root@aminglinux ~]# cd /etc/sysconfig/network-scripts/
[root@aminglinux network-scripts]# cp ifcfg-ens33 ifcfg-ens37
[root@aminglinux network-scripts]# vim ifcfg-ens37
- To change the mac, you can use the ip add command to view the MAC of the new network card and change it in the configuration file
- Restart the network card: ifup ens37
- Restart network services: system CTL restart network
- Whether or not a new network card IP can communicate with a physical machine
- Close the firewall of the three machines after they have been set up
- Machine B and C download and install iptables-services package: Yum install-y iptables-services
- Machine B, Machine C Start iptables Service: System CTL start iptables
- Machine B and C set up boot start: system CTL enable iptables; clearing rules: iptables-F; service iptables save;
[root@aming2 ~]# systemctl start iptables
[root@aming2 ~]# systemctl enable iptables
Created symlink from /etc/systemd/system/basic.target.wants/iptables.service to /usr/lib/systemd/system/iptables.service.
[root@aming2 ~]# iptables -F
[root@aming2 ~]# service iptables save
iptables: Saving firewall rules to /etc/sysconfig/iptables:[  Sure?  ]
[root@aming2 ~]# iptables -nvL
Chain INPUT (policy ACCEPT 11 packets, 784 bytes)
 pkts bytes target     prot opt in     out     source               destination

Chain FORWARD (policy ACCEPT 0 packets, 0 bytes)
 pkts bytes target     prot opt in     out     source               destination

Chain OUTPUT (policy ACCEPT 13 packets, 1284 bytes)
 pkts bytes target     prot opt in     out     source               destination
2. A Machine Installation LVS Core Component Tool: ipvsadm
[root@aminglinux ~]# yum install -y ipvsadm
- Write scripts and execute: / usr/local/sbin/lvs_nat.sh
[root@aminglinux ~]# vim /usr/local/sbin/lvs_nat.sh

# Open Routing Forwarding on director Server
echo 1 /proc/sys/net/ipv4/ip_forward
# Turn off redirection of icmp
echo 0  /proc/sys/net/ipv4/conf/all/send_redirects
echo 0  /proc/sys/net/ipv4/conf/default/send_redirects
# Pay attention to distinguishing the name of the network card. The two network cards are ens33 and ens37, respectively.
echo 0  /proc/sys/net/ipv4/conf/ens33/send_redirects   //Intranet
echo 0  /proc/sys/net/ipv4/conf/ens37/send_redirects    //Extranet
# director sets up nat firewall
iptables -t nat -F
iptables -t nat -X
iptables -t nat -A POSTROUTING -s 192.168.222.0/24  -j MASQUERADE
# director sets ipvsadm
IPVSADM='/usr/sbin/ipvsadm'
$IPVSADM -C
$IPVSADM -A -t 192.168.209.130:80 -s rr
$IPVSADM -a -t 192.168.209.130:80 -r 192.168.222.111:80 -m -w 1
$IPVSADM -a -t 192.168.209.130:80 -r 192.168.222.112:80 -m -w 1
- Execution of scripts, if not output, means that the script has no errors
[root@aminglinux ~]# sh /usr/local/sbin/lvs_nat.sh
Test:
- nginx is installed on both rs
- Set up the home page of two rs to make a distinction. That is to say, when curl the ip of two rs directly, different results will be obtained.
Edit index pages of machine B
[root@aming2 nginx]# vi /usr/local/nginx/html/index.html
[root@aming2 nginx]# curl localhost
aming2
 Editing index pages of C machines
[root@aming3 ~]# vim /usr/local/nginx/html/index.html
[root@aming3 ~]# curl localhost
This is a test default site.
[root@aminglinux ~]# curl 192.168.209.130
This is a test default site.
[root@aminglinux ~]# curl 192.168.209.130
aming2
[root@aminglinux ~]# ipvsadm -ln
IP Virtual Server version 1.2.1 (size=4096)
Prot LocalAddress:Port Scheduler Flags
  -> RemoteAddress:Port           Forward Weight ActiveConn InActConn
TCP  192.168.209.130:80 wlc persistent 3
  -> 192.168.222.111:80           Masq    1      0          3
  -> 192.168.222.112:80           Masq    1      0          9