Apply for Tencent cloud server, personal real-name certification can be free trial for 15 days.
Install Nginx+php+mysql+jdk+tomcat based on CentOS 7.4. Connect cloud services with putty terminals locally and integrate web Environment
step
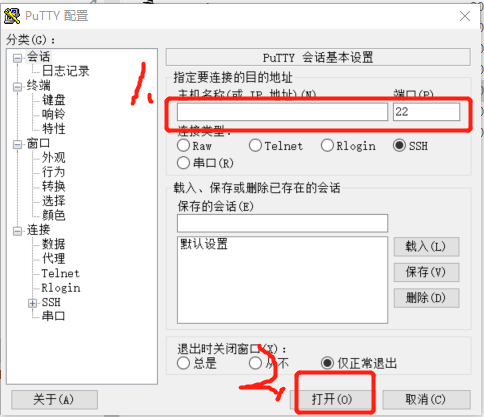
1. Download and install putty. There are many tools in putty, such as putty.exe, which can open the connection cloud server terminal pscp.exe to upload files.
2. Open putty.exe and the following interface appears. Fill in the IP port number of the cloud server host and the same as your own cloud server.
3. Entering login password in terminal interface is the user name password of cloud server.

4. Installation of software
4.1 Install nginx
Enter the command: yum install nginx
During the download process, prompt Is this ok to enter y to return.
Display Complete finally! Installation completed
4.2 Install mysql
Enter the command: yum update
Upload the local mysql file for installation
wget http://repo.mysql.com/mysql-community-release-el7-5.noarch.rpm
Unzip after downloading
rpm -ivh mysql-community-release-el7-5.noarch.rpm
Re-execution
yum update
Enter y to return until the update is complete
Enter the command: yum install mysql-server
Enter y to wait for download and installation
Open mysql service after completion
systemctl start mysqld
Input: mysql_secure_installation
Require the first login password to be null by default; ask if you want to set the password to enter y and then need to enter the password twice.
Then there will be auspicious selection of one input n n n y and the last one y.
Log in mysl input
mysql -u root -p
Enter the password you just set and enter it. Enter the command exit to exit mysql.
4.3 Install php
Input: yum install php
After successful installation, install php-fpm
yum install php-fpm
Open service after installation
Open nginx
service nginx restart
After nginx is turned on, the server can be accessed through IP from the external network. Enter http://ip from the browser, such as http://58.87.94.164.
Open php-fpm input
service start php-fpm
Edit configuration files to link nginx with php. To prevent modification errors, make a backup first
cp /etc/nginx/nginx.conf /etc/nginx/nginx.conf_bc
Then make changes.
vi /etc/nginx/nginx.conf
Find the service {} partial modification. (Note the last semicolon;) Press i or insert key to enter editing mode
Press ESC key to return to general mode input after modification: wq save and exit
Restart nginx input
service nginx restart
Setting nginx php boot-up
  systemctl enable nginx.service

  systemctl enable php-fpm
4.4 Install phpMyadmin
yum install phpmyadmin
Establish soft links in the root directory of the website
Input command: ln-s/usr/share/phpMyAdmin/usr/share/nginx/html/phpmyadmin
Edit php.ini file
vi /etc/php.ini
After entering, enter / session.save_path directly, return to find the target and enter editing mode to change it to:
session.save_path = "/var/lib/php/session"
Save Exit after Change Completes
Input command: chown-R nginx: nginx/var/lib/php/session
Then
vi /etc/nginx/conf.d/phpmyadmin.conf
Enter the editor and enter the content
server {
 listen 8081;
 server_name localhost;
 access_log /var/log/nginx/phpmyadmin-access.log main;

 location / {
  root /usr/share/nginx/html/phpmyadmin;
  index index.php;
 }

 location ~ \.php$ {
  root /usr/share/nginx/html/phpmyadmin;
  fastcgi_pass  unix:/var/run/php-fpm/php-fpm.sock;
  fastcgi_index index.php;
  fastcgi_param SCRIPT_FILENAME $document_root$fastcgi_script_name;
  include fastcgi_params;
 }

 location ~ /\.ht {
  deny all;
 }
}
Save and exit. Restart nginx
service nginx restart
Enter http://your public network ip/phpmyadmin/index.php in the browser. Enter the username and password on the phpMyAdmin login page when the bus returns.

If you prompt permission questions, enter cd/var/lib, chmod-R 777 PHP and restart nginx php-fpm
4.5 Installation of jdk
Download to Cloud Server
wget --no-check-certificate --no-cookies --header "Cookie: oraclelicense=accept-securebackup-cookie" http://download.oracle.com/otn-pub/java/jdk/10.0.2+13/19aef61b38124481863b1413dce1855f/jdk-10.0.2_linux-x64_bin.tar.gz
Decompression
tar -zxvf jdk-10.0.2_linux-x64_bin.tar.gz
When decompression is completed, the compressed package command rm-f compressed package name can be deleted
Configuration environment
vi /etc/profile
Enter edit status and insert in the last line
#java environment
export JAVA_HOME=/usr/java/jdk1.8.0_144
export CLASSPATH=.:${JAVA_HOME}/jre/lib/rt.jar:${JAVA_HOME}/lib/dt.jar:${JAVA_HOME}/lib/tools.jar
export PATH=$PATH:${JAVA_HOME}/bin
Save and exit
Make the environment just configured effective
source /etc/profile
Check if the configuration is successful
java -version
Successful if prompted version
4.6 Installation of Tomcat
Download
wget http://mirrors.shu.edu.cn/apache/tomcat/tomcat-9/v9.0.10/bin/apache-tomcat-9.0.10.tar.gz
Decompression
tar -zxvf apache-tomcat-9.0.10.tar.gz
Change the name
mv apache-tomcat-9.0.10.tar.gz tomcat9
Enter the tomcat installation directory and follow your own directory
cd /tomcat9
cd bin
View the running status ps-ef | grep Tomcat
Start tomcat. / startup.sh
Close tomcat. / shutdown.sh
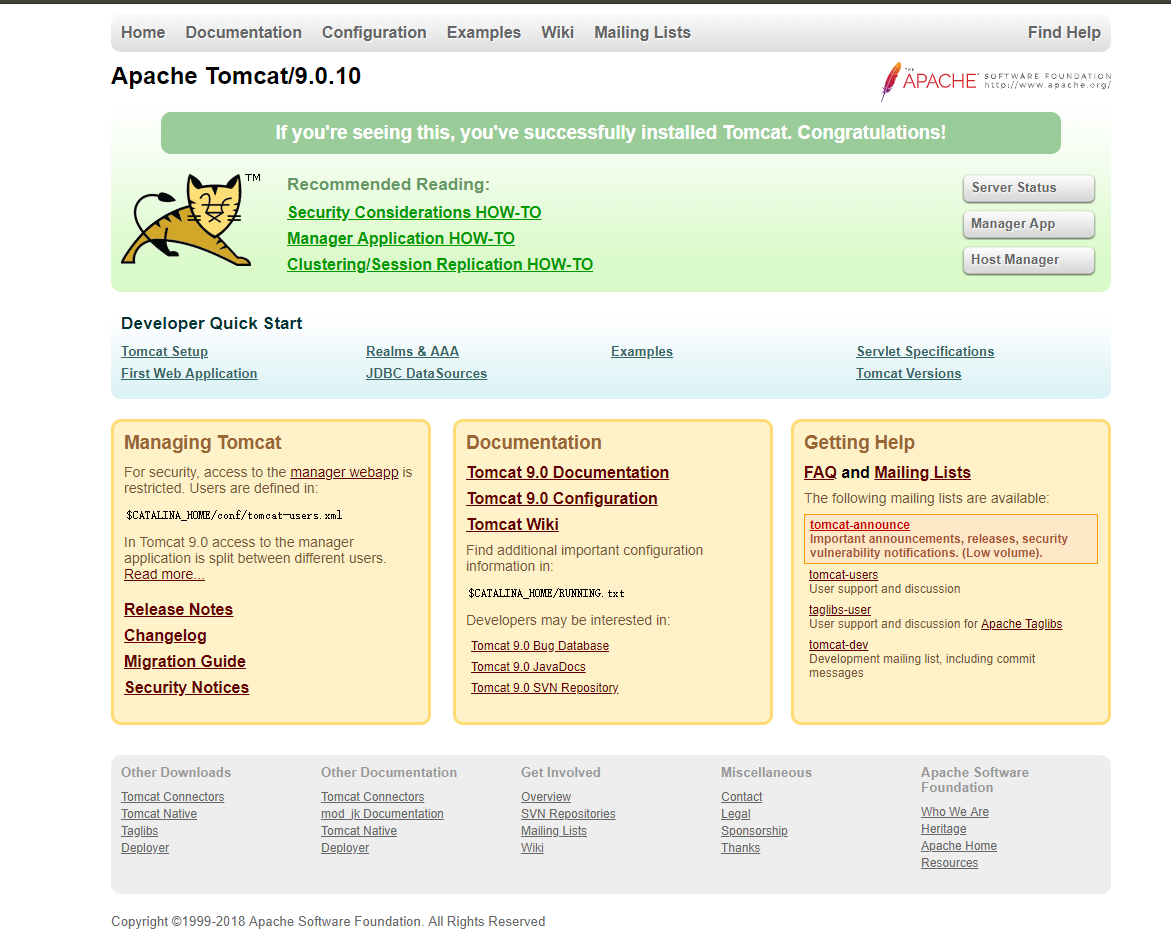
After opening tomcat, you can access ip:8080 and the following page appears to indicate success