1.3 first hibernate program (IDEA+Maven+Hibernate)
1.3.1 create project
1. Create a Maven project first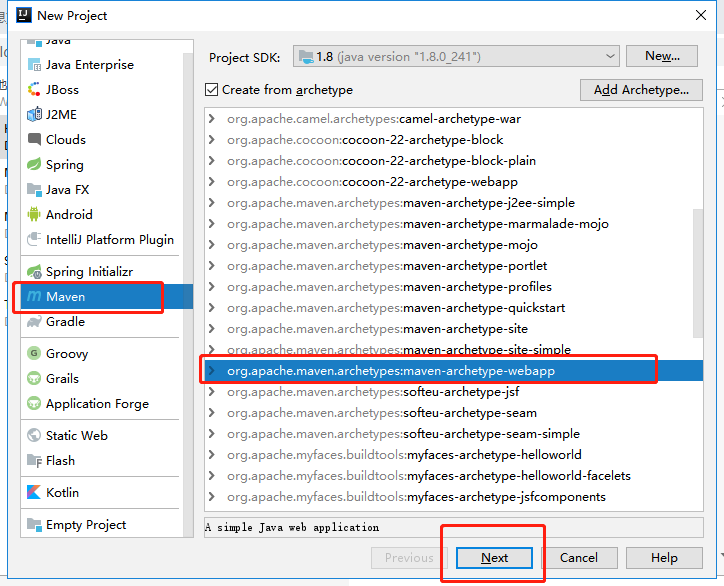
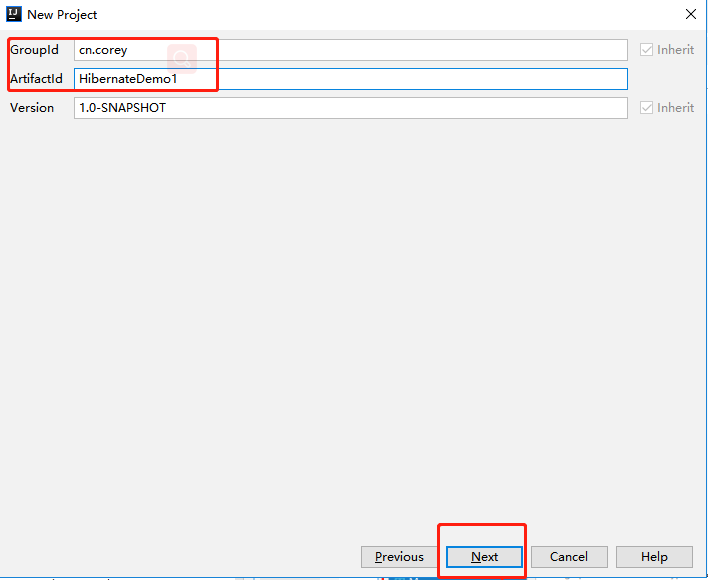
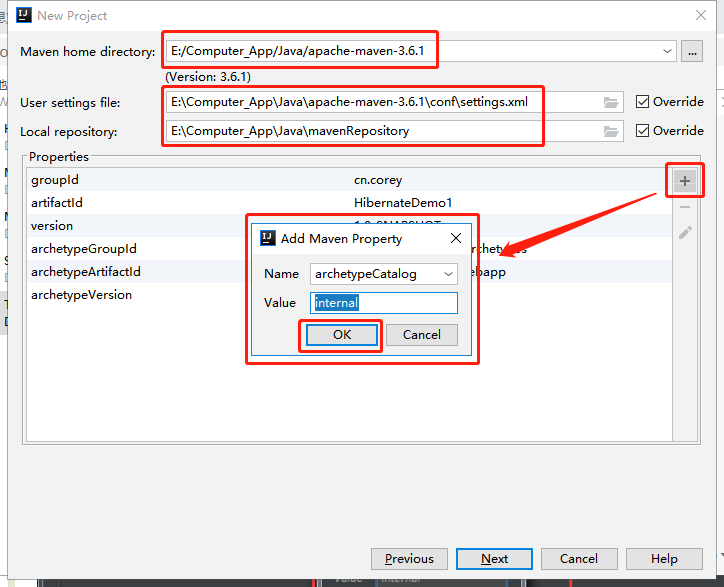
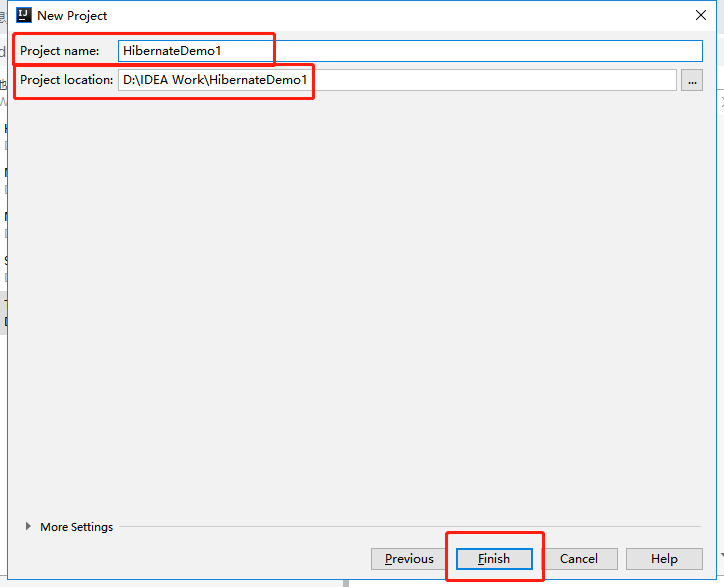
.
2. Improve the project
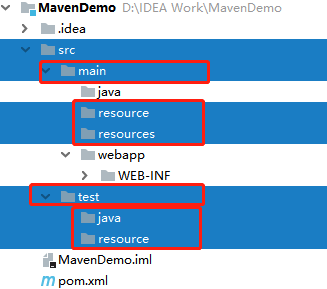
We need to create the successful project directory structure manually.
Create the java and resources folders in the main directory.
. (the picture here uses the screenshot of my last Maven. Some of them are different, but the operation is the same. Don't mind.)
After creating the missing folder, we need to change the function of the new folder:
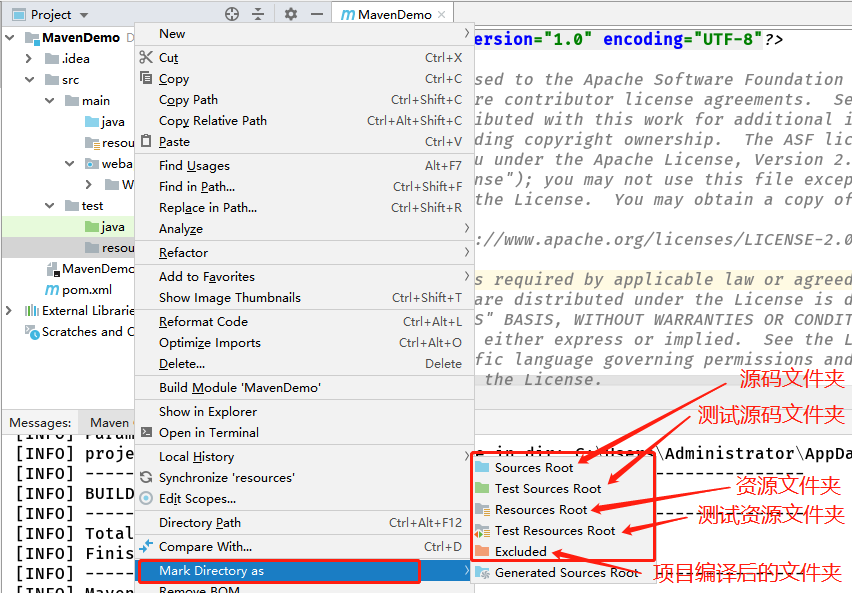
style after change: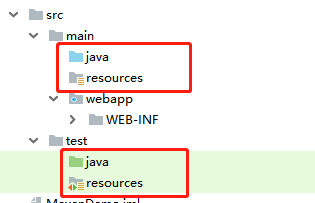
.
3. Configure related dependent packages
Here we need to import the jar package that mysql and hibernate depend on
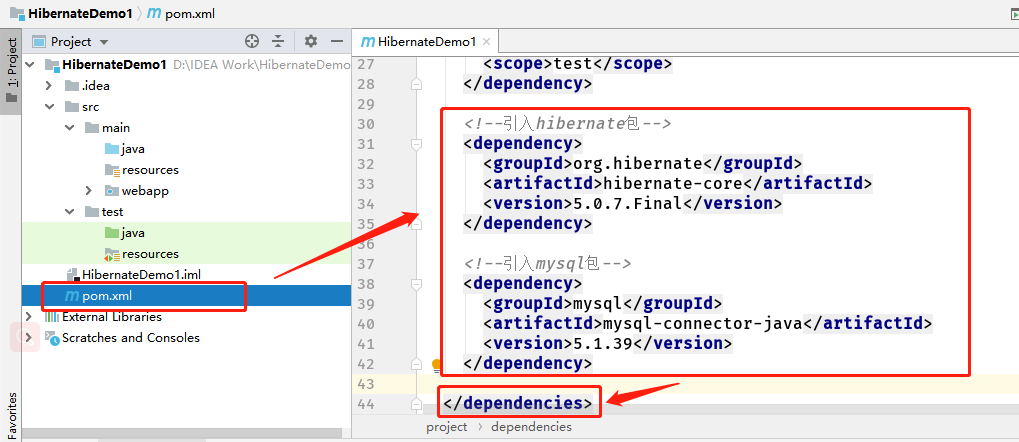
<!--Introduce hibernate package-->
    <dependency>
      <groupId>org.hibernate</groupId>
      <artifactId>hibernate-core</artifactId>
      <version>5.0.7.Final</version>
    </dependency>

<!--Introduce mysql package-->
    <dependency>
      <groupId>mysql</groupId>
      <artifactId>mysql-connector-java</artifactId>
      <version>5.1.39</version>
    </dependency>
.
.
.
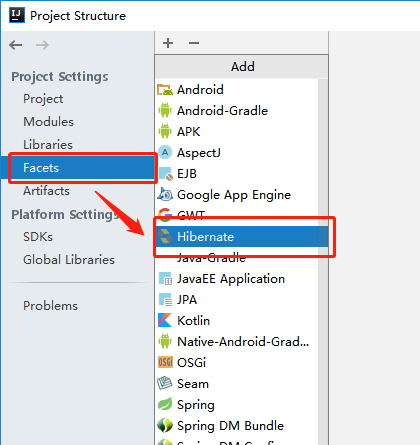
1.3.2 deploy Hibernate and MySQL
1. Add hibernate configuration file
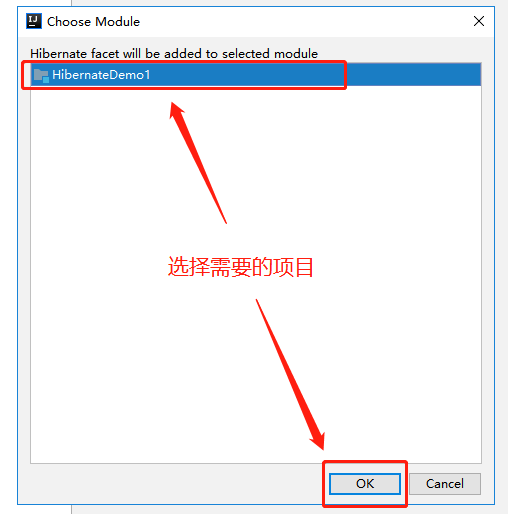
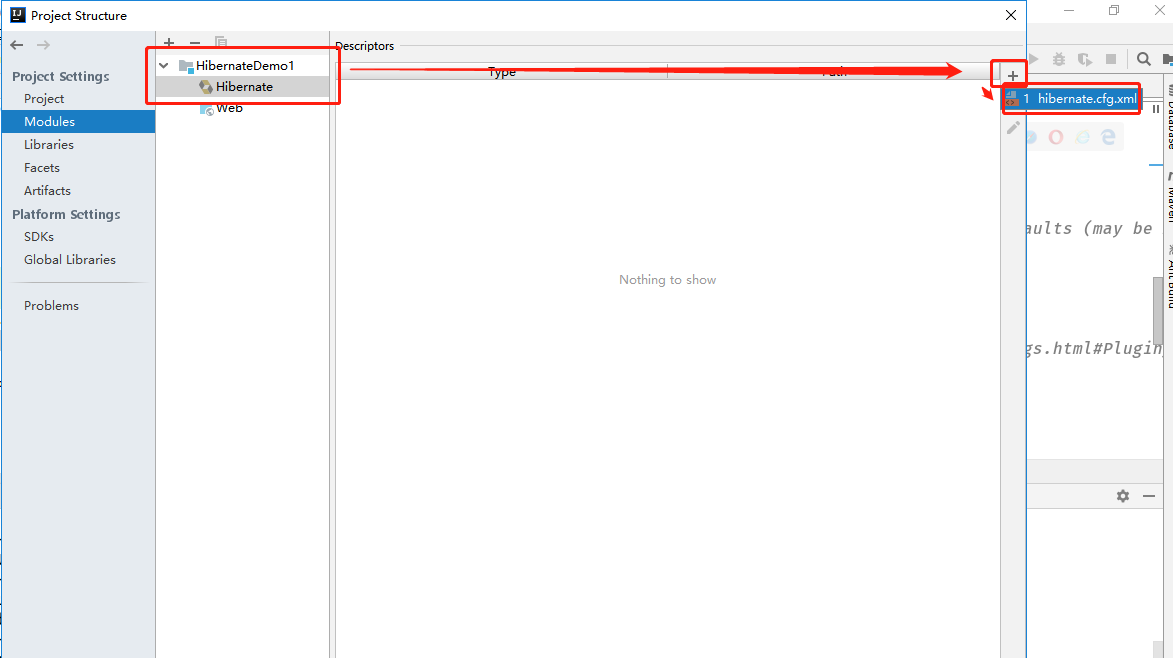
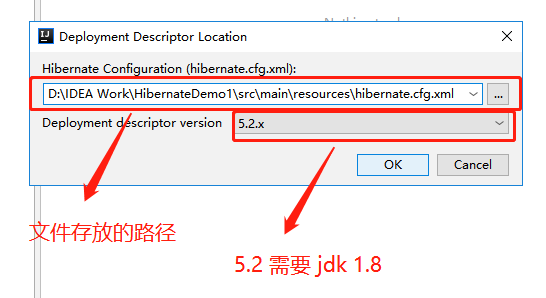
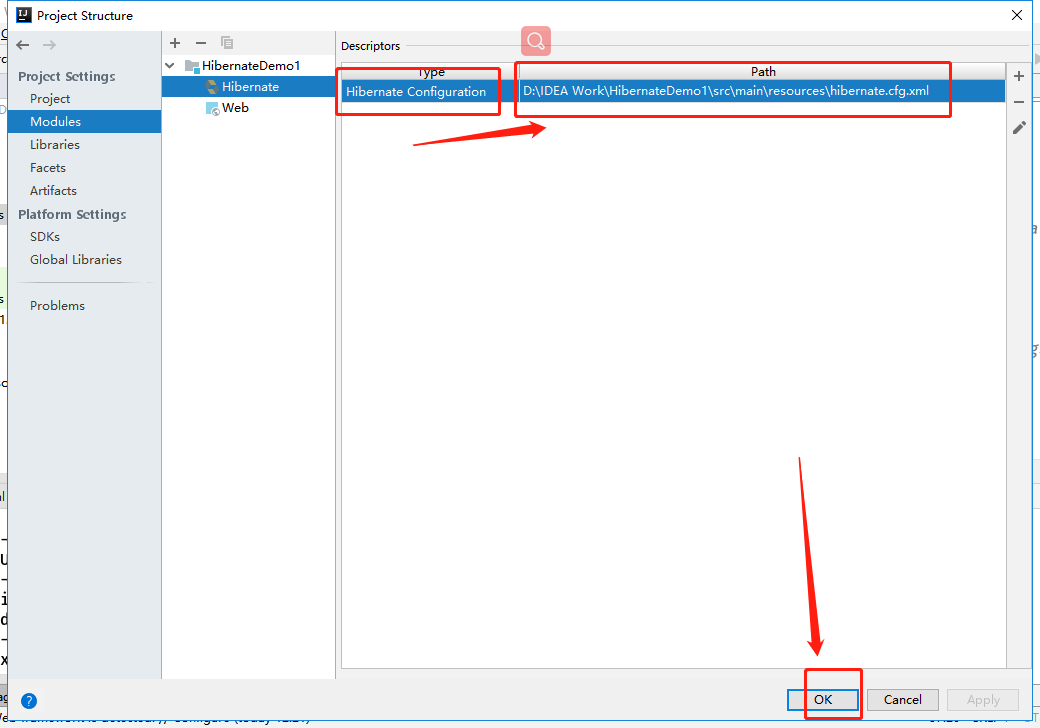
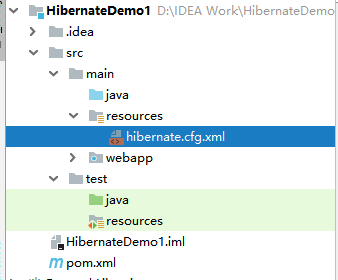
OK, we have successfully added the hibernate configuration file
.
.
2. Write the hibernate configuration file just added
<?xml version='1.0' encoding='utf-8'?> <!DOCTYPE hibernate-configuration PUBLIC "-//Hibernate/Hibernate Configuration DTD//EN" "http://www.hibernate.org/dtd/hibernate-configuration-3.0.dtd"> <hibernate-configuration> <session-factory> <!-- mysql Account name --> <property name="hibernate.connection.username">root</property> <!-- mysql Password --> <property name="hibernate.connection.password">123456</property> <!-- mysql drive --> <property name="hibernate.connection.driver_class">com.mysql.jdbc.Driver</property> <!-- mysql Connect URL --> <property name="hibernate.connection.url">jdbc:mysql:///hibernatedemo?useUnicode=true&characterEncoding=UTF-8</property> <!-- Database dialect --> <!--<property name="dialect">org.hibernate.dialect.MySQLDialect</property>--> <!--// Database dialect used after 5.0 -- > <property name="dialect">org.hibernate.dialect.MySQL5Dialect</property> <!-- display sql Sentence --> <property name="show_sql">true</property> <!-- Format sql Sentence --> <property name="format_sql">true</property> <!-- Create a database as needed (the operation here is to delete the table and recreate the table if it already exists in the database)--> <!--<property name="hbm2ddl.auto">create</property>--> <!--Add the mapping class just generated--> <!--<mapping class="cn.corey.UserEntity"></mapping>--> </session-factory> </hibernate-configuration>
.
.
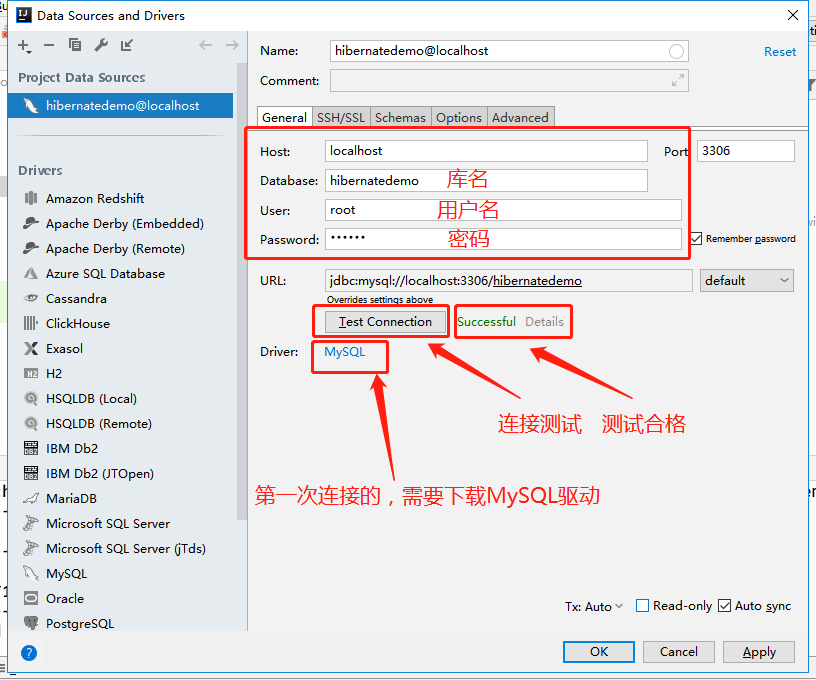
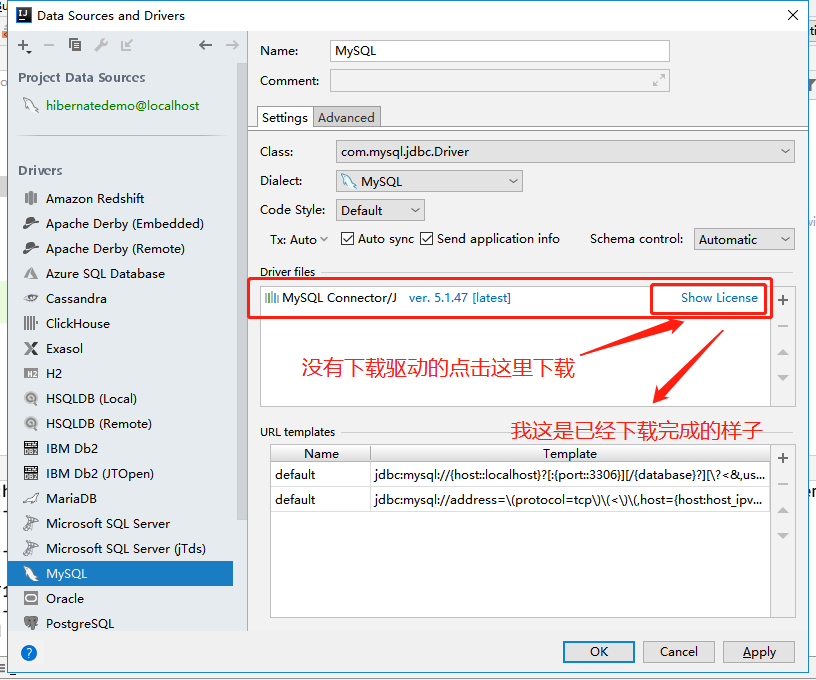
3. Connect to database
Before connecting to the database, I will insert a step here. This is the code to create our MySQL table:
CREATE DATABASE hibernatedemo;
USE hibernatedemo;
CREATE TABLE `user` (
  `user_id` bigint(32) NOT NULL AUTO_INCREMENT COMMENT 'number(Primary key)',
  `user_name` varchar(32) NOT NULL COMMENT 'Full name',
  `user_password` varchar(32) DEFAULT NULL COMMENT 'Password',
  `user_phone` varchar(64) DEFAULT NULL COMMENT 'Telephone',
  PRIMARY KEY (`user_id`)
) ENGINE=InnoDB AUTO_INCREMENT=1 DEFAULT CHARSET=utf8;
Connect to the database through the database database of idea
.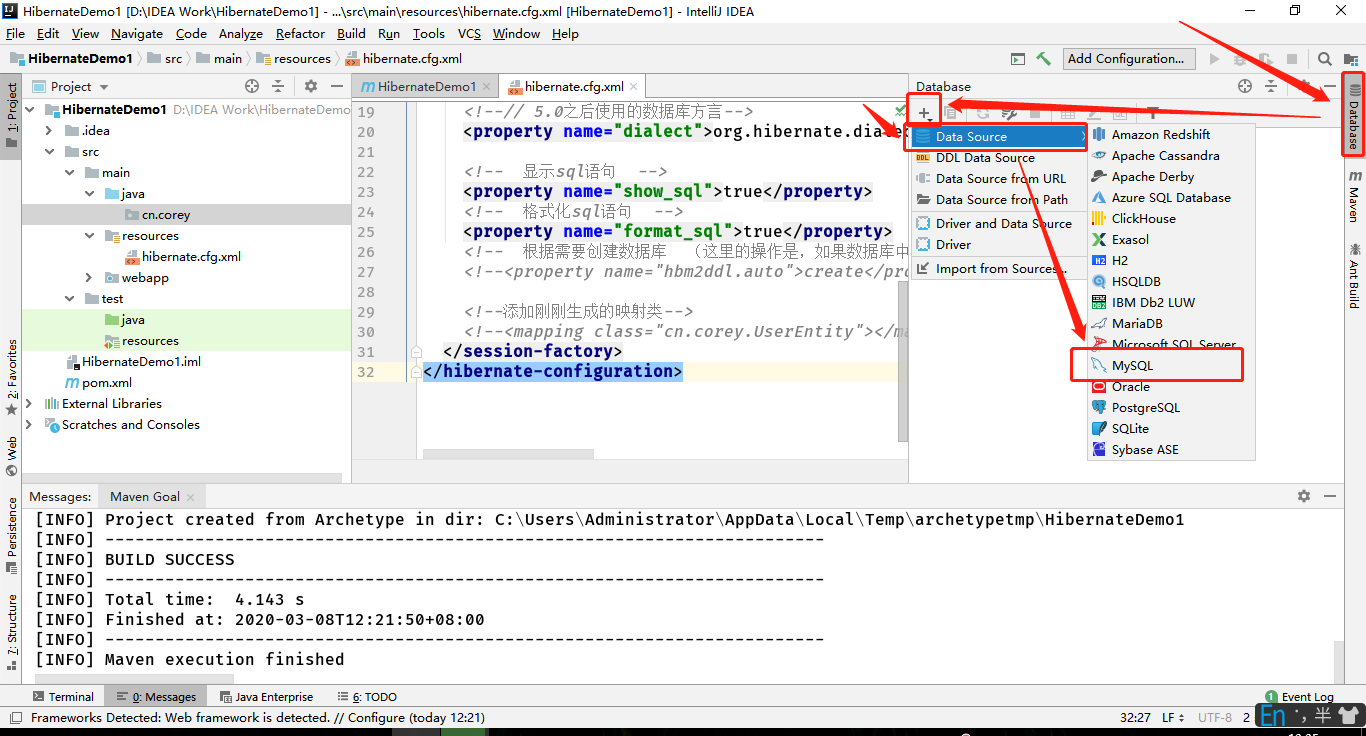
These steps are finished. Just click OK.
After clicking OK, it will display such an interface where we can run our sql statements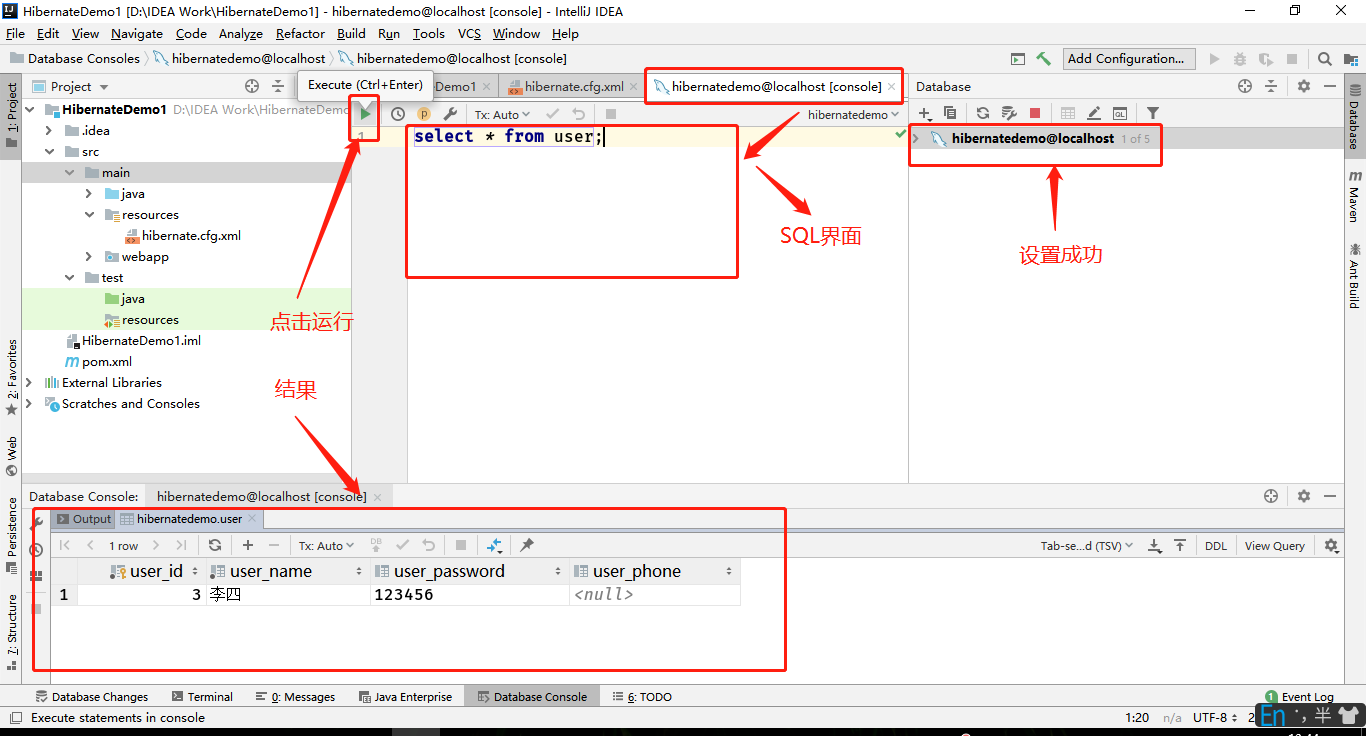
.
.
4. The relationship between table and class data mapping
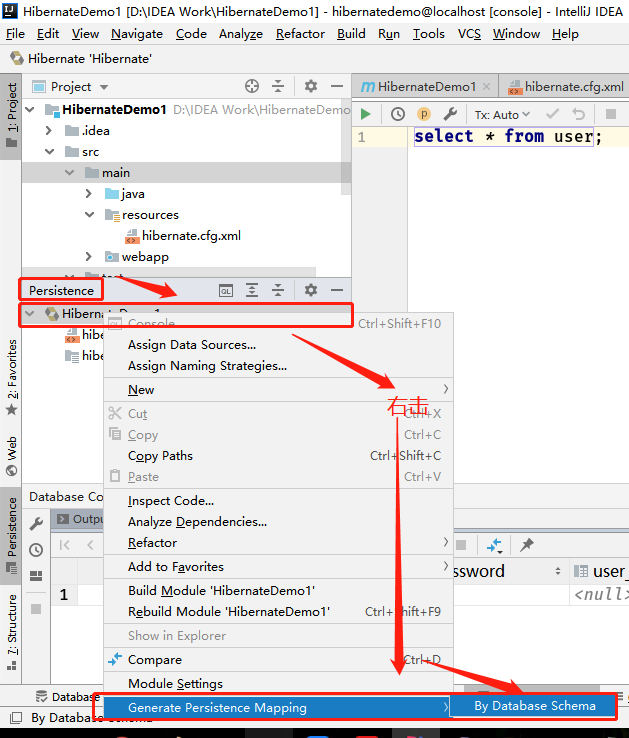
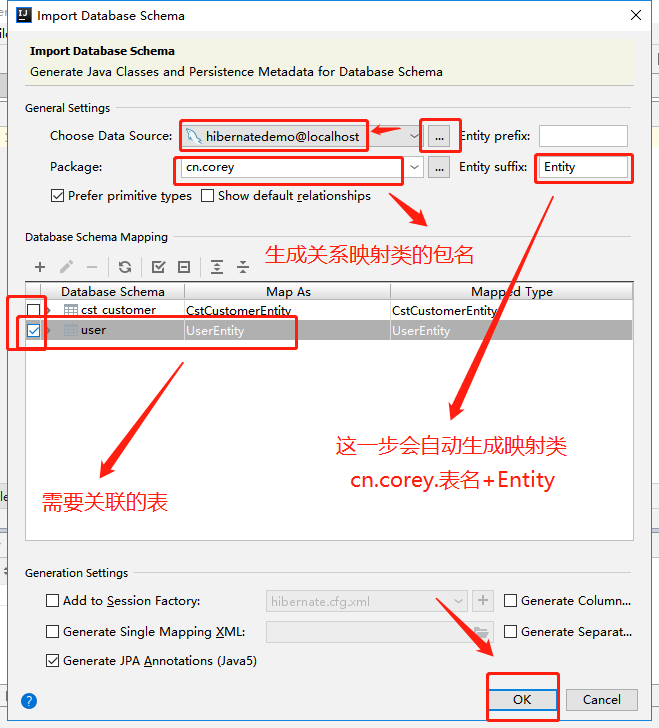
The import database schema OR map is about to be generated. Do you want to continue? Click YES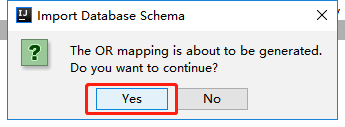
Auto generate mapping class: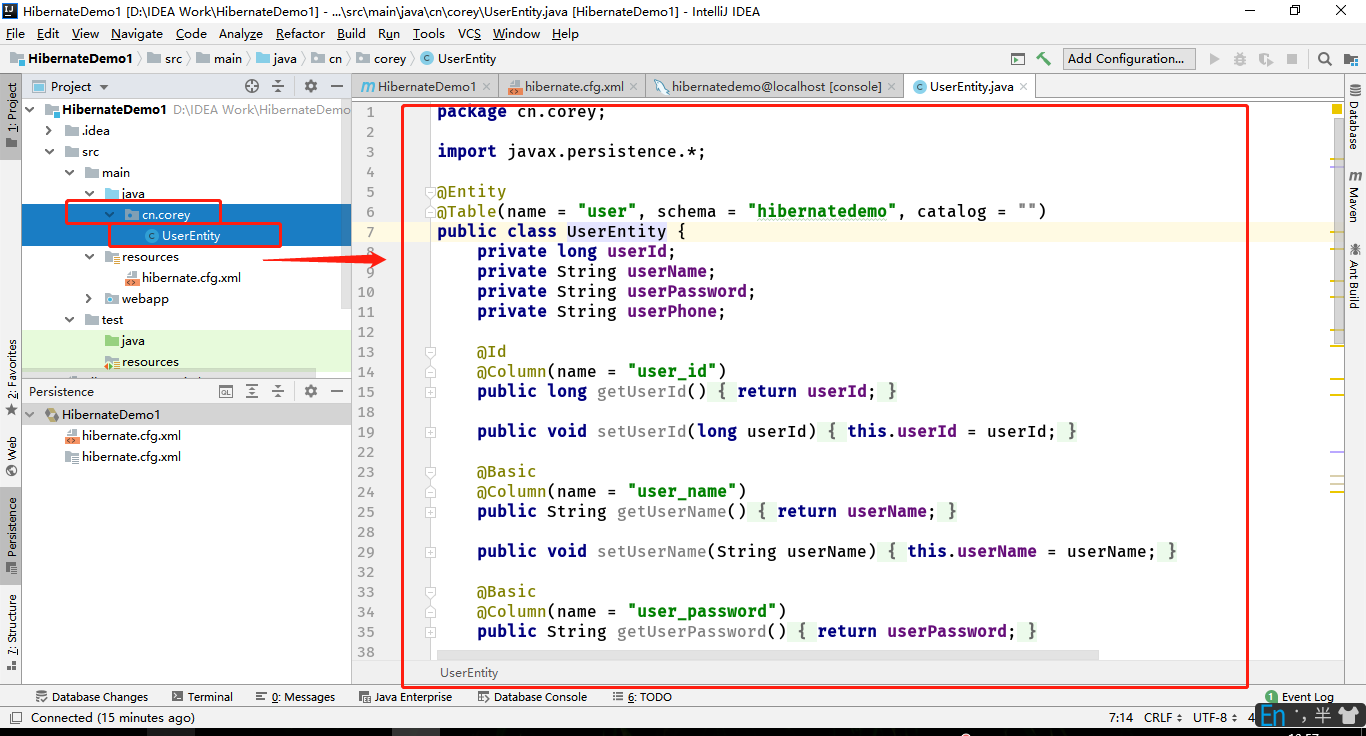
At this point, we need to go back to hibernate.cfg.xml configuration file to add the mapping class just generated
<! -- add the mapping class just generated -- >
    <mapping class="cn.corey.UserEntity"></mapping>
Complete hibernate.cfg.xml configuration:
<?xml version='1.0' encoding='utf-8'?> <!DOCTYPE hibernate-configuration PUBLIC "-//Hibernate/Hibernate Configuration DTD//EN" "http://www.hibernate.org/dtd/hibernate-configuration-3.0.dtd"> <hibernate-configuration> <session-factory> <!-- mysql Account name --> <property name="hibernate.connection.username">root</property> <!-- mysql Password --> <property name="hibernate.connection.password">123456</property> <!-- mysql drive --> <property name="hibernate.connection.driver_class">com.mysql.jdbc.Driver</property> <!-- mysql Connect URL --> <property name="hibernate.connection.url">jdbc:mysql:///hibernatedemo?useUnicode=true&characterEncoding=UTF-8</property> <!-- Database dialect --> <!--<property name="dialect">org.hibernate.dialect.MySQLDialect</property>--> <!--// Database dialect used after 5.0 -- > <property name="dialect">org.hibernate.dialect.MySQL5Dialect</property> <!-- display sql Sentence --> <property name="show_sql">true</property> <!-- Format sql Sentence --> <property name="format_sql">true</property> <!-- Create a database as needed (the operation here is to delete the table and recreate the table if it already exists in the database)--> <!--<property name="hbm2ddl.auto">create</property>--> <!--Add the mapping class just generated--> <mapping class="cn.corey.UserEntity"></mapping> </session-factory> </hibernate-configuration>
.
.
.
.
1.3.3 write test class and test
Or, let's go through the seven steps of Hibernate persistence:
 		//1. Configuration load configuration for initialization

        //2. SessionFactory is the "factory" of Session

        //3. Session create instance

        //4. Transaction open transaction

        //5. Write program to realize operation

        //6. commit, end transaction

        //7. close close Session and release resources
1. Create and write test classes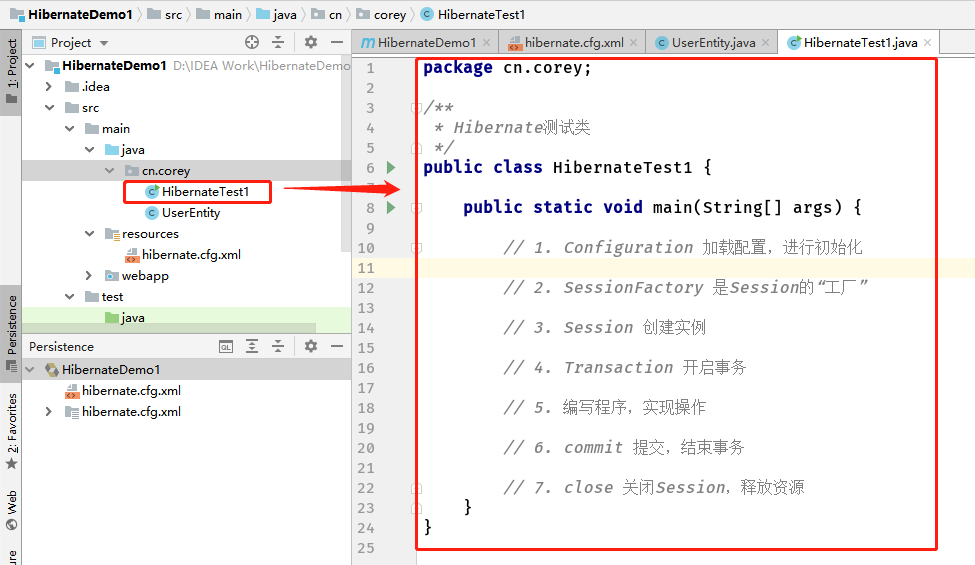
It should be noted that the guide package must not be misguided
Test class completion code:
package cn.corey;

import org.hibernate.Session;
import org.hibernate.SessionFactory;
import org.hibernate.Transaction;
import org.hibernate.cfg.Configuration;

/**
 * Hibernate Test class
 */
public class HibernateTest1 {

    public static void main(String[] args) {

        // 1. Configuration load configuration for initialization
        Configuration configuration=new Configuration().configure();
        // 2. SessionFactory is the "factory" of Session
        SessionFactory sessionFactory=configuration.buildSessionFactory();
        // 3. Session create instance
        Session session=sessionFactory.openSession();
        // 4. Transaction open transaction
        Transaction transaction=session.beginTransaction();

        // 5. Write program to realize operation
        UserEntity userEntity=new UserEntity();
        userEntity.setUserName("Corey");
        userEntity.setUserPassword("1433223");
        session.save(userEntity);

        // 6. commit, end transaction
        transaction.commit();
        // 7. close close Session and release resources
        session.close();
    }
}
.
2. Test
Because we added SQL statement printing in Hibernate configuration:
	<!--  display sql Sentence  -->
    <property name="show_sql">true</property>
Therefore, when our test class runs successfully, the console will print the SQL statements we run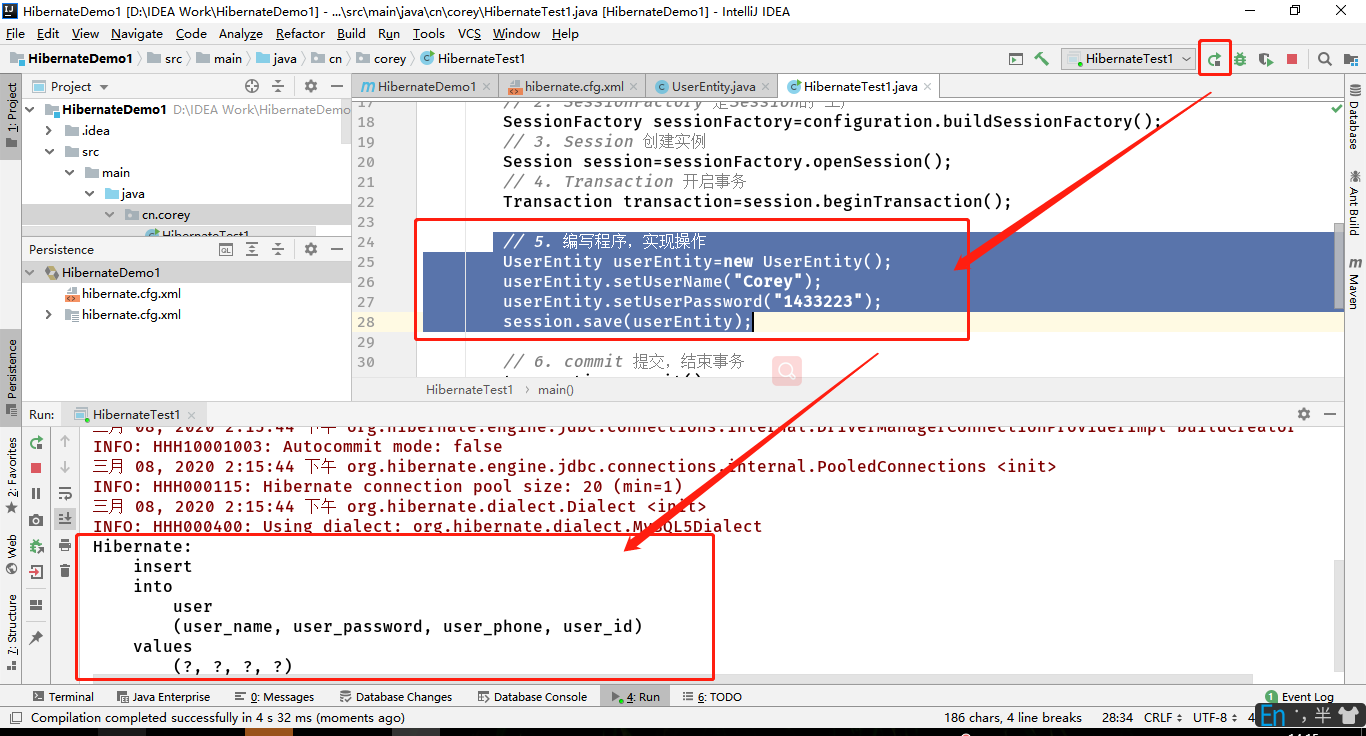
The program runs successfully. Let's go to MySQL to see if the data we added has been added
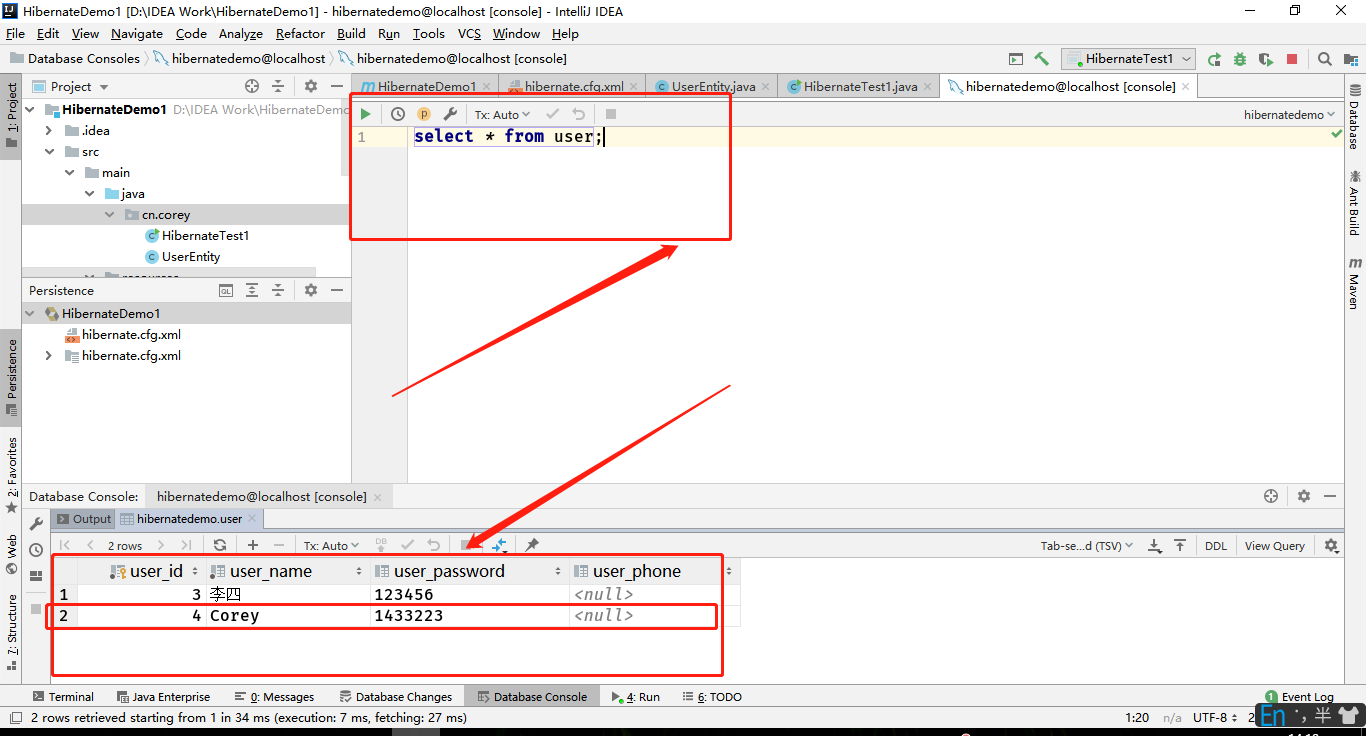
Query the database table, the data we want to add has been successfully added to the table, and the program function has been successfully implemented
.

