User login operation
Description of token
1. Since the server needs to identify the logged in user, the server dynamically generates a unique token and returns it to the user
2. The user saves the token locally for the convenience of carrying it during the next visit
Generate UUID (unique)
/**
     * Idea:
     *      1.Encrypt the password
     *      2.Query the database according to username/password
     *      3.Value:
     *          Login succeeded, return the secret key
     *        No value:
     *          Login failed, null returned
     * @param user
     * @return
     */
    @Override
    public String login(User user) {
        //1. Get plaintext
        String password = user.getPassword();
        //2. Encryption processing
        String md5 = DigestUtils.md5DigestAsHex(password.getBytes());
        user.setPassword(md5);
        System.out.println(md5);
        //3. Query database
        QueryWrapper<User> queryWrapper= new QueryWrapper<>(user);
        //4. Get database objects
        User userDB = userMapper.selectOne(queryWrapper);
        //5. Judge whether the login is correct
        if(userDB == null){
            return null;
        }

        //6. Use UUID to dynamically generate TOKEN, and use hash algorithm to generate TOKEN according to current time milliseconds + random number
        //  There is almost no guarantee of repetition
        String token = UUID.randomUUID().toString()
                .replace("-","");
        return token;
    }
token: user's unique login ID,
Save when session logs in successfully: let token = result.data
window.sessionStorage.setItem("token",token),
The route navigation guard determines whether to log in to the jump page:
let token = window.sessionStorage.getItem("token")
//if(token !==null && token.length>0)
// The following if is interpreted as: if the token is not null
if(token){
return next()
}
next("/login")
Session and Cookie
Session: in computers, especially in network applications, it is called "session control". The session object stores the properties and configuration information required for a specific user session. In this way, when the user jumps between the Web pages of the application, the variables stored in the session object will not be lost, but will exist throughout the user session. When a user requests a Web page from an application, if the user does not have a session, the Web server will automatically create a session object. When a session expires or is abandoned, the server terminates the session. One of the most common uses of the session object is to store user preferences. For example, if you indicate that you don't like viewing drawings, you can store this information in the session object. For more information about using session objects, see "managing sessions" in the ASP applications section. Note that session state is reserved only in browsers that support cookie s.
Summary:
1.Session is called "session mechanism"
2. Opening a web page in a browser is a session
3. The user's data can be saved to the session, but there is a life cycle. When the session is closed, the data disappears
Cookie s, sometimes in the plural. The type is "small text file", which is the data (usually encrypted) stored on the user's local terminal by some websites in order to identify the user's identity and track the Session, and the information temporarily or permanently saved by the user's client computer [1].
explain:
1. A cookie is a small text file
2. The data stored in cookies are generally ciphertext
3. The life cycle of the data in the cookie can be controlled. A few days. A few years!!!
The difference between session and cookie
1.session data is temporarily stored. cookie data can be permanently saved. (different life cycles)
2. Session is a memory object in the browser! A cookie is an actual local file
3.session generally stores some secret related data. Cookies generally store relatively public data (secret free login). (Security)
The front end saves user information
Use session to obtain and save the user's unique token, and jump to the page through route push
login(){
      //Perform data verification after obtaining the form object
      //valid indicates the result of verification. true indicates passing. false indicates failure
      this.$refs.loginFormRef.validate(async valid => {
         //If the verification is not completed, return directly
         if(!valid) return

        //If the verification is successful, an ajax request is initiated
        const {data: result} = await this.$http.post('/user/login',this.loginForm)
        if(result.status !== 200) return this.$message.error("User login failed")
        this.$message.success("User login succeeded")

        //Get user token information
        let token = result.data
        window.sessionStorage.setItem("token",token)

        //After the user logs in successfully, jump to the home page
        this.$router.push("/home")
      })
    }
Realize system home page Jump
Permission verification - route navigation guard
Business requirements
The front-end page Jump is controlled through routing. It is specified that:
1. If the user does not log in, only the login page is allowed to be accessed. Other pages can be accessed only after logging in. (1. Prevent non login from directly jumping to the page through the ip address 2.)
Difficulty: how to intercept user requests
Interceptor function: intercept user's request
Result 1: request release
Result 2: request interception is generally used with redirection!!
Route navigation implementation
Parameter Description:

Configure front-end routing navigation guard
const router = new VueRouter({
  routes
})

/**
 * Define route navigation guard
 * Parameter 1. URL of to route jump
 * Parameter 2. Where does the from route come from
 * Parameter 3. next is a function that indicates release or redirection
 *              next() Release
 *              next("/login") redirect
 * Business realization:
 *    Core logic: check whether there is a token
 *        If you visit the login page, you can release it directly
 *        A token indicates that you have logged in and released the request
 *        No token indicates that the user is not logged in and redirects to the login page
 */
router.beforeEach((to,from,next) => {
   if(to.path === "/login"){
     return next()
   }
    //It indicates that the page visited by the user is not a login request and needs to be verified
    //Get token data
    let token = window.sessionStorage.getItem("token")
    //if(token !==null && token.length>0)
    //The following if is interpreted as: if the token is not null
    if(token){
      return next()
    }

    next("/login")
})
Left menu list implementation
Page analysis

Judge whether to display the list by returning Sysresult.status from the backend Controller
Edit permission layer and code
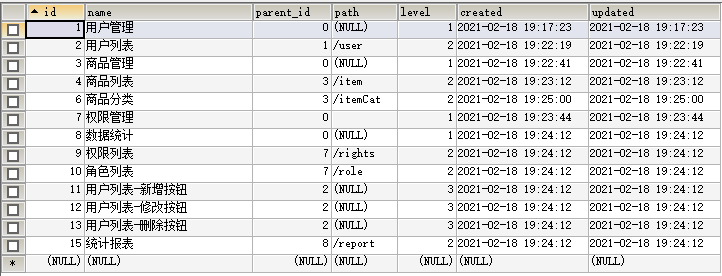
Table design analysis
explain:
Name: permission name
parent_id: parent permission implements parent - child relationship
Path: if there is no path in the first level menu, there is only a path in the second / third level menu
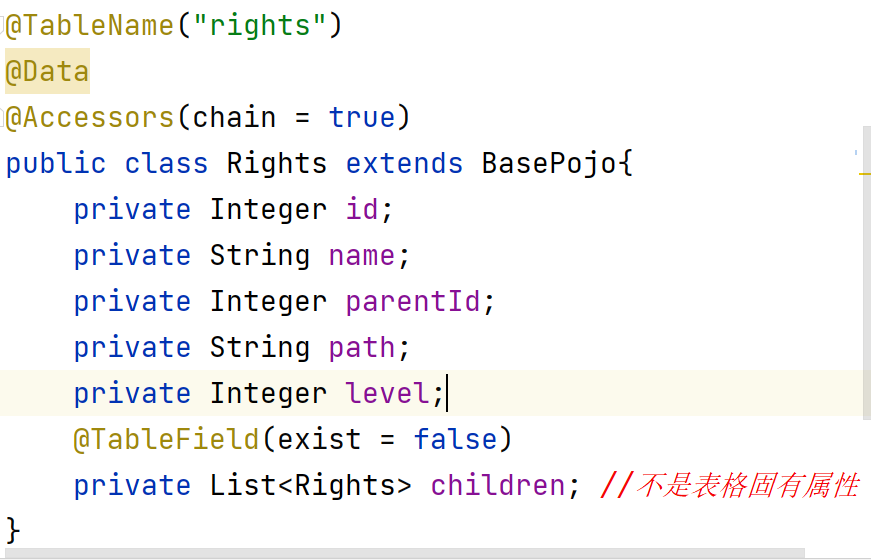
Edit POJO
explain:
1. The children attribute in the current object does not belong to a field, so @ TableField(exist = false) is used for identification
2. There is a parent-child relationship in the permission list, so children are encapsulated through children
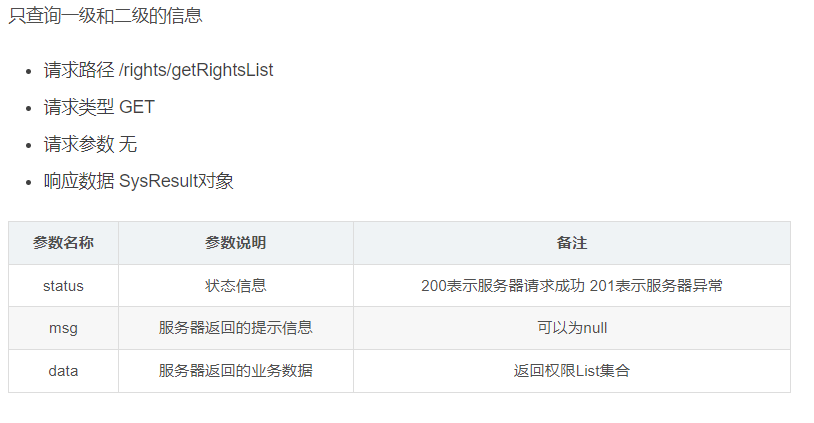
Service interface description
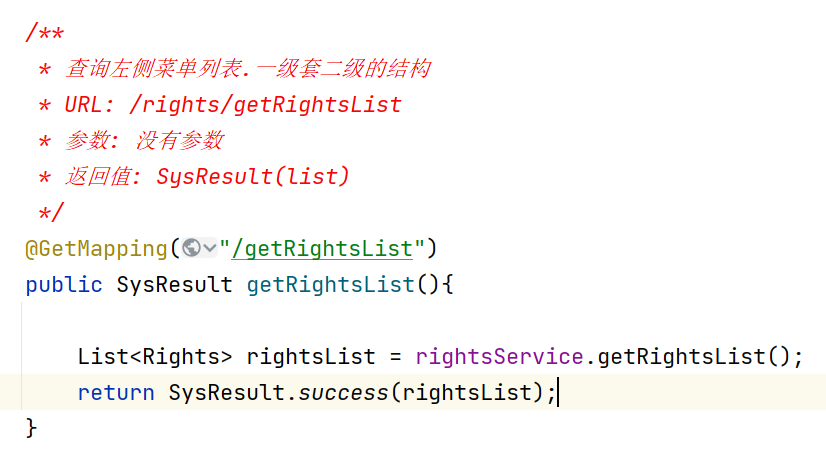
Edit RightsController
Edit lightsservice
  /**
     * Implementation idea:
     *   1.First query the level-1 menu information parent_id = 0
     *   2.Loop the first level menu through the first level menu object
     *   3.Query the secondary menu under the current menu according to the primary menu information
     *   4.Encapsulate the secondary menu obtained by query into the primary object
     * Implementation idea 2 (extension):
     *    Left join is used to realize Association query and encapsulate data
     * @return
     */
    @Override
    public List<Rights> getRightsList() {
        //1. Query level-1 list information
        QueryWrapper<Rights> queryWrapper = new QueryWrapper<>();
        queryWrapper.eq("parent_id",0);
        List<Rights> oneList = rightsMapper.selectList(queryWrapper);
        //2. Traverse the first level list
        for (Rights oneRights : oneList){
            //Query Level 2 according to level 1
            queryWrapper.clear(); //Clear previous condition
            queryWrapper.eq("parent_id",oneRights.getId());
            List<Rights> twoList = rightsMapper.selectList(queryWrapper);
            //Encapsulate the results of the query in the first level object
            oneRights.setChildren(twoList);
        }
        return oneList;
    }
User module implementation
The Home component is the parent component and the rest are child components, which are put into the Home route through children [{}, {}]
ElementUI learning
Vue.use must be declared as a global component after it is defined before sub components can be called
<template>
  <div>
      <!-- Label use principle:
          rule: Define first,Post use
          grammar: el-breadcrumb Found name Breadcrumb Show components
          definition elementUI Components of: Import components on demand
             from elementUI Import specific components from
             1.import {Breadcrumb} from 'element-ui'
             2.Vue.use(Breadcrumb)  Declare as global component.Subcomponents can be called directly
      -->
      <!-- 1.Add breadcrumbs navigation -->
      <el-breadcrumb separator-class="el-icon-arrow-right">
        <el-breadcrumb-item :to="{ path: '/' }">home page</el-breadcrumb-item>
        <el-breadcrumb-item>Activity management</el-breadcrumb-item>
        <el-breadcrumb-item>Activity list</el-breadcrumb-item>
        <el-breadcrumb-item>Activity details</el-breadcrumb-item>
      </el-breadcrumb>

      <!-- 2.Define card view  -->
      <el-card class="box-card">
        <div class="text item">
          <!-- 4.grid: 24 cells per row,You can zoom dynamically -->
          <el-row :gutter="20">
            <el-col :span="8">
              <!-- 3.Define text input box-->
              <el-input placeholder="Please enter the content" v-model="input3" class="input-with-select">
                 <el-button slot="append" icon="el-icon-search"></el-button>
              </el-input>
            </el-col>
            <el-col :span="3">
                <el-button type="primary">Main button</el-button>
            </el-col>
          </el-row>

        </div>
      </el-card>
  </div>
</template>

<script>
    //Externally declare parameters such as component properties / methods. To be called by the root component
    export default {
      data(){
        return {

        }
      }
    }
</script>

<style lang="less" scoped>
</style>