catalogue
1, Construction of pseudo distributed
1.1 introduction to pseudo distributed mode
1.2 platform software description
1.3 requirements for building pseudo distributed environment
1.3.1 environmental requirements
1.3.2 firewall shutdown confirmation
1.3.4 ensure that ssh is valid for password free authentication of localhost
1.3.5 install jdk and hadoop configuration related environment variables
1.4 configuration of pseudo distributed related files
1.4.1 configuration of core-site.xml
1.4.2 configuration of hdfs-site.xml
1.4.3 hadoop-env.sh configuration
1.6.1 start pseudo distributed
2, Fully distributed construction
2.1 introduction to fully distributed mode
2.2 platform software description
2.4 requirements for fully distributed construction environment
2.4.1 description of environmental requirements
2.4.3 static IP and mapping configuration
2.4.4 password free login authentication
2.4.6 install jdk and hadoop and configure relevant environment variables
2.5.1 configuring the core-site.xml file
2.5.2 configure hdfs-site.xml file
2.5.3 configuring mapred-site.xml file
2.5.4 configure the yarn-site.xml file
2.5.5 configure hadoop-env.sh file
2.5.7 configuration yarn-env.sh file
2.6 configuration description of the other two machines
2.7.1 Run the command on the X01 machine
2.7.2 Interpretation of formatting related information
2.8.1 introduction to startup and shutdown scripts
1, Construction of pseudo distributed
1.1 introduction to pseudo distributed mode
1.characteristic
	- When installed on a machine, the distributed idea is used, that is, distributed file system, non local file system.
	- Hdfs Related daemons involved(namenode,datanode,secondarynamenode)All run on one machine and are independent java Process.
2. purpose
	than Standalone mode The code debugging function is added, which allows you to check the memory usage, HDFS Input and output, and other daemons
	Mutual.
1.2 platform software description
- operating system: 		win10/win7
- Virtual software:			VMware14
- virtual machine:			 Host name: xxx01			ip:192.168.10.101
- Package storage path:	  ~
- Software installation path:	   /usr/local/
- Jdk:			   jdk-8u221-linux-x64.tar.gz
- Hadoop:		   hadoop-2.7.6.tar.gz
- user:			  root
1.3 requirements for building pseudo distributed environment
1.3.1 environmental requirements
--1. Make sure the firewall is turned off.
--2. NAT Mode and static IP Determination of (192).168.10.101)
--3. ensure/etc/hosts In the document ip and hostname Mapping relationship of
--4. Ensure secret free login localhost Effective
--5. jdk and hadoop Environment variable configuration for
1.3.2 firewall shutdown confirmation
[root@xxx01 ~]# systemctl stop firewalld
[root@xxx01 ~]# systemctl disable firewalld.service
[root@xxx01 ~]# systemctl stop NetworkManager
[root@xxx01 ~]# systemctl disable NetworkManager

#It is better to turn off SELinux, which is a security mechanism of linux system. Enter the file and set SELinux to disabled
[root@xxxx01 ~]# vi /etc/selinux/config
.........
SELINUX=disabled
1.3.3 configuration mapping
-- get into hosts File, configure it ip and hostname
[root@xxx01 ~]# vi /etc/hosts
127.0.0.1   localhost localhost.localdomain localhost4 localhost4.localdomain4
::1         localhost localhost.localdomain localhost6 localhost6.localdomain6

192.168.10.101 xxx01     <====Add native static IP Mapping relationship between host name and native host name
1.3.4 ensure that ssh is valid for password free authentication of localhost
-1. use rsa Encryption technology to generate public key and private key. Just press enter all the way
[root@xxx01 ~]# ssh-keygen -t rsa
-2. get into~/.ssh Directory, use ssh-copy-id command
[root@xxx01 .ssh]# ssh-copy-id  root@localhost
-3. Verify,Remove the first inquiry( yes/no)
[hadoop@xxx01 .ssh]# ssh localhost
1.3.5 install jdk and hadoop configuration related environment variables
-1. Upload and unzip two packages
[root@xxx01 ~]# tar -zxvf jdk-8u221-linux-x64.tar.gz -C /usr/local/
[root@xxx01 ~]# tar -zxvf hadoop-2.7.6.tar.gz -C /usr/local/

-2. get into local In, rename the two software
[root@xxx01 ~]# cd /usr/local/
[root@xxx01 local]# mv 1.8.0_221/  jdk
[root@xxx01 local]# mv hadoop-2.7.6/ hadoop

-3. Configure environment variables
[hadoop@xxx01 local]# vi /etc/profile

.....ellipsis...........

#java environment
export JAVA_HOME=/usr/local/jdk
export PATH=$JAVA_HOME/bin:$JAVA_HOME/jre/bin:$PATH

#hadoop environment
export HADOOP_HOME=/usr/local/hadoop
export PATH=$HADOOP_HOME/bin:$HADOOP_HOME/sbin:$PATH
1.4 configuration of pseudo distributed related files
1.4.1 configuration of core-site.xml
[root@xxx01 ~]# cd $HADOOP_HOME/etc/hadoop
[root@xxx01 hadoop]# vi core-site.xml

<configuration>
    <!-- Configuring a distributed file system schema and ip as well as port,Default 8020-->
    <property>
        <name>fs.defaultFS</name>
        <value>hdfs://localhost/</value>
    </property>
</configuration>

extend: hadoop1.x The default port is 9000, hadoop2.x The default port of is 8020, which can be used
1.4.2 configuration of hdfs-site.xml
<configuration>
    <!-- Configure the number of copies. Note that the pseudo distribution mode can only be 1.-->
    <property>
        <name>dfs.replication</name>
        <value>1</value>
    </property>
</configuration>
1.4.3 hadoop-env.sh configuration
[root@xxx01 hadoop]# vi hadoop-env.sh
................
# The java implementation to use.
export JAVA_HOME=/usr/local/jdk
..................
1.5 formatting Namenode
1.5.1 format command
[root@xxx01 hadoop]# hdfs namenode -format
1.6 start HDFS
1.6.1 start pseudo distributed
[root@xxx01 hadoop]# start-dfs.sh
1.6.2 viewing startup process
[root@xxx01 hadoop]# jps
namenode
datanode
secondarynamenode
2, Fully distributed construction
2.1 introduction to fully distributed mode
Fully distributed refers to using multiple machines to build a complete distributed file system in a real environment.
In the real world, hdfs Related daemons in are also distributed in different machines, such as:
-1. namenode As far as possible, the daemon should be deployed separately in a machine with relatively good hardware performance.
-2. One is deployed on every other machine datanode Daemon, general hardware environment.
-3. secondarynamenode Daemons are best not to namenode On the same machine.
2.2 platform software description
- operating system: 		win10/win7
- Virtual software:			VMware14
- virtual machine:
					host name     	IP
					xxx01		192.168.10.101
                  	xxx02		192.168.10.102
                  	xxx03		192.168.10.103
- Package storage path:	  /root/
- Software installation path:	   /usr/local/
- Jdk:			   jdk-8u221-linux-x64.tar.gz
- Hadoop:		   hadoop-2.7.6.tar.gz
- user:			  root

Remember, remember, remember:
In the actual production environment, we will not use root Users to build and manage hdfs,Instead, we use ordinary users. We only use it here for the convenience of learning root User.

Attention, attention, attention:
1.If you are from pseudo distributed, you'd better shut down the related daemons of pseudo distributed first: stop-all.sh
2.Delete the relevant settings of the original pseudo distributed
 If the default path was used,It's no use now
 If the original path is the same as the current fully distributed path,Because this is different from the previous initialization,And this file should be generated automatically by the system
 To sum up:To delete namenode and datanode Directory of
2.3 daemon layout
xxx01:	namenode,datanode,ResourceManager,nodemanager
xxx02:	datanode,nodemanager,secondarynamenode
xxx03:	datanode,nodemanager
2.4 requirements for fully distributed construction environment
2.4.1 description of environmental requirements
-1. The firewall of the three machines must be closed.
-2. Ensure that the network configuration of the three machines is unblocked(NAT Mode, static IP,Host name configuration)
-3. ensure/etc/hosts File configuration ip and hostname Mapping relationship of
-4. Ensure that the password free login authentication of three machines is configured (cloning will be more convenient)
-5. Ensure that all machines are time synchronized
-6. jdk and hadoop Environment variable configuration for
2.4.2 close the firewall
[root@xxx01 ~]# systemctl stop firewalld
[root@xxx01 ~]# systemctl disable firewalld
[root@xxx01 ~]# systemctl stop NetworkManager
[root@xxx01 ~]# systemctl disable NetworkManager

#It is better to turn off SELinux, which is a security mechanism of linux system. Enter the file and set SELinux to disabled
[root@xxx01 ~]# vi /etc/selinux/config
.........
SELINUX=disabled
.........
2.4.3 static IP and mapping configuration
--1. Configure static IP(ensure NAT Mode)
[root@xxx01 ~]# vi /etc/sysconfig/network-scripts/ifcfg-ens33
............
BOOTPROTO=static			#Change dhcp to static
............
ONBOOT=yes					#Change no to yes
IPADDR=192.168.10.101		#Add IPADDR attribute and ip address
PREFIX=24					#Add NETMASK=255.255.255.0 or PREFIX=24
GATEWAY=192.168.10.2		#Add GATEWAY
DNS1=114.114.114.114         #Add DNS1 and backup DNS
DNS2=8.8.8.8

--2. service network restart
[root@xxx01 ~]# systemctl restart network
 perhaps
[root@xxx01 ~]# service network restart

--3. Modify host name(If so, skip this step)
[root@localhost ~]# hostnamectl set-hostname xxx01
 perhaps
[root@localhost ~]# vi /etc/hostname
xxx01
[root@xxx01 ~]#  vi /etc/hosts
127.0.0.1   localhost localhost.localdomain localhost4 localhost4.localdomain4
::1         localhost localhost.localdomain localhost6 localhost6.localdomain6

192.168.10.101 xxx01  #Add the mapping relationship between the static IP of this machine and the host name of this machine
192.168.10.102 xxx02
192.168.10.103 xxx03
2.4.4 password free login authentication
-1. use rsa Encryption technology to generate public key and private key. Just press enter all the way
[root@xxx01 ~]# cd ~
[root@xxx01 ~]# ssh-keygen -t rsa

-2. get into~/.ssh Directory, use ssh-copy-id command
[root@xxx01 ~]# cd ~/.ssh
[root@xxx01 .ssh]# ssh-copy-id  root@xxx01

-3. Verify
[hadoop@xxx01 .ssh]# ssh xxx01
#After you enter yes for the first execution below, you will not be prompted to enter the password
[hadoop@xxx01 .ssh]# ssh localhost
[hadoop@xxx01 .ssh]# ssh 0.0.0.0

Note: when the three machines are installed in advance, the public key files need to be synchronized. If cloning technology is used, it is much more convenient to use the same set of key pairs.
2.4.5 time synchronization
crontab -e
2.4.6 install jdk and hadoop and configure relevant environment variables
-1. Upload and unzip two packages
[root@xxx01 ~]# tar -zxvf jdk-8u221-linux-x64.tar.gz -C /usr/local/
[root@xxx01 ~]# tar -zxvf hadoop-2.7.6.tar.gz -C /usr/local/

-2. get into local In, rename the two software
[root@xxx01 ~]# cd /usr/local/
[root@xxx01 local]# mv 1.8.0_221/  jdk
[root@xxx01 local]# mv hadoop-2.7.6/ hadoop

-3. Configure environment variables
[hadoop@xxx01 local]# vi /etc/profile

.....ellipsis...........

#java environment
export JAVA_HOME=/usr/local/jdk
export PATH=$JAVA_HOME/bin:$JAVA_HOME/jre/bin:$PATH

#hadoop environment
export HADOOP_HOME=/usr/local/hadoop
export PATH=$HADOOP_HOME/bin:$HADOOP_HOME/sbin:$PATH
2.5 HADOOP configuration file
2.5.1 configuring the core-site.xml file
<configuration>
     <!-- hdfs Address name: schame,ip,port-->
    <property>
        <name>fs.defaultFS</name>
        <value>hdfs://xxx01:8020</value>
    </property>
     <!-- hdfs The base path of the, which is dependent on other attributes -->
    <property>
        <name>hadoop.tmp.dir</name>
        <value>/usr/local/hadoop/tmp</value>
    </property>
</configuration>
2.5.2 configure hdfs-site.xml file
<configuration>
    <!-- namenode Metadata file managed by daemon fsimage Storage location-->
    <property>
        <name>dfs.namenode.name.dir</name>
        <value>file://${hadoop.tmp.dir}/dfs/name</value>
    </property>
    <!-- determine DFS Where should a data node store its blocks on the local file system-->
    <property>
        <name>dfs.datanode.data.dir</name>
        <value>file://${hadoop.tmp.dir}/dfs/data</value>
    </property>
    <!-- Number of copies of block-->
    <property>
        <name>dfs.replication</name>
        <value>3</value>
    </property>
    <!-- Block size(128M),The following units are bytes-->
    <property>
        <name>dfs.blocksize</name>
        <value>134217728</value>
    </property>
    <!-- secondarynamenode Daemon http Address: host name and port number. Reference daemon layout-->
    <property>
        <name>dfs.namenode.secondary.http-address</name>
        <value>xxx02:50090</value>
    </property>
  	<!-- namenode Daemon http Address: host name and port number. Reference daemon layout-->
	<property>
  	  <name>dfs.namenode.http-address</name>
  	  <value>xxx01:50070</value>
	</property>
</configuration>
2.5.3 configuring mapred-site.xml file
<configuration>
    <!-- appoint mapreduce use yarn Resource Manager-->
    <property>
        <name>mapreduce.framework.name</name>
        <value>yarn</value>
    </property>
    <!-- Configure the address of the job history server-->
    <property>
        <name>mapreduce.jobhistory.address</name>
        <value>xxx01:10020</value>
    </property>
    <!-- Configure the of the job history server http address-->
    <property>
        <name>mapreduce.jobhistory.webapp.address</name>
        <value>xxx01:19888</value>
    </property>
</configuration>
2.5.4 configure the yarn-site.xml file
<configuration>
    <!-- appoint yarn of shuffle technology-->
    <property>
        <name>yarn.nodemanager.aux-services</name>
       <value>mapreduce_shuffle</value>
    </property>
    <!-- appoint resourcemanager Host name of-->
    <property>
        <name>yarn.resourcemanager.hostname</name>
        <value>xxx01</value>
    </property>
    <!--The following options-->
    <!--appoint shuffle Corresponding class -->
	<property>
	<name>yarn.nodemanager.aux-services.mapreduce_shuffle.class</name>
     <value>org.apache.hadoop.mapred.ShuffleHandler</value>
	</property>

	<!--to configure resourcemanager Internal mailing address of-->
	<property>
	<name>yarn.resourcemanager.address</name>
	<value>xxx01:8032</value>
	</property>

	<!--to configure resourcemanager of scheduler Internal mailing address of-->
	<property>
	<name>yarn.resourcemanager.scheduler.address</name>
	<value>xxx01:8030</value>
	</property>

	<!--to configure resoucemanager Internal communication address of resource scheduling-->
	<property>
	<name>yarn.resourcemanager.resource-tracker.address</name>
	<value>xxx01:8031</value>
	</property>

	<!--to configure resourcemanager The internal mailing address of the administrator-->
	<property>
	<name>yarn.resourcemanager.admin.address</name>
	<value>xxx01:8033</value>
	</property>

	<!--to configure resourcemanager of web ui Monitoring page for-->
	<property>
	<name>yarn.resourcemanager.webapp.address</name>
	<value>xxx01:8088</value>
	</property>
</configuration>
2.5.5 configure hadoop-env.sh file
.........
# The java implementation to use.
export JAVA_HOME=/usr/local/jdk
.........
2.5.6 configuring slave files
xxx01
xxx02
xxx03
2.5.7 configuration yarn-env.sh file
.........
# some Java parameters
export JAVA_HOME=/usr/local/jdk
if [ "$JAVA_HOME" != "" ]; then
  #echo "run java in $JAVA_HOME"
  JAVA_HOME=$JAVA_HOME
fi
.........
2.6 configuration description of the other two machines
Method 1: "scp" for synchronization
Tip: this method is applicable to scenes where multiple virtual machines have been built in advance.

--1. synchronization hadoop reach slave On node
[root@xxx01 ~]# cd /usr/local
[root@xxx01 local]# scp -r ./hadoop xxx02:/usr/local/
[root@xxx01 local]# scp -r ./hadoop xxx03:/usr/local/

--2. synchronization/etc/profile reach slave On node
[root@xxx01 local]# scp /etc/profile xxx02:/etc/
[root@xxx01 local]# scp /etc/profile xxx03:/etc/

--3. If slave On node jdk It's not installed. Don't forget to sync jdk.
--4. Check if the synchronization is complete/etc/hosts file
Method 2: clone the X01 virtual machine
Tip: this method is applicable to those that have not been installed slave Virtual machine scenario. By cloning xxx01 Node to clone one xxx02 and xxx03 Machine node, this method does not need to repeatedly install the environment and configuration files, which is very efficient and saves most of the time(The secret key pairs without secret authentication are the same set).

--1. Open a newly cloned virtual machine and modify the host name
[root@xxx01 ~]# hostnamectl set-hostname xxx02
--2. modify ip address
[root@xxx01 ~]# vi /etc/sysconfig/network-scripts/ifcfg-ens33
.........ellipsis.........
IPADDR=192.168.10.102				<==Change to xxx02 Corresponding ip address
.........ellipsis........
--3. service network restart
[root@xxx01 ~]# systemctl restart network
--4. Repeat the above 1 for other newly cloned virtual machines~3 step
--5. Verification of secret free login
	from xxx01 On the machine, connect every other node to verify whether the password free is working well, and remove the first query step

--6. Suggestion: after restarting the network service for each machine, it is best to reboot once.
2.7 formatting NameNode
2.7.1 Run the command on the X01 machine
[root@xxx01 ~]# hdfs namenode -format
2.7.2 Interpretation of formatting related information
--1. Generate a cluster unique identifier:clusterid
--2. Generate a block pool unique identifier:blockPoolId
--3. generate namenode Process management content(fsimage)Storage path for:
	Default profile properties hadoop.tmp.dir Generated under the specified path dfs/name catalogue
--4. Generate image file fsimage,Records the metadata of the root path of the distributed file system

--5. You can check other information, such as the number of copies of blocks and the number of clusters fsOwner Wait.
2.8 start the cluster
2.8.1 introduction to startup and shutdown scripts
1. Startup script
	-- start-dfs.sh			:Used to start hdfs Cluster script
	-- start-yarn.sh		:Used to start yarn Daemon
	-- start-all.sh			:Used to start hdfs and yarn
2. Close script
	-- stop-dfs.sh			:For closing hdfs Cluster script
	-- stop-yarn.sh			:For closing yarn Daemon
	-- stop-all.sh			:For closing hdfs and yarn
3. Single daemon script
	-- hadoop-daemons.sh	:Used to start or shut down separately hdfs Script for one of the daemons
	-- hadoop-daemon.sh		:Used to start or shut down separately hdfs Script for one of the daemons
	reg:
		hadoop-daemon.sh [start|stop] [namenode|datanode|secondarynamenode]

	-- yarn-daemons.sh	:Used to start or shut down separately hdfs Script for one of the daemons
	-- yarn-daemon.sh		:Used to start or shut down separately hdfs Script for one of the daemons
	reg:
		yarn-daemon.sh [start|stop] [resourcemanager|nodemanager]
2.8.2 start hdfs
1) Use start-dfs.sh to start hdfs.
2) Start process resolution:
-Start the daemon of the distributed file system on each machine node in the cluster
A namenode, a resource manager, and a second namenode
Multiple datanode s and nodemanager s
-Generate the edit log file in the directory where the namenode daemon manages the content
-Generate ${hadoop.tmp.dir}/dfs/data directory under the node where each datanode is located
3) jps view process
--1. Run the jps command on X01, and the following processes will occur:
namenode
datanode
--2. Run the jps command on X02, and the following processes will occur:
secondarynamenode
datanode
--3. Run the jps command on X03, and the following processes will occur:
datanode
2.8.3 start yarn
1) Use the start-yarn.sh script
2) jps view
--1. Running the jps command on X01 will lead to the following additional processes
resoucemanager
nodemanager
--2. Running the jps command on X02 will lead to the following additional processes
nodemanager
--3. Running the jps command on X03 will lead to the following additional processes
nodemanager
3) webui view
--1. http://192.168.10.101:50070
--2. http://192.168.10.101:8088
2.9 wordcount case
1) Prepare two files for statistics and store them in ~ / data /
--1. establish data catalogue
[root@xxx01 hadoop]# mkdir ~/data
--2. Upload the following two files to data Directory
- poetry1.txt
- poetry2.txt
2) Create storage directory on hdfs
[root@xxx01 hadoop]# hdfs dfs -mkdir /input
3) Upload the from the local file system to hdfs and check it on the web
[root@xxx01 hadoop]$ hdfs dfs -put ~/data/poetry* /input/
4) Run the built-in word statistics program wordcount
[root@xxx01 hadoop]# cd $HADOOP_HOME
[root@xxx01 hadoop]# hadoop jar share/hadoop/mapreduce/hadoop-mapreduce-examples-2.7.6.jar  wordcount /input /output
5) View webui
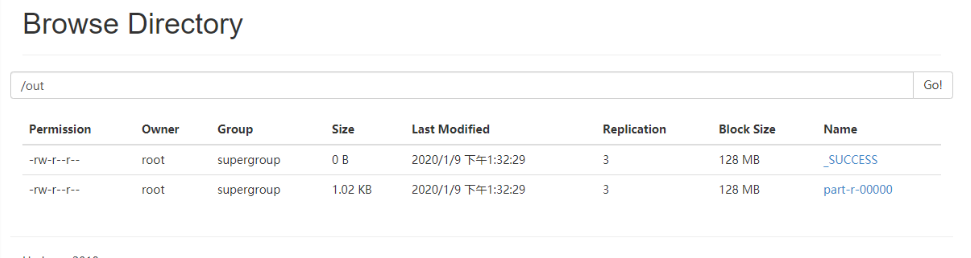
6) View part-r-00000 file
[root@xxx01 hadoop]# hdfs dfs -cat /output/part-r-00000
3, HDFS common commands
Note: instructions for accessing hdfs system:
hadoop dfs --- obsolete
hadoop fs -- more widely used
hdfs dfs -- relatively small range
There is not much difference between hadoop fs and hdfs dfs
--1. Enter hdfs on the command line. After entering, you will be prompted which commands can be used after hdfs, one of which is dfs.
--2. Enter HDFS and dfs on the command line. After entering, you will be prompted with some common shell commands that can be added after dfs
Note: the path of the distributed file system should be from the command line/Start writing, that is, the absolute path

--1. Create directory
[-mkdir [-p] <path> ...]	#Create a directory -p on a distributed file system at multiple levels
 Call format:hdfs dfs -mkdir (-p)  /catalogue

--2. Upload instruction
[-put [-f] [-p] [-l] <localsrc> ... <dst>]   #Upload files from the local file system to the distributed file system
 Call format:hdfs dfs -put /Local file  /Distributed file system path
 be careful:
direct writing/Is the name of the file system omitted hdfs://ip:port.

[-moveFromLocal <localsrc> ... <dst>]		#Upload files from the local file system to the distributed file system
[-copyFromLocal [-f] [-p] [-l] <localsrc> ... <dst>]


--3. View instructions
[-ls [-d] [-h] [-R] [<path> ...]]		#View the contents of the directory of the distributed file system
 Call format:hdfs dfs -ls /
[-cat [-ignoreCrc] <src> ...]	    	#View file contents of distributed file system
Call format:hdfs dfs -cat /xxx.txt
[-tail [-f] <file>]						#View file contents of distributed file system
Call format:hdfs dfs -tail /xxx.txt
 be careful:By default, you can view up to 1000 rows


--4. Download instructions
[-copyToLocal [-p] [-ignoreCrc] [-crc] <src> ... <localdst>]
	be careful:A folder with a local path may not exist
[-moveToLocal <src> <localdst>]
	be careful:from hdfs A path of cuts data locally,Not yet implemented
[-get [-p] [-ignoreCrc] [-crc] <src> ... <localdst>]
	Call format:with copyToLocal

--5. Delete instruction
[-rm [-f] [-r|-R] [-skipTrash] <src> ...]
	be careful:If you delete a folder, you need to add-r
[-rmdir [--ignore-fail-on-non-empty] <dir> ...]
	be careful:Must be an empty folder,Must be used if not empty rm delete
--6. View disk utilization and file size
[-df [-h] [<path> ...]] View disk usage of distributed systems
[-du [-s] [-h] <path> ...]	#View the status of files in the current path on the distributed system 	- h: Human is displayed in a human readable manner


--7. Append content to a file in a distributed file system
[-appendToFile <localsrc> ... <dst>]
Call format:hdfs dfs -appendToFile  Local file     hdfs Files on
 be careful:Random addition, deletion and modification in the middle are not supported

--8. To modify permissions,Consistent with local operation,-R Is to make subdirectories or files modified accordingly
[-chgrp [-R] GROUP PATH...]
[-chmod [-R] <MODE[,MODE]... | OCTALMODE> PATH...]
[-chown [-R] [OWNER][:[GROUP]] PATH...]

--9. Number of copies of modified file
[-setrep [-R] [-w] <rep> <path> ...]
Call format:hadoop fs -setrep  3 /   take hdfs Set the contents in the root directory and subdirectories to 3 copies
 be careful:When the set number of copies is inconsistent with the default number of copies during initialization,The cluster will respond,More than the original, it will be copied automatically.

--10. View the status of the file
hdfs dfs [generic options] -stat [format] <path> ...
Function of command:When to hdfs When writing files, you can dfs.blocksize Configuration item to set the of the file block The size of the. This leads to hdfs Different files on block The sizes are different. Sometimes I want to know hdfs Of a file on block The size can be estimated in advance task Number of. stat Meaning: you can view some attributes of the file.
Call format:hdfs dfs -stat [format] File path
format Form of:
%b: Print file size (directory size is 0)
%n: Print file name
%o: Print block of size
%r: Number of copies printed
%y: utc time yyyy-MM-dd HH:mm:ss
%Y: Print since January 1, 1970 utc Microseconds of
%F: Catalog printing directory,Document printing regular file

be careful:
1)When used-stat Command without specifying format When printing, only the creation time is printed, which is equivalent to%y
2)-stat Followed only by the directory,%r,%o All printed are 0,Only files have copies and sizes
--11. test
hdfs dfs [generic options] -test -[defsz] <path>
Parameter description: -e:Whether the file exists returns 0    -z:If the file is empty, 0 will be returned   -d:Is it a path(catalogue) ,Yes, return 0
 Call format:hdfs dfs -test -d file
example:hdfs dfs -test -d /shelldata/111.txt  && echo "OK"  || echo "no"
explain:Test whether the current content is a folder ,If yes, return ok,If not return no
--12. Create an empty file
hdfs dfs [generic options] -touchz <path> ...
Call format:hdfs dfs touchz  /hadooptest.txt
--13. Displays the number of current folders and subfolders, the number of subfolders, and the total size
hdfs dfs [generic options] -count [-q] [-h] <path> ...
Call format:hdfs dfs  -count   /hadoop
--14. Merge Download
hdfs dfs [generic options] -getmerge [-nl] <src> <localdst>
Call format:hdfs dfs -getmerge  hdfs The above path is the local path
example:hdfs dfs -getmergo /hadoopdata/*.xml /root/test.test
--15. move hdfs Files in (renamed)
hdfs dfds [generic options] -mv <src> ... <dst>
Call format:hdfs dfs -mv /hdfs Path 1  /hdfs Another path 2
example:hfds dfs -mv /aaa   /bbb  Here will be aaa Move whole to bbb in
--16. copy hdfs Files in to hdfs Another directory for
hdfs dfs [generic options] -cp [-f] [-p | -p[topax]] <src> ... <dst>
Call format:hdfs dfs -cp /hdfs route_1  /hdfs route_2
--17.set up Hadoop recycle bin trash:   When we accidentally delete the file,And regret medicine.
--17.1 modify core-site.xml file
 be careful:We need to be namenode and datanode Set garbage collection at the same time,If namenode have access to,
  datanode Invalid,If namenode The has failed,Automatically called datanode Settings for

<property>
  <name>fs.trash.interval</name>
  <!-- 1440 The checkpoint will be cleared in minutes,If 0,The recycle bin is not enabled. -->
  <value>1440</value>
</property>
<property>
    <name>fs.trash.checkpoint.interval</name>
    <value>0</value>
</property>

explain:
one:Checkpoint:
Occurs after executing the following statement.Trash/190907043825 It's a checkpoint
[root@xxx01 sbin]# hadoop fs -ls /user/root/.Trash/
19/09/07 05:15:42 WARN util.NativeCodeLoader: Unable to load native-hadoop library for your platform... using builtin-java classes where applicable
Found 2 items
drwx------   - root supergroup          0 2019-09-07 04:36 /user/root/.Trash/190907043825
drwx------   - root supergroup          0 2019-09-07 05:15 /user/root/.Trash/Current
 two:fs.trash.interval
Minutes. When the minutes are exceeded, the checkpoint will be deleted. If it is zero, the recycle bin function will be disabled. The default is 0.In minutes. Here I set 1 day (60 days)*24)
Delete data rm After, the data will be move To the current folder.Trash/current catalogue
 three:fs.trash.checkpoint.interval
Time interval for checkpoint creation(In minutes). Its value should be less than or equal to fs.trash.interval. If zero, set the value to fs.trash.interval Value of.
four:Delete process analysis
 there Deletion interval Indicates the checkpoint deletion interval(In minutes)
there Emptier interval Indicates that before running a thread to manage checkpoints, NameNode How long will it take(In minutes),Checkpoint creation interval.NameNode Delete more than fs.trash.interval Check points for and/user/${username}/.Trash/Current Create a new checkpoint. The frequency is determined by fs.trash.checkpoint.interval The value of shall be determined and shall not be greater than Deletion interval. This ensures that emptier There are one or more checkpoints in the recycle bin within the window.
[root@xxx01 sbin]# hadoop fs -rm -r /hadoop4.txt
19/09/07 05:15:24 INFO fs.TrashPolicyDefault: Namenode trash configuration: Deletion interval = 1440 minutes, Emptier interval = 0 minutes.
Moved: 'hdfs://xxx01:9000/hadoop4.txt' to trash at: hdfs://xxx01:9000/user/root/.Trash/Current

for example:
fs.trash.interval = 120 (deletion interval = 2 hours)
fs.trash.checkpoint.interval = 60 (emptier interval = 1 hour)

explain:
This leads to NameNode by Current The garbage files in the directory create a new checkpoint every hour and delete the checkpoints that have existed for more than 2 hours.

At the end of the recycle bin life cycle, NameNode from HDFS Delete the file from the namespace. Deleting a file will cause the block associated with the file to be released. Note that the user deleted the file at the same time as HDFS There may be a significant time delay between the corresponding increase of available space in, that is, the user deletes the file, HDFS The available space will not increase immediately, and there is a certain delay in the middle.

five:expunge  Empty Trash
To use this command,First, there must be a recycle bin,Namely fs.trash.interval The value of cannot be 0
 When we execute expunge Command time,In fact, a new checkpoint will be created immediately,And will/.Trash/Current The contents of the are immediately placed in this checkpoint.
example: [root@xxx01 sbin]# hadoop fs -expunge
19/09/07 05:15:58 INFO fs.TrashPolicyDefault: Namenode trash configuration: Deletion interval = 1440 minutes, Emptier interval = 0 minutes.
19/09/07 05:15:58 INFO fs.TrashPolicyDefault: Created trash checkpoint: /user/root/.Trash/190907051558

six:If you want to bypass the garbage collection bin and immediately delete files from the file system  hadoop fs  -rm -skipTrash
[root@xxx01 sbin]# hadoop fs -rm -skipTrash /hadoop111.txt
19/09/07 05:50:13 WARN util.NativeCodeLoader: Unable to load native-hadoop library for your platform... using builtin-java classes where applicable
Deleted /hadoop111.txt


--17.2.test
1)new directory input
[root@xxx01:/data/soft]# hadoop fs -mkdir /input

2)Upload file
[root@xxx01:/data/soft]# hadoop fs -copyFromLocal /data/soft/file0* /input

3)Delete directory input
[root@xxx01 data]# hadoop fs -rmr /input
Moved to trash: hdfs://xxx01:9000/user/root/input

4)See current directory
[root@xxx01 data]# hadoop fs -ls
Found 2 items
drwxr-xr-x - root supergroup 0 2011-02-12 22:17 /user/root/.Trash
 find input Delete, one more directory.Trash

5)Restore the directory you just deleted
[root@xxx01 data]# hadoop fs -mv /user/root/.Trash/Current/user/root/input /user/root/input

6)Check recovered data
[root@xxx01 data]# hadoop fs -ls input
Found 2 items
-rw-r--r-- 3 root supergroup 22 2011-02-12 17:40 /user/root/input/file01
-rw-r--r-- 3 root supergroup 28 2011-02-12 17:40 /user/root/input/file02

7)delete.Trash Directory (garbage cleaning)
[root@xxx01 data]# hadoop fs -rmr .Trash
Deleted hdfs://xxx01:9000/user/root/.Trash
(= - = there are too many theories today. I need to digest them. Xiaobai is practicing guitar recently. Did you teach me two moves? In a twinkling of an eye, it will be Monday again. There are five days before the weekend!!!)