Article directory
What is ActiveMQ
ActiveMQ is the most popular and powerful open source message produced by Apache.
ActiveMQ is a JMS Provider implementation that fully supports the JMS 1.1 and J2EE 1.4 specifications. Although it has been a long time since the JMS specification was introduced, JMS still plays a special role in today's J2EE applications.
What is JMS?
Java Message Service (JMS) application program interface is a Java platform API for message oriented middleware (MOM), which is used to send messages between two applications or distributed systems for asynchronous communication. Java message service is a platform independent API.
Object model of JMS
| ConnectionFactory | Connection factory |
|---|---|
| Connection | Connect |
| Session | Conversation |
| Destination | objective |
| MessageProducer | Producer |
| MessageConsumer | Consumer |
| Message | news |
| Broker | Instance of message middleware (ActiveMQ) |
Message model of JMS
Point to point (P2P) / point to point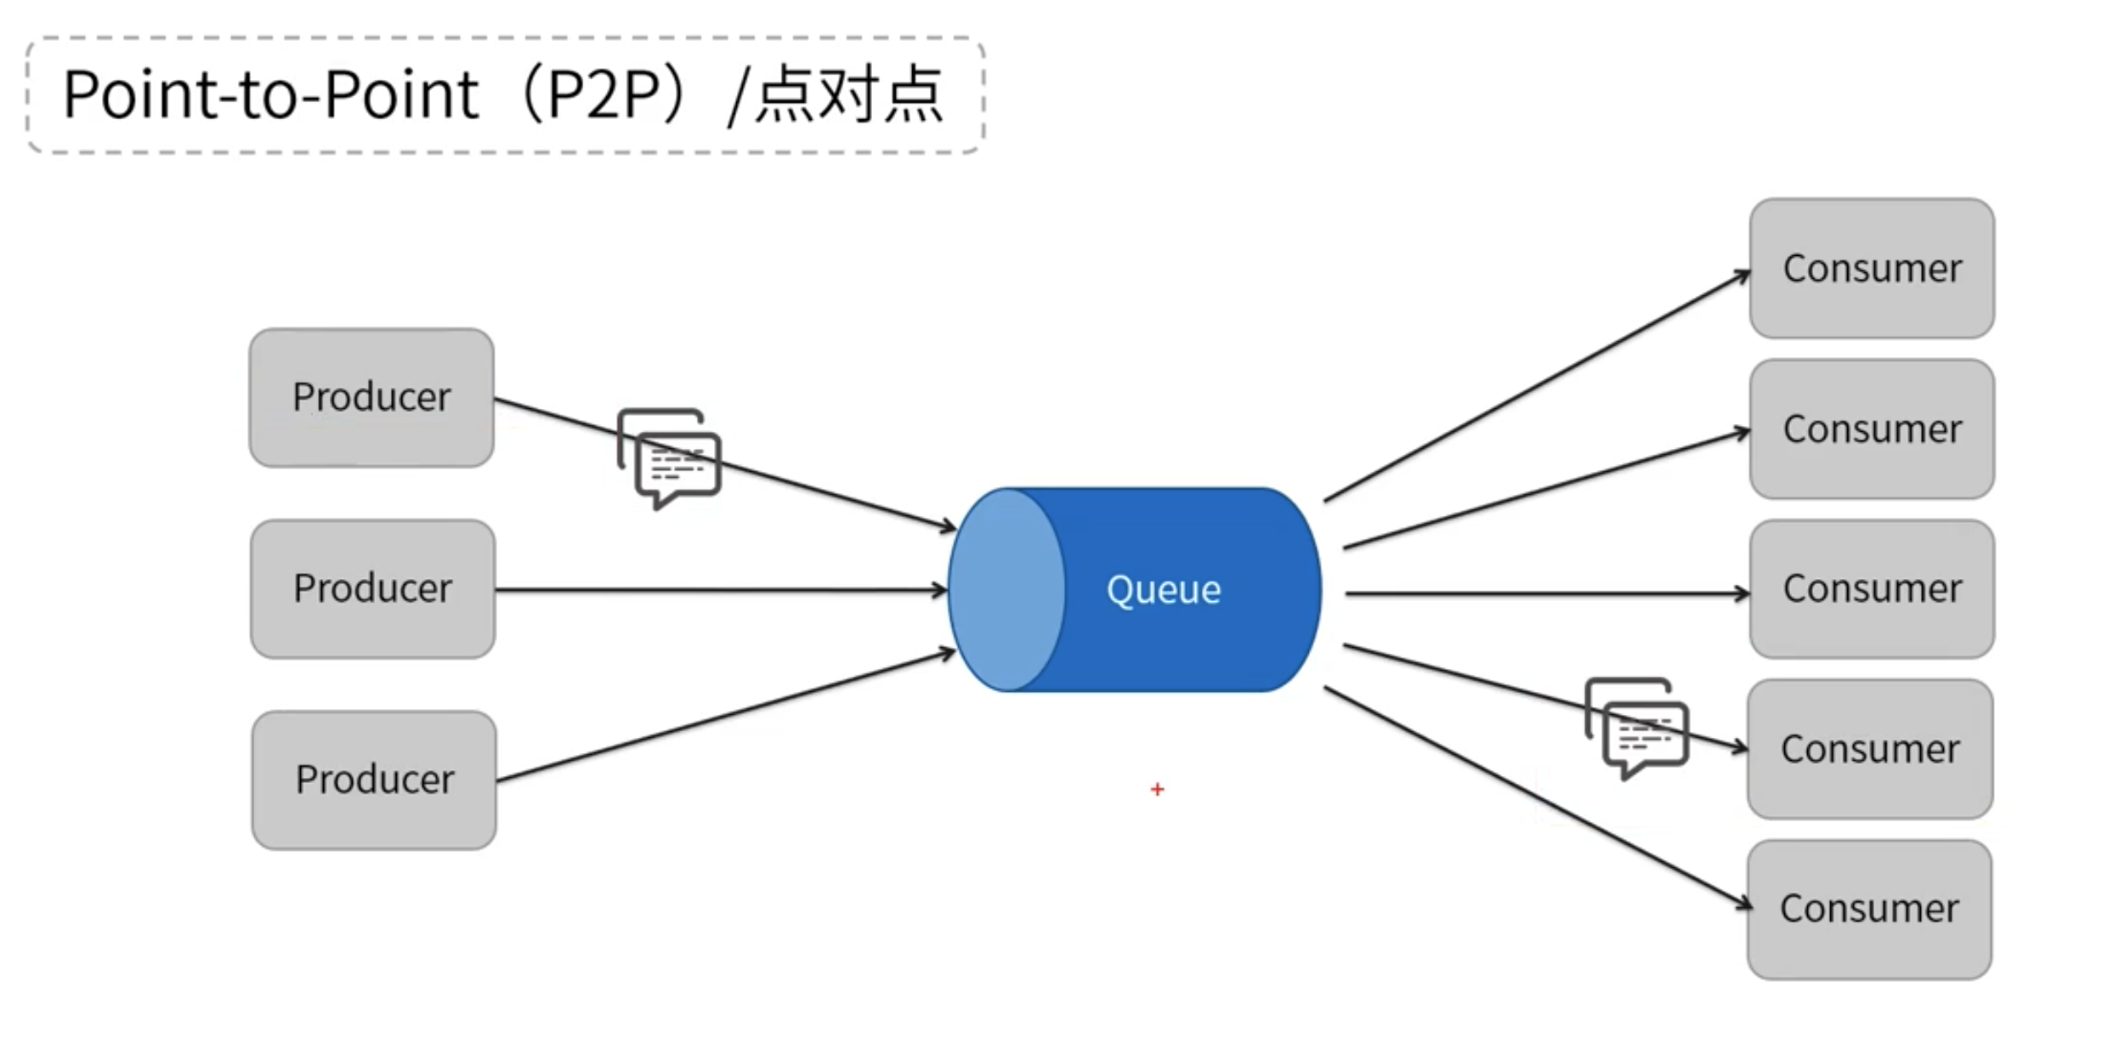
Publish / subscribe / topic (publish / subscribe)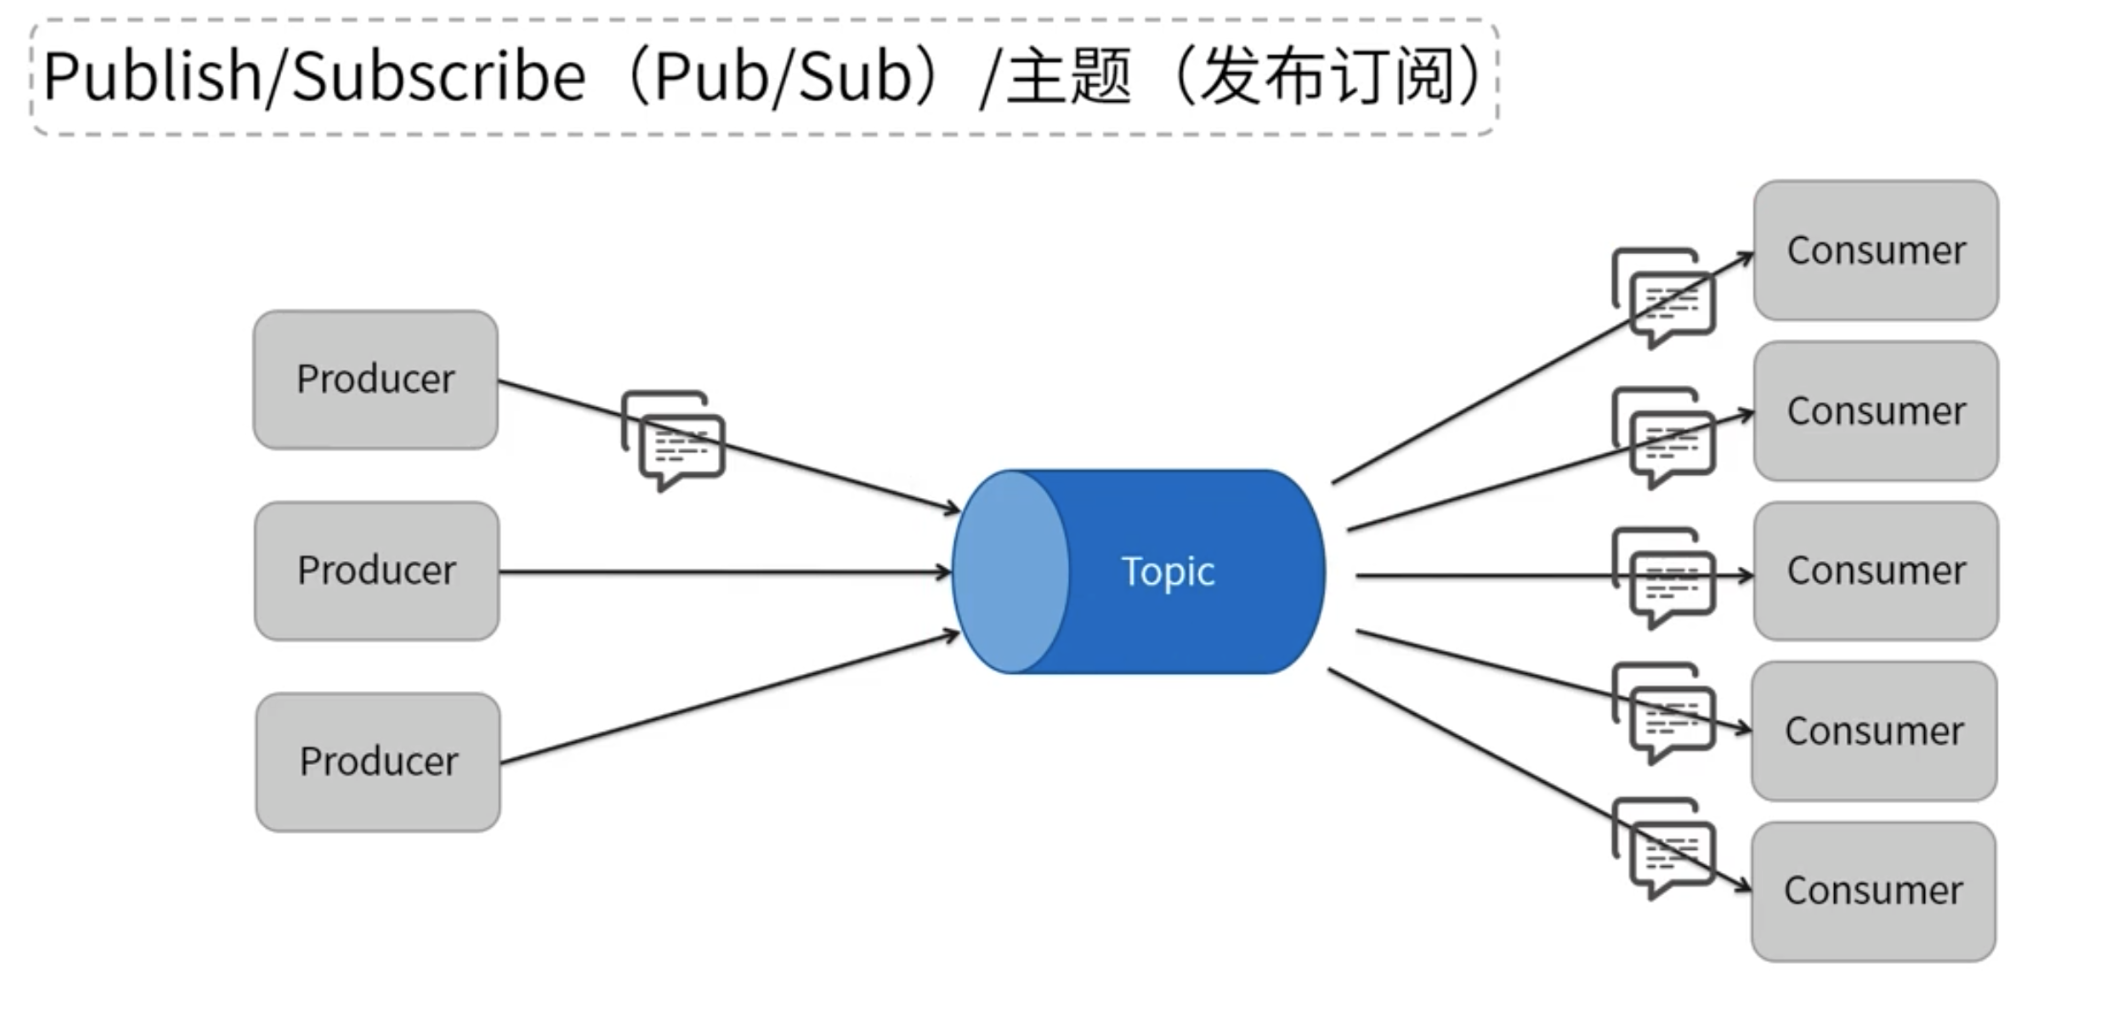
Message structure of JMS
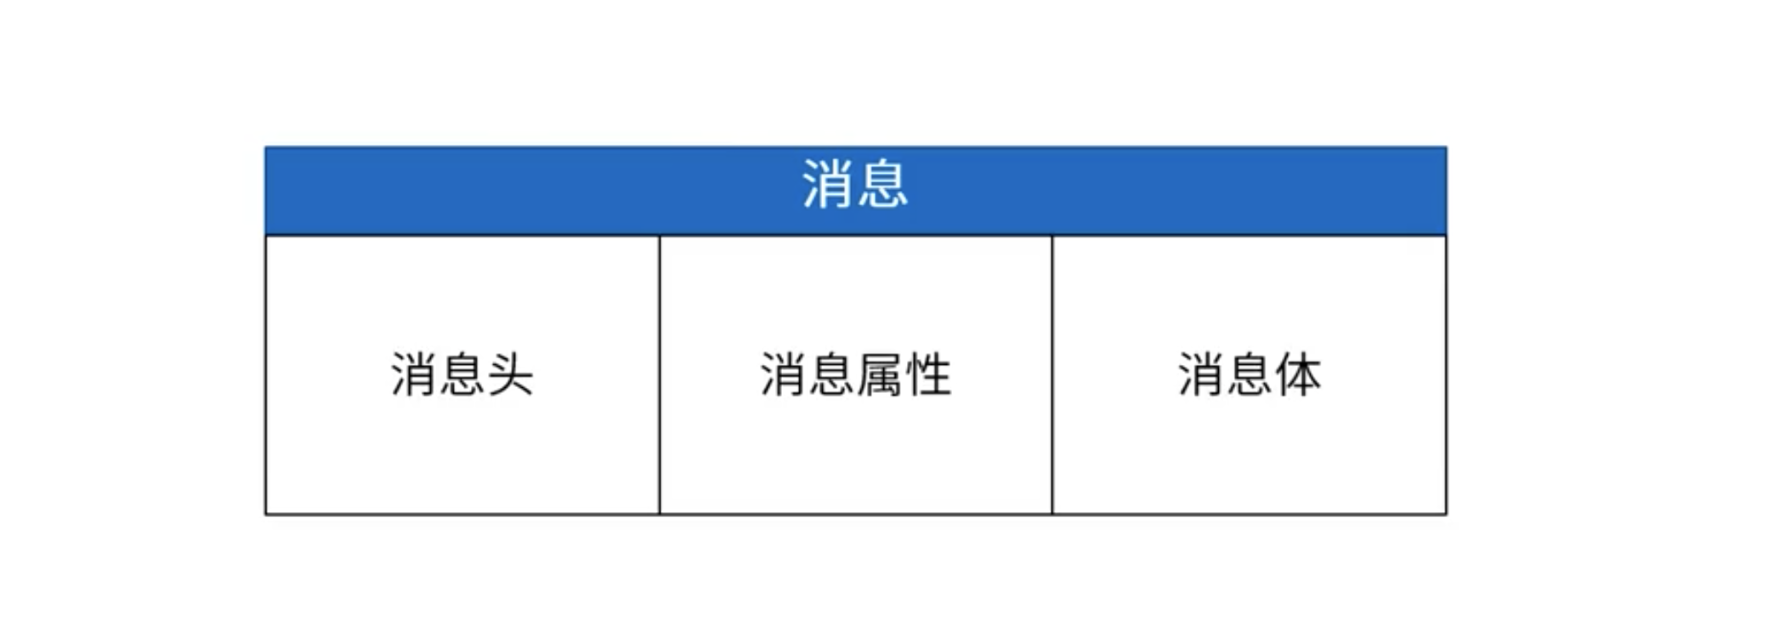
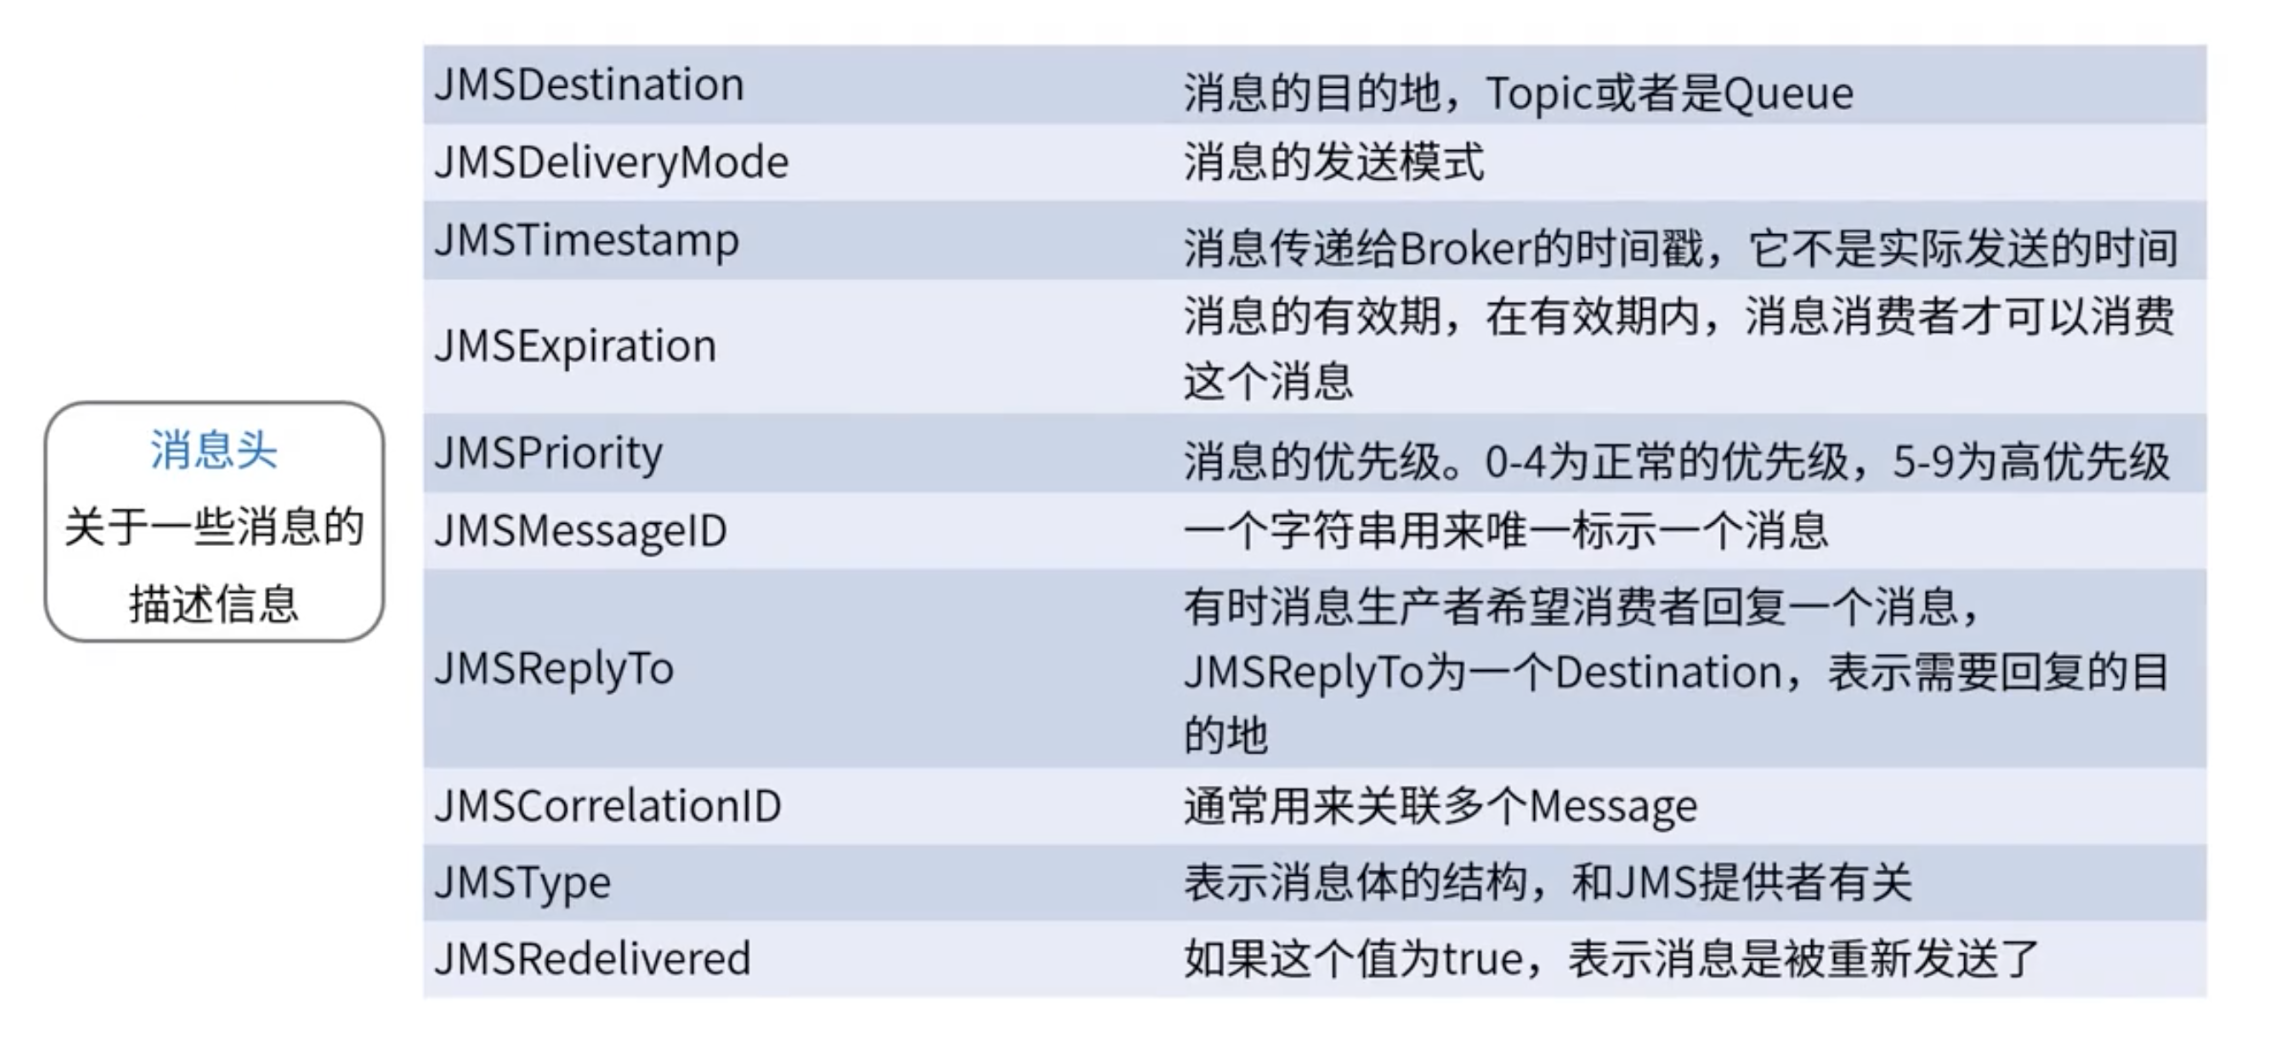
Message header
Message attribute
The message property can be understood as the additional message header of the message, and the property name can be customized
Property value types: boolean, byte, int, long, float, double, String
Message body

Features of ActiveMQ
- Support for multiple programming languages
- Support multiple transport protocols
- There are many ways to persist
ActiveMQ installation
Demo environment: Centos7, jdk8, activemq5.15.8
Download address: http://activemq.apache.org/activemq-5158-release.html
Or cd /tmp, then wget -c http://mirrors.shu.edu.cn/apache/activemq/5.15.8/apache-activemq-5.15.8-bin.tar.gz. If wget is not installed, you can first yum install wget.
Unzip: tar -zxvf apache-activemq-5.15.8-bin.tar.gz -C /var
Modify the directory name mv /var/apache-activemq-5.15.8/ /var/activemq/
Start:. / bin/activemq start
Stop:. / bin/activemq stop
The previous command is used to run ActiveMQ, but the best way is to start ActiveMQ as a service. Using the system service will ensure that ActiveMQ can start when the system starts.
Make system service
1. Create a systemd service file: vi /usr/lib/systemd/system/activemq.service
2. Put in content
[Unit]
Description=ActiveMQ service
After=network.target

[Service]
Type=forking
ExecStart=/var/activemq/bin/activemq start
ExecStop=/var/activemq/bin/activemq stop
User=root
Group=root
Restart=always
RestartSec=9
StandardOutput=syslog
StandardError=syslog
SyslogIdentifier=activemq


[Install]
WantedBy=multi-user.target
3. Find the directory where the Java command is located, where is Java, and fill the copy path into JAVA_HOME in the next step.
4. Set Java home in the activemq configuration file / var/activemq/bin/env
# Location of the java installation
# Specify the location of your java installation using JAVA_HOME, or specify the
# path to the "java" binary using JAVACMD
# (set JAVACMD to "auto" for automatic detection)
JAVA_HOME="/usr/local/java/jdk1.8.0_181"
JAVACMD="auto"
5. Manage the start and stop of activemq through systemctl
- Start activemq service: systemctl start activemq
- View service status: systemctl status activemq
- Create software link: ln -s /usr/lib/systemd/system/activemq.service /etc/systemd/system/multi-user.target.wants/activemq.service
- System CTL enable ActiveMQ
- Check whether it is enabled: systemctl list unit files | grep ActiveMQ
6. Firewall configuration, Web management port is 8161 by default, communication port is 61616 by default
- Add and restart firewall
firewall-cmd --zone=public --add-port=8161/tcp --permanent
firewall-cmd --zone=public --add-port=61616/tcp --permanent
systemctl restart firewalld.service
- Or close the firewall directly: systemctl stop firewalld.service
- If you are an alicloud server, you need to open the firewall port in the console.
Web management platform using ActiveMQ
ActiveMQ has its own management platform, which can be accessed by visiting http: / / service IP:8181/admin in the browser.
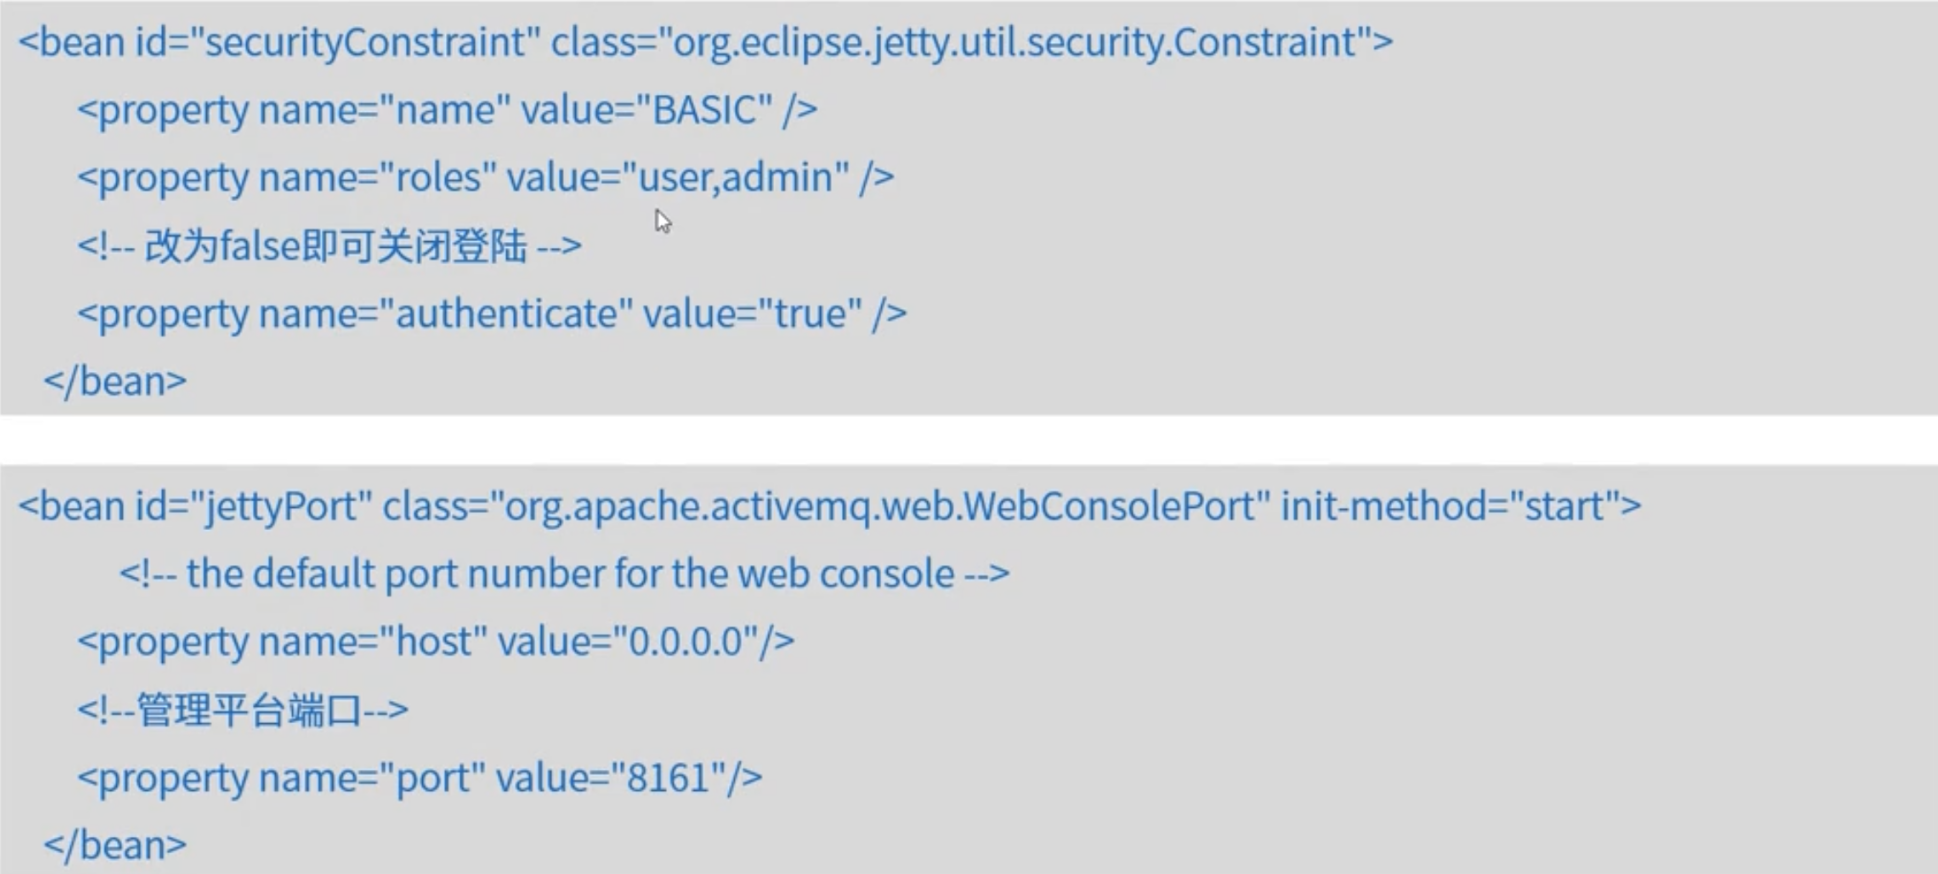
ActiveMQ's management page turns on identity verification by default
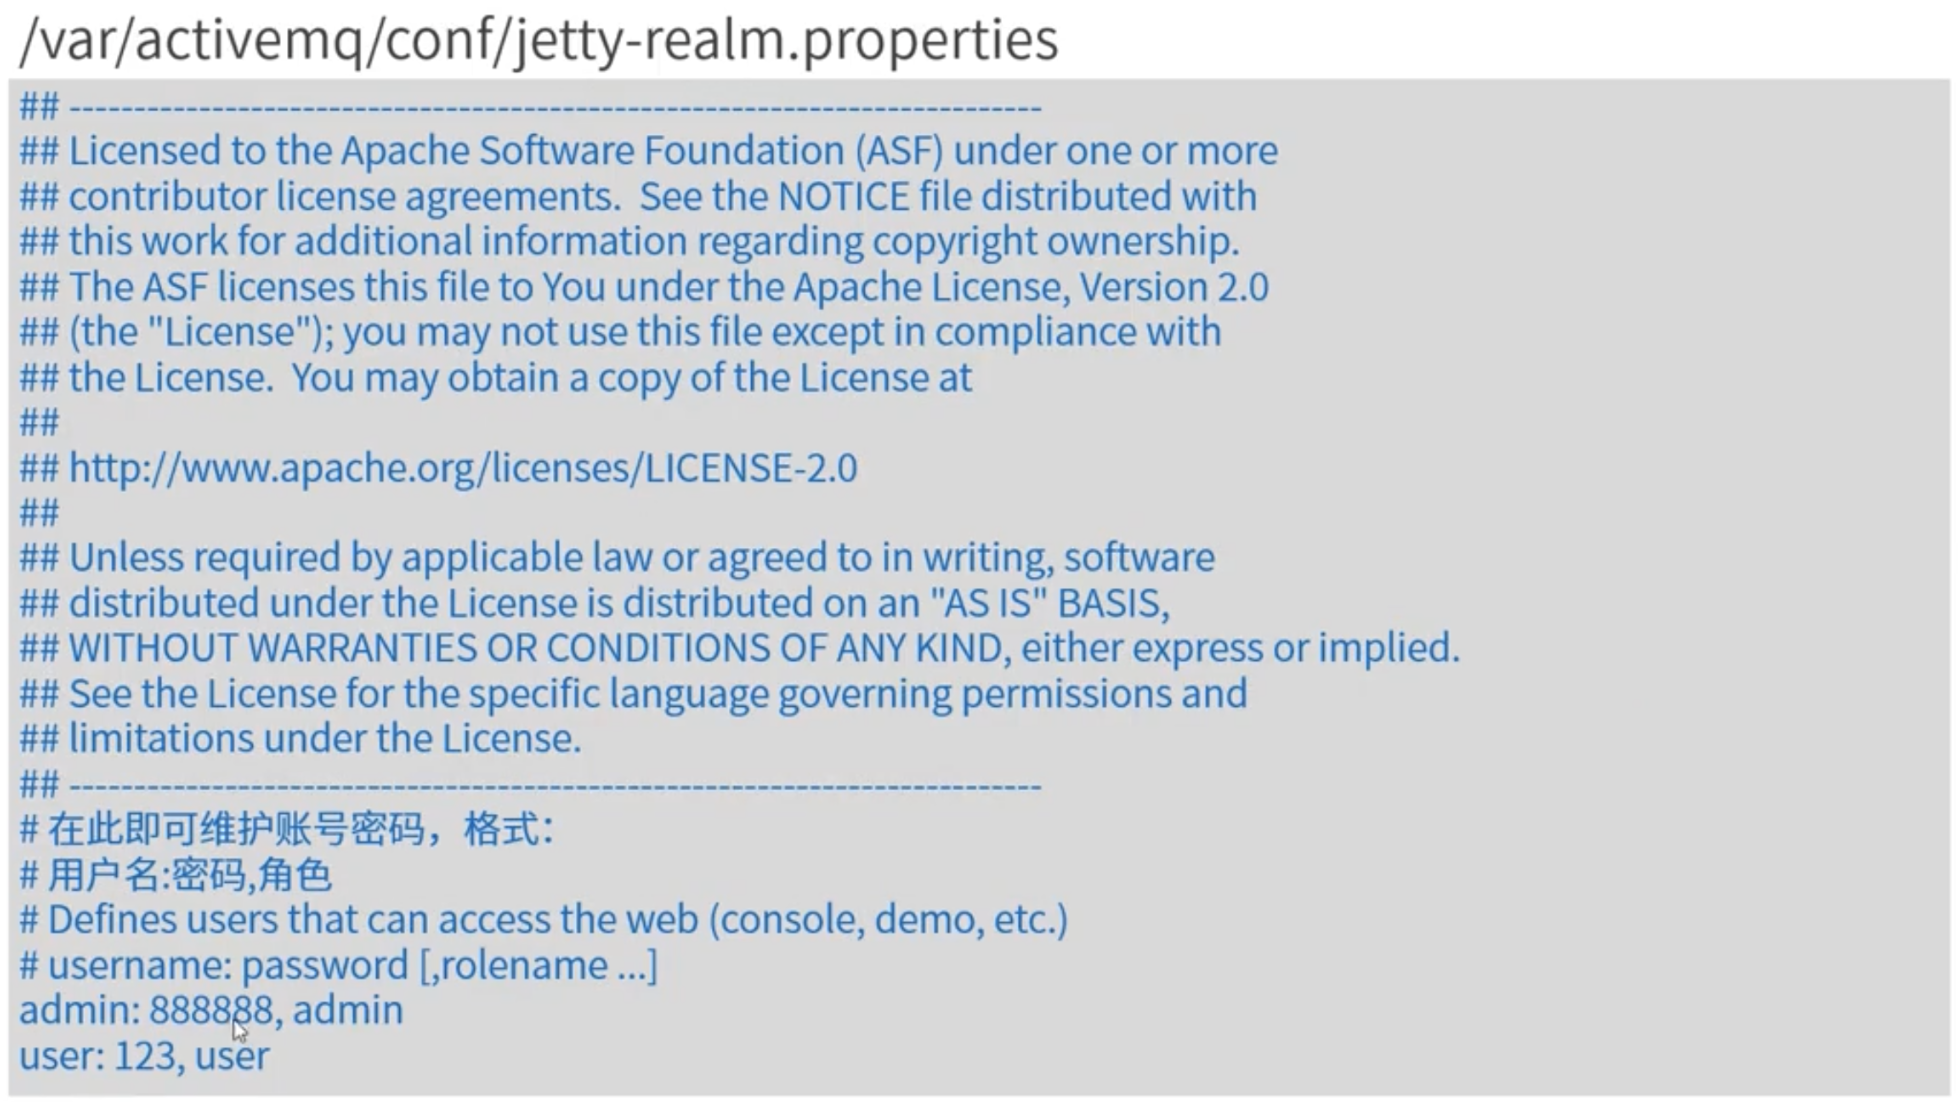
Account number: admin
Password: admin
Web management configuration
ActiveMQ's Web management platform is based on jetty, so you can see jetty's configuration file in / var/activemq/conf directory.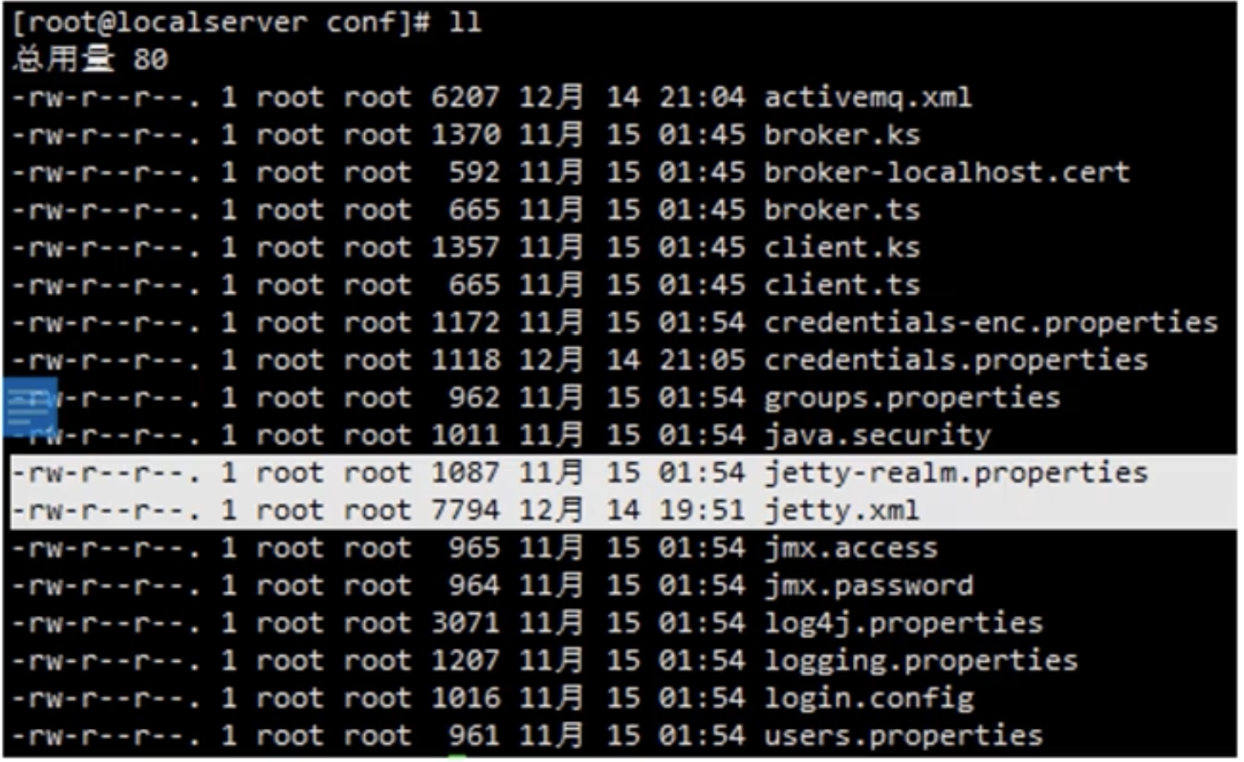
Modify the default port of the web management platform in / var/activemq/conf/jetty.xml.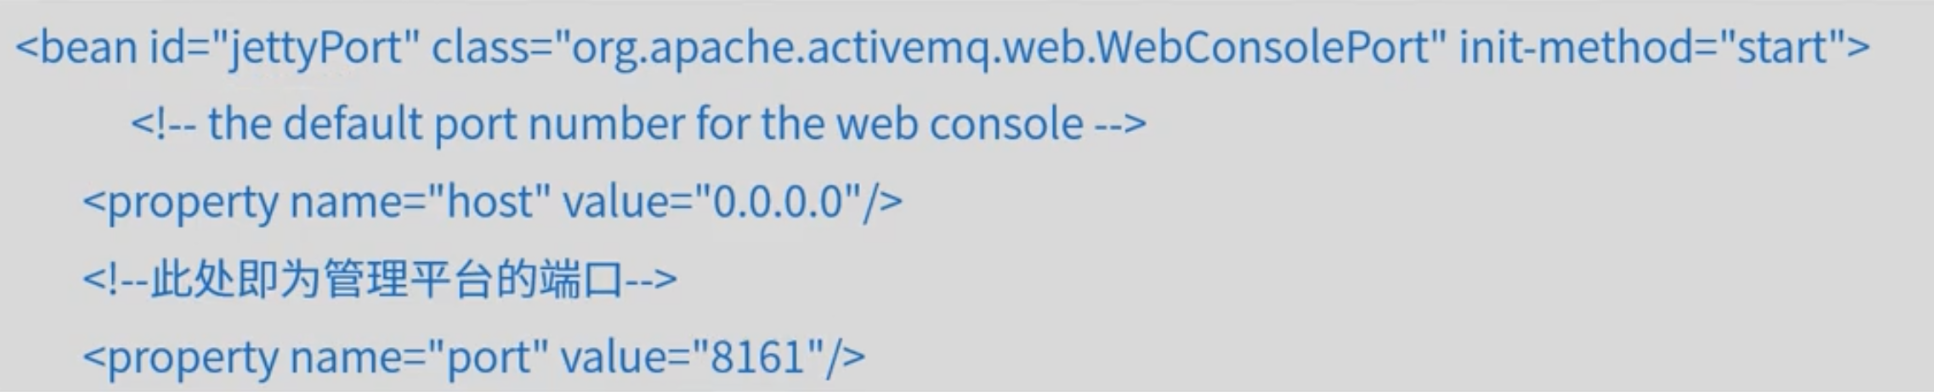
Using ActiveMQ in Java
Maven uses ActiveMQ
Add dependency
<dependencies>
        <dependency>
            <groupId>org.apache.activemq</groupId>
            <artifactId>activemq-all</artifactId>
            <version>5.15.8</version>
        </dependency>

        <dependency>
            <groupId>org.eclipse.paho</groupId>
            <artifactId>org.eclipse.paho.client.mqttv3</artifactId>
            <version>1.2.0</version>
        </dependency>
    </dependencies>
/**
 * Simple producer
 */
public class Producer {
    public static void main(String[] args) {
        new ProducerThread("tcp://123.57.246.250:61616", "queue1").start();
    }

    static class ProducerThread extends Thread {
        String brokerUrl;
        String destinationUrl;

        public ProducerThread(String brokerUrl, String destinationUrl) {
            this.brokerUrl = brokerUrl;
            this.destinationUrl = destinationUrl;
        }

        @Override
        public void run() {
            ActiveMQConnectionFactory connectionFactory;
            Connection conn;
            Session session;

            try {
                // 1. Create connection factory
                connectionFactory = new ActiveMQConnectionFactory(brokerUrl);
                // 2. Create connection object md
                conn = connectionFactory.createConnection();
                conn.start();
                // 3. Create session
              	//First parameter: whether to start transaction. true: transaction is enabled, the second parameter is ignored.
								//Second parameter: only when the first parameter is false can it make sense. Response mode of the message. 1. Automatic response 2. Manual response. Automatic response means that the client will delete the message after receiving it. Receiving the message does not mean that it is used correctly. If we want to ensure that the message is consumed correctly, we need to manually.
                session = conn.createSession(false, Session.AUTO_ACKNOWLEDGE);
                // 4. Create a point-to-point destination
                 Destination destination = session.createQueue(destinationUrl);
                // 5. Create producer message
                MessageProducer producer = session.createProducer(destination);
                // Set the producer's mode with two options: persistent / non persistent
                producer.setDeliveryMode(DeliveryMode.PERSISTENT);
                // 6. Create a text message
                String text = "Hello world!";
                TextMessage message = session.createTextMessage(text);
                for (int i = 0; i < 1; i++) {
                    // 7. Send message
                    producer.send(message);
                }
                // 8. Close connection
                session.close();
                conn.close();
            } catch (JMSException e) {
                e.printStackTrace();
            }
        }
    }
}
/**
 * Simple consumer
 */
// http://activemq.apache.org/consumer-features.html
public class Consumer {
    public static void main(String[] args) {
        new ConsumerThread("tcp://123.57.246.250:61616", "queue1").start();
        new ConsumerThread("tcp://123.57.246.250:61616", "queue1").start();
    }
}

class ConsumerThread extends Thread {

    String brokerUrl;
    String destinationUrl;

    public ConsumerThread(String brokerUrl, String destinationUrl) {
        this.brokerUrl = brokerUrl;
        this.destinationUrl = destinationUrl;
    }

    @Override
    public void run() {
        ActiveMQConnectionFactory connectionFactory;
        Connection conn;
        Session session;
        MessageConsumer consumer;

        try {
            // brokerURL http://activemq.apache.org/connection-configuration-uri.html
            // 1. Create connection factory
            connectionFactory = new ActiveMQConnectionFactory(this.brokerUrl);
            // 2. Create connection object
            conn = connectionFactory.createConnection();
            conn.start(); // Be sure to start
            // 3. Create session (one or more sessions can be created)
            session = conn.createSession(false, Session.AUTO_ACKNOWLEDGE);
            // 4. Create a point-to-point receive target, queue point to point
            Destination destination = session.createQueue(destinationUrl);

            // 5. Create consumer message http://activemq.apache.org/destination-options.html
            consumer = session.createConsumer(destination);

            // 6. Receive message (wait for no message)
            Message message = consumer.receive();
            if (message instanceof TextMessage) {
                System.out.println("Text message received:" + ((TextMessage) message).getText());
            } else {
                System.out.println(message);
            }

            consumer.close();
            session.close();
            conn.close();
        } catch (JMSException e) {
            e.printStackTrace();
        }
    }
}
Output: text message received: Hello world!
springboot uses ActiveMQ
- pom file import dependency
	<parent>
        <groupId>org.springframework.boot</groupId>
        <artifactId>spring-boot-starter-parent</artifactId>
        <version>2.1.1.RELEASE</version>
    </parent>

    <properties>
        <java.version>1.8</java.version>
    </properties>
    <dependencies>
        <!--Direct use spring-boot-starter-activemq-->
        <dependency>
            <groupId>org.springframework.boot</groupId>
            <artifactId>spring-boot-starter-activemq</artifactId>
        </dependency>
        <!-- MQTT -->
        <dependency>
            <groupId>org.springframework.integration</groupId>
            <artifactId>spring-integration-mqtt</artifactId>
        </dependency>
    </dependencies>
- Write configuration application.properties
spring.activemq.broker-url=tcp://123.57.246.250:61616
spring.activemq.user=admin
spring.activemq.password=admin
- Producer code
@SpringBootApplication
public class Producer {

    @Autowired
    private JmsTemplate jmsTemplate;

    @PostConstruct
    public void init() {
        jmsTemplate.convertAndSend("queue1", "Hello Spring 4");
    }

    public static void main(String[] args) {
        SpringApplication.run(Producer.class, args);
    }
}
- Consumer code
@SpringBootApplication
@EnableJms
public class Consumer {

    @JmsListener(destination = "queue1")
    public void receive(String message) {
        System.out.println("Message received:" + message);
    }

    public static void main(String[] args) {
        SpringApplication.run(Consumer.class, args);
    }
}
Manually configure multiple ActiveMQ
- A JmsConfiguration class needs to be added
@Configuration
@EnableJms
public class JmsConfiguration {

    /**
     * Connection factory
     * Configure multiple ActiveMQ to copy one method, change the method name and some parameters.
     * @param brokerUrl
     * @param userName
     * @param password
     * @return
     */
    @Bean
    public ConnectionFactory connectionFactory1(@Value("${spring.activemq.broker-url}") String brokerUrl, @Value("${spring.activemq.user}") String userName, @Value("${spring.activemq.password}") String password) {
        return new ActiveMQConnectionFactory(userName, password, brokerUrl);
    }

    /**
     * Connection factory
     *
     * @param brokerUrl
     * @param userName
     * @param password
     * @return
     */
    @Bean
    public ConnectionFactory connectionFactory2(@Value("${spring.activemq.broker-url}") String brokerUrl, @Value("${spring.activemq.user}") String userName, @Value("${spring.activemq.password}") String password) {
        return new ActiveMQConnectionFactory(userName, password, brokerUrl);
    }

    /**
     * Listening container in queue mode
     *
     * @param connectionFactory
     * @return
     */
    @Bean
    public JmsListenerContainerFactory<?> jmsListenerContainerFactoryQueue(ConnectionFactory connectionFactory) {
        DefaultJmsListenerContainerFactory bean = new DefaultJmsListenerContainerFactory();
        bean.setConnectionFactory(connectionFactory);
        return bean;
    }

    /**
     * topic Monitor
     * @param connectionFactory
     * @return
     */
    @Bean
    public JmsListenerContainerFactory<?> jmsListenerContainerFactoryTopic(ConnectionFactory connectionFactory) {
        DefaultJmsListenerContainerFactory bean = new DefaultJmsListenerContainerFactory();
        bean.setConnectionFactory(connectionFactory);
        bean.setPubSubDomain(true);
        return bean;
    }

    /**
     * Queue template
     *
     * @param connectionFactory
     * @return
     */
    @Bean
    public JmsTemplate jmsTemplateQueue(ConnectionFactory connectionFactory) {
        return new JmsTemplate(connectionFactory);
    }

    /**
     * Publish subscription template
     *
     * @param connectionFactory
     * @return
     */
    @Bean
    public JmsTemplate jmsTemplatePublish(ConnectionFactory connectionFactory) {
        JmsTemplate jmsTemplate = new JmsTemplate(connectionFactory);
        jmsTemplate.setPubSubDomain(true);
        return jmsTemplate;
    }

}
- Producer code demonstration
@SpringBootApplication
public class Producer {

    @Autowired
    private JmsTemplate jmsTemplatePublish;

    @Autowired
    private JmsTemplate jmsTemplateQueue;

    @PostConstruct
    public void send() {
        // Queue mode send
        jmsTemplatePublish.convertAndSend("topic1", "Hello Spring topic 1");

        // Publish and subscribe mode send
        jmsTemplateQueue.send("queue1", new MessageCreator() {
            @Override
            public Message createMessage(Session session) throws JMSException {
                MapMessage message = session.createMapMessage();
                message.setString("msg", "Hello Spring xxxx");
                return message;
            }
        });
    }

    public static void main(String[] args) {
        SpringApplication.run(Producer.class, args);
    }
}
- Consumer code demonstration
@SpringBootApplication
public class Consumer {

    @JmsListener(destination = "queue1", containerFactory = "jmsListenerContainerFactoryQueue")
    public void receiveQueue(Message message) throws JMSException {
        if (message instanceof TextMessage) {
            System.out.println("Text message received:" + ((TextMessage) message).getText());
        } else if (message instanceof ActiveMQMapMessage) {
            System.out.println("Received Map News:" + ((ActiveMQMapMessage) message).getContentMap());
        } else {
            System.out.println(message);
        }
    }

    @JmsListener(destination = "topic1", containerFactory = "jmsListenerContainerFactoryTopic")
    public void receiveTopic(String message) {
        System.out.println("Received subscription message:" + message);
    }

    public static void main(String[] args) {
        SpringApplication.run(Consumer.class, args);
    }
}

