Preface
As for what spring security is, there are two main functions: user authentication and authorization. That is, we often say that users can only perform other operations after logging in. If they do not log in, they will be redirected to the login interface. Some users have permission to perform an operation, while others are authorized if they cannot. It is a project safety framework. Same as shiro framework. The difference between the two can be Baidu small. Spring security is a member of the spring family, so spring boot is a natural support for spring security.
The reason for this is that the configuration of spring security, which has been criticized by many people, is complicated and complicated, and becomes simpler in spring boot. If we are just demo effect, we can achieve 0 configuration implementation.
Let's meet
rely on
We introduce Spring security's statter in pom.xml file
<dependency>
   <groupId>org.springframework.boot</groupId>
    <artifactId>spring-boot-starter-security</artifactId>
</dependency>
<dependency>
    <groupId>org.springframework.boot</groupId>
    <artifactId>spring-boot-starter-web</artifactId>
</dependency>
test
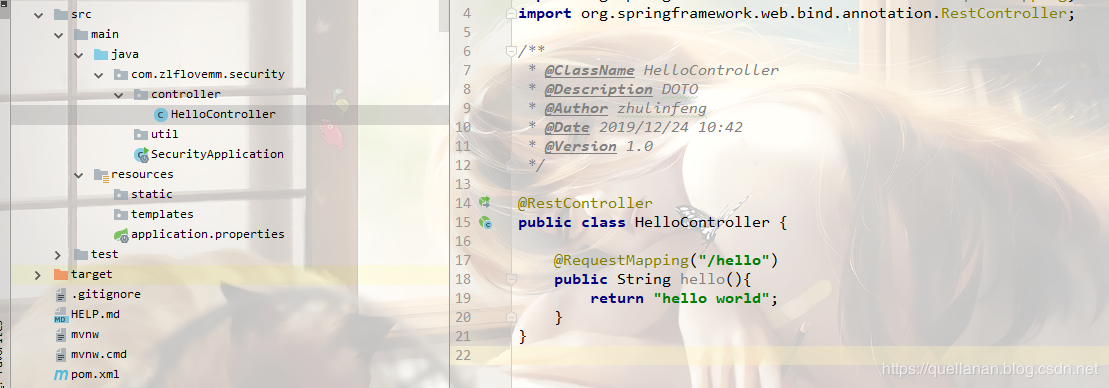
Let's take a look at the 0 configuration first. After introducing dependency, we create a HelloController as follows:
@RestController
public class HelloController {

    @RequestMapping("/hello")
    public String hello(){
        return "hello world";
    }
}
 And then we launch the project and, as we normally understand it, visit directly
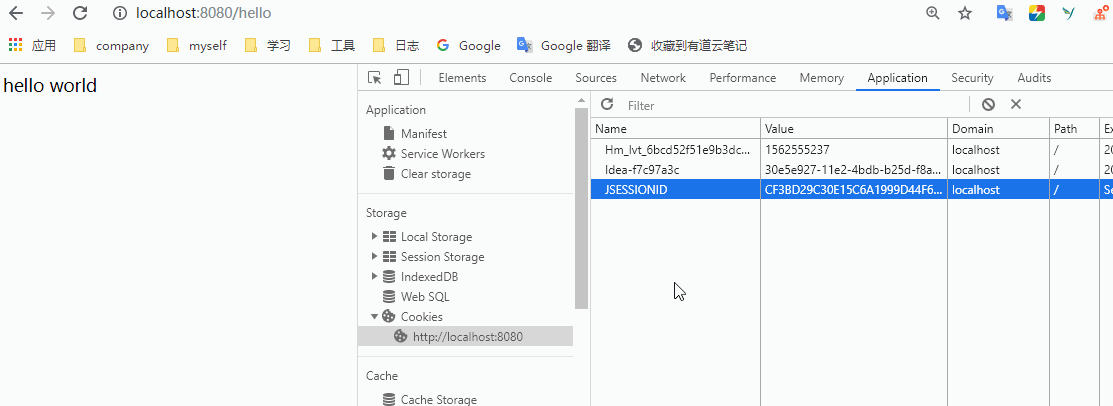
localhost:8080/hello
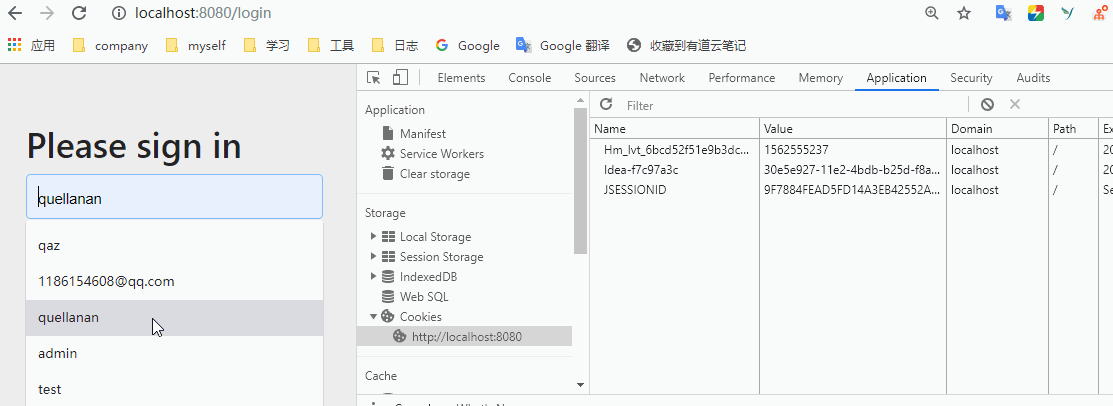
Will return to hello world. But the result was a redirect to / login. The following interface comes with Spring security.
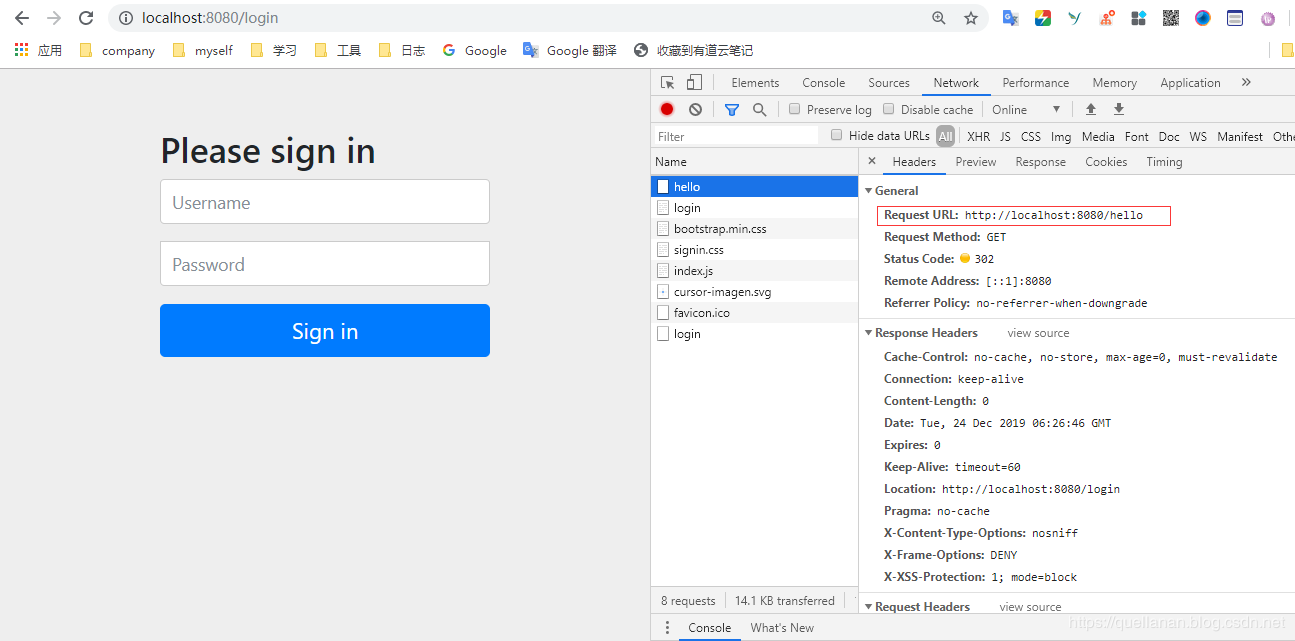 In fact, as you can see above, Spring security has already worked. You can't access the / hello interface without login.
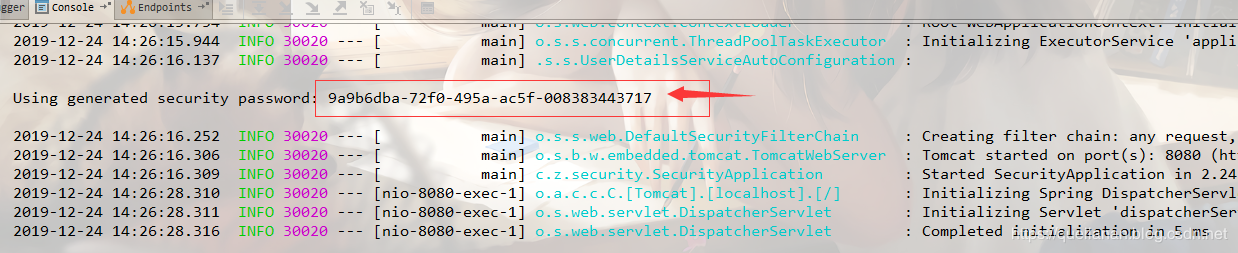
The default user name is user;
The password is printed on the console when our project is started. It will be generated randomly every time.
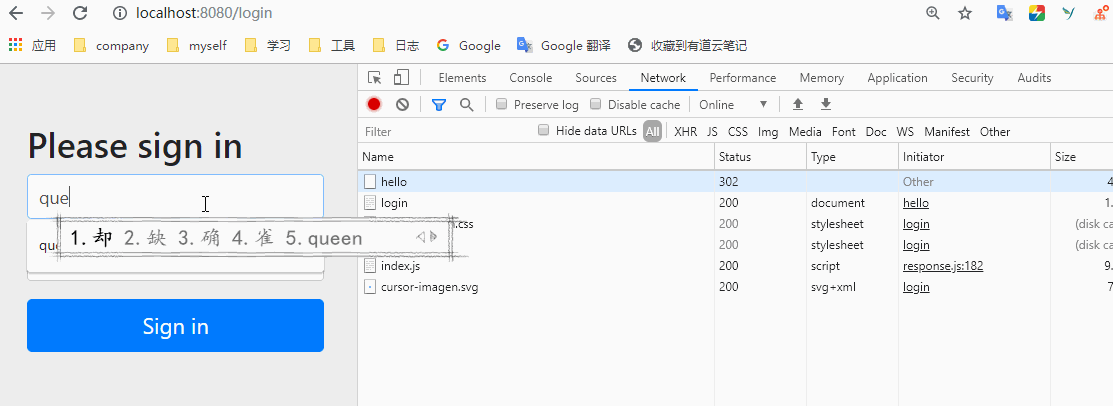
 Let's enter the account code and try again
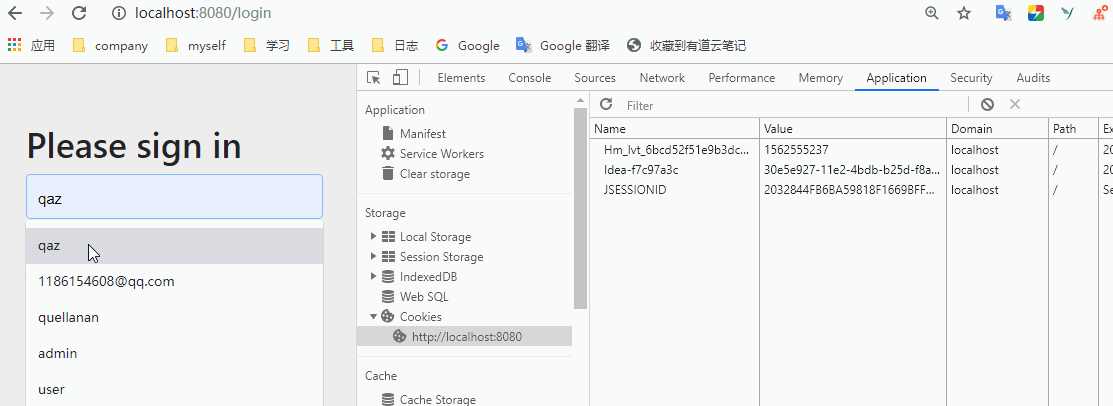
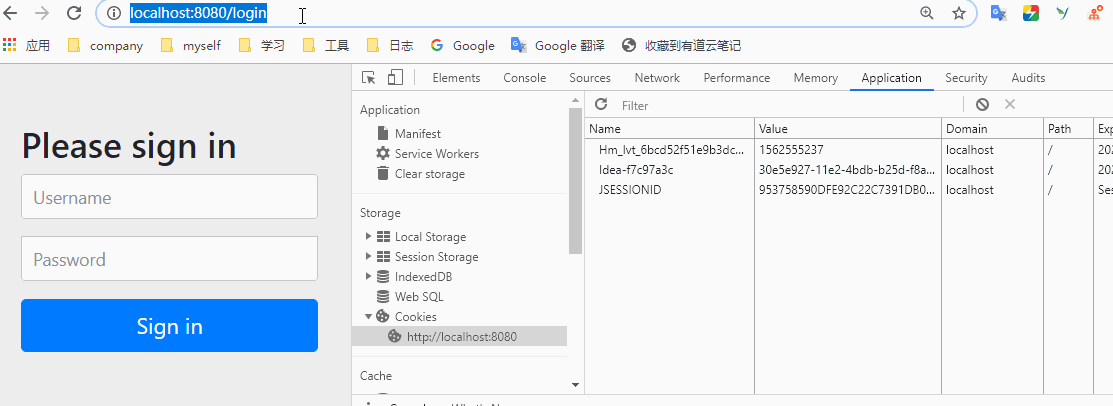
 You can see that after logging in, when we request / hello, we will directly return to hello world. Is it possible to access it all the time after logging in once? Of course not. After the login is successful, the information will be saved in the session. When you log in again, it will pass the session verification, so that you can access it. When the session expires, we need to log in again after clearing it manually. Let's try. Open the console and clean up the jsessionid in the cookies in the application.
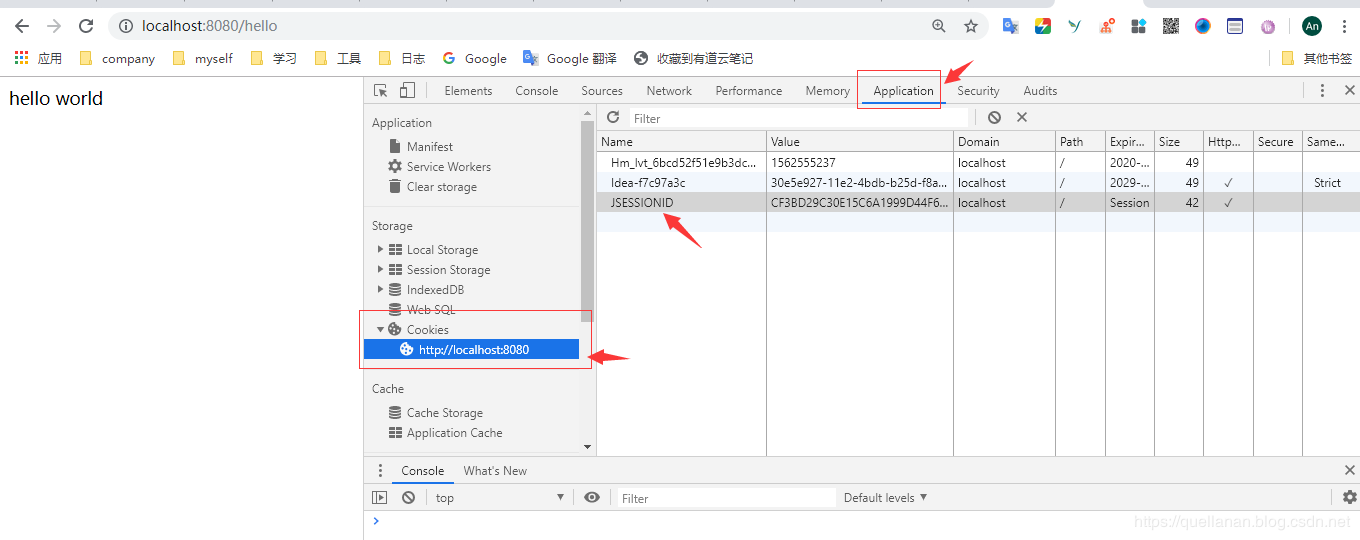 We then ask for a try. We can find that after deletion, we will return to the login interface.
Simple configuration of users and passwords
We use the default user name and password above, but we will not do so in fact. It just shows that spring boot is fully integrated with Spring security. Now let's simply configure the user name and password. The reason for this is that we should not use it in the actual process. The reason why we want to talk about it is to let you know more comprehensively and lay the groundwork for the following.
Configuration in application.properties
First of all, we can simply configure the user name and password in application.properties. Instead of the default username and password.
spring.security.user.name=quellanan
spring.security.user.password=123456
spring.security.user.roles=admin
Set user name, password and role respectively. We only use user authentication here for the time being, so it doesn't matter whether the role is set or not. After that, we will restart the project and try again on the interface.
 No problem, but it's useless. We won't do it in practice.
In memory configuration
To configure in memory, it is relatively complicated. We create a config package and create a SecurityConfig class under the package to inherit the WebSecurityConfigurerAdapter
@Configuration
public class SecurityConfig extends WebSecurityConfigurerAdapter {

    @Override
    protected void configure(AuthenticationManagerBuilder auth) throws Exception {
        auth.inMemoryAuthentication()
                .passwordEncoder(passwordEncoder()) // Specify encryption method
                .withUser("qaz").password(passwordEncoder().encode("123456")).roles("admin")
                .and()
                .withUser("test").password(passwordEncoder().encode("123456")).roles("USER");
    }


    @Bean
    public PasswordEncoder passwordEncoder() {
        // BCryptPasswordEncoder: an encryption tool provided by Spring Security
        return new BCryptPasswordEncoder();
    }
}
Here we rewrite the configure (authentication manager builder auth) method, which is to configure the defined users into memory. There is a problem to explain here. If it is configured here, the password needs to be encrypted with BCryptPasswordEncoder. If it is not encrypted, no error will be reported when the project is compiled and started, but the login will prompt the account password error.
Another problem is that if we configure it here, what we configure in application.people will fail.
These two methods mentioned above are not commonly used. We will not write the user information in the actual project at all. Basically, they exist in the database. So let's start with our most commonly used model.
As a result of this category, involving more, a separate level of the title out, not put in the two levels of the title inside.
User authentication from database
Since the database is used, the configuration of data is naturally introduced into the project. I use mysql and mybatis here
This is the directory structure after the whole project is formed. Put it out first, everyone has a foundation in mind, and then step by step.

Building database and building tables
Three simple tables, user, roles, roles ﹣ user.
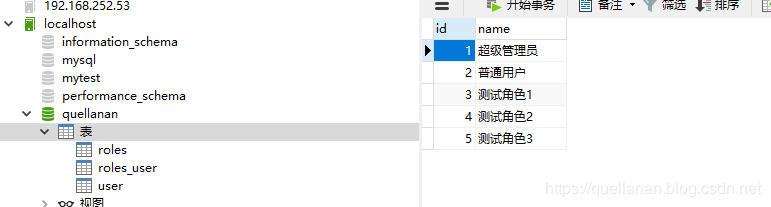 Here is sql. Direct execution
/*
Date: 2017-12-26 18:36:12
*/

CREATE DATABASE `quellanan` DEFAULT CHARACTER SET utf8;

USE `quellanan`;

SET FOREIGN_KEY_CHECKS=0;

-- ----------------------------
-- Table structure for roles
-- ----------------------------
DROP TABLE IF EXISTS `roles`;
CREATE TABLE `roles` (
  `id` int(11) NOT NULL AUTO_INCREMENT,
  `name` varchar(32) DEFAULT NULL,
  PRIMARY KEY (`id`)
) ENGINE=InnoDB AUTO_INCREMENT=6 DEFAULT CHARSET=utf8;

-- ----------------------------
-- Records of roles
-- ----------------------------
INSERT INTO `roles` VALUES ('1', 'Super administrator');
INSERT INTO `roles` VALUES ('2', 'Ordinary users');
INSERT INTO `roles` VALUES ('3', 'Test role 1');
INSERT INTO `roles` VALUES ('4', 'Test role 2');
INSERT INTO `roles` VALUES ('5', 'Test role 3');

-- ----------------------------
-- Table structure for roles_user
-- ----------------------------
DROP TABLE IF EXISTS `roles_user`;
CREATE TABLE `roles_user` (
  `id` int(11) NOT NULL AUTO_INCREMENT,
  `rid` int(11) DEFAULT '2',
  `uid` int(11) DEFAULT NULL,
  PRIMARY KEY (`id`),
  KEY `rid` (`rid`),
  KEY `roles_user_ibfk_2` (`uid`),
  CONSTRAINT `roles_user_ibfk_1` FOREIGN KEY (`rid`) REFERENCES `roles` (`id`),
  CONSTRAINT `roles_user_ibfk_2` FOREIGN KEY (`uid`) REFERENCES `user` (`id`) ON DELETE CASCADE
) ENGINE=InnoDB AUTO_INCREMENT=131 DEFAULT CHARSET=utf8;

-- ----------------------------
-- Records of roles_user
-- ----------------------------
INSERT INTO `roles_user` VALUES ('1', '1', '1');
INSERT INTO `roles_user` VALUES ('2', '2', '2');
INSERT INTO `roles_user` VALUES ('3', '3', '3');
INSERT INTO `roles_user` VALUES ('4', '1', '4');


-- ----------------------------
-- Table structure for user
-- ----------------------------
DROP TABLE IF EXISTS `user`;
CREATE TABLE `user` (
  `id` int(11) NOT NULL AUTO_INCREMENT,
  `username` varchar(64) DEFAULT NULL,
  `nickname` varchar(64) DEFAULT NULL,
  `password` varchar(255) DEFAULT NULL,
  `enabled` tinyint(1) DEFAULT '1',
  `email` varchar(64) DEFAULT NULL,
  `userface` varchar(255) DEFAULT NULL,
  `regTime` datetime DEFAULT NULL,
  PRIMARY KEY (`id`)
) ENGINE=InnoDB AUTO_INCREMENT=21 DEFAULT CHARSET=utf8;

-- ----------------------------
-- Records of user
-- ----------------------------
INSERT INTO `user` VALUES ('1', 'quellanan', '', '$2a$10$Hv0YGLi/siOswCTP236MtOTWbClcM6rN1LCyqwfRmrwCJZqXHsj5a', '1', 'quellanan@qq.com','', '2017-12-08 09:30:22');

INSERT INTO `user` VALUES ('2', 'qaz', '', '$2a$10$6H69XLebCrGhHeHzDXEoH.0x8tMFS0XfdDPwI5s.Eu9pbqRpncA.G', '1', 'quellanan@qq.com','', '2017-12-08 09:30:22');

INSERT INTO `user` VALUES ('3', 'wsx', '', '$2a$10$6H69XLebCrGhHeHzDXEoH.0x8tMFS0XfdDPwI5s.Eu9pbqRpncA.G', '1', 'quellanan@qq.com','', '2017-12-08 09:30:22');

INSERT INTO `user` VALUES ('4', 'test', '', '$2a$10$6H69XLebCrGhHeHzDXEoH.0x8tMFS0XfdDPwI5s.Eu9pbqRpncA.G', '1', 'quellanan@qq.com','', '2017-12-08 09:30:22');


SET FOREIGN_KEY_CHECKS=1;
pom.xml increases dependency
We first add the pom file based on the original one, as follows.
		<dependency>
            <groupId>mysql</groupId>
            <artifactId>mysql-connector-java</artifactId>
            <scope>runtime</scope>
        </dependency>

        <dependency>
            <groupId>org.mybatis.spring.boot</groupId>
            <artifactId>mybatis-spring-boot-starter</artifactId>
            <version>2.1.0</version>
        </dependency>

        <dependency>
            <groupId>org.apache.commons</groupId>
            <artifactId>commons-pool2</artifactId>
        </dependency>

        <dependency>
            <groupId>org.projectlombok</groupId>
            <artifactId>lombok</artifactId>
        </dependency>
The first three are mysql and mybatis dependencies. lombok is a tool class plug-in.
At the same time, we need to modify the build in the pom file, otherwise our project may not find the xml file of mybatis.
	<build>
        <resources>
            <resource>
                <directory>src/main/java</directory>
                <includes>
                    <include>**/*.xml</include>
                </includes>
            </resource>
            <resource>
                <directory>src/main/resources</directory>
            </resource>
        </resources>

        <plugins>
            <plugin>
                <groupId>org.springframework.boot</groupId>
                <artifactId>spring-boot-maven-plugin</artifactId>
            </plugin>
        </plugins>
    </build>
Configure application.properties
spring.datasource.driver-class-name=com.mysql.jdbc.Driver
spring.datasource.url=jdbc:mysql://127.0.0.1:3306/quellanan?allowMultiQueries=true&useUnicode=true&characterEncoding=utf8&serverTimezone=UTC
spring.datasource.username=root
spring.datasource.password=123456
spring.datasource.max-idle=10
spring.datasource.max-wait=10000
spring.datasource.min-idle=5
spring.datasource.initial-size=5
Here if you want to print the sql log of mybatis. You can add a mybatis-config.xml file in the same directory as application.properties
<?xml version="1.0" encoding="UTF-8" ?>
<!DOCTYPE configuration PUBLIC "-//mybatis.org//DTD Config 3.0//EN" "http://mybatis.org/dtd/mybatis-3-config.dtd">
<configuration>
    <settings>
        <setting name="logImpl" value="STDOUT_LOGGING" />
    </settings>
</configuration>
And add the
mybatis.config-location=classpath:/mybatis-config.xml
entry
We create RoleEntry under the entry package. The code is as follows:
@Getter
@Setter
public class RoleEntry {
    private Long id;
    private String name;
}
We are creating UserEntry, but UserEntry is special because we need to use Spring security. So here, UserEntry needs to implement UserDetails. The code is as follows:
@Setter
@Getter
public class UserEntry implements UserDetails {

    private Long id;
    private String username;
    private String password;
    private String nickname;
    private boolean enabled;
    private List<RoleEntry> roles;
    private String email;
    private String userface;
    private Timestamp regTime;

    /**
     * Get role permissions
     * @return
     */
    @Override
    public Collection<? extends GrantedAuthority> getAuthorities() {
        List<GrantedAuthority> authorities = new ArrayList<>();
        for (RoleEntry role : roles) {
            authorities.add(new SimpleGrantedAuthority("ROLE_" + role.getName()));
        }
        return authorities;
    }

    /**
     * Get password
     * @return
     */
    @Override
    public String getPassword() {
        return password;
    }

    /**
     * Get user name
     * @return
     */
    @Override
    public String getUsername() {
        return username;
    }


    /**
     * Whether the user account expires
     */
    @Override
    public boolean isAccountNonExpired() {
        return true;
    }

    /**
     * Whether the user account is locked
     */
    @Override
    public boolean isAccountNonLocked() {
        return true;
    }

    /**
     * Whether the user password expires
     */
    @Override
    public boolean isCredentialsNonExpired() {
        return true;
    }

    /**
     * Is the user available
     */
    @Override
    public boolean isEnabled() {
        return enabled;
    }
}
As you can see, they are basically rewritten methods. It's also relatively simple.
mapper
Here I put xml file and interface together, you can also create a mapper in resources, where to put the xml file. There is nothing to say about the mapper layer, which is some knowledge of mybatis.
RolesMapper
@Mapper
public interface RolesMapper {
    List<RoleEntry> getRolesByUid(Long uid);
}
RolesMapper.xml
<?xml version="1.0" encoding="UTF-8" ?>
<!DOCTYPE mapper
        PUBLIC "-//mybatis.org//DTD Mapper 3.0//EN"
        "http://mybatis.org/dtd/mybatis-3-mapper.dtd">
<mapper namespace="com.zlflovemm.security.mapper.RolesMapper">
    <select id="getRolesByUid" parameterType="long" resultType="com.zlflovemm.security.entry.RoleEntry">
        SELECT r.* FROM roles r,roles_user ru WHERE r.`id`=ru.`rid` AND ru.`uid`=#{uid}
    </select>
</mapper>
UserMapper
@Mapper
public interface UserMapper {
    UserEntry loadUserByUsername(@Param("username") String username);
}
UserMapper.xml
<?xml version="1.0" encoding="UTF-8" ?>
<!DOCTYPE mapper
        PUBLIC "-//mybatis.org//DTD Mapper 3.0//EN"
        "http://mybatis.org/dtd/mybatis-3-mapper.dtd">
<mapper namespace="com.zlflovemm.security.mapper.UserMapper">
    <select id="loadUserByUsername" resultType="com.zlflovemm.security.entry.UserEntry">
        SELECT * FROM user WHERE username=#{username}
    </select>
</mapper>
service
In the service layer, we need to realize the UserDetailsService interface. Let's create a UserService to inherit UserDetailsService. Then create a UserServiceImpl to implement the UserService to achieve the purpose of UserDetailsService. This is to ensure a unified level of project structure.
UserService
public interface UserService extends UserDetailsService {
}
UserServiceImpl
@Service
@Slf4j
@Transactional
public class UserServiceImpl implements UserService {

    @Autowired
    UserMapper userMapper;
    @Autowired
    RolesMapper rolesMapper;

    @Override
    public UserDetails loadUserByUsername(String s) throws UsernameNotFoundException {
        UserEntry user = userMapper.loadUserByUsername(s);
        if (user == null) {
            //Avoid returning null. Here, a User object without any value is returned, which will fail in the later password comparison process
            return new UserEntry();
        }
        //Query the user's role information, and return it to save in user
        List<RoleEntry> roles = rolesMapper.getRolesByUid(user.getId());
        user.setRoles(roles);
        return user;
    }
}
As you can see, the main purpose is to implement the loadUserByUsername method. In this method, loadUserByUsername and getRolesByUid are the methods defined in mapper to query database data.
SecurityConfig
So much has been done before, but in fact, it's all preparatory work. The main purpose is to provide a Bean. After that, we will go back to SecurityConfig. In fact, there are few changes we need to make now. We annotate the method that the user wrote in memory. Query through database.
@Configuration
public class SecurityConfig extends WebSecurityConfigurerAdapter {

    @Autowired
    UserService userService;

    @Bean
    public PasswordEncoder passwordEncoder() {
        // BCryptPasswordEncoder: an encryption tool provided by Spring Security
        return new BCryptPasswordEncoder();
    }

    @Override
    public void configure(AuthenticationManagerBuilder auth) throws Exception {
        auth.userDetailsService(userService)
                .passwordEncoder(passwordEncoder());//passwoldEncoder is the encryption of the password. If the password in user is not encrypted, this method can be omitted. Note: for encryption, please use the encryption method that comes with security.
    }

}
It can be compared with the initial SecurityConfig file. In fact, you have one more user service, and then the authentication manager builder auth is verified through the user service.
test
Well, in fact, we have finished it. When we start the project, we can see that it achieves the same effect as before written in memory.
filter
I thought it would be over by now, but in fact, it's a little bit haha. We now need to log in to access all interfaces. If we don't log in, we will jump to the login interface. In fact, we are sure that some of them can be accessed without authentication, such as the following static files or registration requests. So we still need to configure filtering.
In fact, it is also very simple. In the same way, you can override the configure(HttpSecurity http) method in the SecurityConfig file.
Here I directly refer to the official website.
https://spring.io/guides/gs/securing-web/
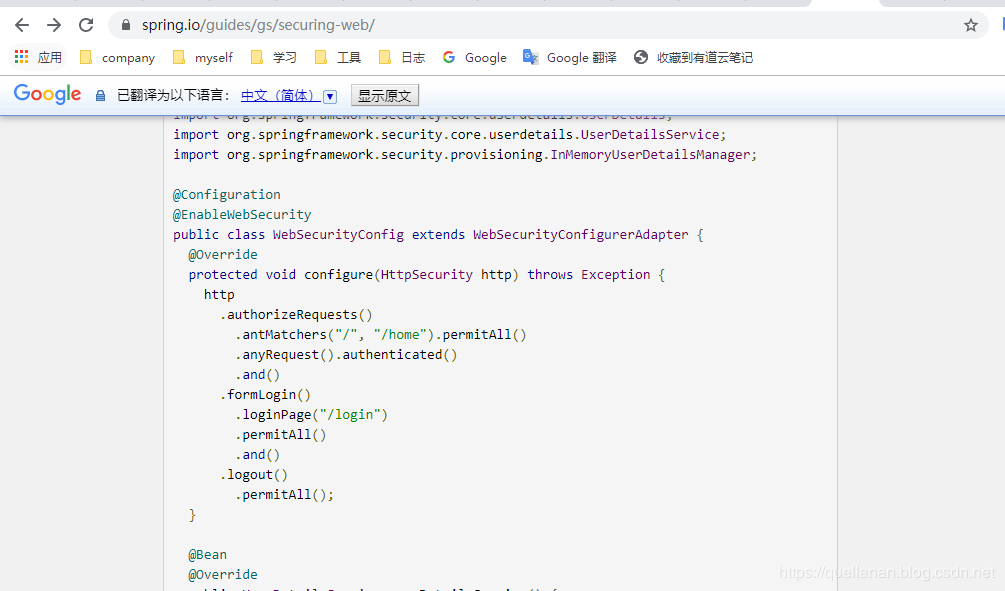
The configure(HttpSecurity) method defines which URL paths should be protected and which URL paths should not be protected. Specifically, the '/' and '/ home' paths are configured to require no authentication. All other paths must be verified. After users log in successfully, they will be redirected to the page that previously requested authentication. There is a custom "/ login" page named loginPage() that everyone can view.
In our code, just comment out the loginPage("/login"). If not, we need to write our own login interface and request. We use the frame here.
    @Override
    protected void configure(HttpSecurity http) throws Exception {
        http.authorizeRequests()
            .antMatchers("/", "/hello").permitAll()
            .anyRequest().authenticated()
            .and()
            .formLogin()
            //.loginPage("/login")
            .permitAll()
            .and()
            .logout()
            .permitAll();
    }
This configuration means that / hell and / requests will not be blocked. Other requests need to be logged in before they can be accessed. In order to see the effect more conveniently, we add two more methods to HelloController
    @RequestMapping("/hello2")
    public String hello2(){
        return "hello adada";
    }

    @RequestMapping("/")
    public String hello3(){
        return " qazqeee";
    }
}
Now let's start to see the effect.
 It is proved that the filter we configured is effective.
Off the coast
This is almost the end. In fact, there are a lot of knowledge points, which can not be covered in an article. This is a kind of turning jade. I hope it can help you. I will keep updating later
OK, I uploaded the source code to github https://github.com/QuellanAn/security
Follow up
Welcome everyone to pay attention to the personal public number "programmers love yogurt".
Share all kinds of learning materials, including java, linux, big data, etc. The materials include video documents and source code, and share the high-quality technical blog articles delivered by myself and others.
If you like, remember to pay attention and share