Introduction to Airtest
Airtest is a UI automatic testing tool based on image recognition and poco control recognition produced by Netease. Airtest's framework is an image recognition framework developed by Netease team. The ancestor of this framework is a novel graphic scripting language Sikuli. The principle of Sikuli framework is that computer users do not need to write code line by line, but use the way of screen capture and use the cut graphics to arrange and combine them into an artifact program, which is a part of airtest.
In addition, Airtest is also based on the poco U control search framework. This framework is also a cross platform U testing framework of NetEase. The principle is similar to appium. It controls the target control by means of the name of the control, id and so on, and then calls function methods, such as click(),swip(), to click or operate the target control.
About automated testing
Concept: automated testing is the process of writing complex manual test cases into code using automated testing tools, and allowing machines to automatically run test cases instead of manual ones. In fact, it is a process of transforming human driven test behavior into machine execution.
Significance: save manpower, material resources, time and hardware resources and improve test efficiency. Especially for cumbersome and repeated test cases, testers can focus more on the establishment and development of new test modules, so as to improve test coverage.
Common UI automation test tools on the market and their advantages and disadvantages
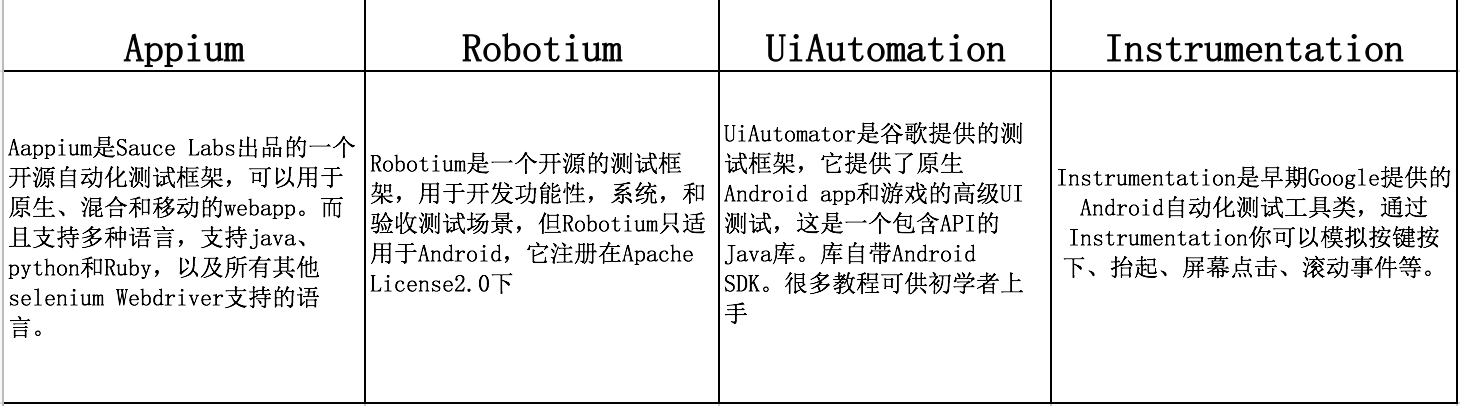
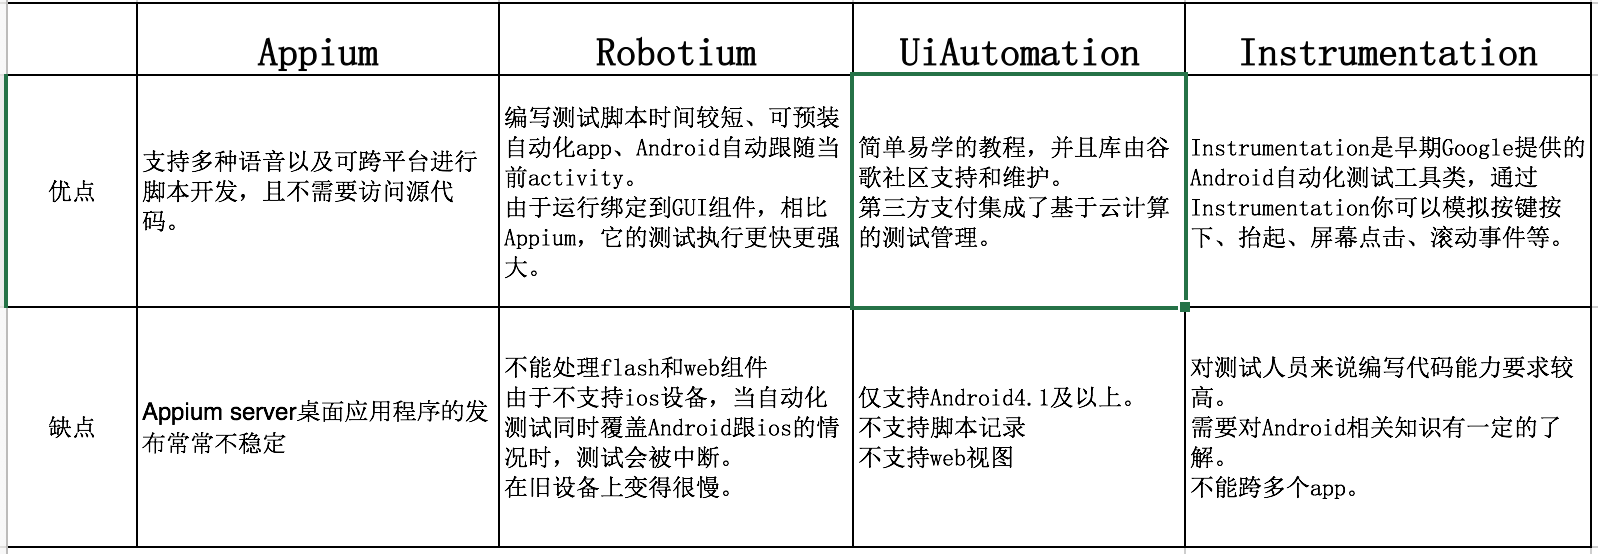
Advantages and disadvantages of the above mainstream tools:
Compared with the above tools, Airtest has the following advantages and disadvantages:
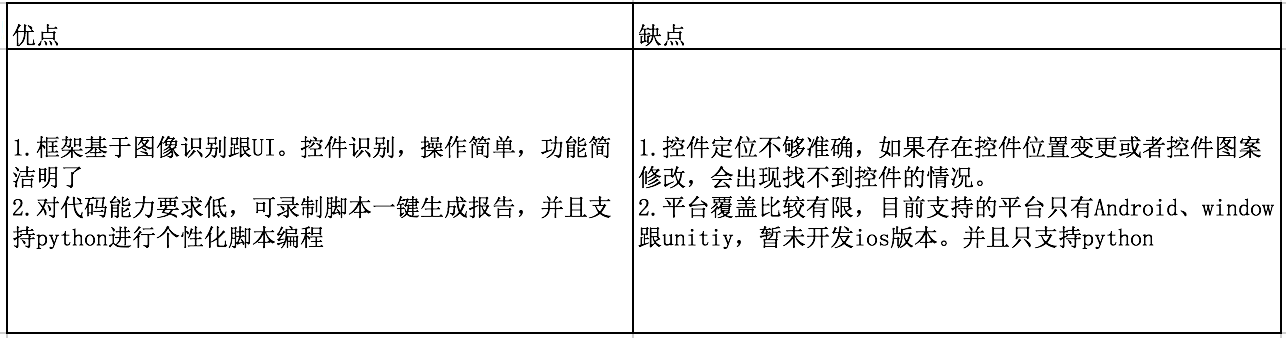
So in fact, Airtest based on image recognition is more suitable for game testing.
Construction of environment
1. Airtest ide Download
Airtest ide has helped you integrate all environments. It has its own recording script bar, automatic script generation, its own editor and its own simulator. With an airtest IDE, you can easily and simply record scripts. The download address is airtest's official website:
http://airtest.netease.com/
The tutorial and documentation of airtest ide are also in the following connection:
https://airtest.doc.io.netease.com/
Android real machine connection
When using airtest ide to automatically test Android applications, the first step is to connect Android devices.
Android real machine connection preparation:
- Please install the official driver of the corresponding brand of the mobile phone first to ensure that the computer can be used for USB debugging of the mobile phone
- Make sure that the "developer options" in the phone is turned on and the "allow USB debugging" in the "developer options" is turned on
- Some mobile phones need to turn on "allow analog location" and "allow application installation through USB"
- Closing the installed mobile assistant software on the computer can avoid most problems. Please be sure to manually end the mobile assistant process in the task manager
Android real USB connection
- Please use the USB cable to connect the mobile phone. Click OK in the pop-up window allowing USB debugging on the mobile phone,
- Click the refresh ADB button in the connection panel to refresh the device list,
- Click Connect of the corresponding device in the list to complete the connection,
- If the device is not swiped out, click the refresh ADB button.
If you encounter connection problems, please refer to Android connection FAQs: https://airtest.doc.io.netease.com/IDEdocs/faq/1_common%20problems/
After the mobile phone is connected to Airtest, two app s will be installed into the mobile phone, as follows:
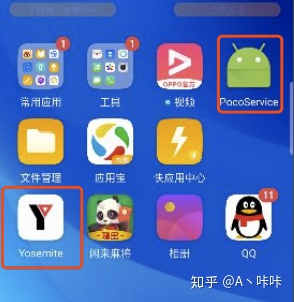
pocoservice is an app that supports poco operation. yosemite is the input method of airtest. After installation, the default input method of the mobile phone will become this input method. If you need to change back to the original input method, you need to manually modify it in the mobile phone settings;
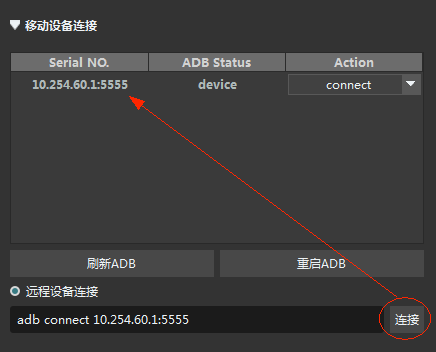
Remote connection
- The remote device with known IP and port ip:port and airtest ide can be connected directly,
- Click the remote device connection button in the device window
- Fill the adb connect ip:port field into the filling box and click the connect button,
- The remote device will appear in the device list and click the connect button.
Wireless connection
reference resources: Connect your phone wirelessly using adb
When the mobile phone and the computer are on the same wifi, you can try to connect the mobile phone wirelessly. However, due to the stability of the network connection, the connection may not be stable enough. The specific connection steps are as follows:
- Make sure that the USB debugging option is turned on and connect the phone to the computer with the USB cable first
- Execute the command adb tcpip 5555 on the computer side, where 5555 is the port number, which can be specified according to your own needs, and 5555 is the default value
- Get the IP address of the mobile phone, which can be found in mobile phone settings - about mobile phone - status information - IP address, or execute adb ifconfig to view it
- Then you can unplug the USB cable, input the adb connect mobile phone ip at the remote device connection of airtest ide: the port number 5555 just filled in, click Connect, refresh ADB, and you can see the connected devices in the device list
- If the connection is disconnected due to network fluctuation, restart ADB, etc., execute adb connect ip:port again.
Recording
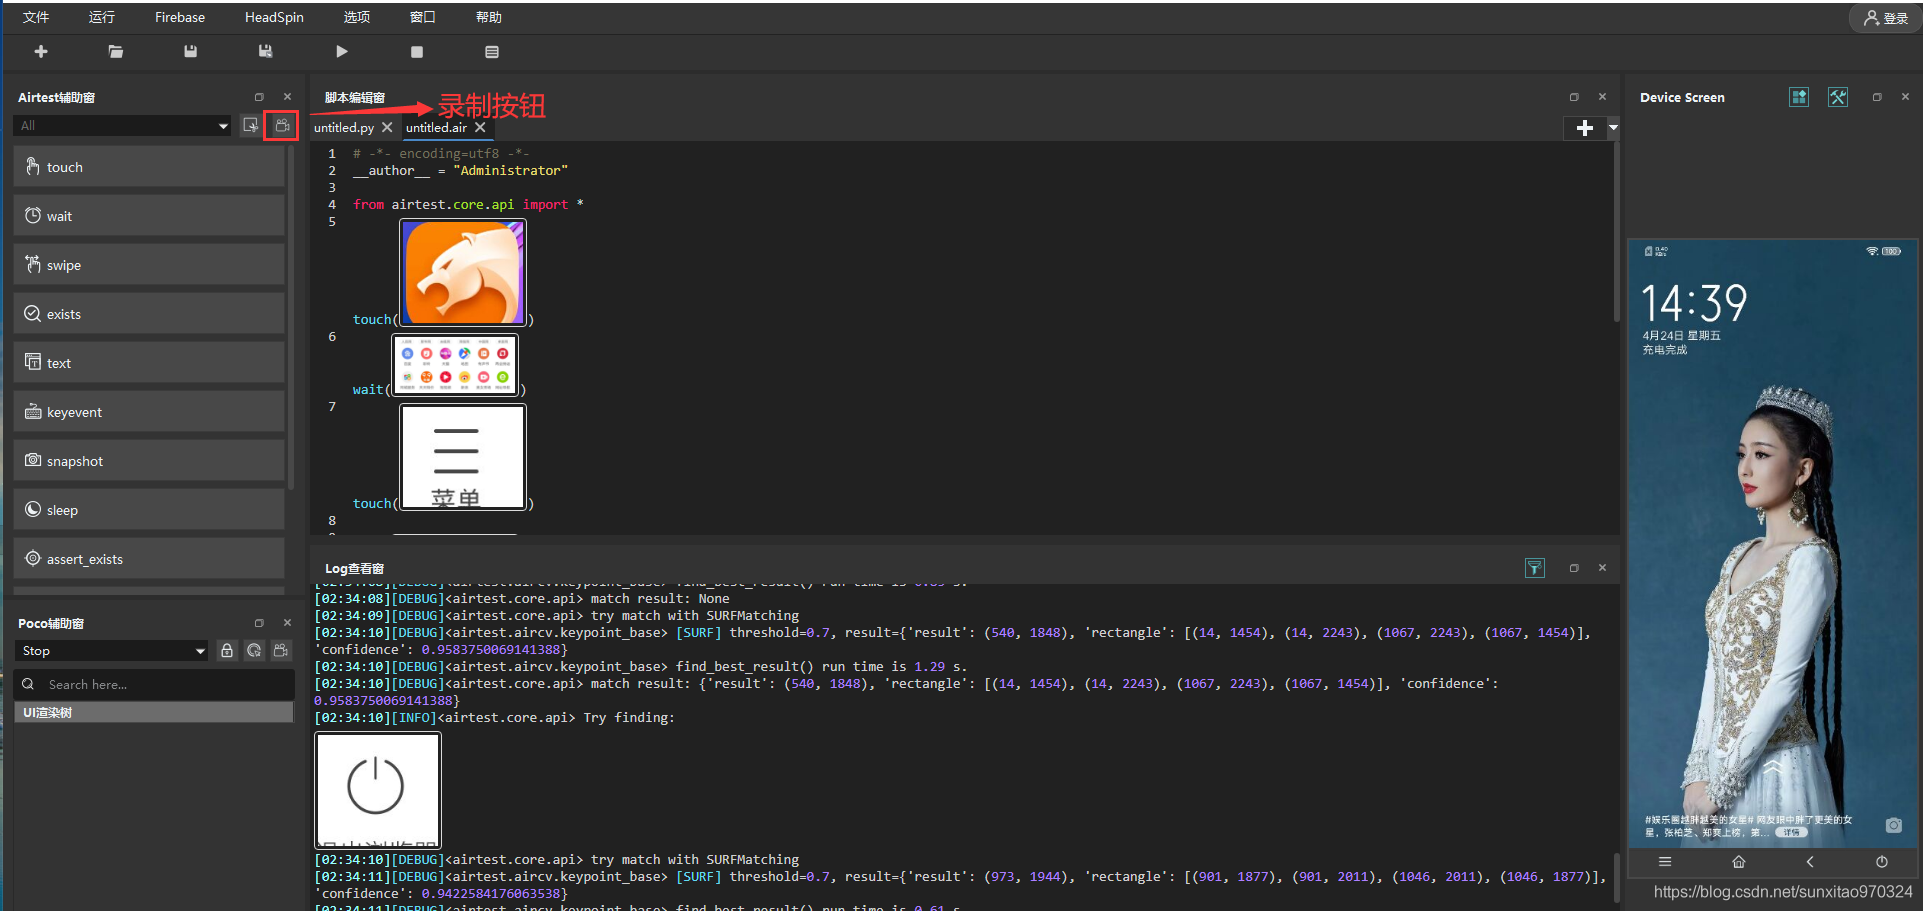
Click the record button to select an event for recording, which can be operated with the mouse
Describe the function of each parameter during recording
- touch(): Click to click according to the image captured during script recording
- wait(): you can wait for a picture in the picture to appear. If the picture is matched within the specified time range, the focus of the picture will be returned. Otherwise, a TargetNotFoundError exception will be thrown
- swipe(): you can slide from one position to another
- exists(): determines whether a picture exists in the picture. If it matches the picture, it returns the focus of the picture. Otherwise, it returns False
- text(): enter text
- sleep(): thread suspended
- assert_exists(): asserts that the picture exists on the current screen
- assert_not_exists(): asserts that the picture does not exist
- assert_equal(): asserts that the values are equal
- assert_not_equal(): assert unequal values
- assert_exists() and assert_ The difference between equal() and assert()_ Exists asserts that the object is a picture, assert_ The object of the equal assertion is a value
It can be configured according to the required parameters
A simple. air script parsing
What is an. air script
After downloading and decompressing Airtest IDE, the exclusive ide of Airtest script, click "new script" to create a script file with the suffix. air by default, which is the exclusive suffix of Airtest script.
Let's open the new script folder just now, and you can see that the. air script file is actually an ordinary folder with a. py file with the same name attached. When Airtest ide executes the script, it actually executes the. py file inside. In other words, although the Airtest script has its own suffix, it is still a python script in essence and follows Python syntax. We can freely import other Python third-party libraries according to actual needs.
It is worth noting that there must be a. py file with the same name in the. Air folder, otherwise running instructions such as airtest run test.air on the command line will cause failure.
Initialize environment
First of all, just like an ordinary Python script, we need to write from airtest.core.api import * at the beginning of the code file to import all the main APIs of Airtest, so as to use these APIs in subsequent scripts.
auto_setup Is an interface used to initialize the environment. The interface document is in here , it accepts four parameters. We can set the path where the current script is located, specify the device to run the script, set the default log path and set the script parent path.
- If Auto_ If setup does not pass in any parameters, Airtest will read the parameters passed in the runtime command line to initialize the environment.
- When creating scripts in airtest IDE, the simplest initialization code generated by default is auto_ Setup (_file_), which means to pass in the script file as the script path. Other parameters will read the parameters passed in from the running command line by default.
There are two forms of script running command line. The parameters in the command line include device, log, etc
- Example of running Airtest script from the command line: > Airtest run untitled.air -- device Android: / / / mobile device number -- log /.
For more information on running scripts using the command line, refer to file. - When running the script with airtest IDE, an available command line will be automatically generated in the "Log view window" for your reference.
"D:\AirtestIDE-path\AirtestIDE" runner "D:\script-path\untitled.air" --device Android://127.0.0.1:5037/5PZTQWQOGES8RWUG --log "C:\Users\username\AppData\Local\Temp\AirtestIDE\scripts\aa8c71acdfa70c3068b862cb42ffb8dc"
Device connection
- If a device parameter such as -- device Android: / / / is passed in the command line at runtime, the script will automatically connect to the corresponding device during initialization, and there is no need to write additional code to connect.
- If the device is not connected during initialization, you can use connect in the script code_ Device interface to connect the device.
- Airtest supports simultaneous connection of multiple devices in a script, using set_ The current interface can switch between multiple devices, and the device() interface can obtain the devices currently in use.
Simulated Click
Airtest, as an automatic test framework, simulates human operation. Common interfaces mainly include:
- touch Click a position to set the clicked position, times, holding time and other parameters
- swipe Slide from one position to another
- text Call the input method to enter the specified content
- keyevent Enter a key response, such as enter, delete
- wait Wait for a specified picture element to appear
- snapshot Cut a picture of the current picture
- other
See this for the core API file , the APIs in this document page are all cross platform APIs. Since we import ed all the interfaces in airtest.core.api in the first line of the code, these APIs can be called directly in the code, such as:
from airtest.core.api import *
touch((x, y))
In many interfaces, the Template image object can be passed in as a parameter. When running, you will click the location of the image in the screen, like this:
# Equivalent to touch((x, y)), (x, y) is the center point of the picture
touch(Template(r"tpl1556019871196.png", record_pos=(0.204, -0.153), resolution=(1280, 720)))
Among them, the Template object is a picture class. Airtest will first try to find a position in the current picture that can match the picture. If it is found, it will click on the coordinate. If it is not found, it will throw a recognition exception. We will introduce the Template image class in more detail later.
Installation package
1) Installing Airtest framework using pip pip install airtest
2) If you run the code and report ImportError: DLL load failed: the error of the specified module cannot be found in the cv2 module, if the python version used is lower than 3.7, please run it directly:
pip uninstall opencv-contrib-python
# If the following installation statement fails to run, you can try to update pip to the latest version and try again
pip install opencv-contrib-python==3.2.0.7
3) Poco installation
Use pip to install the poco framework pip install pocoui. Please note that the name of the library is pocoui and do not fill it in incorrectly.
Airtest basic operation method
In addition to cross platform APIs, there are also platform specific APIs, such as:
airtest.core.android #Android platform
airtest.core.ios   #Apple platform
airtest.core.win   #Windows platform
Let's talk about these modules in detail.
Cross platform API module
The first one we want to introduce here is the cross platform module:
from airtest.core.api import * #Import all methods
1) . initialize the device
Here, we also have two schemes for initializing the device. Please see below:
Initialize according to the UUID of the device
Syntax format:
init_device(platform='Android',uuid='',cap_method=JAVACAP for Android)
#Platform – Android, IOS or Windows
#uuid – uuid of the target device, for example, serialno for Android, handle for Windows, uuid for iOS
#kwargs – optional platform specific keyword args, such as cap_method = JAVACAP for Android
Here are some examples:
init_device(platform='Android',uuid='127.0.0.1:62001',cap_method='JAVACAP')
Initialize according to the URL of the device
The syntax format is as follows:
android:///Connect current Android device
android://adbhost:adbport/serial NO.?cap_method=javacap&touch_method=adb
windows:///Connect to local desktop programs
ios:///Connecting IOS devices
Here we are mainly connected by passing in the ADB address, port and serial number of the connected night God simulator. Specific examples are as follows:
connect_device('android://127.0.0.1:5037/127.0.0.1:62001?cap_method=javacap&touch_method=adb')
2) . return to the currently active device
device()

3) . set current active device
Sometimes, if we connect multiple devices and need to switch, we use this function to achieve the purpose. We can use the device index or the device serial number to switch.
set_current(0)
set_current('127.0.0.1:62001')
4) . configuration of operating environment
auto_setup(basedir = None,devices = None,logdir = None,project_root = None,compress = 0 )
basedir Set the location of the current script,__file__it's fine too.
devices Specifies that the device to run the script exists as a list
logdir Set the log saving path when the script runs. The default is None,Set as True Can save
project_root  set up api Project root directory for
5) . turn on and execute the remote Shell command
shell(cmd) #ls / data / local / tmp
6) . start the program on the device
start_app('Application package name to launch')
7) . stop the program on the device
stop_app('Application package name to launch')
8) . clear application data on the device
clear_app('Application package name to launch')
9) . install the application on the device
install(filepath='The path to the file to install on the target device')
10) . uninstall the application on the device
uninstall('Application package name')
11) . screenshot and save to file
snapshot(filename='1.jpg',msg='hello',quality=3)
filename:Picture name
msg:A short description of the screenshot
quality:image quality,Range is[1,99]Integer of
12) . wake up and unlock the device
wake('equipment')
13) . return to the home screen of the target device
home('equipment')
14) Click, slide, pinch, press and enter on the device screen
click(v=Template(x,y),times=2) #single click
v:Touch the target, which can be Template Instance, or absolute coordinates( x,y)
times: How many touches are performed

double_click() #double-click
swipe(v1,v2)#Slide start and end points
swipe(v1,vector=(x,y))#Move along a vector, which can be a coordinate or a percentage of the screen
#Return values: origin position and target position

pinch()#Pinch operation is equivalent to scaling, and the parameters are as follows:
in_or_out:Zoom in or out
center:Default to None Represents the center of the screen
percent:The screen scale of pinch action. The default value is 0.5
keyevent(keyname='Home')#Key operation

text('text')#Enter text on the device
15) Sleep, wait
sleep(2)#Sleep for two seconds and delay for two seconds
wait(v,timeout,interval,intervalfunc)#Wait to match the template on the device screen
v:Waiting target object
timeout:Timeout
interval:The interval between attempts to find a match(second)
intervalfunc:After each failed attempt to find the corresponding match, it is called.
Return value: coordinates of matching target
16) . check if the given target exists on the device screen
exists(v)
v:Check object
 If the target cannot be found; otherwise False,Otherwise, the coordinates of the target are returned
17) . find all targets that appear on the device screen and return their coordinates
find_all(v)
v:Find a target
 Return to coordinate list
18) . assertion operation
assert_exists(v,msg) #Assert that the target exists on the device screen
assert_not_exists(v,msg) #Assert that the target does not exist on the device screen
v:Target to check
msg:A short description of the assertion

assert_equal(v1,v2,msg) #Asserts that two values are equal
assert_not_equal(v1,v2,msg) #Assert that two values are not equal
v1:First value
v2:Second value
msg:A short description of the assertion
Here we've basically finished using the method. Let's do the actual operation. The next article will be presented soon.
- use
from airtest.core.api import *
# Connect local Android devices via ADB
connect_device("Android:///")
#Install the software apk to be tested and the path information.
install("path/to/your/apk")
#Start running app
start_app("com.pingan.certicationApp")
#Click a picture, and the picture will be provided in Airtest based on the image recognition syntax.
touch(Template("image_of_a_button.png"))
#Slide voice, start picture and end picture
swipe(Template("slide_start.png"), Template("slide_end.png"))
#Add picture of assertion
assert_exists(Template("success.png"))
#Click the back button on Android
#keyevent("BACK")
#Click Home on Android to return
#home()
#uninstall("package_name_of_your_apk")
- poco sample
# -*- encoding=utf8 -*-
__author__ = "enmonster"

from airtest.core.api import *

auto_setup(__file__)

from poco.drivers.android.uiautomation import AndroidUiautomationPoco
poco = AndroidUiautomationPoco(use_airtest_input=True, screenshot_each_action=False)

poco("com.miui.home:id/workspace").offspring("Calculator").offspring("com.miui.home:id/icon_icon").click()
poco("com.miui.calculator:id/btn_c_s").click()
poco("com.miui.calculator:id/digit_7").click()
poco("com.miui.calculator:id/op_add").click()
poco("com.miui.calculator:id/digit_5").click()
poco("com.miui.calculator:id/btn_equal_s").click()
poco auxiliary window
poco locates elements through their attributes. Common API s are as follows:
attr('type '): extract the value of the specified element attribute as type
get_text(): extracts the text content of the specified element
attr('text '): retrieves the attributes of the ui element by the given attribute name. If the attribute does not exist, return none (the attributes are visible, text, type, pos, size, name, etc.)
exists(): determines whether the specified element exists on the current screen, true or false
click(): click the event. click(center), click([0.5,0.5]), focus([0.5,0.5]).click() can be used to click the center of the control
rclick(): right click
double_click(): double click
long_click(): long press operation
Swipe: sliding event. For example, swipe([0.2, -0.2], duration=1) slides at an angle of 45 degrees for 1 second
Drag: drag event, such as poco(text = "drag position required"). drag_to(poco(text = "target position"))
focus (local positioning): local positioning, such as poco('control address'). focus('center '). click(), click the middle position of the control
Wait: wait for events, such as poco('control address'). wait(2).click() when the control appears, and wait for 2 seconds at most
Multiple mobile phone interactions
If the case involves the interaction between two mobile phones, you can connect multiple mobile phones in the. py file. For which mobile phone you need to operate on, you need to use set in the script_ Cerrent() to switch to the corresponding mobile phone;
device1 = "c17a4cb4" #Equipment 1
device2 = "RKK0217C15003363" #Equipment 2
dev1 = connect_device("android://127.0.0.1:5037/"+device1) # connect device 1
dev2 = connect_device("android://127.0.0.1:5037/"+device2) # connect device 2
poco1 = AndroidUiautomationPoco(dev1) #Initialize device 1
poco2 = AndroidUiautomationPoco(dev2) #Initialize device 2
set_current(device1)#Switch to phone 1
set_current(device2)Switch to mobile 2
case example
After initializing the device, poco operations of related devices can be performed. For example:
This example is to open wechat, click a friend in the chat message, and then clear the friend chat;
from poco.drivers.android.uiautomation import AndroidUiautomationPoco
device1 = "c17a4cb4" #Equipment number
dev1 = connect_device("android://127.0.0.1:5037/"+device1) # connect master's mobile phone
poco1 = AndroidUiautomationPoco(dev1) #Instantiate mobile phone
auto_setup(__file__)


def clear_wechat(poco):#Clear chat records of wechat
     start_app("com.tencent.mm")#Start wechat
     sleep(12)#Wait 12 seconds
     poco1(text="Samsung").click()#Click "Samsung" to chat
     poco1("android.support.v7.widget.LinearLayoutCompat").click()#Click More
     poco1(text="Clear chat").click()#Click to clear the chat record
     poco1(text="empty").click()#Click clear
     stop_app("com.tencent.mm")#Close wechat
Method of referencing other air files
If there are many repeated operations, you can write these repeated operations into a public air file, and then reference the public air file in the use case:
For example, there is a file named gongyou.air, in which there is a clear_wechat method. This clear_wechat method is a use case for clearing wechat chat records. If you need to use this clear_wechat in a use case, you need to reference this file in the use case, and then pour in the clear_wechat method in the reference file, as follows:
# -*- encoding=utf8 -*-
__author__ = "xhong"

from airtest.core.api import *
from poco.drivers.android.uiautomation import AndroidUiautomationPoco
from poco.exceptions import PocoNoSuchNodeException
from poco.exceptions import PocoTargetTimeout
ST.PROJECT_ROOT = "D:\code\AirtestCase"#Path to reference public air
using("gongyou.air")
from gongyou import clear_wechat
reference resources: https://www.jianshu.com/p/32d08455e86f
https://blog.csdn.net/sunxitao970324/article/details/105731046
http://testerhome.com/topics/20704
https://cloud.tencent.com/developer/article/1819833
https://zhuanlan.zhihu.com/p/165527546
https://blog.csdn.net/chqj_163/article/details/109242399
Airtest ide connection to Android and FAQs:
https://www.cnblogs.com/songzhenhua/p/14716116.html
The airtest connection device has a black screen or runs an error minicap timeout problem:
https://blog.csdn.net/qq_32394351/article/details/112512540