Preface
What is swagger2, let me not say here, is a simple interface document for front-end and back-end debugging.
Actually, I didn't think about using swagger before.Because I used YAPI before, but this is a separate tool.And it's open source, so it's easy for the whole team to work together.But if we're sitting on a personal project here, we'll use the simpler swagger2, which is easier for us to use in springboot.
pom.xml
Everything starts with configuration, we're mapping swagger2 and need to introduce dependencies first.The following:
<dependency>
            <groupId>io.springfox</groupId>
            <artifactId>springfox-swagger2</artifactId>
            <version>2.9.2</version>
        </dependency>
        <dependency>
            <groupId>io.springfox</groupId>
            <artifactId>springfox-swagger-ui</artifactId>
            <version>2.9.2</version>
        </dependency>
SwaggerConfig
After introducing dependencies, we need to write a configuration, and we create a SwaggerConfig class in the config directory.The contents are as follows:
@Configuration
@EnableSwagger2
public class SwaggerConfig {

    @Bean
    public Docket createRestApi(){
        return new Docket(DocumentationType.SWAGGER_2)
                .apiInfo(apiInfo())
                .select()
                .apis(RequestHandlerSelectors.basePackage("com.quellan.zlflovemm.controller"))
                .paths(PathSelectors.any())
                .build();
    }

    private ApiInfo apiInfo(){
        return  new ApiInfoBuilder()
                .title("Spring Boot Use Swagger2 structure RESTful APIs")
                .description("SpringBoot integration Swagger,detailed information......")
                .version("1.0.0")
                .build();
    }
}
You can see that the code is not complex, that is, you created a Docket bean.The only thing to note is the directory where the interface is configured.
In fact, at this point, we have already configured it.Let's start a project test.After starting the project, type:
http://localhost:9090/zlflovemm/swagger-ui.html

You can see that the interface we wrote before is already displayed on the interface.But now the interface is still horrible, you can see when you practice it yourself, we need to do more work.Some friends here may have problems and find that no such interface has occurred. It may be misconfigured or you may have configured interceptors.When I started doing it myself, there was a lack of access to the page.Then we found that this was caused by the interceptor we set up in our last article.We can comment it out first.
Configuration in Interface
Let's write using the user class interface, since it's still a hassle to write documents.The code is as follows:
@Slf4j
@RestController
@RequestMapping("/user")
@Api(tags = "User management related interfaces")
public class UserController {

    @Autowired
    private UserService userService;

    @ApiOperation("Get User List")
    @RequestMapping(value = "/list")
    public List<UserEntry> findUserList(){
        return userService.findUserList();
    }


    @ApiOperation("Add User Information")
    @ApiImplicitParams({
            @ApiImplicitParam(name = "userName",value = "User name",defaultValue = "zlf"),
            @ApiImplicitParam(name="password",value = "Password",defaultValue = "zlf"),
            @ApiImplicitParam(name = "email",value = "mailbox",defaultValue = "11@qq.com")
    })
    @RequestMapping(value = "/add",method = RequestMethod.GET)
    public String addUser(@RequestParam(value = "userName")String uaserName,@RequestParam(value = "password")String password,@RequestParam(value = "email")String email){
        int falg=userService.addUser(uaserName,password,email);
        if(falg>0){
            return "success";
        }
        return "error";
    }

    @ApiOperation("Delete user information")
    @ApiImplicitParam(name = "id",value = "1",defaultValue = "1")
    @RequestMapping(value = "/delete",method = RequestMethod.GET)
    public String deleteUser(@RequestParam(value = "id")int id){
        if(userService.deleteUser(id)>0){
            return "success";
        }
        return "error";
    }


    @ApiOperation("Get User List 2")
    @RequestMapping(value = "/list2",method = RequestMethod.GET)
    public List<UserEntry> findUserList2(){
        return userService.findUserList2();
    }

    @ApiOperation("New User Information 2")
    @ApiImplicitParams({
            @ApiImplicitParam(name = "userName",value = "User name",defaultValue = "zlf"),
            @ApiImplicitParam(name="password",value = "Password",defaultValue = "zlf"),
            @ApiImplicitParam(name = "email",value = "mailbox",defaultValue = "11@qq.com")
    })
    @RequestMapping(value = "/add2",method = RequestMethod.GET)
    public String addUser2(@RequestParam(value = "userName")String uaserName,@RequestParam(value = "password")String password,@RequestParam(value = "email")String email){
        int falg= userService.addUser2(uaserName,password,email);
        if(falg>0){
            return "success";
        }
        return "error";
    }

    @ApiOperation("Delete User Information 2")
    @ApiImplicitParam(name = "id",value = "1",defaultValue = "1")
    @RequestMapping(value = "/delete2",method = RequestMethod.GET)
    public String deleteUser2(@RequestParam(value = "id")int id){
        if(userService.deleteUser2(id)>0){
            return "success";
        }
        return "error";
    }
}
Adding @Api(tags = "user management related interface") to a class indicates its role.
On a single interface, we wrote notes through @ApiOperation, @ApiImplicitParams, @ApiImplicitParam.
@ApiOperation is used to indicate the capabilities of the interface.
@ApiImplicitParam is used to set the interface to have a single parameter.
@ApiImplicitParams is used to set multiple parameters for an interface, how to use it, and there are examples in the code.
Next, let's look at the interface.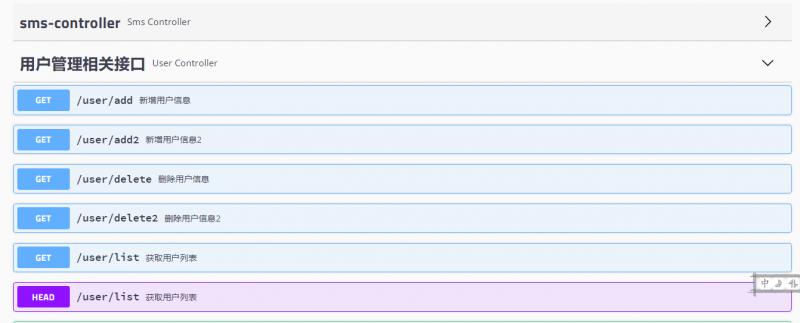

As you can see, the interface can already be displayed, which is much friendlier than we did not configure some comments at the beginning. Click execute to debug the interface or to meet basic needs.However, you also find that swagger is very serious about our code intrusion. We have a lot of code in our project. It is not friendly for us to write code with so many annotated code.
Xanthopanax
So far, the springboot configuration of swagger2 has been implemented, which is relatively simple as a whole, and hopefully will help you.
Well, that's all.
Code uploaded to github:
https://github.com/QuellanAn/zlflovemm
Follow-up gas
Welcome to your personal public number "Programmer loves yoghurt"
Share all kinds of learning materials, including java, linux, big data, etc.The material contains video documentation and source code, as well as sharing my own and delivered high-quality technical blogs.
If you like to remember to focus and share