Absrtact: This paper introduces the use of opencv and yolo to complete video stream target detection, code interpretation is detailed, with source code, easy to use.
In the previous section This paper introduces how to apply YOLO to image target detection. After learning how to detect a single image, we can also use YOLO algorithm to achieve target detection in video stream.
Application of YOLO in Object Detection of Video Stream
First, open the yolo_video.py file and insert the following code:
# import the necessary packages
import numpy as np
import argparse
import imutils
import time
import cv2
import os

# construct the argument parse and parse the arguments
ap = argparse.ArgumentParser()
ap.add_argument("-i", "--input", required=True,
    help="path to input video")
ap.add_argument("-o", "--output", required=True,
    help="path to output video")
ap.add_argument("-y", "--yolo", required=True,
    help="base path to YOLO directory")
ap.add_argument("-c", "--confidence", type=float, default=0.5,
    help="minimum probability to filter weak detections")
ap.add_argument("-t", "--threshold", type=float, default=0.3,
    help="threshold when applyong non-maxima suppression")
args = vars(ap.parse_args())
Similarly, start by importing the relevant data packets and command line parameters. Unlike before, the script does not have an image parameter, instead it measures video paths:
- Input: The path to the input video file;
- - output: The path to output video files;
Video input can be short videos taken by mobile phones or videos searched online. In addition, you can also synthesize multiple photos into a short video. This blog uses an example of the VideoStream class from imutils found on PyImageSearch.
The following code is the same as when dealing with graphics:
# load the COCO class labels our YOLO model was trained on
labelsPath = os.path.sep.join([args["yolo"], "coco.names"])
LABELS = open(labelsPath).read().strip().split("\n")

# initialize a list of colors to represent each possible class label
np.random.seed(42)
COLORS = np.random.randint(0, 255, size=(len(LABELS), 3),
    dtype="uint8")

# derive the paths to the YOLO weights and model configuration
weightsPath = os.path.sep.join([args["yolo"], "yolov3.weights"])
configPath = os.path.sep.join([args["yolo"], "yolov3.cfg"])

# load our YOLO object detector trained on COCO dataset (80 classes)
# and determine only the *output* layer names that we need from YOLO
print("[INFO] loading YOLO from disk...")
net = cv2.dnn.readNetFromDarknet(configPath, weightsPath)
ln = net.getLayerNames()
ln = [ln[i[0] - 1] for i in net.getUnconnectedOutLayers()]
Here, the label is loaded and the corresponding color is generated, then the YOLO model is loaded and the output layer name is determined.
Next, some video-specific tasks will be handled:
# initialize the video stream, pointer to output video file, and
# frame dimensions
vs = cv2.VideoCapture(args["input"])
writer = None
(W, H) = (None, None)

# try to determine the total number of frames in the video file
try:
    prop = cv2.cv.CV_CAP_PROP_FRAME_COUNT if imutils.is_cv2() \
        else cv2.CAP_PROP_FRAME_COUNT
    total = int(vs.get(prop))
    print("[INFO] {} total frames in video".format(total))

# an error occurred while trying to determine the total
# number of frames in the video file
except:
    print("[INFO] could not determine # of frames in video")
    print("[INFO] no approx. completion time can be provided")
    total = -1
In the above code block:
- Open a file pointer pointing to the video file and read the frame circularly.
- Initialize the video writer and frame size;
- Trying to determine the total number of frames in the video file in order to estimate the processing time of the whole video;
Then frame by frame:
# loop over frames from the video file stream
while True:
    # read the next frame from the file
    (grabbed, frame) = vs.read()

    # if the frame was not grabbed, then we have reached the end
    # of the stream
    if not grabbed:
        break

    # if the frame dimensions are empty, grab them
    if W is None or H is None:
        (H, W) = frame.shape[:2]
The above defines a while loop, which then proceeds from the first frame and checks whether it is the last frame of the video. Next, if the frame size is not known, the corresponding size will be obtained.
Next, forward transfer of YOLO is performed using the current frame as input:
ect Detection with OpenCVPython

    # construct a blob from the input frame and then perform a forward
    # pass of the YOLO object detector, giving us our bounding boxes
    # and associated probabilities
    blob = cv2.dnn.blobFromImage(frame, 1 / 255.0, (416, 416),
        swapRB=True, crop=False)
    net.setInput(blob)
    start = time.time()
    layerOutputs = net.forward(ln)
    end = time.time()

    # initialize our lists of detected bounding boxes, confidences,
    # and class IDs, respectively
    boxes = []
    confidences = []
    classIDs = []
Here, a blob is constructed and passed through the network to obtain the prediction. Then continue to initialize the three lists used in image target detection before: boxes, confidences, classIDs:
  # loop over each of the layer outputs
    for output in layerOutputs:
        # loop over each of the detections
        for detection in output:
            # extract the class ID and confidence (i.e., probability)
            # of the current object detection
            scores = detection[5:]
            classID = np.argmax(scores)
            confidence = scores[classID]

            # filter out weak predictions by ensuring the detected
            # probability is greater than the minimum probability
            if confidence > args["confidence"]:
                # scale the bounding box coordinates back relative to
                # the size of the image, keeping in mind that YOLO
                # actually returns the center (x, y)-coordinates of
                # the bounding box followed by the boxes' width and
                # height
                box = detection[0:4] * np.array([W, H, W, H])
                (centerX, centerY, width, height) = box.astype("int")

                # use the center (x, y)-coordinates to derive the top
                # and and left corner of the bounding box
                x = int(centerX - (width / 2))
                y = int(centerY - (height / 2))

                # update our list of bounding box coordinates,
                # confidences, and class IDs
                boxes.append([x, y, int(width), int(height)])
                confidences.append(float(confidence))
                classIDs.append(classID)
In the above code, the same as image target detection is:
- Cyclic Output Layer and Detection;
- Extract classID and filter out weak prediction;
- Calculate boundary frame coordinates;
- Update their respective lists;
Next, non-maximum suppression will be applied:
    # apply non-maxima suppression to suppress weak, overlapping
    # bounding boxes
    idxs = cv2.dnn.NMSBoxes(boxes, confidences, args["confidence"],
        args["threshold"])

    # ensure at least one detection exists
    if len(idxs) > 0:
        # loop over the indexes we are keeping
        for i in idxs.flatten():
            # extract the bounding box coordinates
            (x, y) = (boxes[i][0], boxes[i][1])
            (w, h) = (boxes[i][2], boxes[i][3])

            # draw a bounding box rectangle and label on the frame
            color = [int(c) for c in COLORS[classIDs[i]]]
            cv2.rectangle(frame, (x, y), (x + w, y + h), color, 2)
            text = "{}: {:.4f}".format(LABELS[classIDs[i]],
                confidences[i])
            cv2.putText(frame, text, (x, y - 5),
                cv2.FONT_HERSHEY_SIMPLEX, 0.5, color, 2)
Similarly, the same as image target detection in the above code are:
- The cv2.dnn.NMSBoxes function is used to suppress weak overlapping boundary frames. Here Read more about non-maximum inhibition.
- Cycle through the idx calculated by NMS and draw the corresponding boundary box + label.
The final part of the code is as follows:
    # check if the video writer is None
    if writer is None:
        # initialize our video writer
        fourcc = cv2.VideoWriter_fourcc(*"MJPG")
        writer = cv2.VideoWriter(args["output"], fourcc, 30,
            (frame.shape[1], frame.shape[0]), True)

        # some information on processing single frame
        if total > 0:
            elap = (end - start)
            print("[INFO] single frame took {:.4f} seconds".format(elap))
            print("[INFO] estimated total time to finish: {:.4f}".format(
                elap * total))

    # write the output frame to disk
    writer.write(frame)

# release the file pointers
print("[INFO] cleaning up...")
writer.release()
vs.release()
To sum up:
- Initialize the video writer, which is usually initialized in the first iteration of the loop.
- Print out an estimate of the time required to process the video.
- Write frame to output video file.
- Clean and release pointers;
Now, open a terminal and execute the following commands:
$ python yolo_video.py --input videos/car_chase_01.mp4 \
    --output output/car_chase_01.avi --yolo yolo-coco
[INFO] loading YOLO from disk...
[INFO] 583 total frames in video
[INFO] single frame took 0.3500 seconds
[INFO] estimated total time to finish: 204.0238
[INFO] cleaning up...

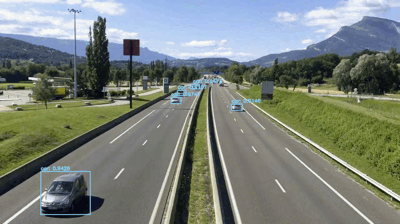
In video / GIF, you can not only see the detected vehicles, but also detect people and traffic lights!
The YOLO target detector performs fairly well in this video. Let's now try different videos from the same car chase video:
$ python yolo_video.py --input videos/car_chase_02.mp4 \
    --output output/car_chase_02.avi --yolo yolo-coco
[INFO] loading YOLO from disk...
[INFO] 3132 total frames in video
[INFO] single frame took 0.3455 seconds
[INFO] estimated total time to finish: 1082.0806
[INFO] cleaning up...

YOLO can detect pedestrians again! Or the suspect returns to their car and continues to chase:
$ python yolo_video.py --input videos/car_chase_03.mp4 \
    --output output/car_chase_03.avi --yolo yolo-coco
[INFO] loading YOLO from disk...
[INFO] 749 total frames in video
[INFO] single frame took 0.3442 seconds
[INFO] estimated total time to finish: 257.8418
[INFO] cleaning up...

Finally, let's see how to use YOLO as a traffic counter:
$ python yolo_video.py --input videos/overpass.mp4 \
    --output output/overpass.avi --yolo yolo-coco
[INFO] loading YOLO from disk...
[INFO] 812 total frames in video
[INFO] single frame took 0.3534 seconds
[INFO] estimated total time to finish: 286.9583
[INFO] cleaning up...
Following is a summary of YOLO video object detection complete video:
Limitations and Disadvantages of YOLO Target Detector
The biggest limitation and disadvantage of YOLO target detector are:
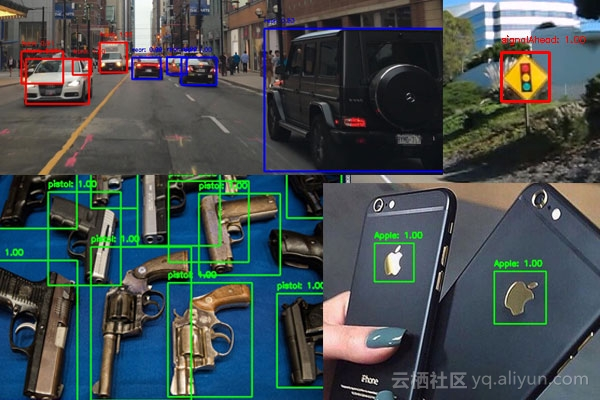
- It does not always handle small objects well.
- It is especially unsuitable for dealing with dense objects.
The limitation is due to the YOLO algorithm itself:
- YOLO object detector divides the input image into SxS grids, where each cell in the grid predicts only a single object.
- If there are multiple small objects in a single cell, YOLO will not be able to detect them and eventually Miss object detection.
Therefore, if your data set is composed of many small objects close together, you should not use YOLO algorithm. For small objects, faster R-CNN s tend to work best, but also the slowest. SSD algorithm can also be used here. SSD usually has a good trade-off between speed and accuracy.
It is worth noting that in this tutorial, YOLO runs slower than SSD, about an order of magnitude slower. Therefore, if you are using a pre-trained Deep Learning Object Detector for OpenCV, you may need to consider using SSD algorithm instead of YOLO algorithm.
Therefore, when selecting an object detector for a given problem, I tend to use the following criteria:
- If I know that small objects need to be detected and speed is not required, I prefer to use faster R-CNN algorithm.
- If speed is the most important, I tend to use YOLO algorithm.
- If a balanced performance is needed, I prefer to use SSD algorithm.
Want to train your Deep Learning Target Detector?
In this tutorial, the YOLO model used is pre-trained on COCO datasets. However, if you want to train the Deep Learning Object Detector on your own data set, how do you operate it?
The general idea is to label the data set by oneself, and train according to the instructions on darknet website and the corresponding parameters of online blog by oneself. Or in my book“ Deep Learning Computer Vision and Python ” In this paper, how to apply faster R-CNN, SSD and RetinaNet to:
- Detecting the logo in the image;
- Detection of traffic signs;
- Detect the front and rear views of the vehicle (for building autopilot vehicle applications);
- Detecting weapons in images and video streams;
All the target detection chapters in the book contain detailed descriptions of algorithms and codes to ensure that you can successfully train your own object detectors. stay Here Learn more about my book (and get free sample chapters and catalogues).
summary
In this tutorial, we learned how to use Deep Learning, OpenCV and Python to complete YOLO object detection. Then, we briefly discuss the YOLO architecture and implement it in Python:
- YOLO object detection is applied to a single image.
- YOLO object detection is applied to video stream.
On a machine equipped with a 3GHz Intel Xeon W processor, a single forward transmission of YOLO takes about 0.3 seconds; however, using Single Detector (SSD) The detection time is only 0.03 seconds, and the speed is increased by an order of magnitude. For object detection using OpenCV and Python on CPU based on real-time in-depth learning, you may need to consider using SSD algorithm.
Author: [Direction]
This article is the original content of Yunqi Community, which can not be reproduced without permission.