Python
1. Python basic syntax
1.1 Python identifier
In Python, identifiers consist of letters, numbers, and underscores.
In Python, all identifiers can include English, numbers, and underscores (), but cannot begin with a number.
Identifiers in Python are case sensitive.
Identifiers that begin with underscores have special meaning. Start with a single underscore_ foo represents class attributes that cannot be accessed directly. They need to be accessed through the interface provided by the class. They cannot be imported with from xxx import *.
Double underlined__ Foo represents the private member of the class, starting and ending with a double underscore__ foo__ Represents a special identifier for special methods in Python, such as__ init__ () represents the constructor of the class.
stu = 1
1.2 lines and indents
The biggest difference between learning Python and other languages is that Python code blocks do not use braces {} to control classes, functions and other logical judgments. The most distinctive feature of Python is to write modules with indentation.
The number of indented whitespace is variable, but all code block statements must contain the same number of indented whitespace, which must be strictly enforced.
 # If there is no strict indentation, an error will be reported during execution
if True:
    print ("True")
else:
    print ("False")
variable
In Python, each variable must be assigned before use, and the variable will not be created until it is assigned
The equal sign (=) is used to assign values to variables
=On the left is a variable name
=On the right is the value stored in the variable
- Type of variable
- str -- string
bool -- Boolean (true or false)
int -- integer
float -- floating point number (decimal) - Python can automatically deduce the type of data stored in the variable according to the value to the right of the = equal sign
- When defining variables, you do not need to specify the type
1.3 input and output of variables
In Python, if you want to get the user's input information on the keyboard, you need to use the input function
Anything a user enters is considered a string by Python
String variable = input("Prompt:")
drill
# 1. Enter Apple unit price
price_str = input("Please enter apple price:")
# 2. Required Apple weight
weight_str = input("Please enter Apple weight:")
# 3. Calculation amount
# 1> Convert Apple unit price to decimal
price = float(price_str)
# 2> Convert Apple weight to decimal
weight = float(weight_str)
# 3> Calculate payment amount
money = price * weight
print(money)
1.4 keywords
A keyword is an identifier that is already used inside Python
Keywords have special functions and meanings
It is not allowed to define an identifier with the same name as the keyword
The import keyword can import a "toolkit". In Python, different toolkits provide different tools
1.5 operator
| Arithmetic operator | describe | supplement |
|---|---|---|
| + | plus | 10 + 20 = 30 |
| - | reduce | 10 - 20 = -10 |
| * | ride | 10 * 20 = 200 |
| / | except | 10 / 20 = 0.5 |
| // | Take and divide | Returns the integer part (quotient) of division. 9 / / 2 outputs the result. 4 |
| % | Remainder | Returns the remainder of division 9% 2 = 1 |
| ** | power | Also known as power, power, 2 * * 3 = 8 |
| Comparison operator | > < == != >= <= | |
| Logical operator | and or not | |
| Assignment Operators | = += -= *= /= //= **= |
Operator precedence
| operator | describe |
|---|---|
| ** | Power (highest priority) |
| * / % // | Multiplication, division, remainder, integer division |
| + - | Addition and subtraction |
| <= < > >= | Comparison operator |
| == != | equal operator |
| = %= /= //= -= += *= **= | Assignment Operators |
| not or and | Logical operator |
2. Branch circulation
2.1 if cycle
The Python programming language specifies that any non-0 and non null (None) values are True, 0 or None is False.
# -*-coding:utf-8-*-
results=59
if results>=60:
    print ('pass')
else :
    print ('fail,')

# -*-coding:utf-8-*-

results = 89

if results > 90:
    print('excellent')
elif results > 80:
    print('good')
elif results > 60:
    print ('pass')
else :
    print ('fail,')
2.2 circular statements
Python provides for loops and while loops. Of course, there are some statements that control loops:
- break: terminates the loop during the execution of the statement block and jumps out of the entire loop
- continue: terminate the current loop during the execution of the statement block, jump out of the loop and execute the next loop
- Pass: pass is an empty statement to maintain the integrity of the program structure
count = 1
sum = 0
while count <= 100:
    sum = sum + count
    count = count + 1
print(sum)
for letter in 'wsc':
    print(letter)
# output
w
s
c
range() function
The Python function range() allows you to easily generate a series of numbers.
range(0,5) # Generate 0,1,2,3,4
Print 99 multiplication table
for i in range(1, 10):
        for j in range(1, i+1):
            print('{}x{}={}\t'.format(i, j, i*j), end='')
        print()

#Output results
1x1=1
2x1=2   2x2=4
3x1=3   3x2=6   3x3=9
4x1=4   4x2=8   4x3=12  4x4=16
5x1=5   5x2=10  5x3=15  5x4=20  5x5=25
6x1=6   6x2=12  6x3=18  6x4=24  6x5=30  6x6=36
7x1=7   7x2=14  7x3=21  7x4=28  7x5=35  7x6=42  7x7=49
8x1=8   8x2=16  8x3=24  8x4=32  8x5=40  8x6=48  8x7=56  8x8=64
9x1=9   9x2=18  9x3=27  9x4=36  9x5=45  9x6=54  9x7=63  9x8=72  9x9=81
random number
In Python, to use random numbers, you first need to import the random number module - "toolkit"
import random
After importing a module, you can directly type. After the module name to prompt all the functions contained in the module
Random. Random (a, b), returns an integer between [a, b], including a and B
random.randint(12, 20)  # Generated random number n: 12 < = n < = 20
random.randint(20, 20)  # The result is always 20
random.randint(20, 10)  # The statement is wrong. The lower limit must be less than the upper limit
3. Lists and tuples
3.1 List
List - a set of ordered and variable data sets; We can access the elements in the list through the index number (location code) of the list;
Any element in a set is called an element or member of the set;
Numbers, characters, strings and even another List can be stored in the same List set at the same time;
There are two ways to create a List:
# Copy directly when creating
list01 = [100,90,80,70]

# Create an empty list and insert
list01 = []
list01.append(100)
list01.append(90)
Accessing elements in a list
list01 = [10,20,30,40,50,60,70,80,90,100]
print(list01[0])    # Result: 10 interpretation: access the first element of the list set
print(list01[-1])   # Result: 100 interpretation: access the last element of the collection
print(list01[4:])   # Results: [50,60,70,80,90100]
print(list01[:4])   # Results: [10,20,30,40] explanation: if there is only the number on the right, the number on the right cannot be obtained
print(list01[:-5])  # Results: [10,20,30,40,50]
print(list01[-5:])  # Results: [60,70,80,90100]
print(list01[1:5])  # Results: [20,30,40,50]
print(list01[-4:-1])    # Results: [70,80,90]
print(list01[1::2])  #Results: [20, 40, 60, 80, 100] interpretation: [start index: end index: index every time]
print(list01[-1:-4:-1]) # Results: [100,90,80]
basic operation
# Assign the value of list01 to list02
list01 = [1,2,3]
list02 = list01

# Use copy to copy the value of list01 to list03
list03 = list01.copy()

# Merge two list sets
list01 = [1,2,3]
list02 = [4,5,6]
print(list01+list02)

# Returns the number of list collection elements
list01 = ['a','b','c']
print(len(list01))

# Using member operators
list01 = ['a','b','c']
print("a Is it list01 in",'a' in list01)  # Both in and not in can be used

# Element addition
list02.append("AAA")
list02.insert(1,"CCC")
# Using extend, you can add a collection
list02.extend(["DDD","EEE","FFF"])

# Element deletion
list01.remove('f')
list01.pop(1)   # Delete the second element
del list01[1:5] # Slice delete second to fifth
list01.clear()  # Clear all elements in the list
Basic operation
list01 = [45,90,123,987,-10,78,96]
print("List01 Maximum value of:",max(list01))
print("List01 Minimum value of:",min(list01))
print("list All elements and:%d"%sum(list01))
# Sort using sort(), which is ascending by default
list01.sort()
# First ascending, then reversing. Use the reverse() method to reverse the operation
list01 = [12,33,44,55,6,22]
list01.sort()
list01.reverse()
# Add parameter
list01 = [12,33,44,55,6,22]
list01.sort(reverse=True)
print(list01)
OpenCV
1. Image
A. Getting started with images
cv2.imread("img/time.jpg",cv2.IMREAD_COLOR)
- First empty: image path
- Second blank: specifies how the image is read
- IMREAD_COLOR load color image
- IMREAD_GRAYSCALE grayscale image
- IMREAD_UNCHANGED loads images, including alpha channels
- Note that in addition to these three flags, you can simply pass integers 1, 0, or - 1, respectively.
cv2.imshow("image name", img) # displays the image
cv2.imwrite("file name", img) # save the picture
cv.waitKey() is a keyboard binding function. The parameter is the time in milliseconds. This function waits for the specified milliseconds for any keyboard event. If you press any key during this time, the program will continue to run. If 0 is passed, it will wait indefinitely for a keystroke. It can also be set to detect specific keys, for example, if key a is pressed, we will discuss it below.
- If you are using a 64 bit computer, you must modify the line k = cv.waitKey(0) as follows: k = cv.waitKey(0) & 0xff
cv.destroyAllWindows() will only destroy all the windows we created. If you want to destroy any particular window, use the function
cv.destroyWindow() passes the exact window name as a parameter.
import cv2 # The read format of opencv is BGR
import matplotlib.pyplot as plt
import numpy as np

img = cv2.imread("img/time.jpg",cv2.IMREAD_COLOR) # Read color image
img2 = cv2.imread("img/time.jpg",cv2.IMREAD_GRAYSCALE) # Read grayscale image
# print(img)

cv2.imshow("image",img) # image display
cv2.imshow("image2",img2) # image display
cv2.waitKey(0) # Wait time, in milliseconds, 0 indicates any key termination
cv2.destroyAllWindows()

cv2.imwrite("img/time-change.jpg",img) # Save picture
import numpy as np
import cv2
img = cv2.imread('img/time.jpg',0)
cv2.imshow('image',img)
k = cv2.waitKey(0)
if k == 27:         # Wait for ESC to exit
    cv2.destroyAllWindows()
elif k == ord('s'): # Wait for keywords, save and exit
    cv2.imwrite('img/time-c.jpg',img)
    cv2.destroyAllWindows()
Using Matplotlib
Matplotlib is Python's drawing library, which can provide you with a variety of drawing methods.
import matplotlib.pyplot as plt
The color image loaded by opencv is in BGR mode. However, Matplotlib is displayed in RGB mode. Therefore, if you use OpenCV to read color images, the color images will not display correctly in Matplotlib.
B. Basic operation of image
1. Access pixel values and modify them
For single pixel access, the Numpy array methods array.item() and array.itemset()) are considered better, but they always return scalars. If you want to access all B, G and R values, you need to call all array.item() respectively.
import cv2 as cv # The read format of opencv is BGR
import matplotlib.pyplot as plt
import numpy as np

# Read image
img = cv.imread("img/time.jpg")
print(img.item(10,10,2))  # Output 111
img.itemset((10,10,2),33) # Modify pixel
print(img.item(10,10,2))  # Output 33
cv.imshow("change",img)
cv.waitKey(0)
2. Access image properties
Image attributes include the number of rows, columns and channels, image data type, number of pixels, etc.
The shape of the image is accessible through img.shape. It returns a tuple of the number of rows, columns, and channels (if the image is color)
The total number of pixels can be accessed through img.size
The image data type is obtained through img.dtype
import cv2 as cv # The read format of opencv is BGR
import matplotlib.pyplot as plt
import numpy as np
# Read image
img = cv.imread("img/time.jpg")
# Shape of image
print("shape---->",img.shape)  # Output (400400,3)
# Image size
print("size----->",img.size)   # Output 480000
# data type
print("dtype---->",img.dtype ) # Output uint8
cv.imshow("change",img)
cv.waitKey(0)
be careful
- img.dtype is very important when debugging because a large number of errors in opencv Python code are caused by invalid data types.
- If the image is grayscale, the returned tuple contains only the number of rows and columns, so this is a good way to check whether the loaded image is grayscale or color.
3. Segmentation and merging of images
b,g,r = cv.split(img)
img = cv.merge((b,g,r))
Note: cv.split() is a time-consuming operation (in terms of time). Therefore, do so only when necessary. Otherwise, index Numpy.
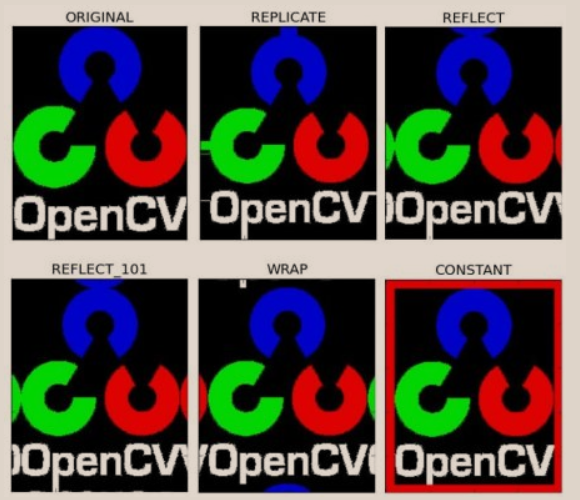
4. Set the border for the image
If you want to create a border around an image, such as a photo frame, you can use cv. Copymakeorder(). But it has more applications in convolution, zero filling and so on. This function takes the following parameters:
- src - input image
- top, bottom, left, right boundary width (in pixels in the corresponding direction)
- borderType - a flag that defines which border to add. It can be of the following types:
- cv.BORDER_CONSTANT - adds a constant colored border. This value should be given as the next parameter.
- cv.BORDER_REFLECT - the border will be a mirror image of the border element as follows: fedcba | abcdefgh | hgfedcb
- cv.BORDER_REFLECT_101 or cv.BORDER_DEFAULT is the same as above, but slightly changed, for example: gfedcb | abcdefgh | gfedcba
- cv.BORDER_REPLICATE the last element is copied like this: aaaaaa | abcdefgh | hhhhh
- cv.BORDER_WRAP is hard to explain. It looks like this: cdefgh | abcdefgh | abcdefg
- value - the color of the border, if the border type is cv.BORDER_CONSTANT
import cv2 as cv
import matplotlib.pyplot as plt

BLUE = [255,0,0]
img1 = cv.imread('img/time.jpg')
replicate = cv.copyMakeBorder(img1,20,10,10,10,cv.BORDER_REPLICATE)
reflect = cv.copyMakeBorder(img1,10,10,10,10,cv.BORDER_REFLECT)
reflect101 = cv.copyMakeBorder(img1,10,10,10,10,cv.BORDER_REFLECT_101)
wrap = cv.copyMakeBorder(img1,10,10,10,10,cv.BORDER_WRAP)
constant= cv.copyMakeBorder(img1,10,10,10,10,cv.BORDER_CONSTANT,value=BLUE)

plt.subplot(231),plt.imshow(img1,'gray'),plt.title('ORIGINAL')
plt.subplot(232),plt.imshow(replicate,'gray'),plt.title('REPLICATE')
plt.subplot(233),plt.imshow(reflect,'gray'),plt.title('REFLECT')
plt.subplot(234),plt.imshow(reflect101,'gray'),plt.title('REFLECT_101')
plt.subplot(235),plt.imshow(wrap,'gray'),plt.title('WRAP')
plt.subplot(236),plt.imshow(constant,'gray'),plt.title('CONSTANT')
plt.show()
5. Arithmetic operation on image
You can add two images through the OpenCV function cv.add() or just through the numpy operation res = img1 + img2. The two images should have the same depth and type, or the second image can be just a scalar value.
Note: there is a difference between OpenCV addition and Numpy addition. OpenCV addition is a saturation operation, while Numpy addition is a modular operation.
Image fusion
This is also image addition, but different weights are given to the image to make it feel fused or transparent. Add an image according to the following equation:
G ( x ) = ( 1 − α ) f 0 ( x ) + α f 1 ( x ) G(x)=(1−α)f_0(x)+αf_1(x) G(x)=(1−α)f0(x)+αf1(x)
cv.addWeighted() applies the following formula to the image.
d s t = α ⋅ i m g 1 + β ⋅ i m g 2 + γ dst=α⋅img1+β⋅img2+γ dst=α⋅img1+β⋅img2+γ
import cv2 as cv # The read format of opencv is BGR
import matplotlib.pyplot as plt
import numpy as np

img1 = cv.imread('img/time.jpg')
img2 = cv.imread('img/opencv.png')
dst = cv.addWeighted(img1,0.7,img2,0.3,0)
cv.imshow('dst',dst)
cv.waitKey(0)
cv.destroyAllWindows()
Two pictures: the array has the same size and the same number of channels
C. Image processing cv2.cvtColor
cv2.cvtColor(input_image, flag)
There are more than 150 color space conversion methods in OpenCV. But we will study only the two most widely used, BGR ↔ Grey and BGR ↔ HSV.
For color conversion, we use the cv function. cvtColor(input_image, flag), where flag determines the type of conversion.
For BGR → grayscale conversion, we use the flag cv.COLOR_BGR2GRAY.
For BGR → HSV, we use the flag cv.COLOR_BGR2HSV
Note: the hue range of HSV is [0179], the saturation range is [0255], and the value range is [0255]. Therefore, if you want to compare OpenCV values with them, you need to standardize these ranges
Exercise: extracting the blue part of the image
Now that we know how to convert BGR image into HSV, we can use it to extract a colored object. It is easier to represent colors in HSV than in BGR color space. In our application, we will try to extract a blue object. The methods are as follows: - take each frame of the video - convert from BGR to HSV color space - we set the threshold of the blue range for the HSV image - now extract the blue object separately, and we can do anything we want to do with the image.
The following is the code for detailed comments:
D. Image geometric transformation
Transformation
OpenCV provides two conversion functions, cv.warpAffine and cv.warpPerspective, which you can use for various conversions.
cv.warpAffine uses 2x3 transformation matrix, while cv.warppaspect uses 3x3 transformation matrix as input
zoom
Zooming is just resizing the image. To do this, OpenCV comes with a function cv.resize(). The size of the image can be specified manually or the scale can be specified. Different interpolation methods can also be used. The preferred interpolation method is cv.INTER_AREA (slow) and cv.INTER_LINEAR is used for scaling. By default, the interpolation method used for all resizing purposes is cv.INTER_LINEAR.
translation
Translation is the movement of the position of an object. If you know the displacement in the (x,y) direction, set it to ( t x , t y ) (t_x,t_y) (tx, ty), you can create the transformation matrix M as follows:
M = [ 1 0 t x 0 1 t y ] M=\begin{bmatrix}1 & 0 & t_x \\ 0 & 1 & t_y\\ \end{bmatrix} M=[1001txty]
You can put it into a Numpy array of type np.float32 and pass it to the cv.warpAffine function.
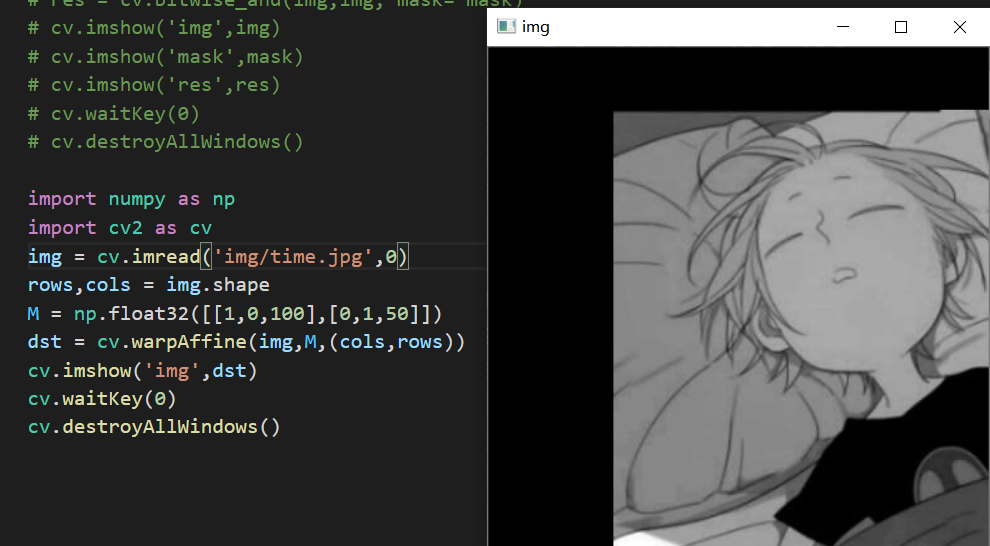
import numpy as np
import cv2 as cv
img = cv.imread('img/time.jpg',0)
rows,cols = img.shape
M = np.float32([[1,0,100],[0,1,50]])
dst = cv.warpAffine(img,M,(cols,rows))
cv.imshow('img',dst)
cv.waitKey(0)
cv.destroyAllWindows()
Warning: the third parameter of cv.warpAffine function is the size of the output image, which should be in the form of (width, height). Remember that width = number of columns and height = number of rows.
E. Image threshold cv.threshold
For each pixel, the same threshold is applied. If the pixel value is less than the threshold, it is set to 0, otherwise it is set to the maximum value.
The function cv. Threshold (SRC, threshold, maxval, type) is used to apply the threshold.
- src: input image. You can only input single channel images, usually gray images.
- thresh: threshold used to classify pixel values.
- maxval: the value assigned when the pixel value exceeds the threshold (or is less than the threshold, depending on the type)
- type: all simple threshold types are
- cv.THRESH_BINARY - maxval (maximum value) is taken for the part exceeding the threshold, otherwise zero is taken
- cv.THRESH_BINARY_INV -- zero is taken for the part exceeding the threshold, otherwise maxval (maximum value) is taken
- cv.THRESH_TRUNC - set the part greater than the threshold as the threshold, otherwise set as 0
- cv.THRESH_TOZERO -- the part greater than the threshold does not change, otherwise it is set to 0
- cv.THRESH_TOZERO_INV -- the part greater than the threshold value is set to 0, otherwise it remains unchanged
ret,thresh = cv2.threshold(img,127,255,cv.THRESH_BINARY)
F. Image smoothing
Mean filter # simple average convolution operation
cv2.blur(img,(3,3)) is generally odd (3,3), (5,5), (7,7)
Block filtering (like mean filtering, normalization can be selected, which is easy to cross the boundary)
cv2.boxFilter(img,-1,(3,3),normalize=True)
Gaussian filtering
cv2.GaussianBlur(img,(5,5),1)
median filtering
cv2.medianBlur(img,5) can be used to remove noise points
G. Morphological transformation
Usually binary images, only black and white
1. Corrosion operation
kernel = np.ones((3,3),np.uint8)
erosion = cv2.erode(img,kernel,iterations = 1)
- iterations: corrosion times
As a result, all pixels near the boundary are discarded according to the size of the kernel. Therefore, the thickness or size of the foreground object decreases, or only the white area in the image decreases. It helps to remove small white noise, separate two connected objects, etc.
2. Expansion operation
Is the BOLD effect
kernel = np.ones((3,3),np.uint8)
dilation = cv.dilate(img,kernel,iterations = 1)
3. Open operation and close operation
- Open operation: corrode and then expand. It is very useful to eliminate noise
- Close operation: expand first and then erode. It is useful when closing small holes inside foreground objects or small black spots on objects.
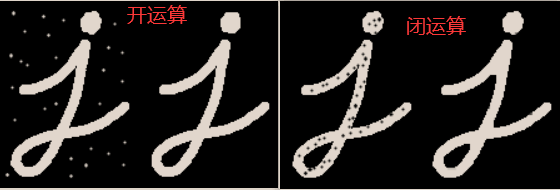
kernel = np.ones((3,3),np.uint8)
opening = cv.morphologyEx(img, cv.MORPH_OPEN, kernel)
closing = cv.morphologyEx(img, cv.MORPH_CLOSE, kernel)
4. Top hat and black hat
- Top hat operation: the difference between the input image and the image operation
- Black hat operation: the difference between the input image and the image closed operation
kernel = np.ones((3,3),np.uint8)
tophat = cv.morphologyEx(img, cv.MORPH_TOPHAT, kernel)
blackhat = cv.morphologyEx(img, cv.MORPH_BLACKHAT, kernel)
H. Image pyramid
1. Gaussian pyramid
Gaussian pyramid: sample down (from bottom to top of pyramid) - zoom out
cv2.pyrDown(): remove all even rows and columns.
Gaussian pyramid: sample up (from top to bottom of pyramid) - zoom in
cv2.pyrUp()
- Expand the image twice in each direction, and fill the new rows and columns with O
- The same kernel as before (multiplied by 4) is convoluted with the enlarged image to obtain an approximate value
2. Laplace pyramid
The layer of the Laplace pyramid is formed by the difference between the layer of the Gaussian pyramid and the extended version of the high layer of the Gaussian pyramid.
2. Video
cv2.VideoCapture("video path") # reads images
import cv2
import matplotlib.pyplot as plt
import numpy as np

vc = cv2.VideoCapture("img/test.mp4")
while vc.isOpened():
    ret ,frame = vc.read() # ret is True if the frame is read correctly
    if frame is None:
        break
    if ret == True:
        gray = cv2.cvtColor(frame,cv2.COLOR_BGR2GRAY) # Convert BGR format to grayscale image
        print("gray----------->",gray)
        cv2.imshow("result",gray)
        if cv2.waitKey(30) & 0xFF == 27:
            break

vc.release()
cv2.destroyAllWindows()
cv2.VideoWriter_fourcc('','','','')
- cv2.VideoWriter_fourcc('I','4','2','0 ') - uncompressed YUV color coding, 4:2:0 chroma subsampling. Good compatibility, but large files. File extension * *. avi**
- cv2.VideoWriter_fourcc('P','I','M','1') - MPEG-1 encoding type, file extension * *. avi * *. Random access, flexible frame rate, variable image size, I-frame, P-frame and B-frame are defined, motion compensation can span multiple frames, motion vector with half pixel accuracy, quantization matrix, GOF structure, slice structure, technical details and input video format.
- cv2.VideoWriter_fourcc('X','V','I','D') - MPEG-4 encoding type. The video size is the average value. The space required by MPEG4 is 1 / 10 of MPEG1 or M-JPEG. It can ensure good definition for moving objects and adjustable inter / time / image quality. File extension * *. avi * *.
- cv2.VideoWriter_fourcc('T','H','E','O ') - OGGVorbis, audio compression format, lossy compression, similar to MP3 and other music formats., Poor compatibility, piece extension * *. ogv * *.
- cv2.VideoWriter_fourcc('F','L','V','1 ') - flv is the abbreviation of FLASH VIDEO, and flv streaming media format is a new video format. Because the file it forms is very small and the loading speed is very fast, it makes it possible to watch video files on the network. Its emergence effectively solves the shortcomings that the exported SWF file is huge and can not be used well on the network after the video file is imported into Flash. The file extension is * *. flv * *.
3. Drawing function in OpenCV
cv.line() cv.circle() cv.rectangle() cv.ellipse() cv.putText()
- parameter
- img: the image of the shape you want to draw
- Color: the color of the shape. For BGR, pass it as a tuple, for example: (255,0,0) for blue. For grayscale, just pass the scalar value.
- Thickness: the thickness of a line or circle. If you pass - 1 to a closed shape, such as a circle, it fills the shape. Default thickness = 1
- lineType: type of line, whether it is 8 connecting line, anti aliasing line, etc. By default, it is 8 connectors. cv2.LINE_AA gives anti aliasing lines, which look very suitable for curves.
Piecemeal knowledge points
What is the channel number of convolution kernel? How to determine the number of convolution output channels of CNN?
Number of convolution kernel channels of CNN = number of channels of convolution input layer
Number of convolution output layer channels of CNN (depth) = number of convolution kernels
The color model of computer display is RGB
Flask is a lightweight Web application framework written in Python. For flash Web development, you need to install before using flash. Use the pip command to install: pip install flash.
Thinning is to refine a curved object into a single pixel wide line to graphically display its topological properties.