Introduction to CSS
The function and development of CSS
-
What is CSS?
(1) CSS (Cascading Style Sheet) is called Cascading Style Sheet.
(2) It is a kind of document that describes the expression of structural documents, mainly used for web page style design, including font size, color, and accurate positioning of elements.
(3) In the traditional web page design, using CSS can make the monotonous HTML page more expressive. -
What are the advantages of CSS over traditional HTML?
(1) Rich expression effect
(2) Small document size
(3) Easy information retrieval
(4) Good readability -
The display effect is required as follows:
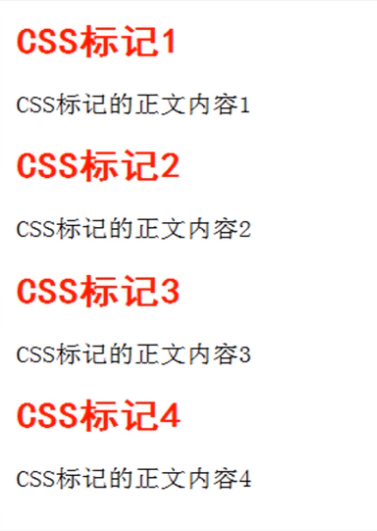
Use HTML to describe data in a traditional way:
<body>
   <h2>
   	<font color="#FF0000" face="black">CSS Tag 1</font>
   </h2>
   <p>CSS Tagged body content 1</p>
   <h2>
   	<font color="#FF0000" face="black">CSS Marker 2</font>
   </h2>
   <p>CSS Tagged body content 2</p>
   <h2>
   	<font color="#FF0000" face="black">CSS Mark 3</font>
   </h2>
   <p>CSS Marked body content 3</p>
   <h2>
   	<font color="#FF0000" face="black">CSS Mark 4</font>
   </h2>
   <p>CSS Marked body content 4</p>
</body>
Use CSS to describe data in a traditional way:
Separation of performance and structure
<head>
<style>
<!--
h2{
		font-family : Blackbody;
		color : red;
}
-->
</style>
</head>
//Form of expression

<body>
	<h2>CSS Tag 1</h2>
	<p>CSS Tagged body content 1</p>
	<h2>CSS Marker 2</h2>
	<p>CSS Tagged body content 2</p>
	<h2>CSS Mark 3</h2>
	<p>CSS Marked body content 3</p>
	<h2>CSS Mark 4</h2>
	<p>CSS Marked body content 4</p>
</body>
//Document structure
- CSS development history
(1) CSS1.0: in December 1996, CSS1.0 came out as the first formal specification, in which font, color and other related attributes have been added.
(2) CSS2.0: in May 1998, the CSS2.0 specification was officially launched. This version of CSS is also the most widely known version. The former front-end developers usually use this CSS specification.
(3) CSS2.1: in February 2004, CSS2.1 made some small-scale changes to the original CSS2.0 and deleted some immature properties supported by browsers. We can think that CSS2.1 is the revised version of CSS2.0.
(4) CSS3.0: in 2010, CSS3 specification was launched, which improved some shortcomings of previous CSS. For example, color module added color correction, transparency and other functions, as well as deformation and animation module.
Basic use of CSS
Introduction of CSS
- CSS can control the display of HTML documents. However, before controlling the display of documents, we should first introduce CSS style sheets into the HTML documents that need to be displayed. HTML provides the following four ways of introduction:
- Use inline styles: this way, styles are defined inline on specific HTML elements, usually used to precisely control the performance of an HTML element.
- Use internal style definition: this method is implemented by defining the style sheet in the HTML file header. In this way, only one HTML document is controlled for each batch of CSS styles.
- Link external style files: this way, style files are completely separated from HTML documents. Style files need to be introduced additionally. In this way, one style can control multiple documents.
- Import external style file: This is similar to the third method, except that @ import is used to import the external style sheet file.
- Use inline style (inline style)
- Inline style is the most direct of all styles, which uses style attributes directly on HTML tags.
- . example effect:
<html>
	<head>
		<title>Page title</title>
	</head>

	<body>
		<p style="color:#FF0000; font-size:20px; text-decoration:underline;">Body content 1</p>
		<p style="color:#000000; font-style:italic;">Body content 2</p>
		<p style="color:#FF00FF; font-size:25px; font-weight:bold;">Text content 3</p>
	</body>
</html>
- Use internal style definitions (inline styles)
- The internal style is to write CSS between and and declare it with tags.
- . example effect:
<html>
<head>
	<title>Page title</title>
	<style type="text/css">
	<!--
	p{
		color : #FF00FF;
		text-decoration:underline;
		font-weight:bold;
		font-size:25px;
	}
	-->
	</style>
</head>

<body>
	<p>Purple, bold, underline, 25 px Effect 1 of</p>
	<p>Purple, bold, underline, 25 px Effect of 2</p>
	<p>Purple, bold, underline, 25 px Effect of 3</p>
</body>
</html>
- Import external style file
- This is the most frequently used way to separate structure from performance.
- Syntax: < link type = "text / CSS" rel = "stylesheet" href = "external style file" >
- Example effect:
<html>
	<head>
		<title>Page title</title>
		<link href="1.css" type="text/css" rel="stylesheet">
	</head>

	<body>
		<h2>CSS Title 1</h2>
		<p>Purple, bold, underline, 25 px Effect 1 of</p>
		<h2>CSS Title 2</h2>
		<p>Purple, bold, underline, 25 px Effect of 2</p>
	</body>
</html>
//======================  1.css  ======================//
h2{
	color : #0000FF;//blue
}
p{
	color : #FF00FF;//violet
	text-decoration : underline;
	font-weight : bold;
	font-size : 20px;
}
//External style files can be used by multiple html
- Import external style file
- This import method is similar to the function of the method, that is, different syntax is used between.
- Syntax: @ import "style file" or @ import url ("style file")
- Example effect:
<html>
	<head>
		<title>Page title</title>
		<style type="text/css">
		<!--
			@import url (1.css);
		-->
		</style>
	</head>

	<body>
		<h2>CSS Title 1</h2>
		<p>Purple, bold, underline, 25 px Effect 1 of</p>
		<h2>CSS Title 2</h2>
		<p>Purple, bold, underline, 25 px Effect of 2</p>
		<h3>CSS Title 3</h3>
		<p>Purple, bold, underline, 25 px Effect of 3</p>
	</body>
</html>
// ======================  1.css  ====================== //
h2{
	color : #0000FF;//blue
}
p{
	color : #FF00FF;//violet
	text-decoration : underline;
	font-weight : bold;
	font-size : 20px;
}
- Priority issues in various ways
- An HTML file can use the above four styles at the same time. When the four styles have the same attributes, what is their priority?
Priority order: inline > internal > Import > link
Tips:
Although the ways of adding various CSS styles to the page have priority, when designing the website, it is better to use only 1-2 kinds, which is not only conducive to the later maintenance and management, but also will not appear all kinds of "collision" situations, which is convenient for the designer to straighten out the overall design ideas.
Three CSS selectors
Introduction of CSS common selectors
- Syntax format defined by CSS:
Selector{
	property : value1;
	property : value2;
}
- The above syntax can be divided into two parts
(1) Selector: a selector determines which elements the style definition works on.
(2) {property: value1; property: Value2} (property definition): the property definition part determines how these styles work (font, color, layout, etc.).
Conclusion: there are two parts to learn CSS
- Master the usage of selector definition;
- Master the definition of various CSS properties.
- Tag selector (element selector)
E {····} / * where e represents a valid HTML element*/
- Example effect:
<html>
	<head>
		<title>Page title</title>
		<style>
			p{color:red;font-size:18px;}				/* Font red, size 18px */
			div{background-color:gray;font-size:25px;}
		</style>
	</head>
	<body>
		<p>Body content 1</p>
		<p>Body content 2</p>
		<div>Text content 3</div>
	</body>
</html>
- Class selector
[E] . classValue {····} / * where e represents a valid HTML element*/
Example effect:
<html>
	<head>
		<title>Page title</title>
		<style>
			.one{color:red;font-size:18px;}					/*Font red, size 18px*/
			div.two{background-color:gray;font-size:25px;}
		</style>
	</head>
	<body>
		<p class="one">Body content 1</p>
		<p>Body content 2</p>
		<p class="two">Body content 2</p>
		<div class="two">Quick content 1</div>
		<div class="one">Quick content 2</div>
	</body>
</html>
At the same time, multiple classes are used to select the operation effect of the controller:
<html>
	<head>
		<title>Use two at the same time class</title>
		<style type="text/css">
			.one{   color:blue;   }			/* colour */
			.two{ font-size:22px; }		/* font size */
		</style>
	</head>

	<body>
		<h4>None of them</h4>
		<h4 class="one">Use both class,Use only the first</h4>
		<h4 class="two">Use both class,Use only the second</h4>
		<h4 class="one two">Use both class,Simultaneous use</h4>
		<h4>None of them</h4>
	</body>
</html>
- ID Selector
[E] (idvalue {· ·} / * where e represents a valid HTML element*/
- Example effect:
<head>
	<title>ID selector</title>
	<style type="text/css">
		#one{font-weight:bold;}					/*bold*/
		#two{font-size:30px;color:#009900;}		/*colour*/
		div#three{border:2px dotted black		/*Border thickness 2px dotted line black*/
					background color:#888}
</head>
<body>
	<p id="one">ID Selector 1</p>
	<p id="two">ID Selector 2</p>
	<div>Layout block 1</div>
	<p id="one two">ID Selector 3</p>
	<div id="three">Layout block 2</div>
</body>
- Selector combination
Selector1, Selector2, Selector3, {· · ·} / * where selector1 and so on are all valid selectors*/
<head>
	<title>Collective statement</title>
	<style type="text/css">h1,h2,h3,h4,h5,p{
		color:purple;
		font-size:15px;
	}
	</style>
</head>

<body>
	<h1>Collective statement h1</h1>
	<h2 class="special">Collective statement h2</h2>
	<h3>Collective statement h3</h3>
	<h4>Collective statement h4</h4>
	<h5>Collective statement h5</h5>
	<p>Collective statement p1</p>
	<p class="special">Collective statement p2</p>
	<p id="one">Collective statement p3</p>
</body>
- Selector nesting
Selector1 Selector2 {· · ·} / * where selector1 and so on are all valid selectors */
- Example effect:
<html>
	<head>
		<title>CSS Nested declaration of selectors</title>
		<style type="text/css">
			<!--
			p b{
				color:maroon;
				text-decoration:underline;
			}
		-->
		</style>
	</head>

	<body>
		<p>Nesting<b>use<b>CSS</b></b>Method of marking</p>
		Out of nested<b>sign</b>No effect
	</body>
</html>
Four CSS common style property settings
- CSS font and text related properties
- CSS provides a lot of properties for controlling the font of text. These properties are mainly used to set the font size, style, thickness and type. Common attributes are as follows:
| Font property label | describe |
|---|---|
| font-family | Specifies the font of the text. For example: "serif", "sans serif", etc |
| font-size | Specify font size of text |
| font-style | Specifies the font style of the text. It mainly includes normal, italic and oblique |
| font-weight | Specifies the thickness of the font. It mainly includes normal, bold and custom thickness |
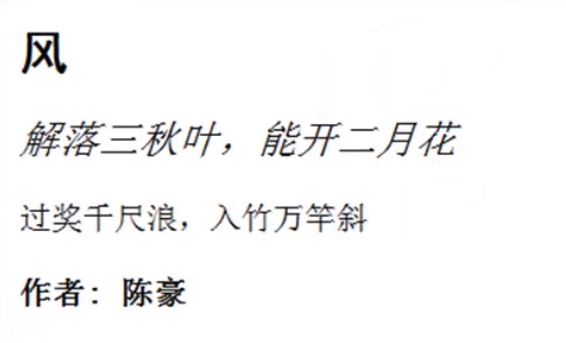
<style>
	h2{font-family:Bold, round;}
	p.article{
		font-size:20px;
		font-style:italic;
	}
	p.kaiti{
		font-family:Regular script_GB2312;
		font-style:normal;
		font-weight:bold;
	}
</style>

<body>
	<h2>wind</h2>
	<p class="article">Untie three autumn leaves, and you can bloom in February</p>
	<p>A thousand feet across the river</p>
	<p class="kaiti">Author: Chen Hao</p>
</body>
- CSS provides a large number of properties for controlling text, which are mainly used to control the appearance of text color, decoration, character spacing, etc. Common attributes are as follows:
| Text property label | describe |
|---|---|
| color | Set text color |
| letter-spacing | Set character spacing |
| line-height | Set text line height |
| text-align | Set the alignment of text, as long as there are left, right, center |
| text-decoration | Set the decoration effect of the text, mainly including outline, underline and linethrough |
| text-indent | Set text block first line indent |
| text-transform | Control the case of text, mainly including uppercase, lowercase and capitalize |
| word-spacing | Set word spacing |
<html>
	<head>
		<title>Text underline, overline, strikeout</title>
		<style>
			p.one{color:red;text-decoration:underline;text-align:center}
			p.two{text-decoration:overline;text-indent:20px;line-height:50px}
			p.three{text-decoration:line-through;text-transfrom:uppercase}
			p.four{word-spacing:20px;letter-spacing:5px}
		</style>
	</head>
	<body>
		<p class="one">I'm paragraph 1</p>
		<p class="two">I'm paragraph 2</p>
		<p class="three">my name is zhangsan</p>
		<p class="four">my name is lisi</p>
		<p>Normal text contrast</p>
	</body>
</html>
- CSS border and background related properties
- In HTML, many elements have border attributes, such as img elements, block level label elements, etc. CSS common border properties are as follows:
| Border properties label | describe |
|---|---|
| border | Set all border properties in one declaration |
| border-width | Set the width of the four borders |
| border-style | Set the style of four borders, mainly including nested, solid, double, dashed |
| border-color | Set the color of the four borders |
| border-left | Set all the left border attributes in the declaration, including border right, etc |
| border-left-color | Set the color of the left border, corresponding to the color of the three sides such as border right color |
| border-left-style | Set the left border style, corresponding to the border right style and other three side styles |
| border-left-width | Control the width of the left border, corresponding to the width of the three sides such as border right width |
<style>
	<!--
		img{
			border-left-style:dotted;
			boder-left-color:#FF9900;
			border-left-width:5px;
			border-right-style:dashed;
			boder-right-color:#FF00FF;
			border-right-width:5px;
			border-top-style:solid;
			boder-top-color:#CC00FF;
			border-top-width:10px;
			border-bottom-style:groove;
			boder-bottom-color:#666666;
			border-bottom-width:15px;
		}
	-->
</style>
<body>
	<img src="grape.jpg">
</body>
<html>
	<head>
		<title>Merge each CSS value</title>
		<style>
			<!--
				img.test1{border:5px double #FF00FF;}
				img.test2{border-right:5px double #FF00FF;
						    border-left:8px solid #0033FF;}
			-->
		</style>
	</head>

	<body>
		<img src="peach.jpg" class="test1">
		<img src="peach.jpg" class="test2">
	</body>
</html>
- In addition to the use of color, the web background can also use pictures. CSS provides relevant properties to control the background pictures accurately. The common properties are as follows:
| Background picture property settings | describe |
|---|---|
| background | Set all background properties in one declaration |
| background-attachment | Set whether the background image is fixed or scrolling with the rest of the page. There are two main values: fixed and scroll |
| background-color | Set the background color of the element |
| background-imag | Sets the background image of the element. There are two main attributes: url and none. |
| background-position | Sets the start position of the background image. You can specify too left, etc., or specific pixel location |
| background-repeat | Sets whether and how background images are repeated. It mainly includes repeat, repeat-x, repeat-y, no repeat |
<style>
	body{
		background-img:url (bg5.jpg);
		background-repeat:no-repeat;
		background-position:200px 25px;
	}
</style>
<body>
	<p>CSS (cascading style sheet), translated into Chinese as cascading style sheet, is used to control web page style and allow style information and Web
	A markup language for page content separation. CSS was approved by W3C in 1996 and recommended. In short, the introduction of CSS is
	In order to make HTML better adapt to the art design of the page. It is HTML based and provides rich formatting functions, such as words
	Body, color, background, overall layout, etc., and web designers can set different styles for various visual browsers, including
	Display, printer, typewriter, projector, PDA, etc. The introduction of CSS has led to a new climax of web design, using
	The excellent pages of CSS design emerge in endlessly.
	</p>
</body>
Tip: we can also combine these background style attributes to make them more concise.
background : url (bg5.jpg) no-repeat 200px 25px ;
- CSS list and table related properties
- CSS provides related attributes for list elements to operate. Common attributes are as follows:
| List element attribute label | describe |
|---|---|
| list-style | Set all list properties in one declaration. |
| list-style-image | Sets the image as a list item marker. There are mainly URL values. |
| list-style-position | Set the location of the list item tag. There are two main values: outside and inside |
| list-style-type | Sets the type of list item tags. It mainly includes disc, circle, square, decimal decimal-leading-zero,lower-roman, upper-roman,lower-greek,lower-latin, upper-latin,armenian,georgian,none |
<html>
	<head>
		<title>Picture symbols</title>
		<style>
			<!--
				body{background-color:#c1daff;}
				li{background-color:#aaa}
			-->
		</style>
	</head>

	<body>
		<p>Use icons as list item Tags</p>
		<ul style="list-style-image:url(icon1.jpg)">
			<li>Road cycling Road cycling</li>
			<li>Track cycling Track cycling</li>
			<li>sprint Chase</li>
		</ul>
		<p>Use numbers as list item tags and place list item tags within list elements</p>
		<ol style="list-style-type:decimal;list-style-position:inside">
			<li>java technology</li>
			<li>android technology</li>
			<li>c technology</li>
		</ol>
	</body>
</html>
- CSS provides related attributes for table elements to operate. Common attributes are as follows
| Table element properties | describe |
|---|---|
| border-collapse | Sets whether to merge table borders into a single border. |
| border-spacing | Sets the distance between cell borders. |
| caption-side | Set the position of the table title. |
| empty-cells | Sets whether empty cells in the table are displayed. |
<style type="text/css">
	#customers
		{font-family:"Trebuchet MS";
		 width:100%;
		 border-collapse:collapse;
		 }
	#customers td, #customers th
		{font-size:13px;
		 border:1px solid #98bf21;
		 }
	#customers th
		{font-size:14px;
		 text-align:left;
		 background-color:#A7C942;
		 color:#FFFFFF
		 }
	#customers tr.alt td
		{
		 color:#000000;
		 background-color:#EAF2D3;
		 }
</style>

<table id="customers">
	<tr>
		<th>Company</th>
		<th>Contact</th>
		<th>Country</th>
	</tr>

	<tr>
		<td>Apple</td>
		<td>Steven Jobs</td>
		<td>USA</td>
	</tr>

	<tr class="alt">
		<td>Baidu</td>
		<td>Li YanHong</td>
		<td>China</td>
	</tr>

	<tr>
		<td>Google</td>
		<td>Larry Page</td>
		<td>USA</td>
	</tr>
</table>
- CSS common pseudo Category Properties
- For < a > tags, we provide CSS pseudo category attributes that can be used to make dynamic effects. The common attributes are as follows:
| <a>Pseudo class attribute | describe |
|---|---|
| a:link | Normal style for hyperlinks |
| a:visited | Hyperlink style clicked |
| a:hover | Style when mouse pointer over hyperlink |
| a:active | When you click on a hyperlink, that is, the style of the hyperlink when currently active |
<body>
	<table class="charal">
		<tr>
			<td><a href="#"> Home Page</a></td>
			<td><a href="#"> mood diary</a></td>
			<td><a href="#">Free</a></td>
			<td><a href="#"> come together</a></td>
			<td><a href="#"> from tomorrow</a></td>
			<td><a href="#"> paper plane</a></td>
			<td><a href="#"> next stop</a></td>
		</tr>
	</table>
</body>

<style>
	<!--
		.charal{
			font-size:15px;
			background-color:#90bcff;
			width:600px;
			}

		.charal td{
			text-align:center;
			}

		a:link{
			color:#005799;
			text-decoration:none;
			}

		a:visited{
			color:#000000;
			text-decoration:none;
			}

		a:hover{
			color:#FFFF00;
			text-decoration:underline;
			}

		a:active{
			color:#FF0000;
			text-decoration:underline;
			}
	-->
</style>
CSS positioning and DIV layout
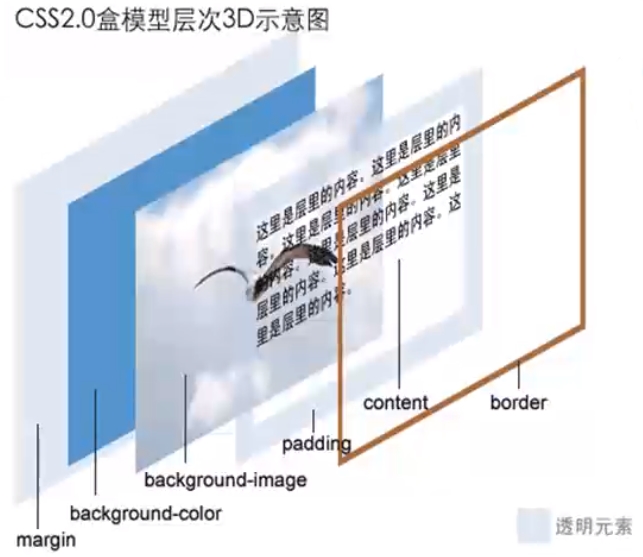
Box model
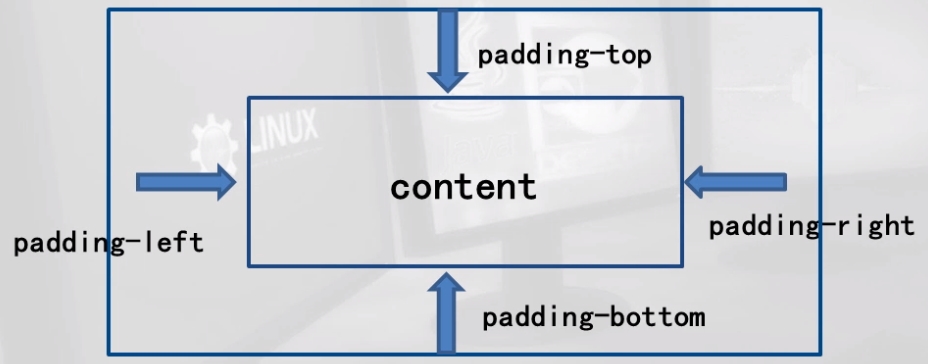
- We can regard the elements in the page as a box, occupying a certain page space, which is often larger than the simple content. In other words, we can adjust the box's border and distance parameters to adjust the box's position.
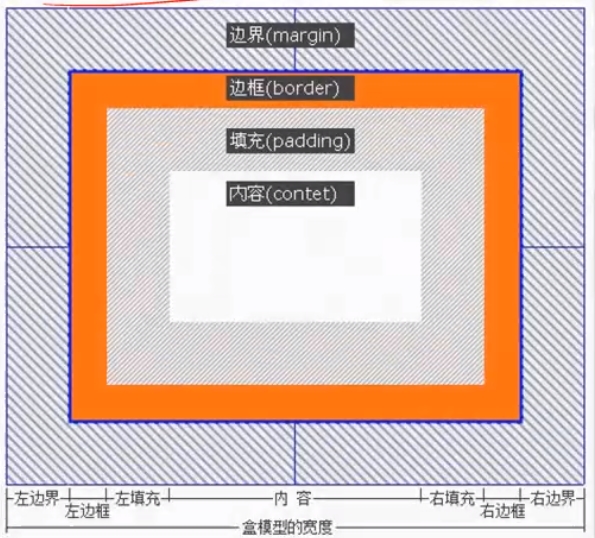
be careful:
It can be concluded from the figure that the width (or height) of a box is determined by content + padding + border + margin, and for any box, you can set the border, padding and margin of four sides respectively. Therefore, we can make good use of these properties of the box to achieve a variety of typesetting effects.
- There are three main border attributes: color, width, and style. Generally, when setting border, three attributes are often well matched to achieve good results.
<html>
	<head>
		<title>border-style</title>
		<style type="text/css">
		<!--
		div{
			border-color:#000000;
			border-width:6px;
			margin:20px;
			padding:5px;
			background-color:#FFFFCC;
		 }
		-->
	</head>
	<body>
		<div style="border-style=dashed">The border-style of dashed.</div>
		<div style="border-style=dotted">The border-style of dotted.</div>
		<div style="border-style=double">The border-style of double.</div>
		<div style="border-style=solid">The border-style of solid.</div>
	</body>
</html>
- padding is used to control the distance between content and border.
<head>
	<style type="text/css">
	<!--
	.outside{
		padding:10px 30px 50px 100px;
		border:1px solid #000000;
		background-color:#fffcd3;
		}
	.inside{
		background-color:#66b2ff;
		border:1px solid #000000;
		width:100%; line-height:40px;
		text-align:center;
		font-family:Arial;
		}
	-->
	</style>
</head>
<body>
	<div class="outside">
		<div class="inside">padding</div>
	</div>
</body>
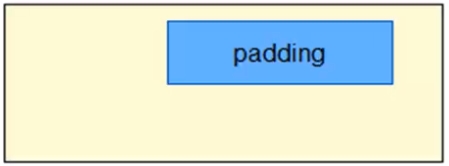
Summary:
The property concept of padding is so simple, but when it is used with margin in CSS, the page can be changed.
- margin refers to the distance between elements.
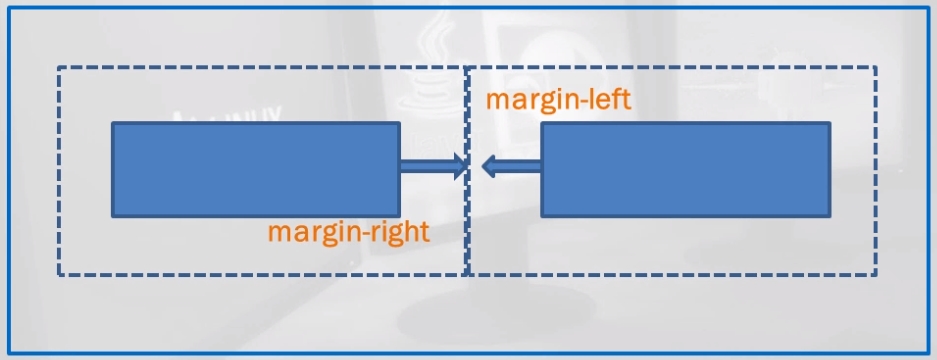
<html>
	<head>
		<style type="text/css">
		<!--
		span{
			background-color:#a2d2ff;
			text-align:center;
			font-family:Arial, Helvetica, sans-serif;
			font-size:12px;
			padding:10px;
			}
		span.left{
			margin-right:30px;
			background-color:#a9d6ff;
			}
		span.right{
			margin-left:40px;
			background-color:#eeb0b0;
			}
		-->
		</style>
	</head>

<body>
	<span class="left">Inline element 1</span><span class="right">Inline element 2</span>
</body>
</html>
<html>
	<head>
		<title>Of two block level elements margin</title>
		<style type="text/css">
		<!--
		div{
			background-color:#a2d2ff;
			text-align:center;
			font-family:Arial, Helvetica, sans-serif;
			font-size:12px;
			padding:10px;
			}
		-->
		</style>
	</head>

<body>
	<div style="margin-bottom:50px">Block element 1</div>
	<div style="margin-top:30px">Block element 2</div>
</body>
</html>
be careful:
The distance between two block level tags is no longer the sum of margin top and margin bottom, but the larger of them.
- In fact, in addition to setting a positive number, margin can also be set to a complex number. When it is set to a negative number, the block will move in the opposite direction, or even cover another block.
<style type="text/css">
	<!--
		span{
			text-align:center;
			font-family:Arial,Helvetica,sans-serif;
			font-size:12px;
			padding:10px;
			border:1px dashed #000000;
			}
		span.left{
			margin-right:30px;
			background-color:#eeb0b0;
			}
		span.right{
			margin-right:-53px;
			background-color:#eeb0b0;
			}
	-->
</style>

<body>
	<span class="left">Inline element 1</span><span class="right">Inline element 2</span>
</body>
-
All kinds of elements in a web page must have their own positions to build the structure of the whole page. Here we show you how to use CSS's float, position, and z-index attributes to locate block elements.
-
Float positioning is an important method in CSS typesetting. The value of the attribute float is very simple. It can be set to left, right or the default value none. When the element is set to float to the left or right, the element will lean to the left or right of its parent element.
emphasize:
Float attribute is often used in text layout and layout layout. To learn the layout of a page well, float attribute must be used skillfully.
Element positioning
- To view an example:
<style type="text/css">
<!--
	body{
		margin:15px;
		font-family:Arial;
		font-size:12px;
		}
	.father{
		background-color:#fffea6;
		border:1px solid #111111;
		padding:25px;
		}
	.son1{
		padding:10px;
		margin:5px;
		background-color:#70baff;
		border:1px dashed #111111;
		float:left;
		}
	.son2{
		padding:5px;
		margin:0px;
		background-color:#ffd270;
		border:1px dashed #111111;
		}
-->
</style>

<body>
	<div class="father">
		<div class="son1">float1</div>
		<div class="son2">float2</div>
	</div>
</body>
When son1 sets the column float, the width of son1 is only its content plus its padding. For the parent container, it does not belong to the parent block, so son2 below will come up. Its internal content is around son1, and keeps the margin distance set by son1.
- If you float sub block son1 and sub block son2 to the left, and add content to son2, you will find that sub block son2 no longer surrounds son1. The effect is as follows:

wise remark of an experienced person:
If son1 is used as menu navigation, son2 is used as body content, and then the frame and background of the parent block are hidden, this is a very popular way of typesetting.
- In CSS, you can clear the impact on float by setting the clear attribute of block element. You can mainly set three values: left, right, and both.
- Position positioning, like float, is also a very important concept in CSS layout. Position is literally the location of a block. That is, the position of a block relative to its parent block and its position relative to itself.
Summary:
When the position of the child block is set to absolute, the child block is no longer subordinate to the parent block, and the distance set by its left border is the distance from the page body, not the distance from the parent block.
- A parent block contains two sub blocks, one of which sets the position attribute value to absolute.
Summary:
Once the position of child block 1 is set to absolute, it will no longer be subordinate to the parent block. Therefore, child block 2 becomes the first child block in the parent block and moves to the top of the parent block.
- When the position parameter of a block is set to relative, it is completely different from that when it is set to absolute. In this case, the child block is positioned relative to its original position in the parent block
Summary:
When the child block position attribute is set to relative, the child block still belongs to the parent block, but it has moved relative to its original position in the husband block.
- The z-index attribute is used to adjust the upper and lower positions of overlapping blocks during positioning. When the position attribute is set for a block, this value can set the overlap relationship between blocks. The default value is 0.
DIV+CSS layout practice
Starting from the overall layout of the page, this paper introduces the concept and specific methods of CSS layout, including the overall idea of CSS layout, and finally consolidate the knowledge learned through practical cases.
-
CSS layout concept
(1) CSS typesetting is a popular typesetting concept. It starts with the page as a wholeMark the blocks, locate the CSS of each block, and then add the corresponding content in this block.
(2) Through the CSS layout of the page, it is very easy to update, even the page topology, can be repositioned by modifying the CSS properties. -
Making a page of tourist destination introduction
(1) Analyze the whole page
(2) Determine the main parts of the whole page
(3) Structured with DIV Tags
(4) Beautify and locate each module through CSS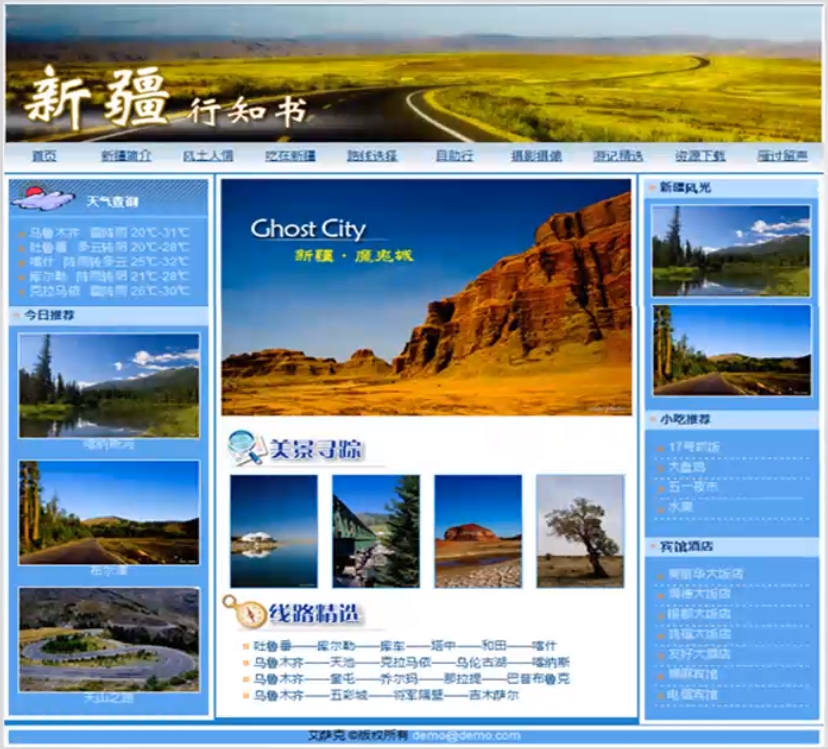
- The whole page is divided into banner, global link, left, middle, right and footer, each part is identified by its own id. The overall blocking effect is as follows:
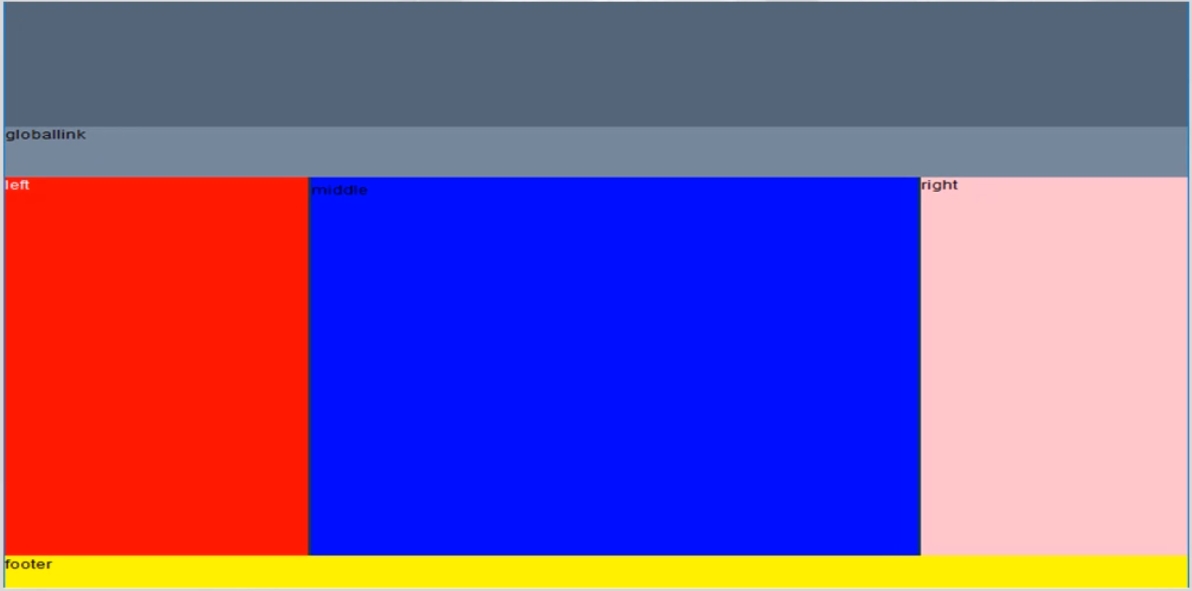
banner is a picture that has been made:
Global link is an unordered list. Each list is a hyperlink implementation:
<ul>
	<li><a href="#">home page</a></li>
	<li><a href="#">Introduction to Xinjiang</a></li>
	<li><a href="#">local customs and practices</a></li>
	<li><a href="#">Eat in Xinjiang</a></li>
	<li><a href="#">Route selection</a></li>
	<li><a href="#">Self service bank</a></li>
	<li><a href="#">Photographing</a></li>
	<li><a href="#">Selected travel notes</a></li>
	<li><a href="#">Resource download</a></li>
	<li><a href="#">a goose utters its cry wherever it flies</a></li>
</ul>
Page practice: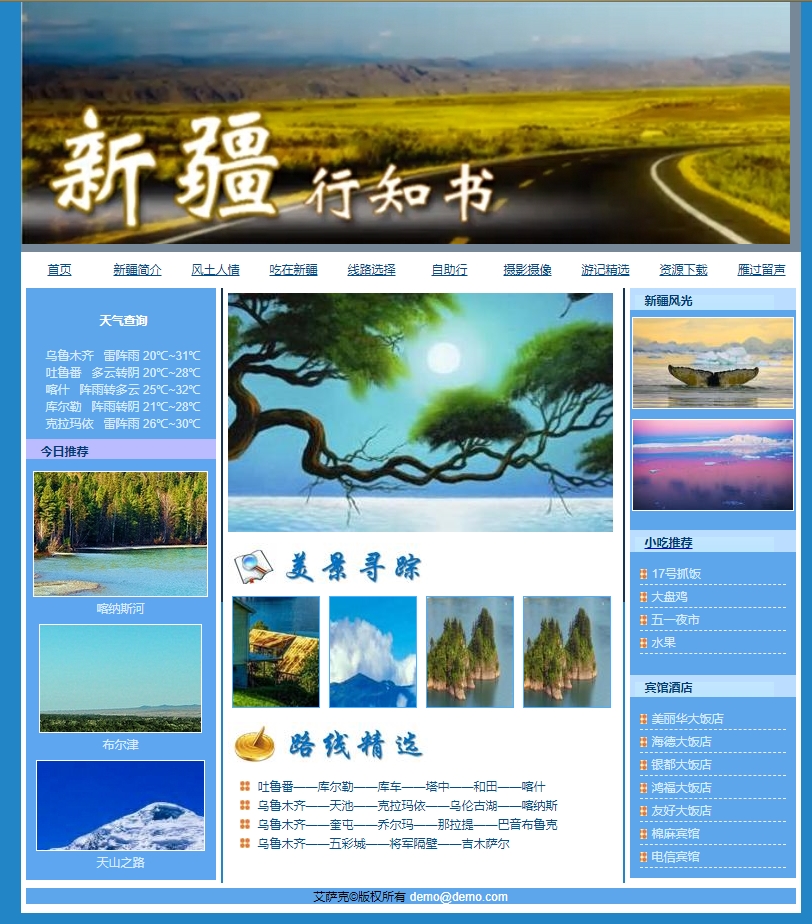
/*********************************** css_html.html ***********************************/ <!DOCTYPE html> <html lang="en"> <head> <meta http-equiv="Content-Type" content="text/html;charset=UTF-8"/> <meta name="Generator" content="EditPlus®"> <meta name="Author" content="yangyuan"> <meta name="Keywords" content="Xinjiang, a beautiful place"> <meta name="Description" content="Xinjiang is a beautiful and fascinating place. Every year, many tourists come here to visit"> <title>Xinjiang Tourism Network</title> <link href="css.css" rel="stylesheet" type="text/css"> </head> <body> <!--Integral outer container--> <div id="container"> <!--banner strip--> <div id="banner"> <img src="bannerjpg.jpg" alt="Scenery of Xinjiang"> </div> <!--Global navigation bar--> <div id="globallink"> <ul> <li><a href="#">home page</a></li> <li><a href="#">Introduction to Xinjiang</a></li> <li><a href="#">local customs and practices</a></li> <li><a href="#">Eat in Xinjiang</a></li> <li><a href="#">Route selection</a></li> <li><a href="#">Self service bank</a></li> <li><a href="#">Photographing</a></li> <li><a href="#">Selected travel notes</a></li> <li><a href="#">Resource download</a></li> <li><a href="#">a goose utters its cry wherever it flies</a></li> </ul> </div> <!--Left column--> <div id="left"> <div id="weather"> <h3><span>Weather query</span></h3> <ul> <li>Urumqi Thunderstorm 20℃~31℃</li> <li>Turpan Cloudy to overcast 20℃~28℃</li> <li>Kashgar Shower to cloudy 25℃~32℃</li> <li>Korla Shower turns overcast 21℃~28℃</li> <li>Karamay Thunderstorm 26℃~30℃</li> </ul> </div> <div id="today"> <h3><span>Today's recommendation</span></h3> <ul> <li><a href="#"><img src="jiang1.jpg"></a></li> <li><a href="#">Kanas River </a></li> <li><a href="#"><img src="jiang2.jpg"></a></li> <li><a href="#">Burqin</a></li> <li><a href="#"><img src="jiang3.jpg"></a></li> <li><a href="#">Tianshan Road</a></li> </ul> </div> </div> <!--Middle content bar--> <div id="middle"> <div id="ghost"><a href="#" title="Devil City"><img src="ghost.jpg" border="0"></a></div> <div id="beauty"> <h3><span>Beautiful scenery</span></h3> <ul> <li><a href="#"><img src="beauty1.jpg"></a></li> <li><a href="#"><img src="beauty2.jpg"></a></li> <li><a href="#"><img src="beauty3.jpg"></a></li> <li><a href="#"><img src="beauty4.jpg"></a></li> </ul> </div> <div id="route"> <h3><span>Route selection</span></h3> <ul> <li><a href="#">Turpan - Korla - Kuqa - Tazhong - Hotan - Kashgar</a></li> <li><a href="#">Urumqi Tianchi Karamay Wulungu Lake Kanas</a></li> <li><a href="#">Urumqi Kuitun chorma Nalati bayinbrook</a></li> <li><a href="#">Urumqi - colorful city - next to the general - jimusar</a></li> </ul> </div> </div> <!--Right column--> <div id="right"> <div id="map"> <h3><span>Scenery of Xinjiang</span></h3> <p><a href="#" title="click to enlarge "><img src="image1.jpg"></p> <p><a href="#" title="click to enlarge "><img src="image2.jpg"></p> </div> <div id="food"> <h3><span>Snack recommendation</span></h3> <ul> <li><a href="#">17 Grab rice No</a></li> <li><a href="#">Saute Spicy Chicken</a></li> <li><a href="#">May day night market</a></li> <li><a href="#">Fruits</a></li> </ul> </div> <div id="life"> <h3><span>Hotel</span></h3> <ul> <li><a href="#">Meilihua Hotel</a></li> <li><a href="#">Hyde Hotel</a></li> <li><a href="#">Yindu Hotel</a></li> <li><a href="#">Hongfu Hotel </a></li> <li><a href="#">Friendship Hotel</a></li> <li><a href="#">Mianma Hotel</a></li> <li><a href="#">Telecommunication Hotel</a></li> </ul> </div> </div> <!--footnote--> <div id="footer"> <p>Isaac©copyright <a href="mailto:demo@demo.com">demo@demo.com</a></p> </div> </div> </body> </html>
/*********************************** css.css ***********************************/
body{
	background:#2286c6;
	margin:0px;
	padding:0px;
	font-size:12px;
	font-family:Arial;
}

#container{
	width:780px;
	height:600px;
	text-align:left;
	background:#123456;
	margin:0px auto;
}


#banner{
	margin:0px;
	padding:0px;
	background:#789;
	height:250px;
	width:100%;
}

#globallink{
	margin:0px;
	padding:0px;
}

#globallink ul{
	list-style-type:none;
	padding:0px;
	margin:0px;
}

#globallink ul li{
	float:left;
	text-align:center;
	width:78px;
}

#globallink ul li a{
	display:block;
	padding:9px 6px 11px 6px;
	margin:0px;
	background:url("button1.jpg") no-repeat;
}

#globallink a:link, #globallink a:visited{
	color:#004a87;
	text-decoration=underline;
}

#globallink a:hover, #globallink a:visited{
	color:#111111;
	text-decoration=none;
	background:url(button1_bg.jpg) no-repeat;
}

#left{
	margin:0px;
	padding:0px 0px 5px 0px;
	background:#ffffff;
	height:590px;
	width:200px;
	color:#d8ecff;
	float:left;
}

#weather{
	background:url("weather.jpg") no-repeat -5px 0px;
	margin:0px 5px;
	background-color:#5ea6eb;
}

#weather h3{
	font-size:12px;
	padding:24px 0px 0px 74px;
	color:#ffffff;
	margin:0px;
}

#weather ul{
	margin:8px 5px 0px 5px;
	padding:10px 0px 8px 5px;
	list-style-type:none;
}

#weather ul li{
	background:url("icon1.jpg") no-repeat 0px 6px;
	padding:1px 0px 0px 10px
}


#middle{
	margin:0px 2px;
	padding:5px 0px 5px 0px;
	background:#ffffff;
	width:400px;
	float:left;
}

#middle div{
	margin:0px 5px 0px 5px;s
}

#middle h3{
	margin:0px;
	padding:0px;
	height:41px;
}

#middle h3 span{
	display:none;/*Remove text*/

}

#beauty{
	margin:15px 0px 0px 0px;
	padding:0px;
}

#beauty h3{
	background:url("icon2.jpg") no-repeat;
	margin:8px 0px 0px 0px;
}

#beauty ul, #route ul{
	list-style-type:none;
	margin:16	px 1px 0px 1px;
	padding:0px;
}

#beauty ul li{
	float:left;
	width:97px;
	text-align:center;
}

#beauty ul li img{
	border:1px solid #4ab0ff;

}

#route h3{
	background:url(icon3.jpg) no-repeat;
	margin:6px 0px 0px 0px;
}

#route{
	clear:both;
	margin:0px;
	padding:5px 0px 15px 0px;
}


#route ul li{
	padding:3px 0px 0px 30px;
	background:url("icon4.jpg") no-repeat 12px 6px;
}

#route ul li a:link, #route ul li a:visited{
	text-decoration:none;
	color:#004e8a;
}

#route ul li a:hover{
	text-decoration:underline;
	color:#000000;
}

#today h3{
	color:#003973;
	font-size:12px;
	background:#bbbbff url("icon2.gif") no-repeat;
	padding: 4px 0px 0px 15px;
	margin:0px 0px 5px 0px;
}

#today{
	background:#5ea6ef;
	margin:0px 5px 0px 5px;
	padding:0px 0px 10px 0px;
}

#today ul{
	list-style-type:none;
	padding:0px 0px 0px 0px;
	margin:-1px 0px 0px 0px;
}


#today ul li{
	text-align:center;
}

#today ul li img{
	border:1px solid #ffffff;
	margin:8px 0px 0px 0px;
}

#today ul li a:link, #today ul li a:visited{
	color:#d8ecff;
	text-decoration:none;
}

#today ul li a:hover{
	color:#ffff00;
	text-decoration:underline;
}

#right{
	margin:0px;
	padding:0px 0px 5px 0px;
	background:#ffffff;

	width:176px;
	color:#d8ecff;
	float:left;
}


#right div{
	margin:0px 5px;
	background:#5ea6eb;
}


#right h3{
	font-size:12px;
	padding:4px 0px 2px 15px;
	color:#003973;
	margin:0px 0px 5px 0px;
	background:#bbddff url("button1_bg.jpg") no-repeat 5px 7px;
}

#map p{
	text-align:center;
	margin:0px;
	padding:2px 0px 5px 0px;
}

#map p img{
	border:1px solid #ffffff;
	text-align:center;
}

#food ul, #life ul{
	list-style-type:none;
	padding:0px 0px 10px 0px;
	margin:10px 10px 0px 10px;
}

#food ul li,#life ul li{
	background:url("icon4.jpg") no-repeat -3px 7px;
	padding:3px 0px 3px 12px;
	border-bottom:1px dashed #eeeeee;
}

#food ul li a:link, #food ul li a:visited, #life ul li a:link, #life ul li a:visited{
	color:#d8ecff;
	text-decoration:none;
}

#food ul li a:hover, #life ul li a:hover{
	color:#000000;
	text-decoration:underline;
}

#food, #life {
	padding-top:11px;
}


#footer{
	background:#ffffff;
	margin:0px;
	padding:1px 0px 5px 0px;
	clear:both;
}

#footer p{
	text-align:center;
	padding:0px;
	margin:4px 5px 4px 5px;
	background:#5ea6eb;

}

#footer p a{
	color:#ffffff;
	text-decoration:none;
}