Chapter 11 Kubernetes core concepts
After the basic deployment in the previous chapter, the components of Kubernetes are not fully understood, especially the characteristics and location of each component are not very clear. Therefore, this chapter will explain the core concepts of each component in detail.
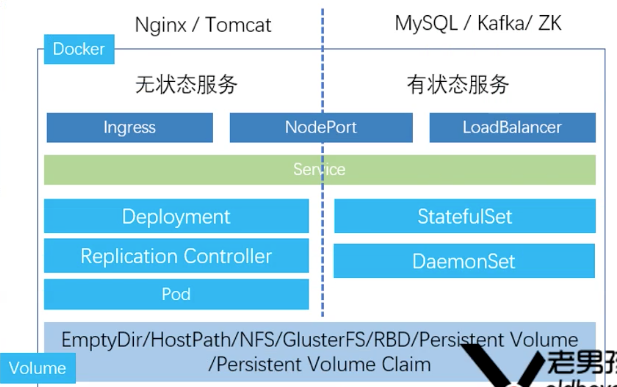
11.1 Kubernetes object
- Service network access: progress, Services
- Container management types: Deployment, ReplicaSet, ReplicationController, DaemonSet, StatefulSet
- Container storage types: Volume, Secret, ConfigMap, PersistentVolume
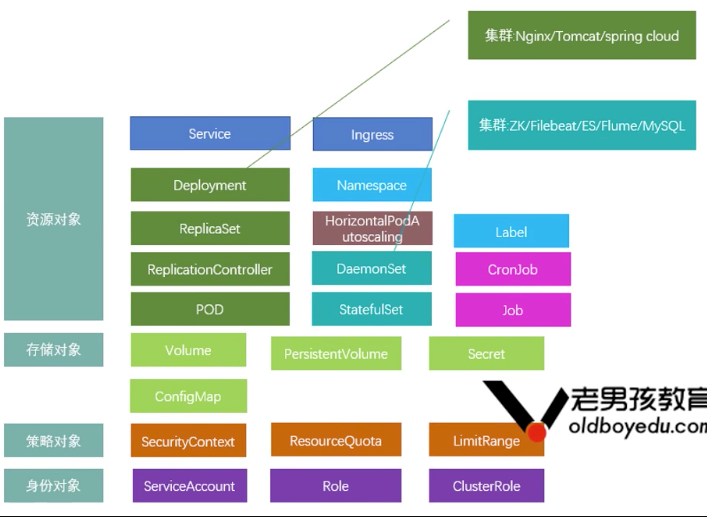
Logical hierarchy
11.2 cluster resource management
11.2.0 Node
Node is the working node of kubernetes cluster, which can be either a physical machine or a virtual machine.
11.2.1 Namespace
A logical isolation technology that saves resources.
Namespace is similar to the concept of users in Linux system. By assigning objects within the system to different namespaces, it forms a logical distinction, so that different groups can be managed separately while sharing cluster resources.
The Name of the Kubernetes object under the same Namespace must be unique.
Namespace provides a scope for names. The name of a resource needs to be unique within a namespace, but cannot cross namespaces. Namespaces cannot be nested within another namespace, and each Kubernetes resource can only belong to one namespace.
By default, the Kubernetes cluster instantiates a default namespace default when configuring the cluster to store the default Pods, Services and Deployments collections used by the cluster.
Note: you do not need to use multiple namespaces to separate minor and different resources, such as different releases of the same project.
11.2.1.1 case: Namespace operation
Create NS
[root@master-1 ~]# kubectl create namespace ns-system
Create test-ns.yaml from the Yaml file
[root@master-1 test]# cat test-ns.yaml
apiVersion: v1
kind: Namespace
metadata:
  name: test-ns
View NS list
[root@master-1 ns]# kubectl apply -f test-ns.yaml
namespace/test-ns created

[root@master-1 ns]# kubectl get namespace
NAME                   STATUS   AGE
default                Active   4d2h
kube-node-lease        Active   4d2h
kube-public            Active   4d2h
kube-system            Active   4d2h
kubernetes-dashboard   Active   3d21h
monitoring             Active   3d6h
test-ns                Active   7s
View ns details
[root@master-1 ns]# kubectl describe namespace/test-ns
Name:         test-ns
Labels:       <none>
Annotations:  kubectl.kubernetes.io/last-applied-configuration: {"apiVersion":"v1","kind":"Namespace","metadata":{"annotations":{},"name":"test-ns"}}
Status:       Active

No resource quota.

No resource limits.
Relationship between NS and Service (10.0.0.0 / 8)
- When a Service is created, it creates the corresponding DNS record.
- The format of this record is < servicename >. < namespace name >. Svc.cluster.local, which means that if the container only uses < service name >, it will resolve to the local service to namespace (default).
- If you want to access across namespaces, you need to use a fully qualified domain name (FQDN).
#The name of dns resolution is svc (service name, not pod name)
dnstools# nslookup nginx
Server:	10.0.0.2
Address: 10.0.0.2#53

Name:nginx.default.svc.cluster.local
Address: 10.0.0.55
For non default default, the full name nginx-n1.kube-system needs to be written
dnstools# nslookup nginx-n1 Server:	10.0.0.2
Address:	10.0 0.2#53
** server can't find nginx-n1: NXDOMAIN

dnstools# nslookup nginx-n1 Server:	10.0.0.2
Address:	10.0 0.2#53

#Solution (resolve to default space by default)
dnstools# nslookup nginx-n1.kube-system.svc.cluster.local
Server:	10.0.0.2
Address:	10.0 0.2#53

Name:	nginx-n1.kube-system.svc.cluster.local
Address: 10.0.0.196
11.2.2 Label
Label mechanism is an important design in Kubernetes. Through the association of objects (pod,service,node) through label, you can classify and select flexibly.
For a Pod, you need to set its own Label to identify it,
Label is a series of Key/value pairs, which are set in Pod – > metadata – > labels. The definition of label is arbitrary, but the label must be identifiable, such as setting the application name and version number of Pod. In addition, the label is not unique. In order to more accurately identify a Pod, multiple dimension labels should be set for the Pod. As follows:
- "release" : "stable", "release" : "canary"
- "environment" : "dev", "environment" : "uat", "environment" : "production"
- "partition" : "customerA", "partition" : "customerB"
11.2.2.1 case 1: setting container Label
In Job, Deployment, ReplicaSet and DaemonSet, the metadata.labels field is usually used in the container to add labels to objects, for example:
Configuration Label
[root@master-1 ingress]# cat traefik-deploy.yaml
apiVersion: apps/v1
kind: DaemonSet
metadata:
  name: traefik-ingress-controller
  labels:
    app: traefik
View label
[root@master-1 ingress]# kubectl describe pod traefik-ingress-controller
Name:   traefik-ingress-controller-4cn9t
Namespace:  default
Priority: 0
Node:   192.168.91.21/192.168.91.21
Start Time: Sat, 18 Apr 2020 16:02:08 +0800
Labels: app=traefik
        controller-revision-hash=846985d876
        pod-template-generation=4
Interface view

11.2.2.2 case 2: setting Node Label
Set the label label of Node to IngressProxy=true
[root@master-1 ingress]# kubectl label nodes 192.168.31.7 IngressProxy=true
Check for success
[root@master-1 ~]# kubectl get nodes --show-labels
NAME           STATUS   ROLES    AGE    VERSION   LABELS
192.168.31.7   Ready    <none>   4d1h   v1.15.1   IngressProxy=true,beta.kubernetes.io/arch=amd64,beta.kubernetes.io/os=linux,kubernetes.io/arch=amd64,kubernetes.io/hostname=192.168.31.7,kubernetes.io/os=linux
192.168.31.8   Ready    <none>   4d1h   v1.15.1   IngressProxy=true,beta.kubernetes.io/arch=amd64,beta.kubernetes.io/os=linux,kubernetes.io/arch=amd64,kubernetes.io/hostname=192.168.31.8,kubernetes.io/os=linux


[root@master-1 ~]#  kubectl get nodes -l IngressProxy=true
NAME           STATUS   ROLES    AGE    VERSION
192.168.31.7   Ready    <none>   4d1h   v1.15.1
192.168.31.8   Ready    <none>   4d1h   v1.15.1
[root@master-1 ~]# kubectl label nodes 192.168.31.7 isNode=true
node/192.168.31.7 labeled

[root@master-1 ~]# kubectl get nodes --show-labels
NAME           STATUS   ROLES    AGE    VERSION   LABELS
192.168.31.7   Ready    <none>   4d1h   v1.15.1   IngressProxy=true,beta.kubernetes.io/arch=amd64,beta.kubernetes.io/os=linux,isNode=true,kubernetes.io/arch=amd64,kubernetes.io/hostname=192.168.31.7,kubernetes.io/os=linux
192.168.31.8   Ready    <none>   4d1h   v1.15.1   IngressProxy=true,beta.kubernetes.io/arch=amd64,beta.kubernetes.io/os=linux,kubernetes.io/arch=amd64,kubernetes.io/hostname=192.168.31.8,kubernetes.io/os=linux

[root@master-1 ~]#  kubectl get nodes -l  isNode=true
NAME           STATUS   ROLES    AGE    VERSION
192.168.31.7   Ready    <none>   4d1h   v1.15.1
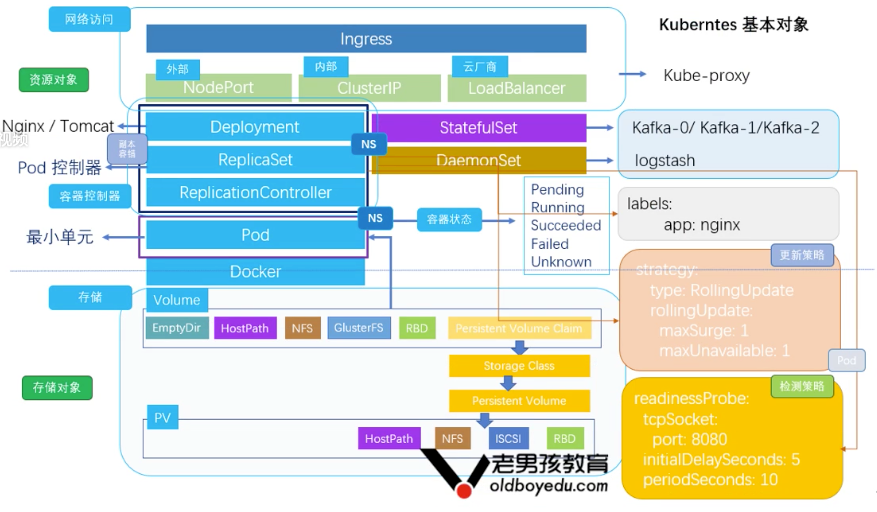
11.3 vessel controller Pod
11.3.1 Pod (container controller)
Pod is the smallest unit of Kubernetes' basic operation and the carrier of application operation.
The whole Kubernetes system is developed around Pod; For example, how to deploy and run pods, how to ensure the number of pods, how to access pods, etc.
You can think of a Pod as a wrapper for a single container, and Kubernetes manages the Pod directly, not the container.
11.3.1.1 case 1: create Nginx Pod
When the kubectl delete operation is invalid, you can try the following steps to troubleshoot the cause:
- Check whether the deployments task is created: kubectl get deployments
- Check if the replica controller is created ReplicationController: kubectl get rc
- Check if the replica set replicasets: kubectl get rs is created
If yes, execute kubectl delete deployment|rc|rs $name first, and then execute kubectl delete pod $pod_name can really achieve the purpose of deletion.
Delete the previous nginx pod
[root@master-1 ~]# kubectl delete deployment nginx-demo
[root@master-1 ~]# kubectl delete rs nginx-demo-68749b58dc
[root@master-1 ~]# kubectl delete rc nginx-demo-68749b58dc-xzk5c
[root@master-1 ~]# kubectl delete pods nginx-demo
[root@master-1 ~]# kubectl delete svc nginx-demo-svc
[root@master-1 nginx]# cat nginx.yaml
apiVersion: v1                #pod interface
kind: Pod                     #Controller name pod
metadata:
  name: nginx                 #pod name
  labels:
    app: nginx                #pod tag app=nginx
spec:
  containers:
    - name: nginx             #Container name
      image: nginx            #Image name
      ports:
        - containerPort: 80   #Container port
          hostPort: 3000      #node port
function
[root@master-1 nginx]# kubectl apply -f nginx.yaml
pod/nginx created
View running status
[root@master-1 nginx]# kubectl describe pod nginx
Name:         nginx
Namespace:    default
Priority:     0
Node:         192.168.31.7/192.168.31.7
Start Time:   Mon, 10 Aug 2020 17:55:55 +0800
Labels:       app=nginx
Annotations:  kubectl.kubernetes.io/last-applied-configuration:
                {"apiVersion":"v1","kind":"Pod","metadata":{"annotations":{},"labels":{"app":"nginx"},"name":"nginx","namespace":"default"},"spec":{"conta...
Status:       Pending
IP:
Containers:
  nginx:
    Container ID:
    Image:          nginx
    Image ID:
    Port:           80/TCP
    Host Port:      3000/TCP
    State:          Waiting
      Reason:       ContainerCreating
    Ready:          False
    Restart Count:  0
    Environment:    <none>
    Mounts:
      /var/run/secrets/kubernetes.io/serviceaccount from default-token-7rdlr (ro)
Conditions:
  Type              Status
  Initialized       True
  Ready             False
  ContainersReady   False
  PodScheduled      True
Volumes:
  default-token-7rdlr:
    Type:        Secret (a volume populated by a Secret)
    SecretName:  default-token-7rdlr
    Optional:    false
QoS Class:       BestEffort
Node-Selectors:  <none>
Tolerations:     node.kubernetes.io/not-ready:NoExecute for 300s
                 node.kubernetes.io/unreachable:NoExecute for 300s
Events:
  Type    Reason     Age   From                   Message
  ----    ------     ----  ----                   -------
  Normal  Scheduled  10s   default-scheduler      Successfully assigned default/nginx to 192.168.31.7
  Normal  Pulling    9s    kubelet, 192.168.31.7  Pulling image "nginx"
11.3.2 ReplicationController and ReplicaSet (container controller)
The ReplicationController is used to ensure that the number of replicas of the container application is always maintained at the user-defined number of replicas (number of containers), that is, if a container exits abnormally, a new Pod will be automatically created to replace it; If there are abnormally many containers, they will also be recycled automatically.
In the new version of Kubernetes, it is recommended to use ReplicaSet instead of ReplicationController. ReplicaSet is not fundamentally different from ReplicationController in name, and ReplicaSet supports collective (multi label selection) selector.
11.3.2.1 case 1: create ReplicationController
- Use the template.metadata.labels field to attach a Label to the Pod to be created, that is, app=nginx
- Specify which pods this RC manages through the spec.selector field
[root@master-1 nginx-rc]# cat nginx-rc.yaml
apiVersion: v1
kind: ReplicationController     #Vessel controller RC
metadata:
  name: nginx-rc                #RC name
spec:
  replicas: 1                   #Number of copies 1
  selector:
    app: nginx-rc               #Controller selection app = nginx RC (label)
  template:
    metadata:
      labels:
        app: nginx-rc                 #Label of template: app = nginx
    spec:
      containers:
        - name: nginx-rc            #Container name
          image: nginx              #Image name
          ports:
            - containerPort: 80     #Container port
Deploy RC
[root@master-1 nginx]# kubectl apply -f nginx-rc.yaml
replicationcontroller/nginx-rc created
View status
[root@master-1 nginx]# kubectl get rc
NAME       DESIRED   CURRENT   READY   AGE
nginx-rc   1         1         1       94s

[root@master-1 nginx]# kubectl describe rc nginx-rc
Name:         nginx-rc
Namespace:    default
Selector:     app=nginx-rc
Labels:       app=nginx-rc
Annotations:  kubectl.kubernetes.io/last-applied-configuration:
                {"apiVersion":"v1","kind":"ReplicationController","metadata":{"annotations":{},"name":"nginx-rc","namespace":"default"},"spec":{"replicas"...
Replicas:     1 current / 1 desired
Pods Status:  1 Running / 0 Waiting / 0 Succeeded / 0 Failed
Pod Template:
  Labels:  app=nginx-rc
  Containers:
   nginx-rc:
    Image:        nginx
    Port:         80/TCP
    Host Port:    0/TCP
    Environment:  <none>
    Mounts:       <none>
  Volumes:        <none>
Events:
  Type    Reason            Age   From                    Message
  ----    ------            ----  ----                    -------
  Normal  SuccessfulCreate  2m1s  replication-controller  Created pod: nginx-rc-2rf4q
Access test
[root@master-1 ~]# kubectl run -it --rm --restart=Never --image=infoblox/dnstools:latest dnstools dnstools# curl 172.17.98.13
11.3.4 adjust RC Pod quantity
[root@master-1 nginx]# kubectl get pod
NAME                                      READY   STATUS    RESTARTS   AGE
nfs-client-provisioner-6d6f7ff69f-bk95b   1/1     Running   1          3d7h
nginx                                     1/1     Running   0          13m
nginx-rc-2rf4q                            1/1     Running   0          4m8s


[root@master-1 nginx]# kubectl scale rc nginx-rc --replicas=3
replicationcontroller/nginx-rc scaled

[root@master-1 nginx]# kubectl get pod
NAME                                      READY   STATUS              RESTARTS   AGE
nfs-client-provisioner-6d6f7ff69f-bk95b   1/1     Running             1          3d7h
nginx                                     1/1     Running             0          15m
nginx-rc-2rf4q                            1/1     Running             0          5m17s
nginx-rc-dvgqb                            0/1     ContainerCreating   0          27s
nginx-rc-gmddb                            0/1     ContainerCreating   0          27s

[the external chain picture transfer fails. The source station may have an anti-theft chain mechanism. It is recommended to save the picture and upload it directly (img-5s7z2vRL-1634538453109)(assets/CA49DA8A169A40A7B3A598161165D374.png)]
pod does not support capacity expansion (command capacity expansion)
[root@master-1 nginx]# kubectl scale pod nginx --replicas=2
error: could not find proper group-version for scale subresource of /v1, Resource=pods: could not find scale subresource for /v1, Resource=pods in discovery information
pod does not support capacity expansion (yaml)
[root@master-1 nginx1]# cat nginx.yaml
apiVersion: v1
kind: Pod
metadata:
    name: nginx	        #pod name
    labels:	            #Label label
        app: nginx	    #Define the label of pod: app = nginx
spec:
    replicas: 2                     # Number of containers
    containers:
        - name: nginx               #Container name
        image: nginx                #Image name
        ports:
            - containerPort: 80	    #Container port
            hostPort: 3000	        #node interface port
An error occurred. The interface does not support replicas
[root@master-1 nginx]# kubectl apply -f nginx.yaml
error: error validating "nginx.yaml": error validating data: ValidationError(Pod.spec): unknown field "replicas" in io.k8s.api.core.v1.PodSpec; if you choose to ignore these errors, turn validation off with --validate=false
11.3.2.2 case 2: create ReplicaSet
- In addition to using matchLabels, the selector also supports collective operations.
- By modifying the value of. spec.replicas, the number of pods run by RS can be modified in real time.
- There is a problem downloading the image
apiVersion: apps/v1
kind: ReplicaSet
metadata:
    name: frontend
    labels:
        app: guestbook
        tier: frontend
spec:
    replicas: 3
    selector:
        matchLabels:
            tier: frontend
        matchExpressions:
            - {key: tier, operator: In, values: [frontend]}
    template:
        metadata:
            labels: #Define multiple labels
                app: guestbook
                tier: frontend
        spec:
            containers:
                - name: php-redis
                image: gcr.io/google_samples/gb-frontend:v3
                resources:
                    requests:
                        cpu: 100m
                        memory: 100Mi
                env:
                    -name: GET_HOSTS_FROM
                    value: dns
                ports:
                    -containerPort: 80
Check whether the startup is successful
[root@master-1 ~]# kubectl describe rs/frontend
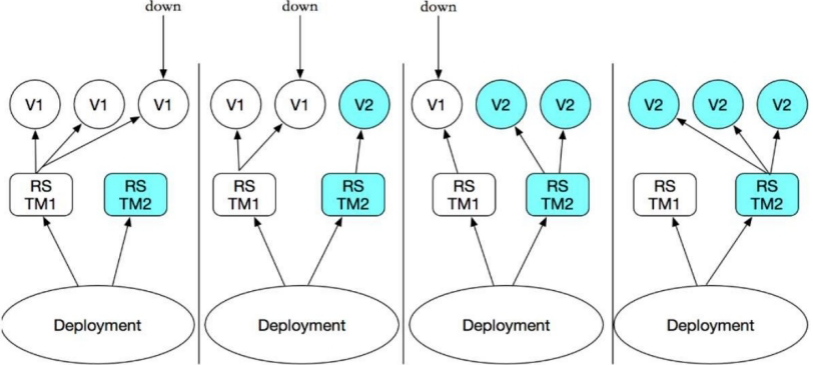
11.3.3 Deployment
Deployment is also a core content of Kubernetes. Its main responsibility is to ensure the number and health of pod s. 90% of its functions are exactly the same as Replication Controller, which can be regarded as a new generation of Replication Controller. However, it has new features beyond Replication Controller:
- Deployment inherits all the functions of replication controller described above.
- In the process of upgrading or creating a container, you can view the detailed progress and status.
- When upgrading the pod image or related parameters, if there is a problem, you can use the rollback operation to rollback to the previous version or the specified version.
- Every Deployment operation can be saved (with operation records) for subsequent rollback
- Every pod upgrade can be suspended and started at any time (easy to control).
- There are many upgrade schemes for pod:
- Recreate: delete all existing pod s and recreate new ones;
- RollingUpdate: the strategy of rolling upgrade and step-by-step replacement. At the same time, it supports more additional parameters, such as setting the maximum number of unavailable pod s, minimum upgrade interval, etc.
Create pod process by container controller
- Use Deployment to create a replicaset, which creates a pod in the background; Check the startup status of pod and whether it is successful.
- Declare the new status of the Pod by updating the PodTemplateSpec field of the Deployment. After that, a new ReplicaSet will be created,
Deployment will start a new ReplicaSet first according to the default update policy (25% of the number of replicas required for RollingUpdate, and the production recommended configuration is: 1) - If the new ReplicaSet fails to start (check port policy), the old ReplicaSet will continue to exist.
- If the expansion is successful, the old ReplicaSet will be cleaned up
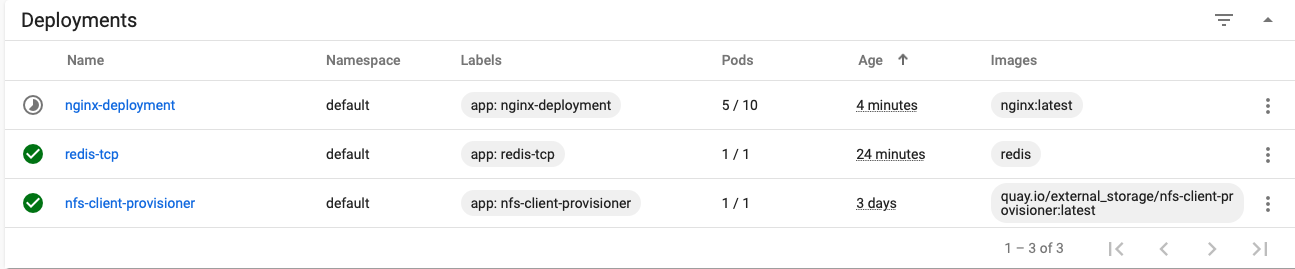
System view Deployment
[root@master-1 ~]# kubectl get deployment
NAME                     READY   UP-TO-DATE   AVAILABLE   AGE
nfs-client-provisioner   1/1     1            1           3d9h
redis-tcp                1/1     1            1           96s
View Deployment details
[root@master-1 ~]# kubectl describe pod redis-tcp
Name:           redis-tcp-5fcb54cd64-52p4d
Namespace:      default
Priority:       0
Node:           192.168.31.7/192.168.31.7
Start Time:     Mon, 10 Aug 2020 19:54:01 +0800
Labels:         app=redis-tcp
                pod-template-hash=5fcb54cd64
Annotations:    <none>
Status:         Running
IP:             172.17.14.13
Controlled By:  ReplicaSet/redis-tcp-5fcb54cd64
Containers:
  redis-tcp:
    Container ID:   docker://bafe30e1911b6a4ae80aca46cbd240d693e7ab7bf2ffb3e9c3a38f582712aacc
    Image:          redis
    Image ID:       docker-pullable://redis@sha256:09c33840ec47815dc0351f1eca3befe741d7105b3e95bc8fdb9a7e4985b9e1e5
    Port:           6379/TCP
    Host Port:      0/TCP
    State:          Running
      Started:      Mon, 10 Aug 2020 19:55:26 +0800
    Ready:          True
    Restart Count:  0
    Environment:    <none>
    Mounts:
      /var/run/secrets/kubernetes.io/serviceaccount from default-token-7rdlr (ro)
Conditions:
  Type              Status
  Initialized       True
  Ready             True
  ContainersReady   True
  PodScheduled      True
Volumes:
  default-token-7rdlr:
    Type:        Secret (a volume populated by a Secret)
    SecretName:  default-token-7rdlr
    Optional:    false
QoS Class:       BestEffort
Node-Selectors:  <none>
Tolerations:     node.kubernetes.io/not-ready:NoExecute for 300s
                 node.kubernetes.io/unreachable:NoExecute for 300s
Events:
  Type    Reason     Age   From                   Message
  ----    ------     ----  ----                   -------
  Normal  Pulling    118s  kubelet, 192.168.31.7  Pulling image "redis"
  Normal  Scheduled  117s  default-scheduler      Successfully assigned default/redis-tcp-5fcb54cd64-52p4d to 192.168.31.7
  Normal  Pulled     33s   kubelet, 192.168.31.7  Successfully pulled image "redis"
  Normal  Created    33s   kubelet, 192.168.31.7  Created container redis-tcp
  Normal  Started    33s   kubelet, 192.168.31.7  Started container redis-tcp


11.3.3 Pod upgrade strategy and detection mechanism
11.3.3.1 upgrade strategy:
strategy:
    type: RollingUpdate	#Default update policy Deployment
    rollingUpdate:
    maxSurge: 1         # The total number of pods can be up to 1 more than the required number of pods
    maxUnavailable: 1   # Maximum number of 1 unavailable Pod during update
11.3.3.2 pod initiation and survival mechanism
pod ready detection (Deployment controller)
readinessProbe: #To determine whether the container has started normally
    tcpSocket:
        port: 8080	            #Check port
    initialDelaySeconds: 5      # kubelet sends the first ready probe five seconds after the container starts
    periodSeconds: 10           #Survival detection is performed every 10 seconds
If the detection is successful, the Pod will be marked as ready, and kubelet will continue to run the detection every 10 seconds.
pod survival detection (Deployment controller)
livenessProbe: #Survival detection
    tcpSocket:
        port: 8080
    initialDelaySeconds: 15     #kubelet performs the first survival probe 15 seconds after the container is started
    periodSeconds: 20           #Survival detection is performed every 10 seconds
Like the ready probe, Kubelet attempts to connect to port 8080 of the container. If the survival probe fails, the container will be restarted.
11.3.3.3 case 1: create Deployment
[root@master-1 demo]# cat nginx-deployment.yaml
apiVersion: apps/v1	    #Controller interface version
kind: Deployment	    #Controller type
metadata:
  name: nginx-deployment    # Deployment controller name
  labels:
    app: nginx-deployment # Deployment controller label
spec:
  replicas: 3	              # Number of Deployment replicas (number of containers)
  selector:
    matchLabels:
      app: nginx-deployment               #tag chooser
  minReadySeconds: 1                      #pod preparation time
  strategy:
    type: RollingUpdate                   #pod upgrade strategy
    rollingUpdate:
      maxSurge: 1                         #Maximum 1 pod upgrade allowed
      maxUnavailable: 1                   #At most one pod is allowed to fail
  template:
    metadata:
      labels:
        app: nginx-deployment             #Template label
    spec:
      containers:
        - name: nginx-deployment              #Container name
          image: nginx:latest                 #Image name
          ports:
            - containerPort: 80               #Container port
          readinessProbe:                 #Container readiness test
            tcpSocket:
              port: 80                    #Detection port
            initialDelaySeconds: 5      #5 seconds after container startup
            periodSeconds: 10           #Detect every 10 seconds after container initialization
deploy
[root@master-1 deployment]# kubectl apply -f nginx-deployment.yaml
deployment.apps/nginx-deployment created
Interface view update policy

View status
[root@master-1 deployment]# kubectl get pods -w
NAME                                      READY   STATUS    RESTARTS   AGE
nfs-client-provisioner-6d6f7ff69f-bk95b   1/1     Running   2          3d9h
nginx                                     1/1     Running   1          140m
nginx-deployment-8568b96ddb-f4fnc         1/1     Running   0          2m8s
nginx-deployment-8568b96ddb-ljq9k         1/1     Running   0          2m8s
nginx-deployment-8568b96ddb-qfgx7         1/1     Running   0          2m8s
nginx-rc-2rf4q                            1/1     Running   1          130m
nginx-rc-dvgqb                            1/1     Running   1          125m
nginx-rc-gmddb                            1/1     Running   1          125m
redis-tcp-5fcb54cd64-52p4d                1/1     Running   0          22m
[root@master-1 deployment]# kubectl describe deployment.apps/nginx-deployment
Name:                   nginx-deployment
Namespace:              default
CreationTimestamp:      Mon, 10 Aug 2020 20:13:54 +0800
Labels:                 app=nginx-deployment
Annotations:            deployment.kubernetes.io/revision: 1
                        kubectl.kubernetes.io/last-applied-configuration:
                          {"apiVersion":"apps/v1","kind":"Deployment","metadata":{"annotations":{},"labels":{"app":"nginx-deployment"},"name":"nginx-deployment","na...
Selector:               app=nginx-deployment
Replicas:               3 desired | 3 updated | 3 total | 3 available | 0 unavailable
StrategyType:           RollingUpdate
MinReadySeconds:        1
RollingUpdateStrategy:  1 max unavailable, 1 max surge
Pod Template:
  Labels:  app=nginx-deployment
  Containers:
   nginx-deployment:
    Image:        nginx:latest
    Port:         80/TCP
    Host Port:    0/TCP
    Readiness:    tcp-socket :80 delay=5s timeout=1s period=10s #success=1 #failure=3
    Environment:  <none>
    Mounts:       <none>
  Volumes:        <none>
Conditions:
  Type           Status  Reason
  ----           ------  ------
  Available      True    MinimumReplicasAvailable
  Progressing    True    NewReplicaSetAvailable
OldReplicaSets:  <none>
NewReplicaSet:   nginx-deployment-8568b96ddb (3/3 replicas created)
Events:
  Type    Reason             Age    From                   Message
  ----    ------             ----   ----                   -------
  Normal  ScalingReplicaSet  2m38s  deployment-controller  Scaled up replica set nginx-deployment-8568b96ddb to 3
Capacity expansion
scale supports container controller types deployment, replicaset, replication controller, and job
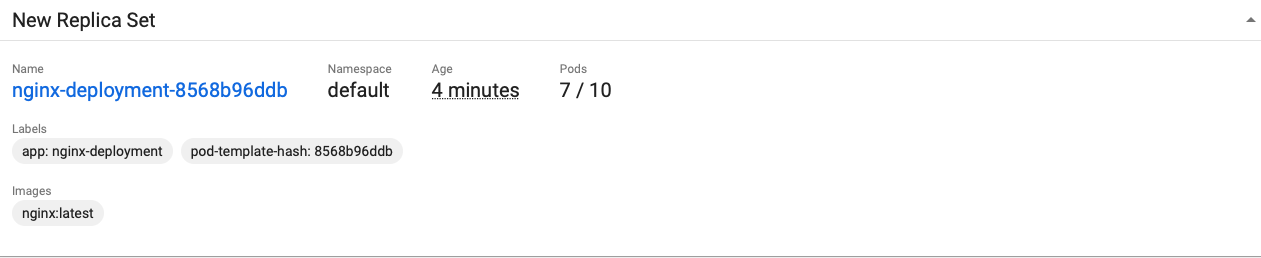
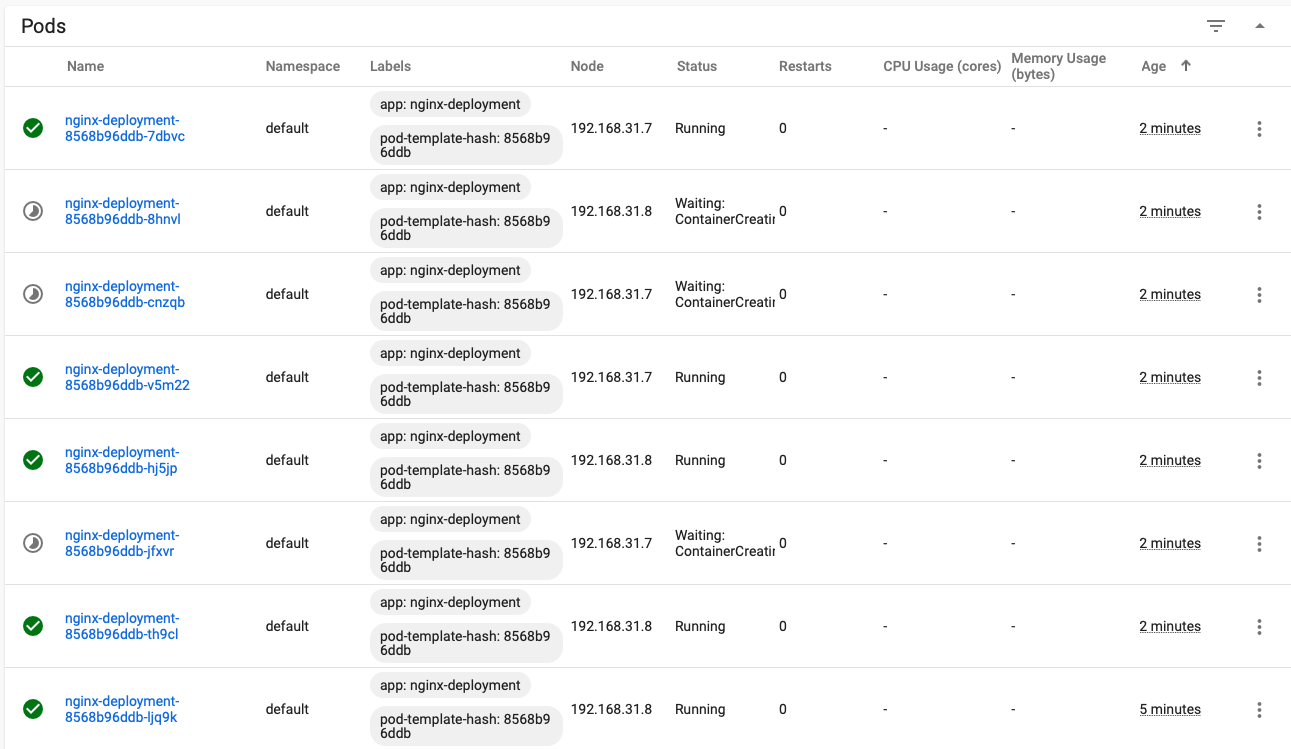
[root@master-1 deployment]# kubectl scale deployment nginx-deployment --replicas 10
deployment.extensions/nginx-deployment scaled
View Deployments
View RS controller
pod is being expanded and created
- Modify the configuration file and detect the update policy
- Change the image to a nonexistent image
- image: nginx111111:latest
[root@master-1 ~]# kubectl apply -f nginx-deployment.yaml
A new RS is created
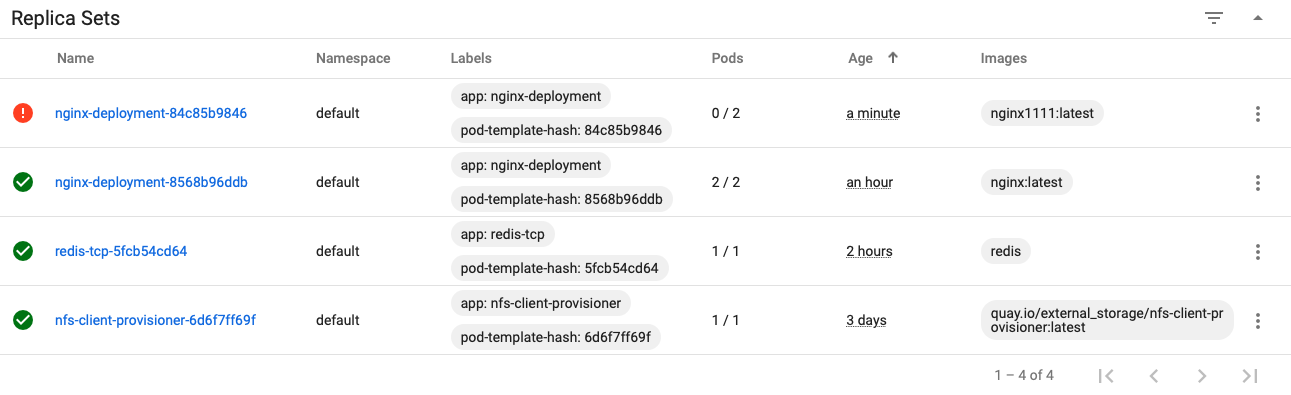
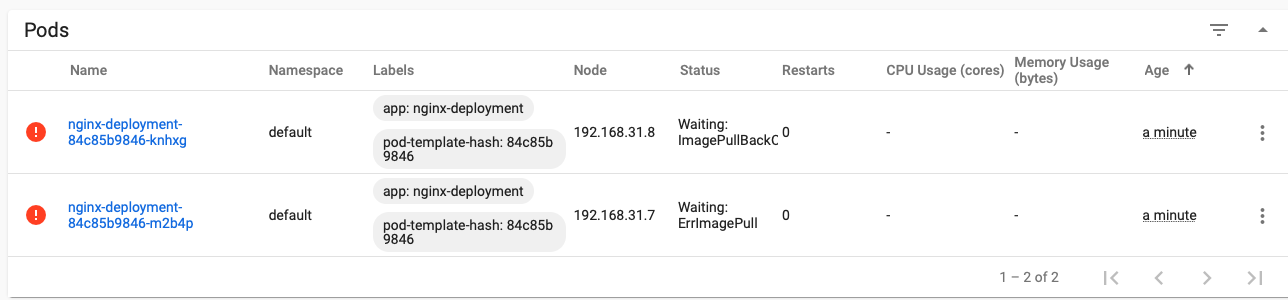
Error in new RS associated pod
According to the update strategy, there will be two old pods. Because the new configuration file is applied, only three of the original 10 pods will be left, and one of them is being updated, so only two pods can be seen as normal
View the update process
[root@master-1 deployment]# kubectl describe deployment nginx-deployment
Name:                   nginx-deployment
Namespace:              default
CreationTimestamp:      Mon, 10 Aug 2020 20:13:54 +0800
Labels:                 app=nginx-deployment
Annotations:            deployment.kubernetes.io/revision: 2
                        kubectl.kubernetes.io/last-applied-configuration:
                          {"apiVersion":"apps/v1","kind":"Deployment","metadata":{"annotations":{},"labels":{"app":"nginx-deployment"},"name":"nginx-deployment","na...
Selector:               app=nginx-deployment
Replicas:               3 desired | 2 updated | 4 total | 2 available | 2 unavailable
StrategyType:           RollingUpdate
MinReadySeconds:        1
RollingUpdateStrategy:  1 max unavailable, 1 max surge
Pod Template:
  Labels:  app=nginx-deployment
  Containers:
   nginx-deployment:
    Image:        nginx1111:latest
    Port:         80/TCP
    Host Port:    0/TCP
    Readiness:    tcp-socket :80 delay=5s timeout=1s period=10s #success=1 #failure=3
    Environment:  <none>
    Mounts:       <none>
  Volumes:        <none>
Conditions:
  Type           Status  Reason
  ----           ------  ------
  Available      True    MinimumReplicasAvailable
  Progressing    True    ReplicaSetUpdated
OldReplicaSets:  nginx-deployment-8568b96ddb (2/2 replicas created)
NewReplicaSet:   nginx-deployment-84c85b9846 (2/2 replicas created)
Events:
  Type    Reason             Age    From                   Message
  ----    ------             ----   ----                   -------
  Normal  ScalingReplicaSet  2m52s  deployment-controller  Scaled down replica set nginx-deployment-8568b96ddb to 3
  Normal  ScalingReplicaSet  2m52s  deployment-controller  Scaled up replica set nginx-deployment-84c85b9846 to 1
  Normal  ScalingReplicaSet  2m52s  deployment-controller  Scaled down replica set nginx-deployment-8568b96ddb to 2
  Normal  ScalingReplicaSet  2m52s  deployment-controller  Scaled up replica set nginx-deployment-84c85b9846 to 2
Delete nginx
[root@master-1 ~]# kubectl delete deployment.apps/nginx-deployment

[root@master-1 deployment]# kubectl delete -f nginx-deployment.yaml
deployment.apps "nginx-deployment" deleted
11.3.4 DaemonSet (container controller)
A DaemonSet object can ensure that the Pod it creates runs a copy on each (or specified Label) Node in the cluster.
- If a new Node is dynamically added to the cluster, the Pod in the DaemonSet will also be added to run on the newly added Node.
- Deleting a DaemonSet will also cascade delete all the pods it creates.
Usage scenario:
- Run the cluster storage daemon, such as glusterd and ceph on each Node.
- Run the log collection daemon on each Node, such as fluent D and logstash.

- Run the monitoring daemon on each Node, such as Prometheus Node Exporter

11.3.4.1 case 1: create a DaemonSet
apiVersion: extensions/v1beta1
kind: DaemonSet
metadata:
  name: log-pilot
  namespace: kube-system
  labels:
    k8s-app: log-pilot
    kubernetes.io/cluster-service: "true"
spec:
  template:
    metadata:
      labels:
        k8s-app: log-es
        kubernetes.io/cluster-service: "true"
        version: v1.22
log-pilot
Each node runs a pod
11.3.5 StatefulSet
Kubernetes introduced PetSet as a new resource object from v1.4 and renamed it StatefulSet in v1.5. In essence, it can be regarded as a special type of Deployment/RC.
- Stateful set is suitable for stateful services;
- StatefulSet has a unique pod name identification, and supports persistent storage (the cluster needs to store data) and rolling update.
Assuming that the name of the StatefulSet running cluster is elasticsearch, the first pod is elasticsearch-0, the second pod is elasticsearch -1, and so on. It is precisely because of the orderly pod names that the component cluster can be (DNS needs to be installed).
11.3.5.1 case 1: stateful set establishes Elasticsearch cluster
apiVersion: apps/v1beta1
kind: StatefulSet
metadata:
  name: elasticsearch
  namespace: kube-system
  labels:
    kubernetes.io/cluster-service: "true"
spec:
  replicas: 2
  serviceName: "elasticsearch-service"
  selector:
    matchLabels:
      app: es
  template:
    metadata:
      labels:
        app: es

11.3.6 basic operation of pod
- Create: kubectl create -f xxx.yaml
- Query list: kubectl get pod (resource type)
- Get pod details:
- kubectl describe pod nginx
- Get the node and IP address of the pod:
- kubectl get pods -o wide
- Monitoring pods status:
- kubectl get pods -w
- List all pod s:
- kubectl get pods -A
- Get pod according to tag (run = nginx):
- kubectl get pods -l app=nginx-deployment
- Enter pod:
- kubectl exec nginx-demo-68749b58dc-rr9rj -i -t bash -n default
- View pod content (non entry):
- kubectl exec nginx-deployment-8568b96ddb-psr74 -n default -i -t -- cat /etc/resolv.conf
- kubectl exec coredns-66db855d4d-26bvw -n kube-system -i -t -- cat /etc/resolv.conf
- Get pod details:
- Delete: kubectl delete pod yourPodName
- Update: kubectl apply /path/to/yourNewYaml.yaml
- Log: kubectl log -f yourPodName (container log can only be seen when it is displayed on the console)
- kubectl logs --tail=20 nginx
11.3.7 POD elastic expansion
Note: the types of elastic scaling supported by POD are deployment, replicaset, and replicationcontroller
Elastic scaling refers to providing resources in an elastic and scalable manner to adapt to load changes. Reflected in Kubernetes, it means that the number of copies of Pod can be dynamically adjusted according to the load.
Adjusting the number of copies of Pod is achieved by modifying the number of copies of Pod in RC. The example command is as follows:
#Expand the number of replicas of the Pod to 10
[root@master-1 ~]# kubectl scale replicationcontroller nginx-deployment --replicas=10
11.3.8 management mode of pod
11.3.9 pod status information
- Pending: the Pod has been accepted by the Kubernetes system, but one or more container images have not been created. The waiting time includes the time to schedule the Pod and the time to download the image through the network, which may take some time.
- Running: the Pod has been bound to a node, and all containers in the Pod have been created. At least one container is running, or is in a startup or restart state.
- Succeeded: all containers in the Pod are successfully terminated and will not be restarted.
- Failed: all containers in the Pod have been terminated, and at least one container has been terminated due to failure. That is, the container exits in a non-zero state or is terminated by the system.
- Unknown: the status of the Pod cannot be obtained for some reasons, usually because the communication with the host where the Pod is located fails.
11.3.9.1 check the operation status of pod
[root@master-1 job]# kubectl get pod
NAME	                                READY	STATUS	    RESTARTS	AGE
demo-app-57756548d8-sltsg	            1/1	    Running	    1	        3d11h
dnstools	                            1/1	    Running	    0	        122m
nfs-client-provisioner-5978c5f69c-k9lkb	1/1	    Running	    1	        5d
1.3.9.2 POD restart strategy
When a container exits abnormally or health check fails, kubelet will perform corresponding operations according to the settings of restart policy. The restart policies include always, onfailure and never
- Always: when the container fails, kubelet will automatically restart the container;
- OnFailure: when the container terminates and the exit code is not 0, kubelet will automatically restart the container;
- Never: kubelet will not restart the container regardless of its running state;
Restart policy usage scenario
- Deployment, RC and daemon set: must be set to Always, and the container needs to be kept running.
- Job and CronJob: OnFailure or Never. Ensure that the container is not restarted after execution.
- kubelet: automatically restart the Pod when it fails. No matter what value the RestartPolicy is set, the Pod will not be health checked.
1.3.9.2.1 configure pod restart strategy
- RC controller and DeamonSet controller are recommended to be set to Always, and it is necessary to ensure the continuous operation of the container.
- Job: OnFailure or Never. Ensure that the container is not restarted after execution.
[root@linux-master1 ~]# vim nginx-deployment.yaml
apiVersion: apps/v1
kind: Deployment
metadata:
  name: nginx-deployment
  namespace: default
  labels:
    app: nginx
spec:
  selector:
    matchLabels:
      app: nginx
  replicas: 1
  template:
    metadata:
      labels:
        app: nginx
    spec:
      restartPolicy: Always #Container restart policy
      containers:
        - name: nginx
          image: nginx:1.12
          imagePullPolicy: IfNotPresent	#Image pull strategy
          ports:
            - containerPort: 80
11.4 mirroring strategy
The default image pull strategy is "IfNotPresent". kubelet will not pull the image if the image already exists.
- If you Always want to pull images, you must set the pull policy to "Always" or set the image label to ": latest".
- If the label of the image is not specified, it will be assumed to be ": latest", and the pull policy is "Always"
In the production environment, when running applications (micro services), it is recommended to set it to Always
Note that when pulling the self built private warehouse image, you need to create a Secret to pull the image. There are three download strategies in kubernetes:
- Always: download the latest image every time. This is recommended for microservices
- Never: only use local images and never download them. Single node
- IfNotPresent: download the image only if it is not available locally. This is recommended for open source third-party applications
11.4.1 case 1: configuring the image pull strategy
[root@linux-master1  ~]#  vim nginx-deployment.yaml
apiVersion: apps/v1
kind: Deployment
metadata:
  name: nginx-deployment
  namespace: default
  labels:
    app: nginx-deployment
spec:
  selector:
    matchLabels:
      app: nginx-deployment
    replicas: 1
  template:
    metadata:
      labels:
        app: nginx-deployment
    spec:
      restartPolicy: Always
      containers:
        - name: nginx-deployment
          image: nginx:1.12
          imagePullPolicy: IfNotPresent
          ports:
            - containerPort: 80
11.5 scheduled tasks
11.5.1 Job
Job is responsible for batch tasks, that is, tasks that are executed only once. It ensures that one or more pods of batch tasks are completed successfully.
Usage scenario: clean up data and synchronize data
11.5.1.1 case 1: Job
The Job configuration file contains only one pod, 2000 digits after the decimal point of the output PI, and the running time is about 10s
[root@master-1 test]# kubectl create -f job.yaml
apiVersion: batch/v1
kind: Job
metadata:
  name: pi
spec:
  template:
    spec:
      containers:
        - name: pi
          image: perl
          command: ["perl",	"-Mbignum=bpi", "-wle", "print bpi(2000)"]
      restartPolicy: Never
  backoffLimit: 4
Note: the perl image is about 880M and needs to be downloaded to the node node in advance
[root@node-1 ~]# docker load < perl.tar
461719022993: Loading layer [==================================================>]  119.2MB/119.2MB
f1d420c2af1a: Loading layer [==================================================>]  17.11MB/17.11MB
a3c1026c6bcc: Loading layer [==================================================>]  17.85MB/17.85MB
d35c5bda4793: Loading layer [==================================================>]  149.9MB/149.9MB
46829331b1e4: Loading layer [==================================================>]  520.3MB/520.3MB
28c01f06325c: Loading layer [==================================================>]  3.584kB/3.584kB
416facee2664: Loading layer [==================================================>]  55.49MB/55.49MB
Loaded image ID: sha256:aebad195b013823cf83716d32039e016f7fa4e6acbd5d1eca2e494b42c85d2fa
function
[root@master-1 job]# kubectl apply -f job.yaml
job.batch/pi created
View task
[root@master-1 job]# kubectl describe jobs/pi
Name:           pi
Namespace:      default
Selector:       controller-uid=73adcf03-0cf7-46cb-b583-ec7a2ce9f8e5
Labels:         controller-uid=73adcf03-0cf7-46cb-b583-ec7a2ce9f8e5
                job-name=pi
Annotations:    kubectl.kubernetes.io/last-applied-configuration:
                  {"apiVersion":"batch/v1","kind":"Job","metadata":{"annotations":{},"name":"pi","namespace":"default"},"spec":{"backoffLimit":4,"template":...
Parallelism:    1
Completions:    1
Start Time:     Mon, 10 Aug 2020 23:03:16 +0800
Pods Statuses:  1 Running / 0 Succeeded / 0 Failed
Pod Template:
  Labels:  controller-uid=73adcf03-0cf7-46cb-b583-ec7a2ce9f8e5
           job-name=pi
  Containers:
   pi:
    Image:      perl
    Port:       <none>
    Host Port:  <none>
    Command:
      perl
      -Mbignum=bpi
      -wle
      print bpi(2000)
    Environment:  <none>
    Mounts:       <none>
  Volumes:        <none>
Events:
  Type    Reason            Age   From            Message
  ----    ------            ----  ----            -------
  Normal  SuccessfulCreate  14s   job-controller  Created pod: pi-xcv2b
Get job
[root@master-1 test]# pods=$(kubectl get pods \
--selector=job-name=pi --output=jsonpath={.items..metadata.name})

[root@master-1 ~]# echo $pods
pi-xcv2b

Get results
[root@master-1 job]# kubectl get pods | grep $pods
pi-t596w    0/1     Completed   0   3m29s
[root@master-1 job]# kubectl logs $pods
3.1415926535897932384626433832795028841971693993751058209749445923078164062
862089986280348253421170679821480865132823066470938446095505822317253594081
28481117450284102701938521105559644622948954930381964428810975665933446128
The status of the container is Completed
[root@master-1 ~]# kubectl get pods | grep $pods
pi-xcv2b                                  0/1     Completed   0          10m
View results
[root@master-1 ~]# kubectl log $pods
log is DEPRECATED and will be removed in a future version. Use logs instead.
3.1415926535897932384626433832795028841971693993751058209749445923078164062862089986280348253421170679821480865132823066470938446095505822317253594081284811174502841027019385211055596446229489549303819644288109756659334461284756482337867831652712019091456485669234603486104543266482133936072602491412737245870066063155881748815209209628292540917153643678925903600113305305488204665213841469519415116094330572703657595919530921861173819326117931051185480744623799627495673518857527248912279381830119491298336733624406566430860213949463952247371907021798609437027705392171762931767523846748184676694051320005681271452635608277857713427577896091736371787214684409012249534301465495853710507922796892589235420199561121290219608640344181598136297747713099605187072113499999983729780499510597317328160963185950244594553469083026425223082533446850352619311881710100031378387528865875332083814206171776691473035982534904287554687311595628638823537875937519577818577805321712268066130019278766111959092164201989380952572010654858632788659361533818279682303019520353018529689957736225994138912497217752834791315155748572424541506959508295331168617278558890750983817546374649393192550604009277016711390098488240128583616035637076601047101819429555961989467678374494482553797747268471040475346462080466842590694912933136770289891521047521620569660240580381501935112533824300355876402474964732639141992726042699227967823547816360093417216412199245863150302861829745557067498385054945885869269956909272107975093029553211653449872027559602364806654991198818347977535663698074265425278625518184175746728909777727938000816470600161452491921732172147723501414419735685481613611573525521334757418494684385233239073941433345477624168625189835694855620992192221842725502542568876717904946016534668049886272327917860857843838279679766814541009538837863609506800642251252051173929848960841284886269456042419652850222106611863067442786220391949450471237137869609563643719172874677646575739624138908658326459958133904780275901
11.5.2 CronJob
CronJob is used to manage time-based jobs, namely:
- Run the Job once at a given point in time
- Run periodically at a given point in time
- Basic format of Crontab
- < minute > < hour > < day > < month > < week > < command >
- Minute values range from 0 to 59
- Hour values range from 0 to 23
- Daily values range from 1 to 31
- Monthly values range from 1 to 12
- Week values range from 0 to 6, where 0 represents Sunday
Multiple times can be separated by commas, ranges can be given by hyphens, and * can be used as wildcards. Spaces are used to separate fields.
11.5.2.1 case 1: create scheduled tasks # and regularly clean up data
echo "Hello from the Kubernetes cluster" every minute
[root@master-1 test]#cat cronjob.yaml
apiVersion: batch/v1beta1
kind: CronJob
metadata:
  name: hello
spec:
  schedule: "*/1 * * * *"
  jobTemplate:
    spec:
      template:
        spec:
          containers:
            - name: hello
              image: busybox
              args:
                - /bin/sh
                - -c
                - date; echo Hello from the Kubernetes cluster
          restartPolicy: OnFailure
Create task
[root@master-1 cronjob]# kubectl apply -f cronjob.yaml
cronjob.batch/hello created

Get task list
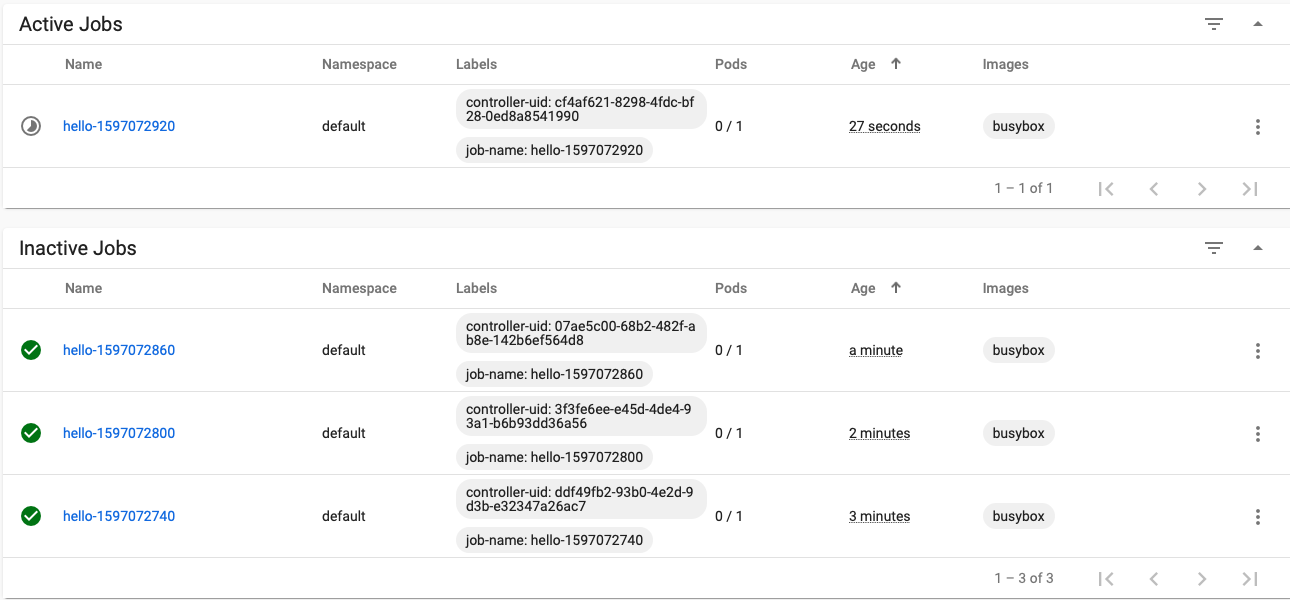
[root@master-1 cronjob]# kubectl get cronjob
NAME    SCHEDULE      SUSPEND   ACTIVE   LAST SCHEDULE   AGE
hello   */1 * * * *   False     1        34s             46s
Get task
[root@master-1 cronjob]# kubectl get jobs
NAME               COMPLETIONS   DURATION   AGE
hello-1597072680   0/1           37s        37s
pi                 1/1           2m38s      15m
Get job
[root@master-1 job]# pods=$(kubectl get pods --selector=job-name=hello-1597072680  --output=jsonpath={.items..metadata.name})
[root@master-1 cronjob]# echo $pods
hello-1597072680-rc7hx
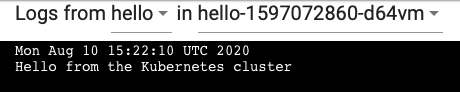
Get results
[root@master-1 cronjob]# kubectl logs $pods
Mon Aug 10 15:19:27 UTC 2020
Hello from the Kubernetes cluster
View tasks through the interface
Results of scheduled task output
Delete Cron Job
[root@master-1 cronjob]# kubectl delete -f cronjob.yaml
cronjob.batch "hello" deleted
11.6 service discovery
11.6.1 Service
This Service cannot be translated directly. In kubernetes, the concept of Service appears in order to better locate each pod or each group of POD (Label label label).
Because we know that the IP address of the POD changes after each restart or container redeployment, and the IP address of the container cannot be fixed, so we need Service to locate the POD.
11.6.1.1 case 1: define the Service of the Service
Access the application through the Nodeport port of the node
[root@master-1 java]# cat provider-passport-service.yaml
apiVersion: v1
kind: Service
metadata:
  name: passport-svc   #Service name
spec:
  type: NodePort
  ports:
    - port: 8081            #Service port type
      targetPort: 8081      #Container port
      protocol: TCP         #Port protocol
    selector:               #Select according to Label
      app: passport
11.6.2 Service network agent mode
When users access the Service through the Service, they actually access the pod Service through the Kube proxy on the node node. The Kube proxy has the following working modes:
- Iptables (default mode),
- IPVS mode,
- userspace
In Kubernetes v1.2, the iptables mode of Kube proxy becomes the default. Kubernetes v1.8 adds the ipvs proxy mode.
Iptables mode
- The Node client directly accesses the ServiceIP, and Linux matches according to the Iptables protocol stack rules and policies.
- ServiceIP directly accesses the Backend Pod according to the tag.
IPVS proxy mode
IPVS is a component of LVS, which provides a four layer load balancer with high performance and high reliability. IPVS is the abbreviation of IP Virtual Server.
- IPVS is built on netfilter. As a part of Linux kernel, it realizes load balancing from the transport layer.
- IPVS can directly forward Services based TCP and UDP to real servers.
- IPVS can directly build a VIPs and forward the request to the backend Pod through the load balancing algorithm.
Load balancing algorithms supported by IPVS:
- rr: polling
- lc: minimum number of connections
- dh: destination address hash
- sh: source address hash
- sed: minimum expected delay
- nq: no queue waiting
11.6.2.1 case 1: Node enables IPVS
be careful:
- To run Kube proxy in IPVS mode, IPVS Linux must be made available on the node before starting Kube proxy.
- When Kube proxy starts in IPVS proxy mode, it verifies that the IPVS kernel module is available. If the IPVS kernel module is not detected, Kube proxy will return to running in iptables proxy mode.
Install ipvsadm, conntrack
[root@master-1 java]# yum -y install ipvsadm conntrack-tools
Load ipvs module
[root@master-1 java]# cat > /etc/sysconfig/modules/ipvs.modules <<EOF
modprobe -- ip_vs
modprobe -- ip_vs_rr
modprobe -- ip_vs_wrr
modprobe -- ip_vs_sh
modprobe -- nf_conntrack_ipv4
EOF
View kernel module loading
[root@master-1 java]# cat >>/etc/sysctl.conf <<EOF
net.ipv4.ip_forward = 1
net.bridge.bridge-nf-call-ip6tables = 1
net.bridge.bridge-nf-call-iptables = 1
EOF
take effect
[root@master-1 ipvs]# sysctl -p
net.ipv4.ip_forward = 1
net.bridge.bridge-nf-call-ip6tables = 1
net.bridge.bridge-nf-call-iptables = 1
Modify Kube proxy configuration file
Add configuration
[root@node-1 ~]# cat /etc/kubernetes/cfg/kube-proxy
--masquerade-all=true                       #Ensure that the reverse flow passes through
--feature-gates=SupportIPVSProxyMode=true   #Open support ipvs mode
--proxy-mode=ipvs                           # Kube proxy final configuration
--ipvs-scheduler=rr                         #Specify the proxy mode as ipvs
Select polling scheduling as the scheduling method
[root@node-1 ~]# cat /etc/kubernetes/cfg/kube-proxy
KUBE_PROXY_OPTS="--logtostderr=true \
--v=4 --metrics-bind-address=0.0.0.0 \
--hostname-override=192.168.91.146 \
--masquerade-all=true \
--feature-gates=SupportIPVSProxyMode=true \
--proxy-mode=ipvs \
--ipvs-scheduler=rr \
--cluster-cidr=10.0.0.0/24 \
--kubeconfig=/etc/kubernetes/cfg/kube-proxy.kubeconfig"
View forwarding list and IP address
[root@node-1 ~]# ipvsadm -L -n | grep 8080
TCP     10.0.0.136:8080 rr
    -> 172.17.25.2:8080         Masq    1   0   0
    -> 172.17.67.9:8080         Masq    1   0   0
TCP     10.0.0.220:8080 rr
    -> 172.17.25.7:8080         Masq    1   0   0
View IP
[root@node-1 ~]# ip a | grep 136
    inet 10.0.0.136/32 brd 10.0.0.136 scope global kube-ipvs0
11.6.2.2 case 2: accessing services through IPVS
Get the pod address of the node
[root@master-1 ~]# kubectl get pod -A -o wide | grep 146
default demo-app-57756548d8-sltsg 1/1 Running 1 3d9h 172.17.25.7 192.168.91.146 <none> <none>
Get svc address of node 146
[root@master-1 ~]# kubectl get svc
NAME        TYPE        CLUSTER-IP      EXTERNAL-IP     PORT(S)     AGE
demo-app    ClusterIP   10.0.0.220      <none>          8080/TCP    3d9h
Access SVC of 146 nodes
dnstools# curl 10.0.0.220:8080
Hello! My name is demo-app-57756548d8-sltsg. I have served 202 requests so far.
Note: if a nodeport port is found on a node whose ipvs mode has been modified, you need to use iptables -F to clear the iptables table, or use curl to access it directly on the machine
11.6.3 Service type
- ClusterIP: expose the service through the internal IP of the cluster. Select this value. The service can only be accessed within the cluster. This is also the default ServiceType.
- NodePort: expose the service through the IP and static port (NodePort) on each Node. The NodePort service will be routed to the ClusterIP service, which will be automatically created. A NodePort service can be accessed from outside the cluster through the request:.
- LoadBalancer: using the load balancer of the cloud provider, you can expose services to the outside. External load balancers can route to NodePort services and ClusterIP services.
11.6.4 Service port type
- Port: the port of the service
- targetport: pod is the port of the container
- nodeport: the port of the host where the container is located (in essence, it is also exposed to the host through the service)
11.6.5 Service access mode
The virtual IP of Service is an internal network virtualized by Kubernetes, which cannot be addressed externally. However, some services need to be accessed externally, such as the web front end. At this time, you need to add a layer of network forwarding, that is, forwarding from the external network to the internal network.
Kubernetes provides three ways to access services: NodePort, LoadBalancer and Ingress.
Access mode diagram:
- NodePort, Kubernetes will expose a port on each Node: NodePort. The external network can access the back-end Service through [NodeIP]:[NodePort].
- LoadBalancer: on the basis of NodePort, Kubernetes can request the underlying cloud platform to create a load balancer and use each Node as the back end for service distribution. This mode requires the support of the underlying cloud platform (such as GCE).
- Ingress is an HTTP routing and forwarding mechanism, which is composed of Ingress Controller and HTTP proxy server. The Ingress Controller monitors the Kubernetes API in real time and updates the forwarding rules of the HTTP proxy server in real time. HTTP proxy servers include GCE load balancer, HaProxy, Nginx and other open source solutions.
- It is essentially a reverse proxy.
11.7 DNS
The DNS server monitors the Kubernetes API that creates new services to create a set of DNS records for each Service. If the DNS of the whole cluster is enabled all the time, all pods should be able to self resolve the name of the Service.
For example, there is a Service named "my Service", which creates a DNS record for "my Service. My ns" in the Namespace named "myns" in the Kubernetes cluster. The Pod in the Namespace named "myns" should be able to find "my Service" simply by name query.
11.7.1 case 1: accessing the Service through the Service name
Get Service name
[root@master-1 job]# kubectl get svc
NAME            TYPE        CLUSTER-IP      EXTERNAL-IP     PORT(S)     AGE
demo-app        ClusterIP   10.0.0.220      <none>          8080/TCP    3d11h
kubernetes      ClusterIP   10.0.0.1        <none>          443/TCP     9d
Access services
Correct format of service access: SERVICE_NAME.NS
[root@master-1 job]# kubectl run -it --rm --restart=Never --image=infoblox/dnstools:latest dnstools
dnstools# curl demo-app.default:8080
Hello! My name is demo-app-57756548d8-sltsg. I have served 2279 requests so far.
Note: the Service will not be modified without modification; The cluster ip will be modified every time the Service is rebuilt. Therefore, it is recommended to use service name to connect to internal services. This is why DNS needs to be installed.
11.8 storage - Secret
Secret solves the configuration problem of sensitive data such as password, token and key without exposing these sensitive data to the image or Pod Spec. Secret can be used as Volume or environment variable.
There are three types of Secret:
- Service Account: used to access the Kubernetes API, which is automatically created by Kubernetes and automatically mounted in the / run/secrets/kubernetes.io/serviceaccount directory of Pod;
- Opaque: Secret in base64 encoding format, which is used to store passwords, keys, etc;
- kubernetes.io/dockerconfigjson: used to store the authentication information of the private docker registry.
11.8.1 case 1: import Docker Registry authentication information
In Kubernetes, you need to import the login information of Docker private image warehouse to pull images from the private warehouse,
The login information is stored using Secret encryption.
- Create secret key
#Create a secret (pay attention to resolving docker server (hosts))
[root@master-1 ~]# kubectl create secret docker-registry registry-secret --docker-server=reg.abc.com  --docker-username=user --docker-password=Aa123456 --docker-email=user@abc.com
secret/registry-secret created
- Download key
[root@master-1 ~]# kubectl get secret registry-secret -o yaml
apiVersion: v1
data:
  .dockerconfigjson: eyJhdXRocyI6eyJyZWcuYWJjLmNvbSI6eyJ1c2VybmFtZSI6InVzZXIiLCJwYXNzd29yZCI6IkFhMTIzNDU2IiwiZW1haWwiOiJ1c2VyQGFiYy5jb20iLCJhdXRoIjoiZFhObGNqcEJZVEV5TXpRMU5nPT0ifX19
kind: Secret
metadata:
  creationTimestamp: "2020-08-11T00:55:20Z"
  name: registry-secret
  namespace: default
  resourceVersion: "142965"
  selfLink: /api/v1/namespaces/default/secrets/registry-secret
  uid: bf406ed7-a8de-41d7-ab2a-1e1791023162
type: kubernetes.io/dockerconfigjson
- Modify to the format to be imported. apiVersion: v1
kind: Secret
metadata:
  name: regis-secre
  namespace: default
data:
  .dockerconfigjson: eyJhdXRocyI6eyJyZWcuYWJjLmNvbSI6eyJ1c2VybmFtZSI6InVzZXIiLCJwYXNzd29yZCI6IkFhMTIzNDU2IiwiZW 1haWwiOiJ1c2VyQGFiYy5jb20iLCJhdXRoIjoiZFhObGNqcEJZVEV5TXpRMU5nPT0ifX19
type: kubernetes.io/dockerconfigjson
- kubectl create -f registry-secret.yaml
[root@master-1 ~]# cat registry-secret.yaml
apiVersion: v1
kind: Secret
metadata:
  name: regsecret
  namespace: default
data:
  .dockerconfigjson:eyJhdXRocyI6eyJyZXBvLmhvc3RzY2MuY29tIjp7InVzZXJuYW1lIjoidXNlciIsInBhc3N3b3JkIjoiQWExMjM0NTY3OCIsImVtYWlsIjoidXNlckBhYmMuY29tIiwiYX
11.9 role based access control - RBAC
Role based access control (RBAC) is a method to adjust and control access to computer or network resources based on the role of users in the enterprise.
- RBAC uses rbac.authorization.k8s.io API Group to realize authorization decision, and allows administrators to dynamically configure policies through Kubernetes API
- To enable RBAC, you need to add the parameter – authorizationmode=RBAC in the apiserver configuration file
11.9.1 RABC operable resource list
- Pods: container
- ConfigMaps: Configuration
- Deployments: container controller
- Nodes: nodes
- Secrets: credentials
- Namespaces: namespace
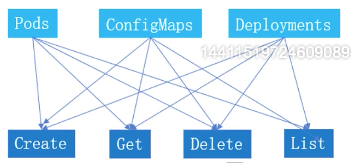
11.9.2 resource list operable permission list
Create,get,delete,list,update,edit,watch,exec
Relationship between resource list and permission:
11.9.3 other objects in RBAC
- Rule: a rule is a set of operations belonging to different API Group resources;
- Role and ClusterRole: role and cluster role. These two objects contain the above Rules elements,
- The difference is,
- In Role, the defined rules only apply to a single namespace, that is, those associated with the namespace,
- The ClusterRole is cluster wide, so the defined rules are not constrained by the namespace.
- Subject: subject, which corresponds to the object trying to operate in the cluster. Three types of subject resources are defined in the cluster:
- User Account: the user is managed by an external independent service. The administrator allocates the private key. The user can use KeyStone or Google account, or even a file list of user name and password. For user management, there is no associated resource object in the cluster, so users cannot manage through the API in the cluster;
- Group: group, which is used to associate multiple accounts. There are some default groups in the cluster, such as clusteradmin;
- Service Account: Service Account, some user accounts managed through Kubernetes API and associated with namespace. It is applicable to applications running inside the cluster. Permission authentication needs to be completed through API. Therefore, ServiceAccount is required for permission operations inside the cluster
- RoleBinding and ClusterRoleBinding: Role binding and cluster Role binding. In short, it is the process of binding the declared Subject to our Role (binding the operation permission to a user),
- The difference between the two is also the difference in the scope of action:
- RoleBinding will only affect the resource operation permissions under the current namespace,
- ClusterRoleBinding affects all namespace s.
11.9.3.1 authorization role binding diagram
Internal authentication of Service Account cluster
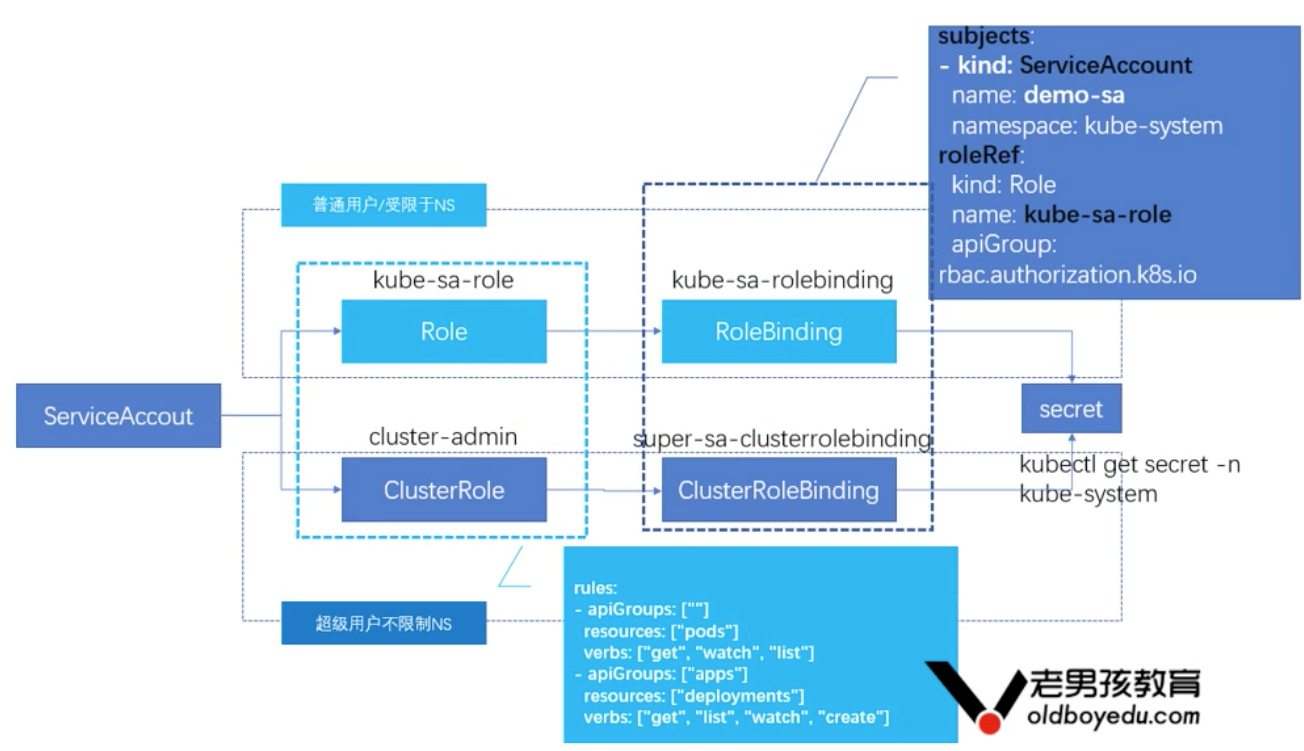
11.9.4 case 1: create a user to log in to the Dashboard
Create a user who logs in to the dashboard and can only operate pods and deployments under the Kube system namespace, so you need to create a ServiceAccount object
Create SA object
[root@master-1 ~]# kubectl create sa demo-sa -n kube-system
serviceaccount/demo-sa created
Create role Kube role
[root@master-1 ~]# cat kube-sa-role.yaml
apiVersion: rbac.authorization.k8s.io/v1
kind: Role
metadata:
  name: kube-sa-role
  namespace: kube-system
rules:
  - apiGroups: [""]                     #The apiGroup corresponding to the resource pods could not be found
    resources: ["pods"]                 #Actionable resources
    verbs: ["get", "watch", "list"]     #List of operations on resources
  - apiGroups: ["apps"]
    resources: ["deployments"]
    verbs: ["get", "list", "watch", "create", "update", "patch", "delete"]
Common apiGroups list: https://kubernetes.io/docs/reference/generated/kubernetes-api/v1.15/
[root@master-1 ~]# cat kube-sa-rolebinding.yaml
kind: RoleBinding
apiVersion: rbac.authorization.k8s.io/v1
metadata:
  name: kube-sa-rolebinding
  namespace: kube-system
subjects:
  - kind: ServiceAccount
    name: demo-sa
    namespace: kube-system
roleRef:
  kind: Role
  name: kube-sa-role
  apiGroup: rbac.authorization.k8s.io
ServiceAccount will generate a Secret object and map it. This Secret contains a token. If the dashboard also belongs to Kube system, this token can be used to log in to the dashboard
[root@master-1 rabc]# kubectl apply -f kube-sa-role.yaml
role.rbac.authorization.k8s.io/kube-sa-role created

[root@master-1 rabc]# kubectl apply -f kube-sa-rolebinding.yaml
rolebinding.rbac.authorization.k8s.io/kube-sa-rolebinding created
Get token
[root@master-1 rabc]# kubectl get secret -n kube-system |grep demo-sa
demo-sa-token-njvtq                      kubernetes.io/service-account-token   3      2m41s
Get base64
[root@master-1 rabc]# kubectl get secret demo-sa-token-njvtq -o jsonpath={.data.token} -n kube-system |base64 -d
eyJhbGciOiJSUzI1NiIsImtpZCI6IiJ9.eyJpc3MiOiJrdWJlcm5ldGVzL3NlcnZpY2VhY2NvdW50Iiwia3ViZXJuZXRlcy5pby9zZXJ2aWNlYWNjb3VudC9uYW1lc3BhY2UiOiJrdWJlLXN5c3RlbSIsImt1YmVybmV0ZXMuaW8vc2VydmljZWFjY291bnQvc2VjcmV0Lm5hbWUiOiJkZW1vLXNhLXRva2VuLW5qdnRxIiwia3ViZXJuZXRlcy5pby9zZXJ2aWNlYWNjb3VudC9zZXJ2aWNlLWFjY291bnQubmFtZSI6ImRlbW8tc2EiLCJrdWJlcm5ldGVzLmlvL3NlcnZpY2VhY2NvdW50L3NlcnZpY2UtYWNjb3VudC51aWQiOiI5YmI2ZTFiMi1iMWU5LTRhZjUtYmMyYy02ODNkNjc2YmQ1ODMiLCJzdWIiOiJzeXN0ZW06c2VydmljZWFjY291bnQ6a3ViZS1zeXN0ZW06ZGVtby1zYSJ9.MCgiXFjxbYEC2HqtBJsKpS-5EWCmw2kULsOZqIYLwxFXpR8rAPzpjzU5WuIDNCguebxOXK_3VnIY-5kLI5TlvyImvM8KEOZkn2JpmJp3EgPzOzypIoqADDCO9rxRTTzGhxS0O1oskuGJu2IZaIGZhrk6GdJ-dc1Mc94wOaqaLHDQXLbZSJmSQvFliDRxYvJZ4fVxztICAUjnTvUMrXgf6RT6nqR6ZFt7m46gLBoxrOiOVHJzBFmqlIXYqk2l-vwaufTS_Vw5oKcEXNItl3g9SydG5Ezp1fb14mnN2YnM_XsCJxRzSOU2H_GPEe-3sgiBbfzdh1HrhBAORUCSqIxT5g
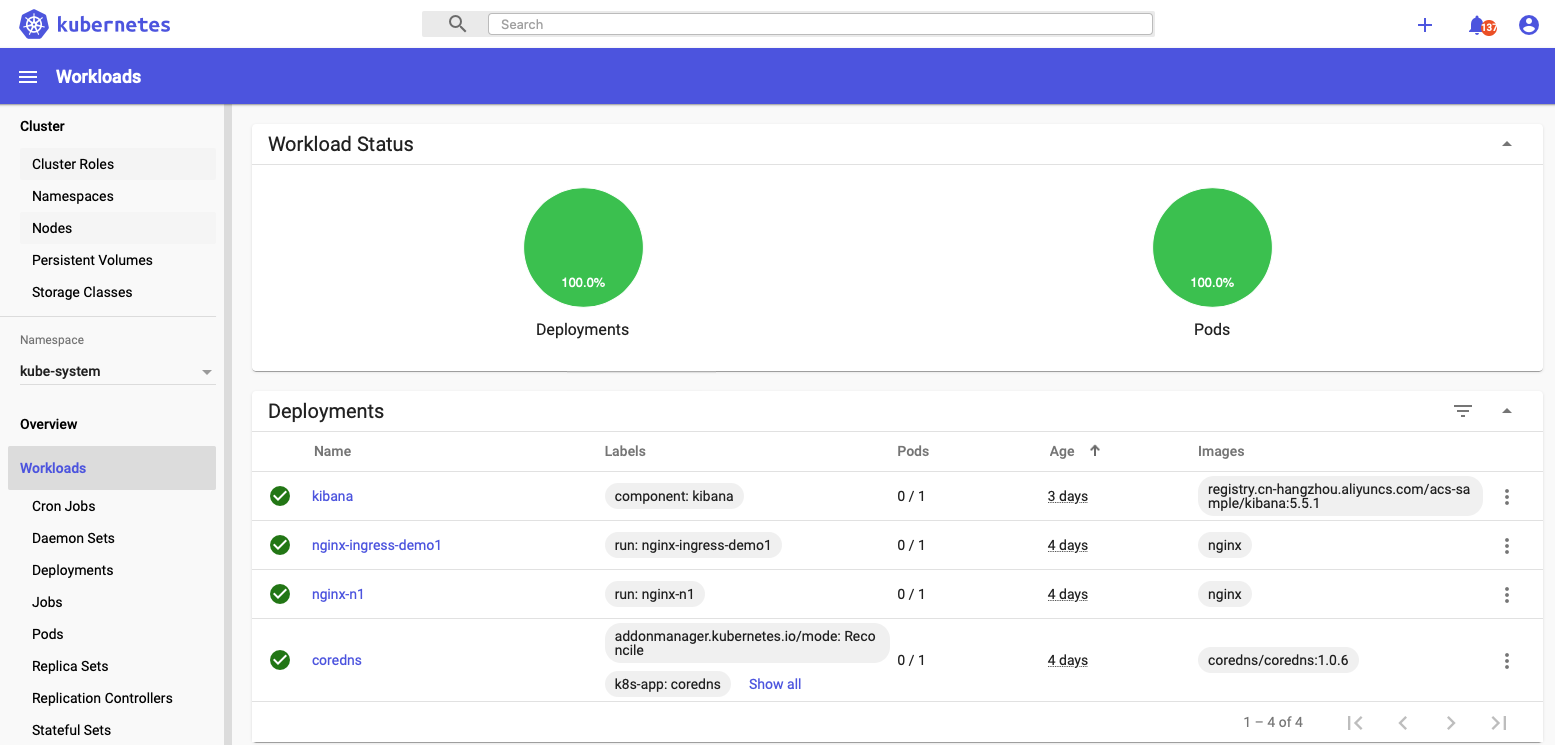
Log in to dashbosh and enter the token generated above
Enter the Kube system namespace
11.9.5 case 2: create an unrestricted SA account for authentication within the cluster
Create SA
[root@master-1 job]# cat super-sa.yaml
apiVersion: v1
kind: ServiceAccount
metadata:
  name: super-sa
  namespace: kube-system
Create account
[root@master-1 rabc]# kubectl apply -f super-sa.yaml
serviceaccount/super-sa created
Create ClusterRole (control permissions)
- Use the cluster admin object, which is the built-in ClusterRole object of Kubernetes cluster. There is no need to create it.
View permissions defined by cluster admin
- All resources are unrestricted, equivalent to super administrator
[root@master-1 rabc]# kubectl get clusterrole cluster-admin -o yaml
apiVersion: rbac.authorization.k8s.io/v1
kind: ClusterRole
metadata:
  annotations:
    rbac.authorization.kubernetes.io/autoupdate: "true"
  creationTimestamp: "2020-08-06T07:05:39Z"
  labels:
    kubernetes.io/bootstrapping: rbac-defaults
  name: cluster-admin
  resourceVersion: "39"
  selfLink: /apis/rbac.authorization.k8s.io/v1/clusterroles/cluster-admin
  uid: 8a74bf28-5875-4c66-bcfb-a49dce6d1aa4
rules:
- apiGroups:
  - '*'
  resources:
  - '*'
  verbs:
  - '*'
- nonResourceURLs:
  - '*'
  verbs:
  - '*'
Create role binding
- The biggest difference between RoleBinding and ClusterRoleBinding is that RoleBinding is limited to NS and ClusterRoleBinding is on the contrary
[root@master-1 job]# cat super-sa-ClusterRoleBinding.yaml
kind: ClusterRoleBinding
apiVersion: rbac.authorization.k8s.io/v1beta1
metadata:
  name: super-sa-clusterrolebinding
subjects:
  - kind: ServiceAccount
    name: super-sa
    namespace: kube-system
roleRef:
  kind: ClusterRole
  name: cluster-admin
  apiGroup: rbac.authorization.k8s.io
[root@master-1 rabc]# kubectl apply -f super-sa.yaml
serviceaccount/super-sa unchanged

[root@master-1 rabc]# kubectl apply -f super-sa-ClusterRoleBinding.yaml
clusterrolebinding.rbac.authorization.k8s.io/super-sa-clusterrolebinding created
The base64 code obtained is the same as that in case 1
[root@master-1 ~]# kubectl get secret -n kube-system
super-sa-token-wqjz6                     kubernetes.io/service-account-token   3      71s
Get token
[root@master-1 rabc]# kubectl get secret super-sa-token-wqjz6 -o jsonpath={.data.token} -n kube-system | base64 -d
eyJhbGciOiJSUzI1NiIsImtpZCI6IiJ9.eyJpc3MiOiJrdWJlcm5ldGVzL3NlcnZpY2VhY2NvdW50Iiwia3ViZXJuZXRlcy5pby9zZXJ2aWNlYWNjb3VudC9uYW1lc3BhY2UiOiJrdWJlLXN5c3RlbSIsImt1YmVybmV0ZXMuaW8vc2VydmljZWFjY291bnQvc2VjcmV0Lm5hbWUiOiJzdXBlci1zYS10b2tlbi13cWp6NiIsImt1YmVybmV0ZXMuaW8vc2VydmljZWFjY291bnQvc2VydmljZS1hY2NvdW50Lm5hbWUiOiJzdXBlci1zYSIsImt1YmVybmV0ZXMuaW8vc2VydmljZWFjY291bnQvc2VydmljZS1hY2NvdW50LnVpZCI6IjI1ZTAzY2QxLTY3N2EtNDAyYy04ZGIzLTVmYjE0NjFkYjA0ZCIsInN1YiI6InN5c3RlbTpzZXJ2aWNlYWNjb3VudDprdWJlLXN5c3RlbTpzdXBlci1zYSJ9.cvBz0uv717Z6OKw3S_ahFxrtF_5CdG-KKOwoQIm7YSZsdKwk0Fovxgf-cKaFILFOb1uKHsbU7Sk2e3VUJx0fdI4ugv6jo53Bi7WO6HPVRoCSxhEoYffzb8GFcRZ0sObPcHqvv35nb572Ll8B-krd3aJ_uUmsPp4QH6LsakXVeQFkAQ-MJBzvX_KcisBqTp87dnvmZJMLbUhsZea0UexGvbwUMR2NLQNelhjJRPfyhlk5TLOpVfycN59BkXtcoD8Ayd8EHWW9T6Dpa1ZXWN-wjJOwl_RT6c1GPARyjOydGIVCAW7sWQAZR-NQmxuWonHyQu-qLjW8e1HhMvn_GE6b3A
Log in to the system using the token generated above

11.9.6 case 3: explanation of Yamal authorization document of RBAC
[root@master-1 job]# cat prometheus-rabc.yaml
apiVersion: rbac.authorization.k8s.io/v1beta1
kind: ClusterRoleBinding
metadata:
  name: prometheus-rbac
subjects:
  - kind: ServiceAccount
    name: prometheus-k8s
    namespace: monitoring
roleRef:
  kind: ClusterRole
  name: cluster-admin
  apiGroup: rbac.authorization.k8s.io
11.9.7 case 4: actual operation authorization command operation
kubectl create clusterrolebinding system:anonymous --clusterrole=cluster-admin --user=system:anonymous
explain
- The cluster role is bound to the user system:anonymous and has the permission of cluster admin. The cluster role name is system:anonymous
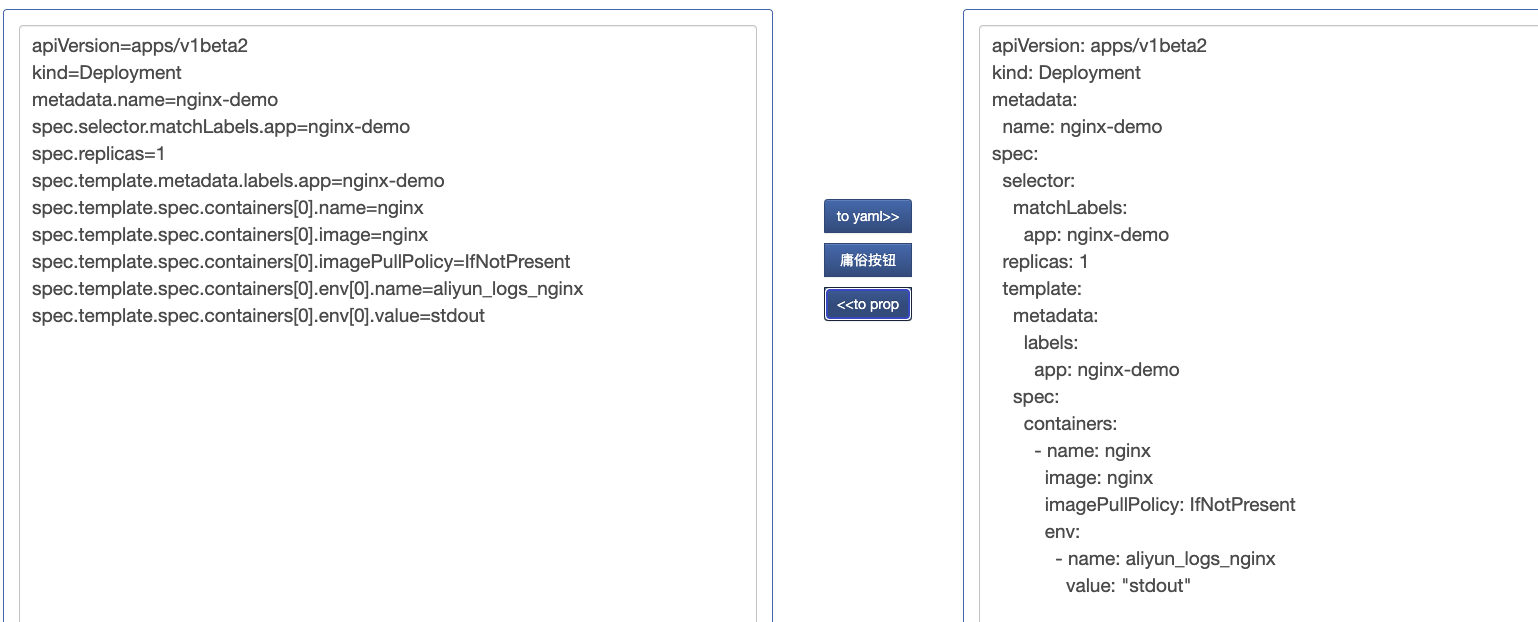
11.10 Yaml document details
11.10.0 what is yaml?
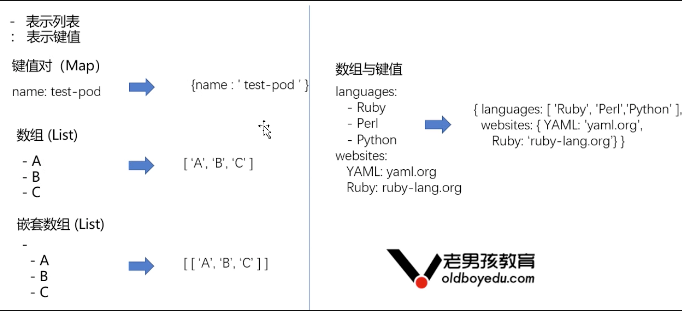
Yaml is a language for writing configuration files. Structurally, it has two optional types: Lists and Maps.
- List uses - (DASH) to define each item,
- Map is represented by a key value pair of key:value.
11.10.1 YAML syntax rules
- Case sensitive;
- Use indentation to represent hierarchical relationships;
- When indenting, the Tal key is not allowed, and only spaces are allowed;
- The number of indented spaces is not important, as long as the elements of the same level are aligned to the left;
- "#" indicates a comment. From this character to the end of the line, it will be ignored by the parser;
- "-" is an optional separator;
11.10.2 Yaml structure type diagram
In Kubernetes, Yaml supports two structure types: Lists and Maps
notes
- Yaml to properties( https://www.toyaml.com/index.html )
- Yaml to Jason( http://nodeca.github.io/js-yaml/ )
11.10.3 Kubernetes
Create resources through yaml. If you need to create Kubernetes objects through yaml files, you need to configure the following fields:
- apiVersion: the version of the Kubernetes API used to create the object
- kind: the type of object you want to create
- metadata: data that helps identify object uniqueness, including a name string, UID, and optional namespace
11.10.4 case 1: explanation of Kubernetes pod arrangement document
The necessary orchestration file for Pod to run in the program
apiVersion: v1      #Specify the api version. This value must be in kubectl api version
kind: Pod           #Specify the role / type to create the resource
metadata:           #Metadata / attributes of resources
  name: test-pod    #The name of the resource must be unique in the same namespace
  labels:           #Label resources
    k8s-app: apache
    version: v1
  annotations:      #Custom annotation list
    - name: String  #Custom annotation name
spec:               #specification of the resource content
  restartPolicy: Always     #Indicates that the container is always running. The default k8s policy is to create the same container immediately after the container exits
  nodeSelector:             #For node selection, label the host kubectl label nodes kube-node1 zone=node1
    zone: node1
  containers:
    - name: test-pod                                #Name of the container
      image: 10.192.21.18:5000/test/chat:latest     #The mirror address used by the container
      imagePullPolicy: Never        # Kubernetes pull mirror strategy
      command: ['sh']               #Start the running command of the container, which will overwrite the ENTRYPOINT in the container and correspond to the ENTRYPOINT in the Dockefile
      args: ["$(str)"]              #The command parameter to start the container corresponds to the CMD parameter in Dockerfile
      env:                          #Specifies the environment variables in the container
        - name: str                 #The name of the variable
          value: "/etc/run.sh"      #Value of variable
      resources:                  #resource management
        requests:                 #When the container is running, the minimum resource requirements, that is, how many resource containers are required to operate normally
          cpu: 0.1                #CPU resources (number of cores): floating point number or integer + m, 0.1=100m, and the minimum value is 0.001 core (1m)
          memory: 32Mi            #Memory usage
        limits:                   #Resource constraints
          cpu: 0.5
          memory: 1000Mi
      ports:
        - containerPort: 80       #External port of container development
          name: httpd             #name
          protocol: TCP
      livenessProbe:            #Setting of pod content health check
        httpGet:                #Check the health through httpget. If it returns between 200-399, it is considered that the container is normal
          path: /               #URI address
          port: 80
          scheme: HTTP
        initialDelaySeconds: 180    #Indicates how long after the first test starts after the container is started
        timeoutSeconds: 5           #Timeout for detection
        periodSeconds: 15           #Inspection interval
        #You can also use this method
        #exec: the method of executing the command for monitoring. If its exit code is not 0, it is considered that the container is normal
        #  command:
        #    - cat
        #    - /tmp/health
        #You can also use this method
        #tcpSocket: / / check health through tcpSocket
        #  port: number
      lifecycle:                    #Life cycle management
        postStart:                  #Tasks run before the container runs
          exec:
            command:
              - 'sh'
              - 'yum upgrade -y'
        preStop:#Tasks that run before the container closes
          exec:
            command: ['service httpd stop']
      volumeMounts:             #Mount persistent storage volumes
        - name: volume          #The name of the mounted device should correspond to volumes[*].name
          mountPath: /data      #Mount to a path of the container
          readOnly: True
    volumes:                  #Define a set of mounted devices
      - name: volume          #Define the name of a mounted device
        #meptyDir: {}
        hostPath:
          path: /opt          #The mounted device type is hostPath and the path is / opt under the host computer. There are many device types supported here
          #nfs
11.10.5 case 2: Kubernetes deployment operation
apiVersion: apps/v1         # Versions before 1.9.0 use apps/v1beta2, which can be viewed through the command kubectl API versions
kind: Deployment            #Specify the role / type to create the resource
metadata:                   #Metadata / attributes of resources
  name: web-server          #The name of the resource must be unique in the same namespace
spec:
  replicas: 2               #Number of pod copies
  selector:                 #Define label selector
    matchLabels:
      app: web-server       #Label of pod meeting the target
  template:                 # This template is used when the Deployment expands the pod
    metadata:
      labels:               #Pod label
        app: web-server     #The label of the pod copy. The selector selects the pod copy according to this label
    spec:                   #Specify the content of the resource
      containers:           #Part of pod content container definition
        - name: nginx       #Name of the container
          image: nginx:1.12.1       #Mirror address of the container
          ports:
            - containerPort: 80     #Container exposed port
[root@master ~]# kubectl create -f nginx.yaml
11.10.6 case 3: operation of Kubernetes Services
[root@master ~]# cat nginx-svc.yaml
apiVersion: v1
kind: Service
metadata:
  name: nginx-service       #service name
spec:
  selector:
    app: web-server         #pod matching service selector tag
  ports:
    - protocol: TCP
      port: 80              #service port
      targetPort: 80        #pod port
11.11 ConfigMap
ConfigMap allows you to separate configuration files from property files to make containerized Applications Portable.
- Kubernetes space can be used;
- It can be used as a variable or path file;
- Pod supports automatic content update;
Get ConfigMap in the system
[root@master-1 configmap]# kubectl get configmap
NAME             DATA   AGE
traefik-config   1      4d11h
11.11.1 case 1: configure all key value pairs in ConfigMap as container environment variables
Create a ConfigMap that contains multiple key value pairs.
[root@master-1 configmap]# cat configmap-multikeys.yaml
apiVersion: v1
kind: ConfigMap
metadata:
  name: special-config
  namespace: default
data:
  SPECIAL_LEVEL: L1
  SPECIAL_TYPE: Nginx
Create ConfigMap
[root@master-1 configmap]# kubectl apply -f configmap-multikeys.yaml
configmap/special-config created
View ConfigMap
[root@master-1 configmap]# kubectl get configmap/special-config -n default
NAME             DATA   AGE
special-config   2      31s
View details
[root@master-1 configmap]# kubectl describe configmap special-config
Name:         special-config
Namespace:    default
Labels:       <none>
Annotations:  kubectl.kubernetes.io/last-applied-configuration:
                {"apiVersion":"v1","data":{"SPECIAL_LEVEL":"L1","SPECIAL_TYPE":"Nginx"},"kind":"ConfigMap","metadata":{"annotations":{},"name":"special-co...

Data
====
SPECIAL_LEVEL:
----
L1
SPECIAL_TYPE:
----
Nginx
Events:  <none>
Create container reference ConfigMap
[root@master-1 configmap]# cat pod-configmap.yaml
apiVersion: v1
kind: Pod
metadata:
  name: pod-test-configmap
spec:
  containers:
    - name: pod-test-configmap
      image: busybox
      command: [ "/bin/sh", "-c", "echo $(SPECIAL_LEVEL_KEY) $(SPECIAL_TYPE_KEY)" ]
      env:
        - name: SPECIAL_LEVEL_KEY
          valueFrom:
            configMapKeyRef:
              name: special-config
              key: SPECIAL_LEVEL
        - name: SPECIAL_TYPE_KEY
          valueFrom:
            configMapKeyRef:
              name: special-config
              key: SPECIAL_TYPE
  restartPolicy: Never
Create pod
[root@master-1 configmap]# kubectl apply -f pod-configmap.yaml
pod/pod-test-configmap created
View pod log
[root@master-1 configmap]# kubectl log pod-test-configmap
log is DEPRECATED and will be removed in a future version. Use logs instead.
L1 Nginx
11.11.2 case 2: adding ConfigMap data to a specific path in the container
Nginx pod file
[root@master-1 configmap]# cat nginx.yaml
apiVersion: apps/v1beta2    # for versions before 1.9.0 use apps/v1beta2
kind: Deployment
metadata:
  name: nginx-deployment
spec:
  selector:
    matchLabels:
      app: nginx-configmap
  replicas: 1
  template:
    metadata:
      labels:
        app: nginx-configmap
    spec:
      containers:
        - name: nginx-configmap
          image: nginx
          volumeMounts:
            - name: config-volume
              mountPath: /mnt/
          ports:
            - containerPort: 80
      volumes:
        - name: config-volume
          configMap:
            name: special-config
            items:
              - key: SPECIAL_LEVEL
                path: keys
start-up
[root@master-1 configmap]# kubectl apply -f nginx.yaml
deployment.apps/nginx-deployment created

[root@master-1 configmap]# kubectl get pod | grep nginx-deployment
nginx-deployment-69fd86756f-f6bhw         1/1     Running     0          115s
View container contents
[root@master-1 configmap]# kubectl exec -it nginx-deployment-69fd86756f-f6bhw bash
root@nginx-deployment-69fd86756f-f6bhw:/# cd /mnt
root@nginx-deployment-69fd86756f-f6bhw:/mnt# ls
keys
root@nginx-deployment-69fd86756f-f6bhw:/mnt# cat keys
L1root
Modify ConfigMap content (verify pod automatic update)
- Modification content
[root@master-1 configmap]# cat configmap-multikeys.yaml
apiVersion: v1
kind: ConfigMap
metadata:
  name: special-config
  namespace: default
data:
  SPECIAL_LEVEL: L111
  SPECIAL_TYPE: Nginx
Apply new configuration
[root@master-1 configmap]# kubectl apply -f configmap-multikeys.yaml
configmap/special-config configured

[root@master-1 configmap]# kubectl describe configmap special-config
Name:         special-config
Namespace:    default
Labels:       <none>
Annotations:  kubectl.kubernetes.io/last-applied-configuration:
                {"apiVersion":"v1","data":{"SPECIAL_LEVEL":"L111","SPECIAL_TYPE":"Nginx"},"kind":"ConfigMap","metadata":{"annotations":{},"name":"special-...

Data
====
SPECIAL_LEVEL:
----
L111
SPECIAL_TYPE:
----
Nginx
Events:  <none>
See if the container can be updated automatically
- Wait 1 minute (default)
[root@master-1 configmap]# kubectl exec -it nginx-deployment-69fd86756f-f6bhw -- cat /mnt/keys
L111
11.11.3 case 3: configure all key value pairs in ConfigMap as container environment variables
Define profile
- kustomize application configuration management
[root@master-1 redis]# cat kustomization.yaml
configMapGenerator:
  - name: redis-master-config
    files:
      - redis-config
resources:
  - redis-pod.yaml
Define redis profile
[root@master-1 redis]# cat redis-config
maxmemory 2mb
maxmemory-policy allkeys-lru
Define redis pod file
[root@master-1 redis]# cat redis-pod.yaml
apiVersion: v1
kind: Pod
metadata:
  name: redis
spec:
  hostNetwork: true
  containers:
    - name: redis
      image: redis:5.0.4
      command:
        - redis-server
        - "/redis-master/redis.conf"
      env:
        - name: MASTER
          value: "true"
      ports:
        - containerPort: 6379
      resources:
        limits:
          cpu: "0.1"
      volumeMounts:
        - mountPath: /redis-master-data
          name: data
        - mountPath: /redis-master
          name: config
  volumes:
    - name: data
      emptyDir: {}
    - name: config
      configMap:
        name: redis-master-config
        items:
          - key: redis-config
            path: redis.conf
Since the redis TCP pod is created in the inress chapter, port 6379 is occupied. You need to delete the pod
Create redis
[root@master-1 redis]# ll
total 12
-rw-r--r-- 1 root root 120 Aug 11 10:33 kustomization.yaml
-rw-r--r-- 1 root root  43 Aug 11 10:29 redis-config
-rw-r--r-- 1 root root 652 Aug 11 10:31 redis-pod.yaml

[root@master-1 redis]# kubectl apply -k .
configmap/redis-master-config-k66gtchdm4 unchanged
pod/redis created
Get redis node address
[root@master-1 redis]# kubectl get pods -o wide | grep redis
redis   1/1     Running     0       6m10s       192.168.91.21       192.168.91.21   <none>      <none>
Connect to Redis
[root@master-2 ~]# redis-cli -h 192.168.91.21 -p 6379
192.168.91.21:6379> CONFIG GET maxmemory
1) "maxmemory"
2) "2097152"    #byte
192.168.91.21:6379> CONFIG GET maxmemory-policy
1) "maxmemory-policy"
2) "allkeys-lru"