Preface
This article is from the Vue3 + Ts course of coderwhy
Attached link:https://ke.qq.com/course/3453141
Who can reject a teacher who adds 100% positive comments?
Catalog
vs-code snippet
-
Settings - User Code Snippets - Select Language
-
Copy the snippet you need to snippet generator Under the website and after filling in the Description and Tab trigger, copy to vs-code
Template syntax
-
Development Modes for React
-
React uses jsx, so the corresponding code is written in a syntax similar to js
-
js is then compiled into React via Babe.Create Element function call
-
-
vue also supports the jsx development model (which will be discussed later):
-
But in most cases, use HTML-based template syntax
-
In templates, developers are allowed to declaratively bind data from DOM and underlying component instances to-and-fro.In the bottom implementation, vue compiles the template into a virtual DOM rendering function, which I will talk about later.
-
Use of mustache
-
Basic Use: <h2>{{message}}</h2>
-
Expression <h2>{{message*10}}</h2>
-
Function < h2>{{message.split("). reverse() join(")}}</h2>
-
Ternary Operator <h2>{{isShow?"Hhhhhh": "}}</h2>
Common Instructions
-
v-once directive
-
v-once is used to specify that elements or components are rendered only once
-
When data changes, elements or components and all their children are treated as static content and skipped.
-
This directive can be used for performance optimization;
 <h2 v-once>{{counter}}</h2>
 <button @click="increment">+1</button>
-
-
Render only once if it is a child node
<div v-once>
     <h2>{{counter}}</h2>
     <h2>{{message}}</h2>
 </div>
 <button @click="increment">+1</button>
-
-
v-text
-
textContent used to update elements
 <h2 v-text="message"></h2>
 <!-- Equivalent to -->
 <h2>{{message}}</h2>
-
-
v-html
-
By default, if the content we are presenting is html in itself, the vue will not parse it specifically.
-
If we want this to be parsed by Vue, we can use v-html to show it
<template id="my-app"> <div>{{msg}}</div> <div v-html="msg"></div> </template> <script> const App = { template: '#my-app', data() { return { msg: '<span style="color:red; background: blue;">Ha ha ha</span>' } } } </script>
-
-
-
v-pre
-
V-preis used to skip the compilation of elements and their children, displaying the original Muustache tag:
-
Skip nodes that do not require compilation to speed up compilation
 <template id="my-app">
     <h2 v-pre>{{message}}</h2>
 </template>
-
-
-
v-cloak
-
This directive remains on the element until the associated component instance has finished compiling.
-
When used with CSS rules such as [v-cloak] {display: none}, this directive hides uncompiled Mushache tags until the component instance is ready
<template id="my-app"> <h2 v-cloak>{{message}}</h2> </template> <script> const App = { template: '#my-app', data() { return { message: "Hello World" } } } </script> -
Will not be displayed until the compilation is complete
-
-
v-bind
-
Binding Properties for v-bind
-
Useful tips Vue3 supports multiple root elements
-
The front end is a series of instructions, mainly inserting values into the template content.
-
However, in addition to content that needs to be determined dynamically, we also want some properties to be bound dynamically.
-
For example, dynamically binding the href attribute of element a;
-
Such as dynamically binding the src attribute of img elements;
-
-
Binding properties we use v-bind:
-
Abbreviations:
-
Expected: any (with argument) | Object (without argument)
-
Parameter: attrOrProp (optional)
-
Modifiers:
-
.camel - Converts the kebab-case attribute name to camelCase.
-
-
Usage: Dynamically bind one or more attribute s, or prop a component to an expression.
-
-
v-bind binding basic properties
-
v-bind is used to bind one or more attribute values, or to pass props values to another component (as you learn about components);
-
What properties need to be dynamically bound in development?
-
There are still many, such as picture link src, website link href, dynamic binding of some classes, styles and so on
-
-
v-bind has a corresponding grammatical sugar (:), which is short form.
-
In development, we usually use the form of grammatical sugar because it is more concise
<template id="my-app"> <!-- 1.v-bind Basic Use --> <img v-bind:src="imgUrl" alt=""> <a v-bind:href="link">Use Baidu Search</a> <!-- 2.v-bind Provide a grammatical sugar : --> <img :src="imgUrl" alt=""> <img src="imgUrl" alt=""> </template>
-
-
v-bind binding class
-
In development, sometimes our element class es are dynamic, such as
-
When the data is in a certain state, the font is red.
-
Font is black when data is in another state
-
-
There are two ways to bind a class:
-
Object Grammar
-
Array syntax
-
-
-
Binding class-object syntax
-
Object Syntax: We can pass to: class (short for v-bind:class) an object to dynamically switch classes
<template id="my-app"> <div :class="className">Ha ha ha ha</div> <!-- Object Grammar: {'active': boolean} --> <div :class="{'active': isActive}">Ha Ha</div> <button @click="toggle">switch</button> <!-- You can also have multiple key-value pairs --> <div :class="{active: isActive, title: true}">Ha Ha</div> <!-- Default class And dynamic class Combination --> <div class="abc cba" :class="{active: isActive, title: true}"> Ha Ha </div> <!-- Put objects in a separate property --> <div class="abc cba" :class="classObj">Ha Ha</div> <!-- Put the returned object in one methods(computed)Method --> <div class="abc cba" :class="getClassObj()">Ha Ha</div> </template> <script src="../js/vue.js"></script> <script> const App = { template: "#my-app", data() { return { className: "why", isActive: true, title: "abc", classObj: { active: true, title: true }, }; }, methods: { toggle() { this.isActive = !this.isActive; }, getClassObj() { return { active: true, title: true } } }, }; Vue.createApp(App).mount("#app"); </script>
-
-
Binding class - array syntax
-
Array syntax: We can pass an array to: class to apply a list of classes
<template id="my-app"> <div :class="['abc', title]">Ha ha ha ha</div> <div :class="['abc', title, isActive ? 'active': '']">Ha ha ha ha</div> <div :class="['abc', title, {active: isActive}]">Ha ha ha ha</div> </template> <script src="../js/vue.js"></script> <script> const App = { template: '#my-app', data() { return { message: "Hello World", title: "cba", isActive: true } } } Vue.createApp(App).mount('#app'); </script>
-
-
Introduction to binding style
-
We can use v-bind:style to bind some CSS inline styles
-
This time because there are certain styles that we need to decide dynamically based on the data
-
For example, the color, size, etc. of a piece of text
-
-
CSS property names can be named with camelCase or kebab-case, remember to enclose in quotation marks
-
There are two ways to bind a class
-
Object Grammar
-
Array syntax
-
-
-
Binding style walkthrough
-
Object Grammar
<template id="my-app"> <!-- :style="{cssPropertyName: cssPropertyValue}" --> <div :style="{color: finalColor, 'font-size': '30px'}">Ha ha ha ha</div> <div :style="{color: finalColor, fontSize: '30px'}">Ha ha ha ha</div> <div :style="{color: finalColor, fontSize: finalFontSize + 'px'}">Ha ha ha ha</div> <!-- Bind one data Property value in, And it's an object --> <div :style="finalStyleObj">Ha Ha</div> <!-- Call a method --> <div :style="getFinalStyleObj()">Ha Ha</div> </template> -
Array syntax
-
Style's array syntax applies multiple style objects to the same element
 <template id="my-app">
     <div :style="[style1Obj, style2Obj]">Ha ha ha</div>
     <img :src="" alt="">
     <a :href=""></a>
     <div :class></div>
 </template>
-
-
-
Dynamic Binding Properties
-
In some cases, the name of our attribute may not be fixed
-
Front end We have fixed attribute names regardless of src, href, class, style binding
-
If the attribute name is not fixed, we can define it using the format: [attribute name]= "value"
-
This way of binding, we call it dynamic binding properties;
 <template id="my-app">
     <div :[name]="value">Ha ha ha</div>
 </template>
-
-
-
Bind an object
-
What if we want to bind all the attributes of an object to all the attributes on an element?
-
Very simple, we can bind an object directly with v-bind
-
-
Case: info objects are split into div attributes
 <template id="my-app">
     <div v-bind="info">Ha ha ha ha</div>
     <div :="info">Ha ha ha ha</div>
 </template>
-
v-on
-
v-on binding event
-
Previously, we bound the content and attributes of elements, and another very important feature in front-end development is interaction.
-
In front-end development, we need a wide range of interactions with users on a regular basis
-
At this point, we have to listen for user events, such as clicks, drags, keyboard events, etc.
-
How do you listen for events in Vue? Use the v-on directive.
-
-
-
Usage of v-on
-
Abbreviation: @
-
Expected: Function | Inline Statement | Object
-
Parameter: event p modifier:
-
.stop - Calls event.stopPropagation().
-
.prevent - Calls event.preventDefault().
-
.capture - Use capture mode when adding event listeners.
-
.self - Triggers a callback only if the event is triggered from the element itself bound by the listener.
-
. {keyAlias} - Triggers a callback only if the event is triggered from a specific key.
-
.once - Triggers a callback only once.
-
.left - Triggers only when the left mouse button is clicked.
-
.right - Triggers only when the right mouse button is clicked.
-
.middle - Triggers only when the middle mouse button is clicked.
-
.passive - {passive: true} mode add listener
-
-
Usage: Bind event listening
-
-
Basic use of v-on
<template id="my-app"> <!-- Complete Writing: v-on:Listened Events="methods Medium method" --> <button v-on:click="btn1Click">Button 1</button> <div class="area" v-on:mousemove="mouseMove">div</div> <!-- Grammatical Sugar --> <button @click="btn1Click">Button 1</button> <!-- Bind an expression: inline statement --> <button @click="counter++">{{counter}}</button> <!-- Bind an object --> <div class="area" v-on="{click: btn1Click, mousemove: mouseMove}"></div> <div class="area" @="{click: btn1Click, mousemove: mouseMove}"></div> </template> -
v-on parameter transfer
-
When defining methods in methods for @click calls, you need to be aware of parameter issues:
-
Case 1: If the method does not require additional parameters, the () after the method may not be added.
-
Note, however, that if there is a parameter in the method itself, the native event event event parameter is passed in by default
-
-
Scenario 2: If you need to pass in a parameter at the same time and an event is required, you can pass in an event through $event.
 <template id="my-app">
     <!-- Default incoming event object, Available in methods -->
     <button @click="btn1Click">Button 1</button>
     <!-- $event You can get the event object when the event occurs -->
     <button @click="btn2Click($event, 'coderwhy', 18)">Button 2</button>
 </template>
-
-
Modifier for v-on
-
v-on supports modifiers, which are equivalent to some special handling of events:
-
.stop - Calls event.stopPropagation().
-
.prevent - Calls event.preventDefault().
-
.capture - Use capture mode when adding event listeners.
-
.self - Triggers a callback only if the event is triggered from the element itself bound by the listener.
-
. {keyAlias} - Triggers a callback only if the event is triggered from a specific key.
-
.once - Triggers a callback only once.
-
.left - Triggers only when the left mouse button is clicked.
-
.right - Triggers only when the right mouse button is clicked.
-
.middle - Triggers only when the middle mouse button is clicked.
-
.passive - {passive: true} mode add listener
 <template id="my-app">
     <div @click="divClick">
       <button @click.stop="btnClick">Button</button>
     </div>
     <input type="text" @keyup.enter="enterKeyup">
 </template>
-
conditional rendering
-
In some cases, we need to decide whether certain elements or components are rendered based on the current conditions, at which point we need to make conditional judgments.
-
Vue provides the following instructions for conditional judgment:
-
v-if
-
v-else
-
v-else-if
-
v-show
-
-
-
v-if, v-else, v-else-if are used to render the contents of a block based on conditions:
-
These are rendered only when the condition is true;
-
These three instructions are similar to JavaScript conditional statements if, else, else if;
 <template id="my-app">
     <input type="text" v-model="score">
     <h2 v-if="score > 90">excellent</h2>
     <h2 v-else-if="score > 60">good</h2>
     <h2 v-else>Fail</h2>
 </template>
-
-
Rendering principle of v-if:
-
v-if is inert;
-
When the condition is false, the judgment will not be rendered or destroyed at all.
-
When the condition is true, the content in the condition block will be rendered.
-
-
template element
-
Since v-if is an instruction, it must be added to an element:
-
But what if we want to switch multiple elements?
-
At this p oint we render the div, but we don't want the div element to be rendered;
-
At this point, we can choose to use the template;
-
-
The template element can be used as an invisible wrapping element and on v-if, but ultimately the template will not be rendered:
-
A little like a block in a applet
<template id="my-app"> <template v-if="isShowHa"> <h2>Ha ha ha ha</h2> <h2>Ha ha ha ha</h2> <h2>Ha ha ha ha</h2> </template> <template v-else> <h2>Ha Ha</h2> <h2>Ha Ha</h2> <h2>Ha Ha</h2> </template> </template>
-
-
v-show
-
The usage of v-show and v-if appears to be consistent and depends on a condition to decide whether to display elements or components
 <template id="my-app">
     <h2 v-show="isShow">Ha ha ha ha</h2>
 </template>
-
-
Differences between v-show and v-if
-
First, there are differences in usage:
-
v-show does not support template s;
-
v-show cannot be used with v-else;
-
-
Secondly, the essential difference is:
-
Whether or not the v-show element needs to be displayed on the browser, its DOM is actually rendered, just toggled through the display property of CSS;
-
When the v-if condition is false, the corresponding element radicals will not be rendered in the DOM.
-
-
How do you choose in development?
-
If our elements need to switch frequently between display and hide, use v-show;
-
If switching does not occur frequently, use v-if;
-
-
-
List Rendering
-
In real development, we often get a set of data from the server and need to render it.
-
At this point we can use v-for to do it;
-
v-for is similar to a JavaScript for loop and can be used to traverse a set of data;
-
-
v-for Basic Use
-
The basic format of n v-for is an "item in array":
-
Arrays are usually from data or prop, or in other ways;
-
item is an alias we give each element, which can be defined by itself.
-
-
We know that when traversing an array, we often need to get the index of the array:
-
If we need an index, we can use the format: "(item, index) in array";
-
Notice the order above: the array element item item item is in the front, and the index item index is in the back;
 <template id="my-app">
     <h2>Movie List</h2>
     <ul>
       <!-- foreach -->
       <li v-for="(movie, index) in movies">{{index+1}}.{{movie}}</li>
     </ul>
     <h2>Personal information</h2>
     <ul>
       <!-- Traversing Objects -->
       <li v-for="(value, key, index) in info">{{value}}-{{key}}-{{index}}</li>
     </ul>
     <h2>Traversal Numbers</h2>
     <ul>
       <li v-for="(num, index) in 10">{{num}}-{{index}}</li>
     </ul>
   </template>
-
-
-
Types supported by v-for
-
v-for also supports traversing objects and has one or two or three parameters:
-
One parameter: "value in object";
-
Two parameters: "(value, key) in object";
-
Three parameters: "(value, key, index) in object";
-
-
v-for also supports traversal of numbers:
-
Each item is a number;
-
-
-
template element
-
Similar to v-if, you can use template elements to render a section of content that contains more than one element in a loop:
-
We use template s to wrap multiple elements instead of div s;
<template id="my-app">
     <ul>
       <template v-for="(value, key) in info">
         <li>{{key}}</li>
         <li>{{value}}</li>
         <li class="divider"></li>
       </template>
     </ul>
   </template>
-
-
-
Array Update Detection
-
Vue will be wrapped around the change methods of the array being listened for, so they will also trigger view updates. These wrapped methods include:
-
push()
-
pop()
-
shift()
-
unshift()
-
splice()
-
sort()
-
reverse()
-
-
Method of replacing arrays
-
The above method directly modifies the original array, but some methods do not replace it, but instead generate new arrays, such as filter(), concat(), and slice().
<template id="my-app"> <h2>Movie List</h2> <ul> <li v-for="(movie, index) in movies">{{index+1}}.{{movie}}</li> </ul> <input type="text" v-model="newMovie"> <button @click="addMovie">Add Movie</button> </template> <script src="../js/vue.js"></script> <script> const App = { template: '#my-app', data() { return { newMovie: "", movies: [ "Intergalactic Traverse", "Inception", "Talk West", "Godfather", "Juvenile School" ] } }, methods: { addMovie() { this.movies.push(this.newMovie); this.newMovie = ""; // this.movies = this.movies.filter(item => item.length > 2); } } } Vue.createApp(App).mount('#app'); </script>
-
-
-
What is the function of key in v-for?
-
When using v-for for for list rendering, we usually bind a key attribute to an element or component.
-
What does this key attribute do? Let's first look at the official explanation:
-
The key attribute is mainly used in Vue's virtual DOM algorithm to identify VNodes when comparing old and new nodes.
-
If key is not used, Vue uses an algorithm that minimizes dynamic elements and tries to modify/reuse the same types of elements in place as much as possible.
-
When key is used, it reorders elements based on key changes and removes/destroys elements that key does not exist.
-
-
Official explanations are not easy for beginners to understand, such as the following questions:
-
What are old and new nodes and what is VNode?
-
How do I try to modify and reuse without a key?
-
When there is a key, how do I rearrange it based on the key?
-
-
-
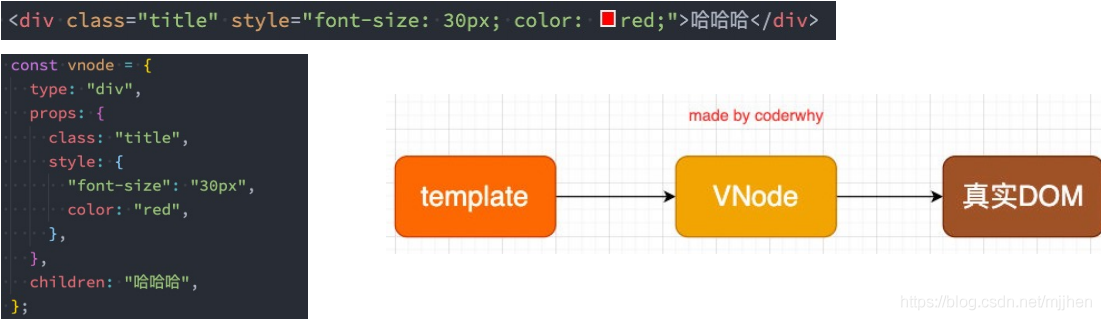
Understanding VNode
-
Let's first explain the concept of VNode:
-
Because we don't yet have a complete concept of learning components, we should first understand the VNode created by HTML elements.
-
The full name of VNode is Virtual Node, or virtual node;
-
In fact, whether components or elements, they all end up being a VNode in the Vue;
-
VNode is essentially a JavaScript object;
-
-
-
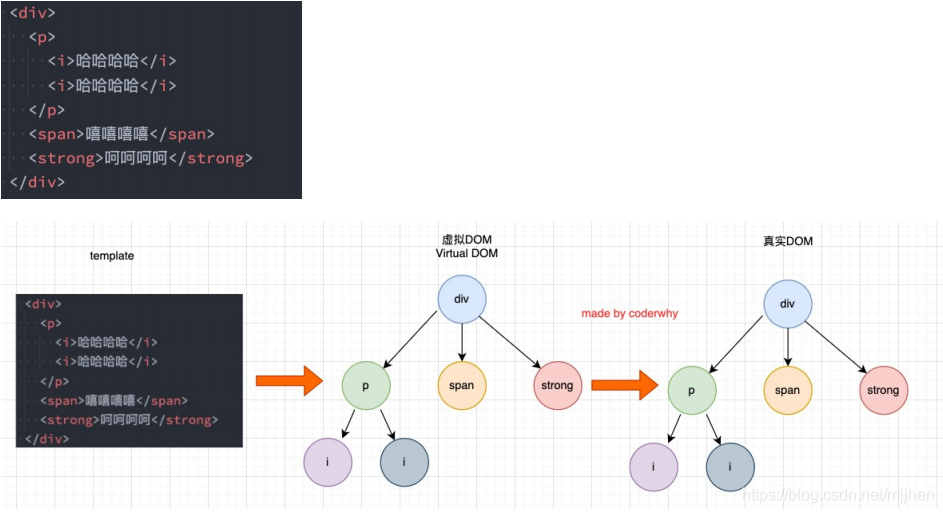
Virtual DOM
-
If we're not just a simple div, but a bunch of elements, they should form a VNode Tree:
-
-
Insert F Case
-
Let's start with a case where when I click a button, an f is inserted in the middle;
-
We can be sure that this update is not necessary for ul and button and that the li st of our LIS needs to be updated:
-
In Vue, the entire list is not re-rendered for child element nodes of the same parent element;
-
Because they are unchanged for a, b, c, d in the list;
-
When operating a real DOM, we only need to insert a li of f in the middle.
-
-
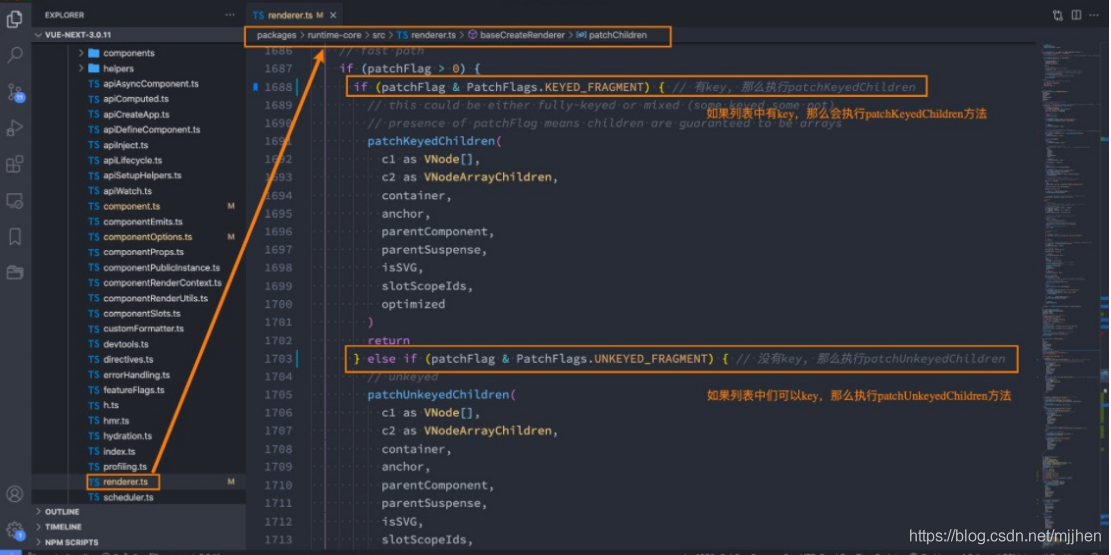
So how exactly do updates to lists in Vue work?
-
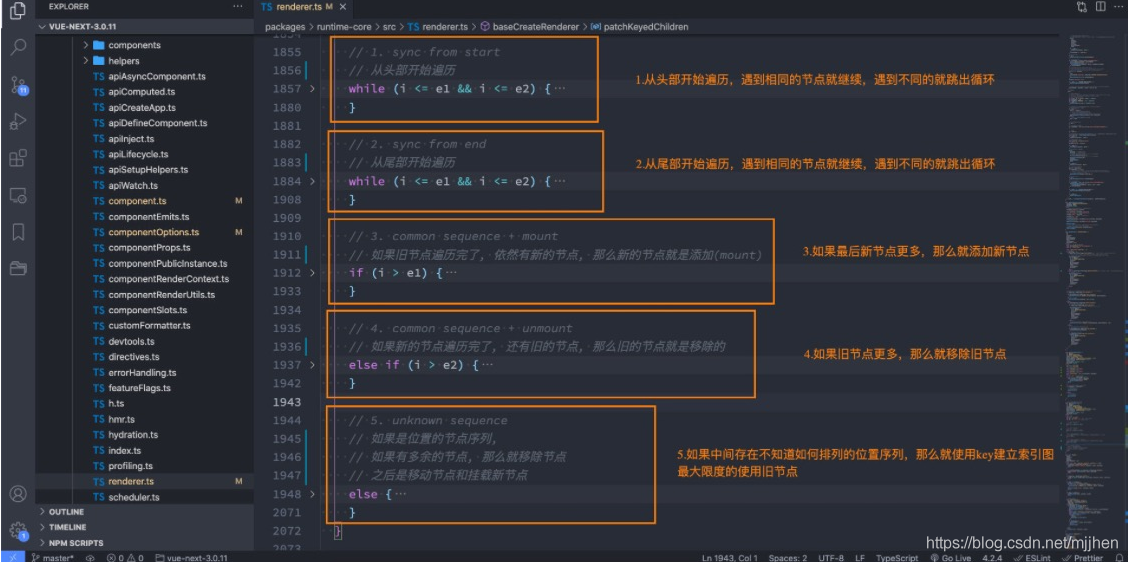
Vue actually calls two different methods for keys and no keys;
-
With key, use the patchKeyedChildren method;
-
Without a key, use the patchUnkeyedChildren method for that long;
<template id="my-app"> <ul> <li v-for="item in letters" :key="item">{{item}}</li> </ul> <button @click="insertF">insert F element</button> </template> <script src="../js/vue.js"></script> <script> const App = { template: '#my-app', data() { return { letters: ['a', 'b', 'c', 'd'] } }, methods: { insertF() { this.letters.splice(2, 0, 'f') } } } Vue.createApp(App).mount('#app'); </script>
-
-
-
Vue Source's Judgment of key
-
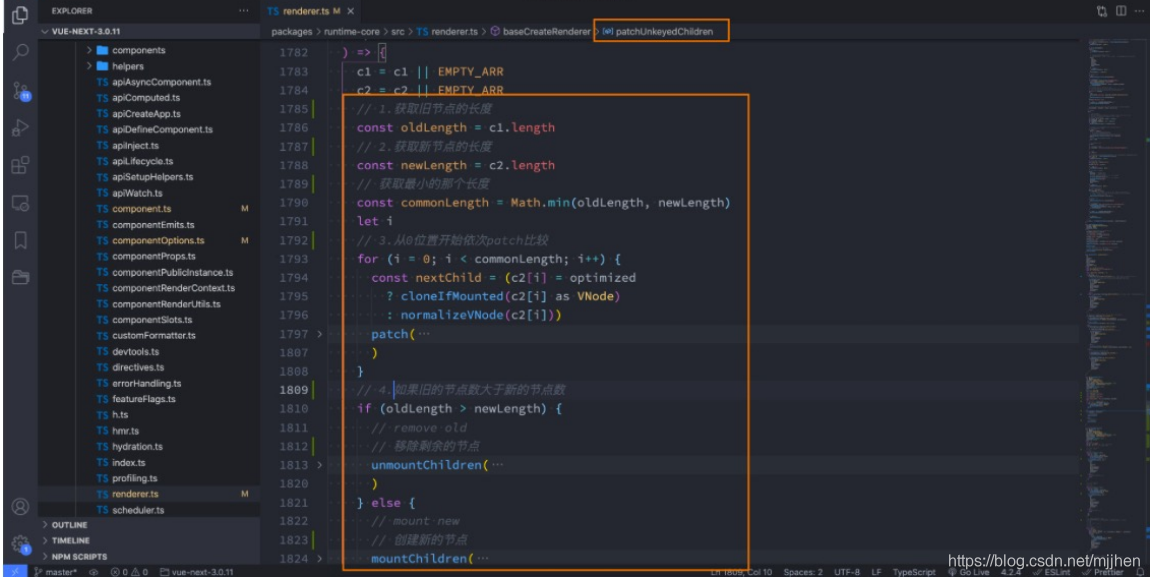
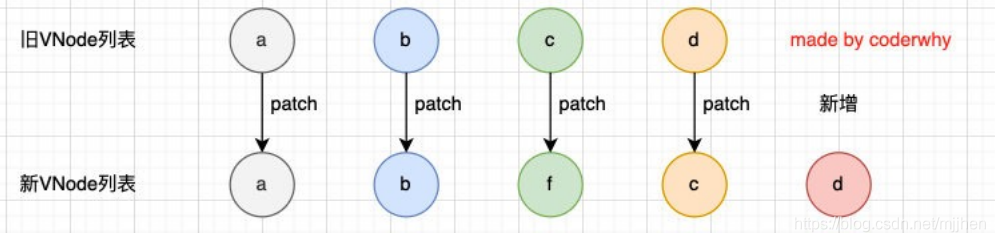
Operation without key
-
Operation without key
-
We will find that the diff algorithm above is not efficient:
-
c and d actually don't need any changes;
-
But because our c is used by f, all subsequent content will be changed once and added at last.
-
-
-
-
Operate with key
-
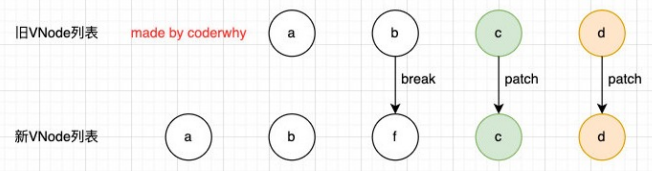
Operational procedure with key-diff algorithm
-
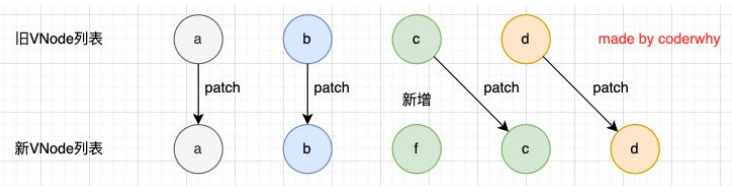
The first step is to traverse and compare from the beginning:
-
a and b are consistent and will continue to compare;
-
c and f break out of the loop because the key is inconsistent
-
-
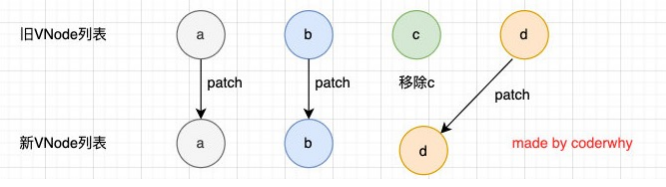
- The second step is to traverse and compare from the tail
-

-
The third step is to add a new node if the old node is traversed but there are still new nodes:
-
-
The fourth step is to remove the old node if the new node is traversed but the old one still exists:
-
-
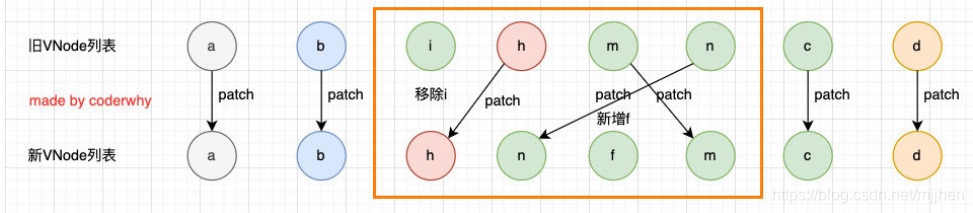
The fifth step is the most characteristic scenario, with many unknown or disordered nodes in between:
-
-
-
-
Conclusion with or without key
-
So we can see that Vue uses our key s as much as possible to optimize the diff algorithm:
-
We are very inefficient without key s;
-
Keeping the same key makes the diff algorithm more efficient when inserting or resetting the order;
-
-