Hadoop cluster construction
1, Environmental preparation (prepare a formwork machine)
1.1 template machine configuration - Hadoop 100
The template machine does not move. In order to facilitate cloning later, new nodes are added directly
Virtual machine requirements: 4G memory, 50G hard disk, CentOS7, minimum installation
Here, Hadoop 100 is used as the template machine, and the cluster is configured as Hadoop 102 (NN), Hadoop 103 (yarn) and Hadoop 104 (2nn)
1.1.1 virtual machine installation
In addition, write how to install a virtual machine
1.1.2 modify host address and host name
(1) Modify IP address
//Open file
vi /etc/sysconfig/network-scripts/ifcfg-ens33

//Set the file parameters to the following
DEVICE=ens33
TYPE=Ethernet
ONBOOT=yes
BOOTPROTO=static
NAME="ens33"
IPADDR=192.168.1.100 //IP address
PREFIX=24 	//The bit length of the subnet mask is optional
GATEWAY=192.168.1.2 	//gateway
DNS1=114.114.114.114 	//Domain name server 1 --- resolve domain name
DNS2=8.8.8.8	//Domain name server 2
After modification, execute systemctl restart network
(2) Modify host name
Enter the content and open the file
vi /etc/hostname
Content in file
localhost.localdomain
Modify this host name to
hadoop100
Save exit
(3) Modify hosts hostname on Linux
Open file
vi /etc/hosts
Add the following under the file
192.168.1.100 hadoop100
192.168.1.101 hadoop101
192.168.1.102 hadoop102
192.168.1.103 hadoop103
192.168.1.104 hadoop104
192.168.1.105 hadoop105
192.168.1.106 hadoop106
192.168.1.107 hadoop107
192.168.1.108 hadoop108
Explanation: multiple servers are configured here to facilitate adding new nodes or clones in the future. This file does not need to be modified frequently
Save exit
Restart the device. After restarting, you can find that the host name has been modified successfully
(4) Modify hosts hostname on Windows
Enter the following folder under Windows system
C:\Windows\System32\drivers\etc
Copy the hosts file in this directory to the desktop
Putting files on the desktop is convenient for modification. You need administrator permission to execute them in the current directory, just in case
Open the file and add the following content under the file
192.168.1.100 hadoop100
192.168.1.101 hadoop101
192.168.1.102 hadoop102
192.168.1.103 hadoop103
192.168.1.104 hadoop104
192.168.1.105 hadoop105
192.168.1.106 hadoop106
192.168.1.107 hadoop107
192.168.1.108 hadoop108
Save and exit to overwrite the original hosts
1.1.3 turn off the firewall and start it automatically
// Turn off firewall
systemctl stop firewalld
// Turn off firewall auto start mode
systemctl disable firewalld
1.1.4 install the necessary plug-ins
yum install -y epel-release
yum install -y psmisc nc net-tools rsync vim lrzsz ntp libzstd openssl-static tree iotop git
At this point, you can edit with vim, try not to edit with vi
If you need to view the network configuration, such as ifconfig command
Installation required:
sudo yum install net-tools
sudo is required if the user is not root
1.1.5 adding ordinary users
//Create atguigu user
useradd atguigu
passwd atguigu
1.1.6 configure root permissions for users
//Opening method 1:
visudo
//Opening method 2:
vi /etc/sudoers

//Use the search function to find the root word, and the third word can be seen
/root  //Direct input
//The contents are as follows
## Allow root to run any commands anywhere
root    ALL=(ALL)     ALL
//Insert a row under root
## Allow root to run any commands anywhere
root      ALL=(ALL)     ALL
atguigu   ALL=(ALL)     NOPASSWD:ALL
1.1.7 create directory
(1) Create two folders. Software stores the software installation package and module stores the software
mkdir /opt/module
mkdir /opt/software
(2) Set master and group
chown atguigu:atguigu /opt/module
chown atguigu:atguigu /opt/software
Because the following operations are performed by ordinary users, permissions should be given
1.1.8 restart virtual machine: reboot
1.2 clone three virtual machines
The cluster requires at least 3 machines to start: namenode, yarn secondarynode
1.2.1 cloning
Shut down the template machine and clone three virtual machines completely
Change them to Hadoop 102, Hadoop 103 and Hadoop 104 respectively
1.2.2 modify host name and address
Take Hadoop 102 as an example, the operation of other machines is the same
(1) Modify IP address
//Open file
vi /etc/sysconfig/network-scripts/ifcfg-ens33

//Change IP address
IPADDR=192.168.1.100
//Change to
IPADDR=192.168.1.102
After modification, execute systemctl restart network
(2) Modify host name
Enter the content and open the file
vi /etc/hostname
Content in file
hadoop100
Modify this host name to
hadoop102
Save exit
(3) Restart
Configure other machines when restarting
2, JDK and Hadoop installation
2.1 uninstall the existing JDK
rpm -qa | grep -i java | xargs -n1 sudo rpm -e --nodeps
2.2 unzip JDK and Hadoop
① Upload the installation packages of JDK and Hadoop to Linux
/**
Files need to be uploaded to 	/ opt/software
	1, You can upload using xftp
	2, Drag the file directly to the Linux folder
*/
② Unzip the installation package
// In / opt/software Directory - relative path
tar -zxvf jdk-8u212-linux-x64.tar.gz -C /opt/module/
// Writing under absolute path
tar -zxvf /opt/software/hadoop-3.1.3.tar.gz -C /opt/module
Make good use of table key to complete
2.3 configuring environment variables
① Configure environment variables
//Method 1: create a new my in / etc/profile.d /_ Env.sh file
sudo  touch  /etc/profile.d/my_env.sh
sudo vim /etc/profile.d/my_env.sh
//The configuration is as follows:
#JAVA_HOME
export JAVA_HOME=/opt/module/jdk1.8.0_212
#HADOOP_HOME
export HADOOP_HOME=/opt/module/hadoop-3.1.3
PATH=$PATH:$JAVA_HOME/bin:$HADOOP_HOME/bin:$HADOOP_HOME/sbin


//Method 2: directly configure the environment variables into the / etc/profile file, and add the following contents at the end of the / etc/profile file (not recommended)
② Make environment variables effective
- Enter source /etc/profile.d/my_env.sh
- Reconnect xshell
2.4 test and installation
Is the test effective:
--Detect by displaying the value of the environment variable
echo $JAVA_HOME
echo $PATH

--By viewing version detection
 hadoop version
 if hadoop version Unavailable, restart the virtual machine
 sync
 sudo reboot
2.5 introduction to Hadoop directory (must be familiar with)
(1)bin Directory: storage pair Hadoop Related services( HDFS,YARN)Script to operate

(2)etc catalog: Hadoop Configuration file directory for storage Hadoop Configuration file for

(3)lib Directory: storage Hadoop Local library (compression and decompression of data)

(4)sbin Directory: store start or stop Hadoop Scripts for related services

(5)share Directory: storage Hadoop Dependence of jar Packages, documents, and official cases
2.6 Hadoop operation mode
2.6.1 local mode (single process)
- It can run directly without any Hadoop related configuration. The default mode is local mode
- By default, Hadoop is configured to run as a single process in non distributed mode
Official WordCount case:
1,stay hadoop-3.1.3 Create a file below wcinput folder
	mkdir wcinput
2,stay wcinput Create a file under wc.input file
	touch wc.input
3,edit wc.input file
	vi wc.input
 Content:
	aaa	aaa
	bbb
	aaa	bbb
	ccc
4,Execution procedure
	hadoop jar share/hadoop/mapreduce/hadoop-mapreduce-examples-3.1.3.jar wordcount wcinput wcoutput
5,View run results
	cat wcoutput/part-r-00000
   You will see the following results
   aaa 3
   bbb 2
   ccc 1
matters needing attention:
1)Attention should be paid to the problem of specifying paths.
2)Note the problems in the output path
   The specified output path cannot exist. If it exists, an exception will be thrown.
org.apache.hadoop.mapred.FileAlreadyExistsException: Output directory file:/opt/module/hadoop-3.1.3/wcoutput already exists
3)After configuring the cluster, you can no longer run the local mode, and an error will be reported
2.6.2 pseudo distribution mode (single node)
Slightly, not at all, learn directly, really
2.6.3 fully distributed (multi node)
1) prepare 3 clients (close firewall, static ip, host name)
2) install JDK
3) configure environment variables
4) install Hadoop
5) configure environment variables
6) configure cluster
7) single point start
8) configure ssh
9) get together and test the cluster
3, Fully distributed operation mode
3.1 virtual machine preparation
Requirement: complete the configuration of the first point
3.2 writing cluster distribution script
Problems to be solved in distributing scripts:
Because the cluster is composed of servers, the cluster configuration must be synchronized. When a server needs to modify the configuration, other nodes must also modify it synchronously. When there are many servers in the cluster, such repetitive work is very much and meaningless. Therefore, the most important role of writing a script is to directly synchronize the configuration of one machine to all other machines in the cluster.
(1) scp (secure copy)
scp definition: scp Data copy between servers can be realized.
Basic syntax:
scp    -r          $pdir/$fname              $user@hadoop$host:$pdir/$fname
 Command recursion       File path to copy/name    Target user@host:Destination path/name
(2) rsync remote synchronization tool
rsync It is mainly used for backup and mirroring. It has the advantages of high speed, avoiding copying to the same content and supporting symbolic links
/*
	rsync And scp:
	Copying files with rsync is faster than scp. rsync only updates difference files. scp is to copy all the files
*/
Basic syntax:
rsync    -av       $pdir/$fname              $user@hadoop$host:$pdir/$fname
 Command options parameter the path of the file to copy/name    Target user@host:Destination path/name

Option parameters:
		option						function
		-a						Archive copy
		-v						Show replication process
(3) xsync cluster distribution script
/*
	Note: the scripts are stored in the / opt/module/hadoop-3.1.3/bin folder. The reasons for choosing this directory are as follows: ① environment variables have been configured in this folder; ② The content of this file is related to Hadoop and can be stored here for easy management.
	The path can be arbitrary, but the environment variable needs to be configured, which can be run directly in any position of the system
*/
	a. stay/opt/module/hadoop-3.1.3/bin Create under folder xsync script
		cd /opt/module/hadoop-3.1.3/bin
		touch xsync
	b. modify xsync Script permissions
		chmod +x xsync
	c. Edit script
		Look at the next code block. Please pay attention to whether it is garbled when copying and pasting
	d. Test script
		xsync /opt/module/hadoop-3.1.3/bin/xsync
The script is as follows:
#!/bin/bash
#1. Number of judgment parameters
if [ $# -lt 1 ]
then
  echo Not Enough Arguement!
  exit;
fi
#2. Traverse all machines in the cluster
for host in swk3 swk4 swk5		#for host in hadoop102 hadoop103 hadoop104
do
  echo ====================  $host  ====================
  #3. Traverse all directories and send them one by one
  for file in $@
  do
    #4. Judge whether the file exists
    if [ -e $file ]
    then
      #5. Get parent directory
      pdir=$(cd -P $(dirname $file); pwd)
      #6. Get the name of the current file
      fname=$(basename $file)
      ssh $host "mkdir -p $pdir"
      rsync -av $pdir/$fname $host:$pdir
    else
      echo $file does not exists!
    fi
  done
done
3.3 configure ssh non secret login
(1) Configure ssh
Basic grammar
	ssh Of another computer ip address
/*
When ssh is used to connect before configuration, the password will be entered, such as:
Are you sure you want to continue connecting (yes/no)?
Enter yes and follow the prompts to enter the password of the connected user
*/
(2) No secret key configuration
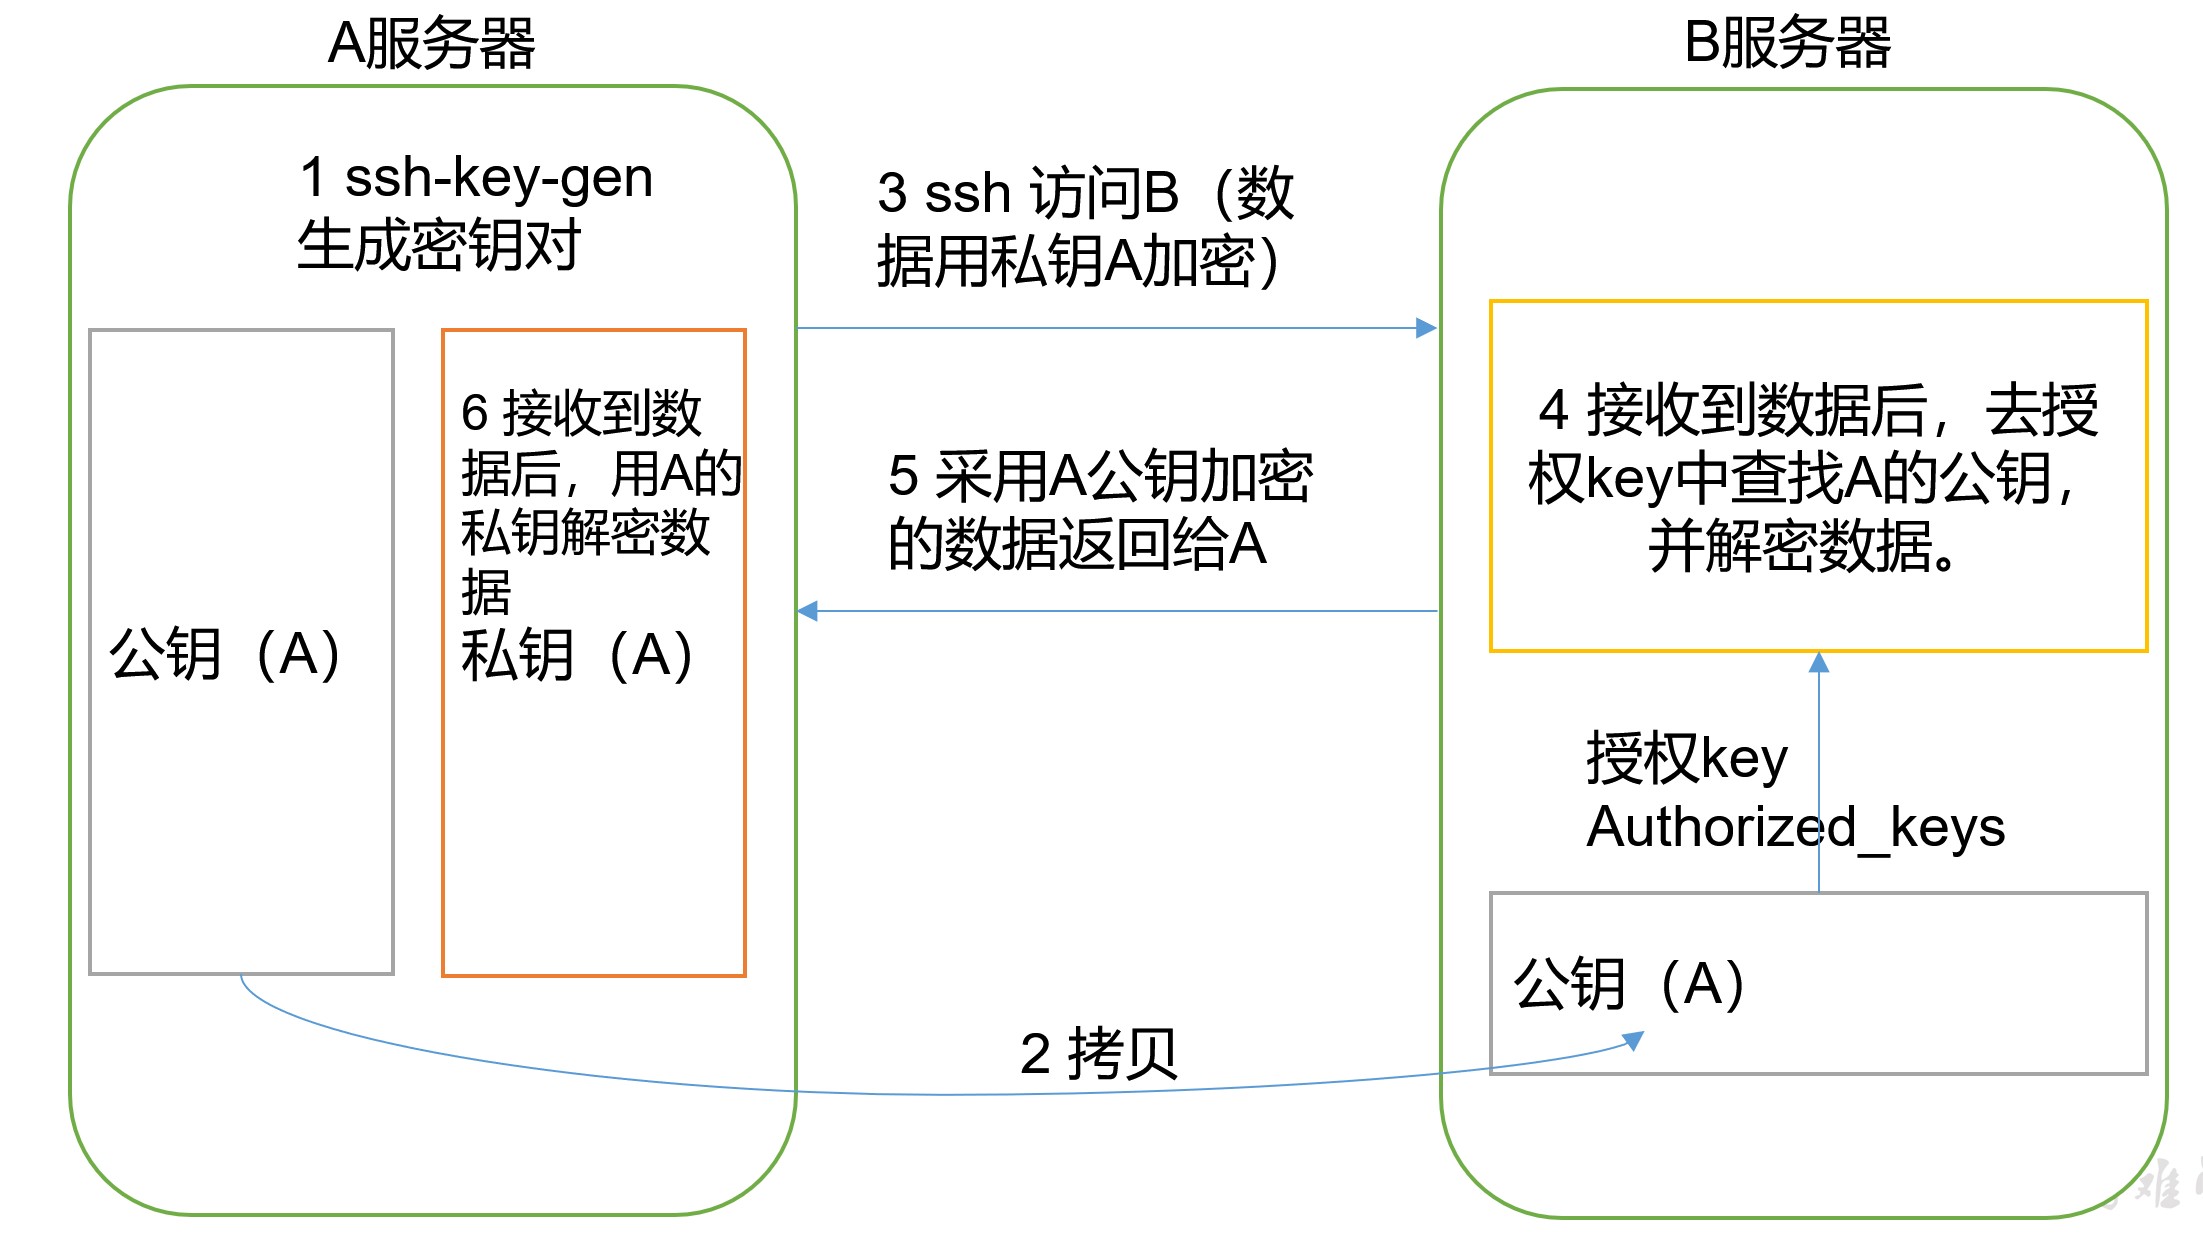
a. secret free login principle
b. generate public key and private key (Hadoop 102 is used)
ssh-keygen -t rsa
// Hit three returns and two file IDS will be generated_ RSA (private key), id_rsa.pub (public key)
// You can view the. ssh folder in your home directory
c. copy the public key to the target machine for password free login
ssh-copy-id hadoop102
ssh-copy-id hadoop103
ssh-copy-id hadoop104
/*
	be careful:
	① After configuring the public key and private key of Hadoop 102, you also need to configure the root user of Hadoop 102 to log in without secret 			 Root users of Hadoop 102, Hadoop 103 and Hadoop 104
	② After configuring Hadoop 102, configure Hadoop 103 and Hadoop 104 in the same way. It must be ensured that each node of the cluster can 			 It is enough to log in to any node without secret
*/

/*
	Expand and think:
	① Write a script to distribute the public key to other nodes.
		Reason: the public key generated by each node is the same, so after each node generates the public key and private key, use a node to 				 The public keys of all nodes are copied to this node and then distributed.
	② The public key is unique and can be disclosed. Take Hadoop 102 as an example. If each node wants to send information to Hadoop 102, then 		 You can get its public key encryption data and send data to Hadoop 102. Hadoop 102 uses its own private key after receiving the data 		 Decrypt--- There are three kinds of encryption and decryption, which are generally public key and private key
	③ rsa Algorithm --- it is an asymmetric encryption algorithm
*/
(3) ssh folder (~ /. ssh) file function explanation
| known_hosts | Record the public key of the computer accessed by ssh |
|---|---|
| id_rsa | Generated private key |
| id_rsa.pub | Generated public key |
| authorized_keys | Store the authorized secret free login server public key |
3.4 cluster deployment
(1) Cluster deployment planning
be careful:
- NameNode and SecondaryNameNode should not be installed on the same server
- Resource manager also consumes a lot of memory. It should not be configured on the same machine as NameNode and SecondaryNameNode.
| hadoop102 | hadoop103 | hadoop104 | |
|---|---|---|---|
| HDFS | NameNode DataNode | DataNode | SecondaryNameNode DataNode |
| YARN | NodeManager | ResourceManager NodeManager | NodeManager |
(2) Configure cluster
a. Core file configuration - > core-site.xml
Open file
cd /opt/module/hadoop-3.1.3/etc/hadoop/
vim core-site.xml
The file content is configured as follows
<configuration>
    <!--appoint HDFS in NameNode Address of -->
    <property>
        <name>fs.defaultFS</name>
        <value>hdfs://hadoop102:9820</value>
    </property>
    <!-- appoint Hadoop The storage directory where files are generated at run time -->
    <property>
        <name>hadoop.tmp.dir</name>
        <value>/opt/module/hadoop-3.1.3/data</value>
    </property>
    <!--  adopt web Interface operation hdfs Permissions for -->
    <property>
            <name>hadoop.http.staticuser.user</name>
            <value>atguigu</value>
    </property>
    <!-- behind hive Compatibility configuration for  -->
    <property>
        <name>hadoop.proxyuser.atguigu.hosts</name>
        <value>*</value>
    </property>
    <property>
        <name>hadoop.proxyuser.atguigu.groups</name>
        <value>*</value>
    </property>
</configuration>
b. HDFS configuration - > hdfs-site.xml
Open profile
cd /opt/module/hadoop-3.1.3/etc/hadoop/
vim hdfs-site.xml
The file contents are configured as follows:
<configuration>
    <property>
        <name>dfs.namenode.secondary.http-address</name>
        <value>hadoop104:9868</value>
    </property>
</configuration>
c. YARN configuration - > yarn-site.xml
Open profile
cd /opt/module/hadoop-3.1.3/etc/hadoop/
vim yarn-site.xml
The file content is configured as follows
<configuration>
<!--  Reducer How to get data-->
    <property>
        <name>yarn.nodemanager.aux-services</name>
        <value>mapreduce_shuffle</value>
</property>
<!--  appoint YARN of ResourceManager Address of-->
    <property>
        <name>yarn.resourcemanager.hostname</name>
        <value>hadoop103</value>
</property>
<!-- Environment variables from NodeManagers The environment property inherited by the container, for mapreduce Application, except default hadoop op_mapred_home Should be added outside. The attribute values are as follows-->
    <property>
        <name>yarn.nodemanager.env-whitelist</name>
<value>JAVA_HOME,HADOOP_COMMON_HOME,HADOOP_HDFS_HOME,HADOOP_CONF_DIR,CLASSPATH_PREPEND_DISTCACHE,HADOOP_YARN_HOME,HADOOP_MAPRED_HOME</value>
</property>
<!-- solve Yarn The virtual memory limit was exceeded while executing the program, Container cover kill  -->
    <property>
        <name>yarn.nodemanager.pmem-check-enabled</name>
        <value>false</value>
    </property>
    <property>
        <name>yarn.nodemanager.vmem-check-enabled</name>
        <value>false</value>
    </property>
<!-- behind hive Compatibility configuration for  -->
    <property>
        <name>yarn.scheduler.minimum-allocation-mb</name>
        <value>512</value>
    </property>
    <property>
        <name>yarn.scheduler.maximum-allocation-mb</name>
        <value>4096</value>
    </property>
    <property>
        <name>yarn.nodemanager.resource.memory-mb</name>
        <value>4096</value>
</property>
</configuration>
d. MapReduce configuration - > mapred-site.xml
Open profile
cd /opt/module/hadoop-3.1.3/etc/hadoop/
vim mapred-site.xml
The file content is configured as follows
<configuration>
<!-- appoint MR Run in Yarn upper -->
    <property>
        <name>mapreduce.framework.name</name>
        <value>yarn</value>
    </property>
</configuration>
e. Distribution profile
The configuration of all nodes in the cluster should be synchronized
xsync /opt/module/hadoop-3.1.3/etc/hadoop/
3.5 cluster
The workers file is the name of the node of the cluster
(1) Configure workers
Open file
vim /opt/module/hadoop-3.1.3/etc/hadoop/workers
Add the following
hadoop102
hadoop103
hadoop104
Note: spaces and blank lines are not allowed in this file. It must be strict, otherwise the cluster cannot be started
Distribution profile
xsync /opt/module/hadoop-3.1.3/etc/hadoop/
(2) Start cluster
a. Start formatting for the first time
If the cluster is started for the first time, you need to format the namenode on the Hadoop 102 node (note that before formatting, you must first stop all namenode and datanode processes started last time, and then delete the data and log data)
hdfs namenode -format
Note: be careful here. You can't repeat formatting, otherwise you can't start the cluster.
b. Start HDFS
start-dfs.sh
The command is in hadoop Under the root directory sbin file
c. Start YARN
* * start YARN on the node (Hadoop 103) * * where ResourceManager is configured
start-yarn.sh
 The command is in hadoop Under the root directory sbin file
d. Viewing cluster content on the web
View NameNode information
- Enter in the browser: http://hadoop102:9870
View YARN information
- Enter in the browser: http://hadoop103:8088
View SecondaryNameNode information
- Enter in the browser: http://hadoop104:9868/status.html
Solve the problem that the details of the SecondaryNameNode cannot be seen on the web side
/*
	Path: $HADOOP_HOME/share/hadoop/hdfs/webapps/static
	Look at line 61 of dfs-dust.js
*/
'date_tostring' : function (v) {
    return moment(Number(v)).format('ddd MMM DD HH:mm:ss ZZ YYYY');
},
// And modify the return value of the function as follows:
'date_tostring' : function (v) {
  return new Date(Number(v)).toLocaleString();
},
(3) Test cluster
1,Upload files to cluster
	hadoop fs -mkdir -p /user/atguigu/input hadoop fs -put $HADOOP_HOME/wcinput/wc.input /user/atguigu/input
2,Upload large files
	hadoop fs -put  /opt/software/hadoop-3.1.3.tar.gz  /
3,Splicing	--After the uploaded file is cut into 128 pieces, it is spliced and downloaded locally. The size is the same as that before uploading
	[atguigu@hadoop102 subdir0]$ cat blk_1073741836>>tmp.jar
	[atguigu@hadoop102 subdir0]$ cat blk_1073741837>>tmp.jar
	[atguigu@hadoop102 subdir0]$ tar -zxvf tmp.jar
4,download
	[atguigu@hadoop102 hadoop-3.1.3]$ bin/hadoop fs -get /hadoop-3.1.3.tar.gz ./
5,implement wordcount program
	hadoop jar share/hadoop/mapreduce/hadoop-mapreduce-examples-3.1.3.jar wordcount /user/atguigu/input /user/atguigu/output
(4) Write group script
Every time you start, you need to start dfs on Hadoop 102 and start yarn on Hadoop 103. This is more troublesome, so write a script and start it at one time
	a. stay/opt/module/hadoop-3.1.3/bin Create under folder mycluster script
		cd /opt/module/hadoop-3.1.3/bin
		touch mycluster
	b. modify xsync Script permissions
		chmod +x mycluster
	c. Edit script
		Look at the next code block. Please pay attention to whether it is garbled when copying and pasting
	d. Test script
		mycluster stop
The script is as follows
#!/bin/bash

if [ $# -ne 1 ]
	then
		echo "args number error!!!"
		exit
fi

case $1 in
"start")
	ssh hadoop102 $HADOOP_HOME/sbin/start-dfs.sh
	ssh hadoop103 $HADOOP_HOME/sbin/start-yarn.sh
	;;
"stop")
	ssh hadoop102 $HADOOP_HOME/sbin/stop-dfs.sh
	ssh hadoop103 $HADOOP_HOME/sbin/stop-yarn.sh
	;;
*)
	echo "args info error!!!"
	;;
esac
3.6 summary of cluster start / stop modes
(1) Each service component starts / stops one by one
start-up DFS
hdfs --daemon start namenode/datanode/secondarynamenode
 start-up YARN
yarn --daemon start/stop  resourcemanager/nodemanager

stop it DFS
hdfs --daemon stop namenode/datanode/secondarynamenode
 stop it YARN
yarn --daemon stop  resourcemanager/nodemanager
(2) Separate start / stop of each module (common)
Prerequisite: each node of the cluster is configured with ssh password free login
**Please know clearly namenode and yarn Start the corresponding service at the corresponding node**
DFS
start-dfs.sh/stop-dfs.sh     --- hadoop102 upper
YARN
start-yarn.sh/stop-yarn.sh  --- hadoop103 upper
3.7 configuring the history server
In order to view the historical operation of the program, you need to configure the history server. The specific configuration steps are as follows:
(1) Configure mapred-site.xml
Open file
cd /opt/module/hadoop-3.1.3/etc/hadoop/
vim mapred-site.xml
Add the following
<!-- Historical server address -->
<property>
    <name>mapreduce.jobhistory.address</name>
    <value>hadoop102:10020</value>
</property>

<!-- History server web End address -->
<property>
    <name>mapreduce.jobhistory.webapp.address</name>
    <value>hadoop102:19888</value>
</property>
(2) Distribution configuration
xsync /opt/module/hadoop-3.1.3/etc/hadoop//mapred-site.xml
(3) Start the history server and view it
Start history server
start-up
mapred --daemon start historyserver
 close
mapred --daemon start historyserver
Check for startup
Enter in the console jps see HistoryManager
 perhaps
 stay web End view: http://hadoop102:19888/jobhistory
3.8 configuring log aggregation
Log aggregation concept: after the application runs, upload the program running log information to the HDFS system.
Benefits of log aggregation function: you can easily view the details of program operation, which is convenient for development and debugging.
Note: to enable the log aggregation function, you need to restart NodeManager, ResourceManager and HistoryManager.
The specific steps to enable log aggregation are as follows:
(1) Configure yarn-site.xml
cd /opt/module/hadoop-3.1.3/etc/hadoop/
vim yarn-site.xml
(2) Add the following
<!-- Enable log aggregation  -->
<property>
    <name>yarn.log-aggregation-enable</name>
    <value>true</value>
</property>
<!-- Access path-->
<property>
    <name>yarn.log.server.url</name>
    <value>http://hadoop102:19888/jobhistory/logs</value>
</property>
<!-- The storage time is 7 days -->
<property>
    <name>yarn.log-aggregation.retain-seconds</name>
    <value>604800</value>
</property>
(3) Distribution configuration
xsync /opt/module/hadoop-3.1.3/etc/hadoop/yarn-site.xml
(4) Start NodeManager, ResourceManage, Timelineserver, and HistoryServer
On 103: start-yarn.sh
 On 103: yarn --daemon start timelineserver
 On 102: mapred --daemon start historyserver
(5) Execute the WordCount program
hadoop jar $HADOOP_HOME/share/hadoop/mapreduce/hadoop-mapreduce-examples-3.1.3.jar wordcount /user/atguigu/input /user/atguigu/output2
(6) View log
http://hadoop102:19888/jobhistory
Note: generally, the history server and log server will not be started, because it will consume some resources. It can be started when it needs to be used. If the memory is large, it can be ignored
3.9 cluster time synchronization
Time synchronization method:
Find a machine as a time server. All machines synchronize the time with the cluster regularly. For example, synchronize the time every ten minutes.
(1) Time service configuration (must be root)
a. turn off ntp service and self startup on Hadoop 102 (ntp installed this plug-in when it was in the template machine)
sudo systemctl stop ntpd
sudo systemctl disable ntpd
b. modify ntp configuration file
Open profile
sudo vim /etc/ntp.conf
The amendments are as follows:
(1)Amendment 1 (authorization 192).168.1.0-192.168.1.255 All machines on the network segment can query and synchronize time from this machine)
    #restrict 192.168.1.0 mask 255.255.255.0 nomodify notrap
    Change to
    restrict 192.168.1.0 mask 255.255.255.0 nomodify notrap

(2)Modification 2 (time when the cluster is in the LAN and does not use other Internet)
    server 0.centos.pool.ntp.org iburst
    server 1.centos.pool.ntp.org iburst
    server 2.centos.pool.ntp.org iburst
    server 3.centos.pool.ntp.org iburst
    Change to
    #server 0.centos.pool.ntp.org iburst
    #server 1.centos.pool.ntp.org iburst
    #server 2.centos.pool.ntp.org iburst
    #server 3.centos.pool.ntp.org iburst

(3)Add 3 (when the node loses network connection, the local time can still be used as the time server to provide time synchronization for other nodes in the cluster) --- Can be added anywhere
    server 127.127.1.0
    fudge 127.127.1.0 stratum 10
c. modify ntpd file
Open profile
sudo vim /etc/sysconfig/ntpd
Add the following
SYNC_HWCLOCK=yes
d. restart ntpd service and start automatically
systemctl start ntpd
systemctl enable ntpd
(2) Other machine configurations (must be root)
a. configure other machines to synchronize with the time server once every 10 minutes
// Open scheduled task
crontab -e
// Write the following
*/1 * * * * /usr/sbin/ntpdate hadoop102
// Note: when testing, write it for 1 minute. It is best to synchronize it for more than 10 minutes
b. testing
// Modify any machine time, such as Hadoop 104
date -s "2017-9-11 11:11:11"
// View in 1 minute
date
2.168.1.0 mask 255.255.255.0 nomodify notrap
Change to
restrict 192.168.1.0 mask 255.255.255.0 nomodify notrap
(2) Modification 2 (time when the cluster is in the LAN and does not use other Internet)
server 0.centos.pool.ntp.org iburst
server 1.centos.pool.ntp.org iburst
server 2.centos.pool.ntp.org iburst
server 3.centos.pool.ntp.org iburst
Change to
#server 0.centos.pool.ntp.org iburst
#server 1.centos.pool.ntp.org iburst
#server 2.centos.pool.ntp.org iburst
#server 3.centos.pool.ntp.org iburst
(3) Add 3 (when the node loses network connection, the local time can still be used as the time server to provide time synchronization for other nodes in the cluster) - it can be added anywhere
server 127.127.1.0
fudge 127.127.1.0 stratum 10
c. modify ntpd file Open profile
sudo vim /etc/sysconfig/ntpd
**increase**The contents are as follows
SYNC_HWCLOCK=yes
d. Restart ntpd Service and startup
systemctl start ntpd
systemctl enable ntpd
(2) Other machine configurations (required) root (user) a. Configure other machines to synchronize with the time server once every 10 minutes ```java // Open scheduled task crontab -e // Write the following */1 * * * * /usr/sbin/ntpdate hadoop102 // Note: when testing, write it for 1 minute. It is best to synchronize it for more than 10 minutes
b. testing
// Modify any machine time, such as Hadoop 104
date -s "2017-9-11 11:11:11"
// View in 1 minute
date