Reference connection:< https://docs.ceph.com/docs/master/
2.1 cluster planning
At least three Centos7 system virtual machines are used to deploy Ceph cluster. Hardware configuration: 2C4G. In addition, each machine should be equipped with at least three hard disks (5g for each disk)
| HOST | IP | Service | Mark |
|---|---|---|---|
| cephmanager01 | public network:192.168.10.51--ens224 <br>cluster network:172.168.10.51--ens192 | mon, mgr,mds | 8c8g < br > system disk: 200G |
| cephmanager02 | public network:192.168.10.72--ens224 <br/>cluster network:172.168.10.72--ens192 | mon, mgr,mds | 8c8g < br / > system disk: 200G |
| cephmanager03 | public network:192.168.10.75--ens224 <br/>cluster network:172.168.10.75--ens192 | mon, mgr,mds | 8c8g < br / > system disk: 200G |
| cephnode001 | public network:192.168.10.76--ens224 <br/>cluster network:172.168.10.76--ens192 | osd | 4c8g < br > system disk: 200g < br > data disk: 50G / block x4 |
| cephnode002 | public network:192.168.10.82--ens224 <br/>cluster network:172.168.10.82--ens192 | osd | 4c8g < br / > system disk: 200g < br / > data disk: 50G / block x4 |
| cephnode003 | public network:192.168.10.101--ens224 <br/>cluster network:172.168.10.101--ens192 | osd | 4c8g < br / > system disk: 200g < br / > data disk: 50G / block x4 |
| assembly | edition | Recommended configuration | remarks |
| CentOS | CentOS Linux release 7.4.1708 | Better management node CPU | |
| Ceph | 13.2.10 mimic | Large disk space of data node |
2.2 environmental preparation
[execute in manager node and node node]
2.2.1 basic environmental preparation
2.2.1.1 firewall settings
Turn off the firewall and set power on and off
# systemctl stop firewalld && systemctl disable firewalld && systemctl status firewalld
Or configure the firewall port (add the corresponding port according to the situation)
# firewall-cmd --zone=public --add-port=6789/tcp --permanent
# firewall-cmd --zone=public --add-port=6800-7100/tcp --permanent
# firewall-cmd --reload
# firewall-cmd --zone=public --list-all
2.2.1.2 shut down selinux
Permanent shutdown (restart required)
# sed -i 's/enforcing/disabled/' /etc/selinux/config
Temporarily Closed
# setenforce 0
Confirm closing
# getenforce
2.2.1.3 shut down network manager
# systemctl disable NetworkManager && systemctl stop NetworkManager && systemctl status NetworkManager
2.2.1.4 set the host name and add the corresponding relationship between the host name and IP
Set host name [execute on corresponding node]
# hostnamectl --static set-hostname cephmanager01
# hostnamectl --static set-hostname cephmanager02
# hostnamectl --static set-hostname cephmanager03
# hostnamectl --static set-hostname cephnode001
# hostnamectl --static set-hostname cephnode002
# hostnamectl --static set-hostname cephnode003
Modify hosts
# cat >> /etc/hosts << EOF
192.168.10.51   cephmanager01
192.168.10.72   cephmanager02
192.168.10.75   cephmanager03
192.168.10.76   cephnode001
192.168.10.82   cephnode002
192.168.10.101  cephnode003
EOF
2.2.1.5 setting time synchronization
1) Set time zone and synchronize Internet time
# yum install -y ntpdate  chrony
# timedatectl set-timezone Asia/Shanghai
# ntpdate time1.aliyun.com
2) Configure the time of all servers and time server synchronization or synchronization with a server [in this case, synchronize cephmanager01 node time]
Edit / etc/chrony.conf File, add (the time server on the Internet can be deleted):
server 192.168.10.51 iburst
Restart the service and configure boot
# systemctl restart chronyd.service && systemctl enable chronyd.service && systemctl status chronyd.service
Verify: is it synchronized with cephmanager01
# chronyc sources
2.2.1.6 setting file limits
# echo "ulimit -SHn 102400" >> /etc/rc.local
# cat >> /etc/security/limits.conf << EOF
* soft nofile 65535
* hard nofile 65535
EOF
2.2.1.7 kernel parameter optimization
# cat >> /etc/sysctl.conf << EOF
kernel.pid_max = 4194303
vm.swappiness = 0
EOF
# sysctl -p
2.2.1.8 read_ahead
Improve disk read operation by pre reading and recording data to random access memory
# echo "8192" > /sys/block/sda/queue/read_ahead_kb
2.2.1.9 I/O Scheduler
noop should be used for SSD and deadline should be used for SATA/SAS
# echo "deadline" >/sys/block/sd[x]/queue/scheduler
# echo "noop" >/sys/block/sd[x]/queue/scheduler
2.2.1.10 installation of possible tool software
# yum install wget vim lrzsz -y
2.2.2 user environment preparation
2.2.2.1 create user
# useradd -d /home/cephuser -m cephuser
# passwd cephuser
Changing password for user cephuser.
New password: ceph_pass
Retype new password: ceph_pass
Modify the visudo file to make cephuser user in sudo list;
# Add a new line under "root all = (all) all" in line 92: "cephuser all = (all) all"
# visudo
cephuser    ALL=(ALL)       ALL
2.2.2.2 user empowerment
Set the user of cephuser to have sudo (root) permission without password; switch to the user of cephuser to operate
# su - cephuser
[cephuser@cephmanager01 ~]$ echo "cephuser ALL = (root) NOPASSWD:ALL" | sudo tee /etc/sudoers.d/cephuser
[sudo] password for cephuser: ceph_pass
cephuser ALL = (root) NOPASSWD:AL
[cephuser@cephmanager01 ~]$ sudo chmod 0440 /etc/sudoers.d/cephuser
2.2.2.3 ssh password free login
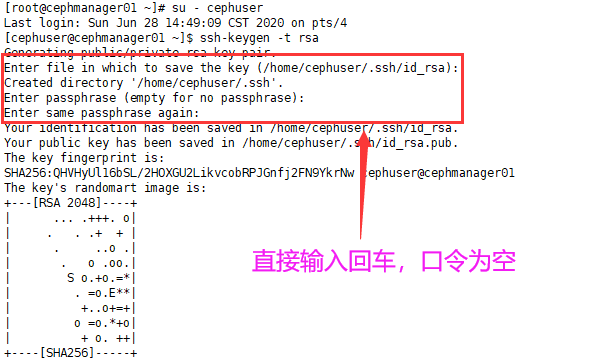
1) Generate secret key
ceph deploy does not support password input. It needs to generate ssh secret key in the management control node and distribute the public key to each ceph node;
The secret key is generated under the user cephuser, and sudo or root cannot be used. By default, the ~ /. ssh directory is generated under the user directory, including the generated secret key pair. When "enter password", press enter and the password is empty;
Note: the three manager nodes are all set as ceph management control nodes, which should enable the three manager nodes to login to all other manager nodes and nodes without password
# They were executed in cephmanager01, cephmanager02 and cephmanager03
[root@cephmanager01 ~]# su - cephuser
Last login: Sun Jun 28 14:49:09 CST 2020 on pts/4
[cephuser@cephmanager01 ~]$ ssh-keygen -t rsa
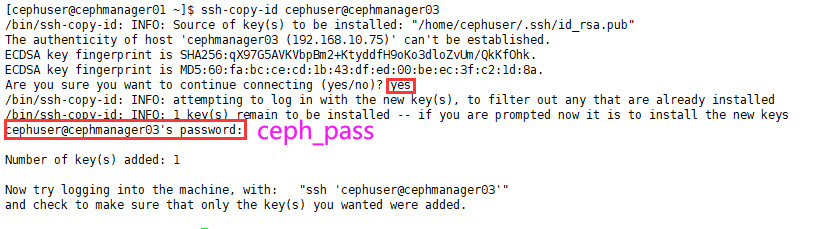
2) Distribution key
Confirm that the relevant user cephuser has been generated for each control manger and node node; after the distribution is successful, generate known under ~ /. ssh /_ Hosts file to record the relevant login information;
# It needs to be distributed to all manager and node nodes on cephmanager01, cephmanager02 and cephmanager03, respectively
[cephuser@cephmanager01 ~]$ ssh-copy-id cephuser@cephmanager02
2.2.3 configure yum source
Configure the intranet yum source server, or configure the corresponding domestic source. Here, configure ceph source and epel source
# cat > /etc/yum.repos.d/ceph.repo << EOF
[ceph]
name=ceph
baseurl=http://mirrors.aliyun.com/ceph/rpm-mimic/el7/x86_64/
gpgcheck=0
priority=1

[ceph-noarch]
name=cephnoarch
baseurl=http://mirrors.aliyun.com/ceph/rpm-mimic/el7/noarch/
gpgcheck=0
priority=1

[ceph-source]
name=Ceph source packages
baseurl=http://mirrors.aliyun.com/ceph/rpm-mimic/el7/SRPMS
gpgcheck=0
priority=1
EOF
# wget -O /etc/yum.repos.d/epel-7.repo http://mirrors.aliyun.com/repo/epel-7.repo
# yum clean all
# yum makecache
# View yum source
# yum repolist
2.3 installing CEPH deploy
[install the CEPH deploy tool in all planned manager nodes. In this case, take cephmanager01 as an example]
Push configuration file, change maintenance, add hard disk and other operations need to use CEPH deploy, and confirm whether the CEPH deploy version is 2.0.1
[root@cephmanager01 ~]# yum install ceph-deploy python-setuptools -y
# Confirm version
[root@cephmanager01 ~]# ceph-deploy --version
2.4 cluster deployment
2.4.1 create cluster
[it is implemented in all manager nodes of the plan, except for special instructions. In this case, cephmanager01 is taken as an example]
When operating under the cephuser account, avoid sudo operation; create a directory on the manager node to store cluster related configuration files;
[root@cephmanager01 ~]# su - cephuser
[cephuser@cephmanager01 ~]$ mkdir cephcluster
# Subsequent CEPH deploy related operations are all executed in the created directory
[cephuser@cephmanager01 ~]$ cd cephcluster/
# The MON (monitor) nodes in the planning are included in the cluster, that is, the cluster is created,
# [this operation is executed by any cephmanager, taking cephmanage01 as an example]
[cephuser@cephmanager01 cephcluster]$ ceph-deploy new cephmanager01 cephmanager02 cephmanager03
[cephuser@cephmanager01 cephcluster]$ ls
ceph.conf  ceph-deploy-ceph.log  ceph.mon.keyrin
2.4.2 modify cluster configuration file (optional)
After the cluster is generated, three files are generated in the cluster directory ceph.conf It is the configuration file;
By default, it can not be modified. In order to start the service according to the plan, it can be modified appropriately;
The following red font section is a new configuration on the default generated conf file
[this operation is executed by any cephmanager, taking cephmanage01 as an example]
[cephde@controller01 cephcluster]$ cat ceph.conf
[global]
fsid = 6a71324c-6949-42bc-92ca-325c9d45ae06
mon_initial_members = cephmanager01, cephmanager02, cephmanager03
mon_host = 192.168.10.51,192.168.10.72,192.168.10.75
auth_cluster_required = cephx
auth_service_required = cephx
auth_client_required = cephx

# Public network: front end mon network, client access network; ensure public network and mon_host is in the same network segment. Otherwise, there may be errors during initialization;
# cluster network: back end osd heartbeat, data / stream replication and recovery network
public network = 192.168.10.0/24
cluster network = 172.168.10.0/24

# The default number of copies is 3, which can be changed according to the actual situation
osd pool default size = 3

# The default protection mechanism does not allow the pool to be deleted, which is set according to the situation
mon_allow_pool_delete = true
2.4.3 installing ceph
[execute at all manager and node nodes]
# It is recommended that you use this command to install on each node
[root@cephmanager01 ~]# yum -y install epel-release
[root@cephmanager01 ~]# yum -y install ceph
# It is not recommended. This command will be installed at the corresponding node, but the source will be automatically replaced with foreign official source, and the network speed will be very slow
[root@cephmanager01 ~]# ceph-deploy install --release mimic cephnode01 cephnode02 cephnode03
# View version
[root@controller01 ~]# ceph -v
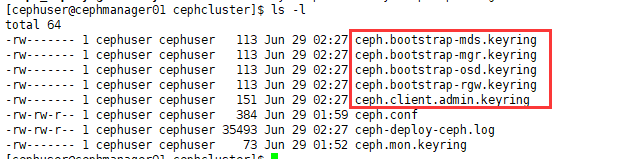
2.4.4 initializing ceph_mon
[this operation is executed in any cephmanager, taking cephmanage01 as an example]
[root@cephmanager01 ~]# su - cephuser
Last login: Mon Jun 29 02:17:20 CST 2020 on pts/0
[cephuser@cephmanager01 ~]$ cd cephcluster/
[cephuser@cephmanager01 cephcluster]$ ceph-deploy mon create-initial
# After initialization, add multiple secret key files in the cluster directory
[cephuser@cephmanager01 cephcluster]$ ls -l
# View status
[cephuser@cephmanager01 cephcluster]$ sudo systemctl status ceph-mon@cephmanager01
2.4.5 distribution ceph.conf And secret key
# Distribute the ceph configuration file and secret key to other control manager nodes and node nodes;
# Note that the distribution node itself also needs to be included. There is no secret key file by default and needs to be distributed;
# If the distributed node already has a configuration file (uniform change of configuration file scenario), you can use the following command: CEPH deploy -- rewrite conf admin XXX
# Distribute the configuration file and secret key to each node / etc/ceph / directory
[cephuser@cephmanager01 cephcluster]$ ceph-deploy admin cephmanager01 cephmanager02 cephmanager03 cephnode001 cephnode002 cephnode003
After that, you can use the ceph -s command, tail - f CEPH deploy- ceph.log View installation log
Copy the files under the cephcluster directory to the remaining manager nodes:
[cephuser@cephmanager01 cephcluster]$ pwd
/home/cephuser/cephcluster
[cephuser@cephmanager01 cephcluster]$ scp ceph.conf ceph-deploy-ceph.log ceph.mon.keyring cephuser@cephmanager03:~/cephcluster/
[cephuser@cephmanager01 cephcluster]$ scp ceph.bootstrap-* cephuser@cephmanager02:~/cephcluster/
2.4.6 configure ceph_mgr for managing clusters
Note: deployment is required after version L
[in any manager node, take cephmanager01 as an example]
[cephuser@cephmanager01 cephcluster]$ ceph-deploy mgr create cephmanager01:cephmanager01_mgr cephmanager02:cephmanager02_mgr cephmanager03:cephmanager03_mgr
# View status
[cephuser@cephmanager01 cephcluster]$ systemctl status ceph-mgr@cephmanager01_mgr
[cephuser@cephmanager01 cephcluster]$ sudo ss -tunlp |grep mgr

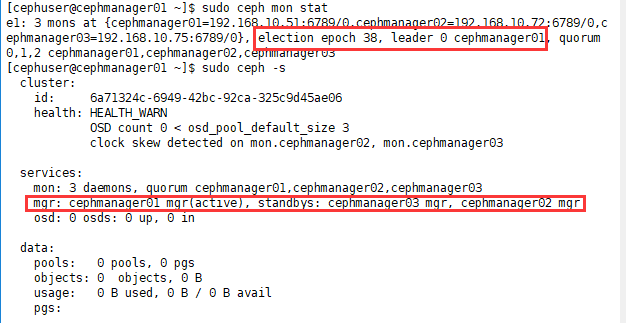
2.4.7 view cluster status information
[both manager and node can execute]
# View monitor status
[cephuser@cephmanager01 ~]$ sudo ceph mon stat
# View ceph status
[cephuser@cephmanager01 ~]$ sudo ceph -s
2.5 OSD
2.5.1 create OSD
osd is located in the node node. You can view the disk status of node node. Take cephnode001 node as an example;
Or in the manager node, use the command: CEPH deploy disk list cephnode001 cephnode001 cephnode00N;
[root@cephnode001 ~]# lsblk
When the osd is actually created, it can be created through the manager node using CEPH deploy [any manager node is executed, taking cephmanager01 as an example];
# The parameter "- Data" specifies the data disk, and the parameter "- Journal" specifies the journal log disk. The log disk can be logical volume(vg/lv) or GPT partition, which is an option operation;
# There are also commands (L version): CEPH deploy osd prepare {node}: {disk} [: {PATH/TO/JOURNAL}]; CEPH deploy osd activate {node}: {disk} [: {/ PATH/TO/JOURNAL}], where [: {/ PATH/TO/JOURNAL}] is the option operation, which can create osd daemons (nodes) with journal logs
[cephuser@cephmanager01 cephcluster]$ ceph-deploy osd create cephnode001 --data /dev/sdb
[cephuser@cephmanager01 cephcluster]$ ceph-deploy osd create cephnode001 --data /dev/sdc
[cephuser@cephmanager01 cephcluster]$ ceph-deploy osd create cephnode001 --data /dev/sdd
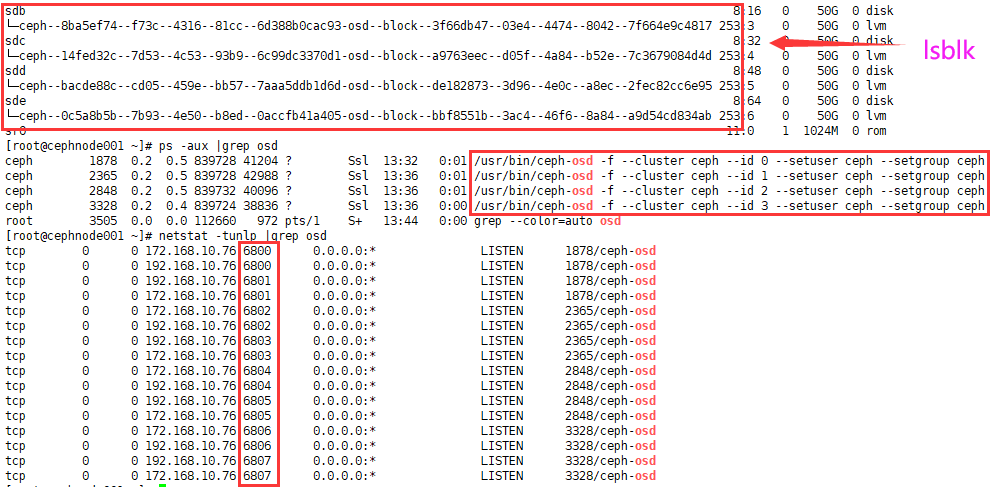
[cephuser@cephmanager01 cephcluster]$ ceph-deploy osd create cephnode001 --data /dev/sdeIn this example, there are three node nodes (osd), and each node runs four osd processes (in the range of 6800-7300 ports, each process listens to one local port) [take cephnode001 as an example];
[root@cephnode001 ~]# lsblk
[root@cephnode001 ~]# ps -aux |grep osd
# osd process port number;
[root@cephnode001 ~]# netstat -tunlp | grep osd
# CEPH osd process, each osd process has a specific sequence number according to the start order
[root@cephnode001 ~]# systemctl status ceph-osd@0
If the node DISK has data, you can initialize it with the command (caution): CEPH deploy DISK zap {node} {DISK}, where {DISK} can be either a physical drive letter or a partition
2.5.2 view OSD status
In the manager node, take cephmanager01 as an example
[cephuser@cephmanager01 cephcluster]$ ceph-deploy osd list cephnode001
[cephuser@cephmanager01 cephcluster]$ sudo ceph osd stat
[cephuser@cephmanager01 cephcluster]$ sudo ceph osd tree
[cephuser@cephmanager01 cephcluster]$ sudo ceph df
In the node node, take cephnode001 as an example
[root@cephnode001 ~]# lsblk
[root@cephnode001 ~]# ps -aux |grep osd
[root@cephnode001 ~]# netstat -tunlp | grep osd
[root@cephnode001 ~]# systemctl status ceph-osd@0