an introduction to
What is Vue?
- Vue (pronunciation / vju) ː/, view) is a progressive framework for building user interfaces
- vue's core library only focuses on view layers, which is not only easy to start, but also easy to integrate with third-party libraries or existing projects
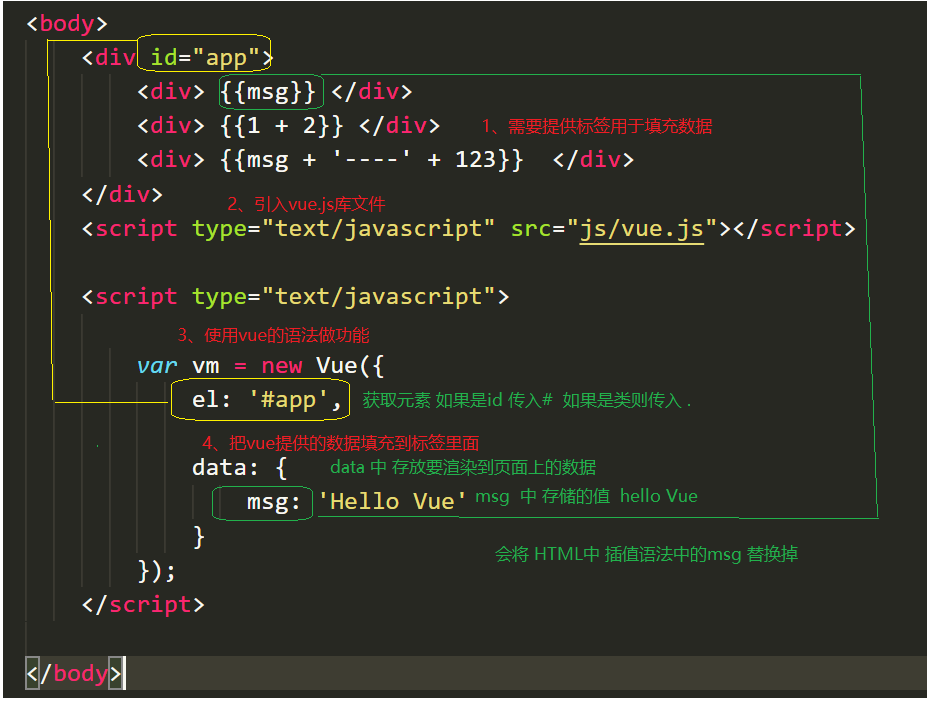
Rendering helloworld onto a page using Vue
Directives (custom attributes)
- The essence is custom attributes
- All specified in Vue begin with v -
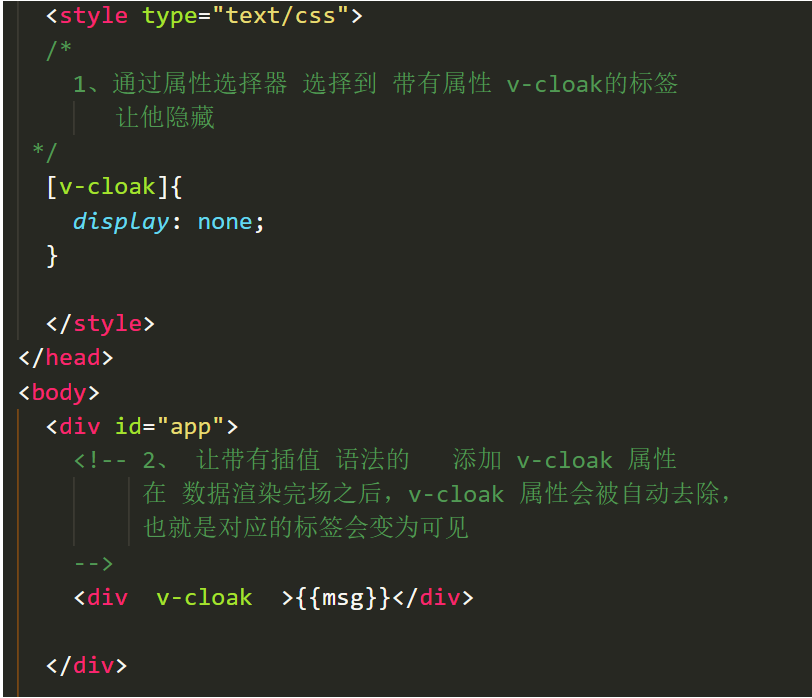
v-cloak
-
Prevent flicker problems when loading pages
 <style type="text/css">
  /*
    1,Select the tag with the attribute v-cloak through the attribute selector to hide it
 */
  [v-cloak]{
    /* Element hiding    */
    display: none;
  }
  </style>
<body>
  <div id="app">
    <!-- 2, Let add with interpolation syntax v-cloak attribute
         After data rendering, v-cloak The attribute is automatically removed,
         v-cloak Once removed, that is, there is no attribute, and the attribute selector cannot select the tag
		 That is, the corresponding label will become visible
    -->
    <div  v-cloak  >{{msg}}</div>
  </div>
  <script type="text/javascript" src="js/vue.js"></script>
  <script type="text/javascript">
    var vm = new Vue({
      //  el specifies that the element id is the element of the app
      el: '#app',
      //  Data is stored in data
      data: {
        msg: 'Hello Vue'
      }
    });
</script>
</body>
</html>
v-text
- The v-text instruction is used to fill the label with data. It is similar to the interpolation expression, but there is no flicker problem
- If there are HTML tags in the data, the HTML tags will be output together
- Note: This is one-way binding. When the value on the data object changes, the interpolation will change; However, when the interpolation changes, it will not affect the value of the data object
<div id="app">
    <!--
		be careful:Do not write interpolation syntax in the instruction. Write the corresponding variable name directly
        stay v-text Do not write interpolation syntax when assigning values in
		General attributes are not added {{}}  Write the corresponding data name directly
	-->
    <p v-text="msg"></p>
    <p>
        <!-- Vue  Interpolation syntax is used only in the content of the label -->
        {{msg}}
    </p>
</div>

<script>
    new Vue({
        el: '#app',
        data: {
            msg: 'Hello Vue.js'
        }
    });

</script>
v-html
-
The usage is similar to v-text, but it can fill HTML fragments into tags
-
There may be security problems. Generally, v-html is only used on trusted content and never on content submitted by users
-
The difference between v-text and v-text is that v-text outputs plain text, which will not be parsed by the browser, but v-html will output it when the HTML tag is parsed.
<div id="app">
  <p v-html="html"></p> <!-- Output: html Labels are parsed at render time -->

    <p>{{message}}</p> <!-- Output:<span>Bind by double parentheses</span> -->

  <p v-text="text"></p> <!-- Output:<span>html The tag is output by the source code when rendering</span> -->
</div>
<script>
  let app = new Vue({
  el: "#app",
  data: {
    message: "<span>Bind by double parentheses</span>",
    html: "<span>html Labels are parsed at render time</span>",
    text: "<span>html The tag is output by the source code when rendering</span>",
  }
 });
</script>
v-pre
- Show raw information skip compilation
- Skip the compilation of this element and its child elements.
- Some static content does not need to be compiled. Adding this instruction can speed up rendering
    <span v-pre>{{ this will not be compiled }}</span>
	<!--  It shows{{ this will not be compiled }}  -->
	<span v-pre>{{msg}}</span>
     <!--   even if data It defines msg It is still shown here{{msg}}  -->
<script>
    new Vue({
        el: '#app',
        data: {
            msg: 'Hello Vue.js'
        }
    });

</script>
v-once
- Perform one-time interpolation [when the data changes, the content at the interpolation will not continue to be updated]
  <!-- even if data It defines msg Later we modified it and still show it for the first time data The data stored inside is Hello Vue.js  -->
     <span v-once>{{ msg}}</span>
<script>
    new Vue({
        el: '#app',
        data: {
            msg: 'Hello Vue.js'
        }
    });
</script>
Difference expression v-text v-html
| Difference expression | Flash problem - v-cloak solution |
|---|---|
| v-text | No flicker problem |
| v-html | safety problem |
Bidirectional data binding
- When the data changes, the view changes
- When the view changes, the data changes synchronously
v-model
- v-model is an instruction, which is restricted to < input >, < Select >, < textarea >, and components
 <div id="app">
      <div>{{msg}}</div>
      <div>
          When the content in the input box changes, the msg  Automatically updated
        <input type="text" v-model='msg'>
      </div>
  </div>
mvvm
- MVC is a layered development concept of the back end; MVVM is the concept of front-end view layer, which mainly focuses on the separation of view layers, that is, MVVM divides the front-end view layer into three parts: model, view and VM ViewModel
- m model
- The data layer in Vue is placed in data
- v view view
- Vue view is our HTML page
- The vm (view model) controller connects the data to the view layer
- vm is an instance of Vue
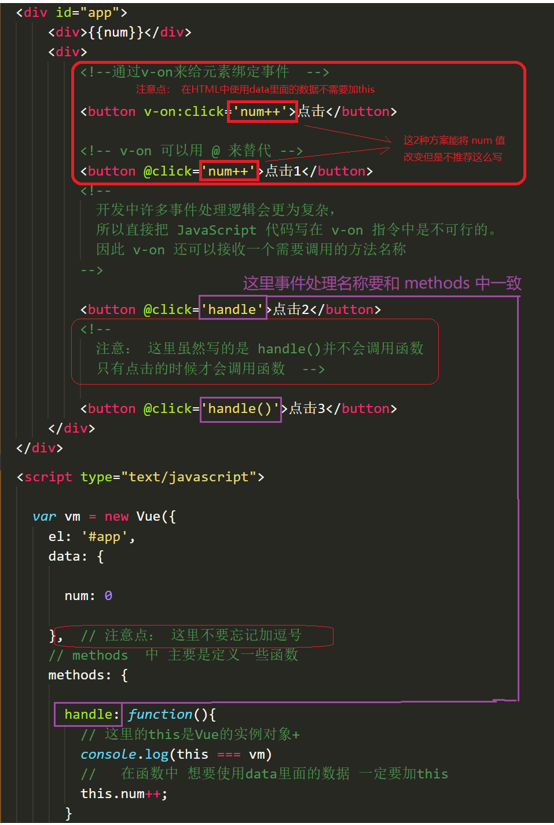
v-on
- Used to bind events
- Form: v-on:click, abbreviated as @ click;
Parameters passed in v-on event function
<body>
    <div id="app">
        <div>{{num}}</div>
        <div>
            <!-- If the event is directly bound to the function name, the event object is passed as the first parameter of the event function by default -->
            <button v-on:click='handle1'>Click 1</button>
            <!-- 2,If the event binding function is called, the event object must be passed as the last parameter,
                 And the name of the event object must be $event
            -->
            <button v-on:click='handle2(123, 456, $event)'>Click 2</button>
        </div>
    </div>
    <script type="text/javascript" src="js/vue.js"></script>
    <script type="text/javascript">
        var vm = new Vue({
            el: '#app',
            data: {
                num: 0
            },
            methods: {
                handle1: function(event) {
                    console.log(event.target.innerHTML)
                },
                handle2: function(p, p1, event) {
                    console.log(p, p1)
                    console.log(event.target.innerHTML)
                    this.num++;
                }
            }
        });
    </script>
Event modifier
- Calling event.preventDefault() or event.stopPropagation() in event handlers is a very common requirement.
- Vue does not recommend that we operate DOM. To solve this problem, Vue.js provides event modifiers for v-on
- A modifier is represented by an instruction suffix beginning with a dot
<!-- Prevent click event from continuing propagation -->
<a v-on:click.stop="doThis"></a>

<!-- Submitting events no longer reloads the page -->
<form v-on:submit.prevent="onSubmit"></form>

<!-- Modifiers can be concatenated to prevent both bubbling and default events -->
<a v-on:click.stop.prevent="doThat"></a>

<!-- Only when event.target Is the handler that is triggered when the current element itself -->
<!-- That is, the event is not triggered from an internal element -->
<div v-on:click.self="doThat">...</div>

When using modifiers, order is important; The corresponding code will be generated in the same order. Therefore, use v-on:click.prevent.self Will block all clicks, and v-on:click.self.prevent Only clicks on the element itself are blocked.
Key modifier
- Keyboard events are sometimes used in projects. When monitoring keyboard events, we often need to check the detailed keys. Vue allows you to add key modifiers for v-on when listening for keyboard events
<!-- Only in `keyCode` Called when is 13 `vm.submit()` -->
<input v-on:keyup.13="submit">

<!-- -When clicked enter Time call `vm.submit()` -->
<input v-on:keyup.enter="submit">

<!--When clicked enter perhaps space Call from time to time `vm.alertMe()`   -->
<input type="text" v-on:keyup.enter.space="alertMe" >

Common key modifiers
.enter =>    enter key
.tab => tab key
.delete (Capture the delete and backspace keys) =>  Delete key
.esc => escape key
.space =>  Space bar
.up =>  upper
.down =>  lower
.left =>  Left
.right =>  right

<script>
	var vm = new Vue({
        el:"#app",
        methods: {
              submit:function(){},
              alertMe:function(){},
        }
    })

</script>
Custom key modifier alias
- In Vue, you can customize key modifier aliases through config.keyCodes
<div id="app">
    Predefined keycode 116(Namely F5)The alias for is f5,Therefore, press in the text input box F5,Will trigger prompt method
    <input type="text" v-on:keydown.f5="prompt()">
</div>

<script>

    Vue.config.keyCodes.f5 = 116;

    let app = new Vue({
        el: '#app',
        methods: {
            prompt: function() {
                alert('I am F5!');
            }
        }
    });
</script>
v-bind
- The v-bind instruction is used to update HTML attributes in response
- v-bind:href can be abbreviated as: href;
<!-- Bind a property -->
<img v-bind:src="imageSrc">

<!-- abbreviation -->
<img :src="imageSrc">
Binding object
- We can give v-bind:class an object to dynamically switch classes.
- Note: the v-bind:class instruction can coexist with the normal class feature
1, v-bind Binding an object is supported in
	If an object is bound, the key is the corresponding class name and the value is the corresponding class name data Data in
<!--
	HTML Final render as <ul class="box textColor textSize"></ul>
	be careful:
		textColor,textSize  The corresponding rendering to the page CSS Class name
		isColor,isSize  corresponding vue data If the data in is true The corresponding class name is rendered to the page


		When isColor and isSize When it changes, class The list will be updated accordingly,
		For example, the isSize Change to false,
		class The list becomes <ul class="box textColor"></ul>
-->

<ul class="box" v-bind:class="{textColor:isColor, textSize:isSize}">
    <li>study Vue</li>
    <li>study Node</li>
    <li>study React</li>
</ul>
  <div v-bind:style="{color:activeColor,fontSize:activeSize}">Object syntax</div>

<sript>
var vm= new Vue({
    el:'.box',
    data:{
        isColor:true,
        isSize:true,
    	activeColor:"red",
        activeSize:"25px",
    }
})
</sript>
<style>

    .box{
        border:1px dashed #f0f;
    }
    .textColor{
        color:#f00;
        background-color:#eef;
    }
    .textSize{
        font-size:30px;
        font-weight:bold;
    }
</style>
Bind class
2,  v-bind Binding an array is supported in    In array classA and classB Corresponding to data Data in

there classA  Right use data Medium  classA
 there classB  Right use data Medium  classB
<ul class="box" :class="[classA, classB]">
    <li>study Vue</li>
    <li>study Node</li>
    <li>study React</li>
</ul>
<script>
var vm= new Vue({
    el:'.box',
    data:{
        classA:'textColor',
        classB:'textSize'
    }
})
</script>
<style>
    .box{
        border:1px dashed #f0f;
    }
    .textColor{
        color:#f00;
        background-color:#eef;
    }
    .textSize{
        font-size:30px;
        font-weight:bold;
    }
</style>
The difference between bound objects and bound arrays
- When binding an object, the attribute of the object is the class name to be rendered, and the attribute value of the object corresponds to the data in data
- When binding an array, the data in data is stored in the array
Binding style
 <div v-bind:style="styleObject">Bind style object</div>'

<!-- CSS Attribute names can be humped (camelCase) Or dash separation (kebab-case,Remember to enclose it in single quotation marks)    -->
 <div v-bind:style="{ color: activeColor, fontSize: fontSize,background:'red' }">inline style </div>

<!--Group syntax can apply multiple style objects to the same element -->
<div v-bind:style="[styleObj1, styleObj2]"></div>


<script>
	new Vue({
      el: '#app',
      data: {
        styleObject: {
          color: 'green',
          fontSize: '30px',
          background:'red'
        },
        activeColor: 'green',
   		fontSize: "30px"
      },
      styleObj1: {
             color: 'red'
       },
       styleObj2: {
            fontSize: '30px'
       }

</script>
Branching structure
v-if usage scenario
- 1 - multiple elements show or hide an element through conditional judgment. Or multiple elements
- 2 - switch between two views
<div id="app">
        <!--  Judge whether to load. If it is true, it will be loaded; otherwise, it will not be loaded-->
        <span v-if="flag">
           If flag by true Then display,false Do not display!
        </span>
</div>

<script>
    var vm = new Vue({
        el:"#app",
        data:{
            flag:true
        }
    })
</script>

----------------------------------------------------------

    <div v-if="type === 'A'">
       A
    </div>
  <!-- v-else-if Follow closely v-if or v-else-if After that v-if Execute when conditions are not satisfied-->
    <div v-else-if="type === 'B'">
       B
    </div>
    <div v-else-if="type === 'C'">
       C
    </div>
  <!-- v-else Follow closely v-if or v-else-if after-->
    <div v-else>
       Not A/B/C
    </div>

<script>
    new Vue({
      el: '#app',
      data: {
        type: 'C'
      }
    })
</script>
The difference between v-show and v-if
- The essence of v-show is to set the label display to none to control hiding
- V-show is compiled only once. In fact, it controls the css, and v-if is constantly destroyed and created. Therefore, the performance of v-show is better.
- v-if dynamically adds or deletes DOM elements to the DOM tree
- v-if switching has a process of local compilation / unloading. During the switching process, the internal event listener and sub components are properly destroyed and rebuilt
Cyclic structure
v-for
- The values in the array used for the loop can be objects or ordinary elements
<ul id="example-1">
   <!-- Cyclic structure-Traversal array
	item It is a name defined by ourselves, which represents each item in the array
	items Corresponding to data Array in-->
  <li v-for="item in items">
    {{ item.message }}
  </li>

</ul>
<script>
 new Vue({
  el: '#example-1',
  data: {
    items: [
      { message: 'Foo' },
      { message: 'Bar' }
    ],

  }
})
</script>
- Using both v-if and v-for is not recommended
- When v-if is used with v-for, v-for has a higher priority than v-if.
   <!--  Cyclic structure-Traversal object
		v Representing objects value
		k  Key representing the object
		i  Representative index
	--->
     <div v-if='v==13' v-for='(v,k,i) in obj'>{{v + '---' + k + '---' + i}}</div>

<script>
 new Vue({
  el: '#example-1',
  data: {
    items: [
      { message: 'Foo' },
      { message: 'Bar' }
    ],
    obj: {
        uname: 'zhangsan',
        age: 13,
        gender: 'female'
    }
  }
})
</script>
- Role of key
- key to make a unique identification for each node
- key is mainly used to update the virtual DOM efficiently
<ul>
  <li v-for="item in items" :key="item.id">...</li>
</ul>
Case – tab
1. HTML structure
`
    <div id="app">
        <div class="tab">
            <!--  tab column  -->
            <ul>
                <li class="active">apple</li>
                <li class="">orange</li>
                <li class="">lemon</li>
            </ul>
              <!--  Corresponding displayed picture -->
            <div class="current"><img src="img/apple.png"></div>
            <div class=""><img src="img/orange.png"></div>
            <div class=""><img src="img/lemon.png"></div>
        </div>
    </div>


`
2. Data provided
         list: [{
                    id: 1,
                    title: 'apple',
                    path: 'img/apple.png'
                }, {
                    id: 2,
                    title: 'orange',
                    path: 'img/orange.png'
                }, {
                    id: 3,
                    title: 'lemon',
                    path: 'img/lemon.png'
                }]
3. Render data to page
-
Replace the number in the tab column on the page
- Use v-for loop to render the title in data to the page
- The path in data is rendered to the page by v-for loop
    <div id="app">
        <div class="tab">
            <ul>
                  <!--
                    1,binding key Improve the role of Vue Performance of
                    2, key It needs to be a unique identification, so it needs to be used id, You can also use index ,
						index And the only one
                    3, item Is each corresponding item in the array
                    4, index Is the index of each item
                -->
                   <li :key='item.id' v-for='(item,index) in list'>{{item.title}}</li>
              </ul>
              <div  :key='item.id' v-for='(item, index) in list'>
                    <!-- :  yes v-bind The shorthand binding property of v-bind -->
                    <img :src="item.path">
              </div>
        </div>
    </div>
<script>
    new  Vue({
        //  The specified operation element is app with id
        el: '#app',
            data: {
                list: [{
                    id: 1,
                    title: 'apple',
                    path: 'img/apple.png'
                }, {
                    id: 2,
                    title: 'orange',
                    path: 'img/orange.png'
                }, {
                    id: 3,
                    title: 'lemon',
                    path: 'img/lemon.png'
                }]
            }
    })

</script>
4. Add an event to each tab bar and highlight the selected one
-
4.1. Highlight the default first tab
- Highlight the tab bar by adding the class name active (the style of CSS active has been written in advance)
- Define a default index in data. currentIndex is 0
- Add the active class name to the first li
- By dynamically binding the class, the index of the first li is 0 and the value of currentIndex is exactly the same
- currentIndex === index if equal, add the class name active; otherwise, add the empty class name
- Highlight the tab bar by adding the class name active (the style of CSS active has been written in advance)
-
4.2. Display the div corresponding to the tab column of the first item by default
- The implementation idea is the same as that of the first tab, except that the class name displayed by the first div is current
<ul> <!-- Dynamic binding class have active Class name highlight none active Do not highlight--> <li :class='currentIndex==index?"active":""' :key='item.id' v-for='(item,index) in list' >{{item.title}}</li> </ul> <!-- Dynamic binding class have current Class name display none current hide--> <div :class='currentIndex==index?"current":""' :key='item.id' v-for='(item, index) in list'> <!-- : yes v-bind The shorthand binding property of v-bind --> <img :src="item.path"> </div> <script> new Vue({ el: '#app', data: { currentIndex: 0, // The current index of the tab defaults to 0 list: [{ id: 1, title: 'apple', path: 'img/apple.png' }, { id: 2, title: 'orange', path: 'img/orange.png' }, { id: 3, title: 'lemon', path: 'img/lemon.png' }] } }) </script> -
4.3. Click the current highlight of each tab column, and the others will be UN highlighted
-
Add a click event to each li
-
Compare the input value of the current index with that of the current currentIndex
-
If they are equal, the current li adds the active class name, the current li highlights the div of the current corresponding index, adds the current div, and displays other hidden
    <div id="app">
        <div class="tab">
            <ul>
                <!--  adopt v-on To add a click event, you need to add the current li Pass the index of
				-->
                <li v-on:click='change(index)'
                    :class='currentIndex==index?"active":""'
                    :key='item.id'
                    v-for='(item,index) in list'>{{item.title}}</li>
            </ul>
            <div :class='currentIndex==index?"current":""'
                 :key='item.id' v-for='(item, index) in list'>
                <img :src="item.path">
            </div>
        </div>
    </div>

<script>
    new  Vue({
        el: '#app',
            data: {
                currentIndex: 0, // The current index of the tab defaults to 0
                list: [{
                    id: 1,
                    title: 'apple',
                    path: 'img/apple.png'
                }, {
                    id: 2,
                    title: 'orange',
                    path: 'img/orange.png'
                }, {
                    id: 3,
                    title: 'lemon',
                    path: 'img/lemon.png'
                }]
            },
            methods: {
                change: function(index) {
                    // Make the current currentIndex equal to the clicked index value through the passed in index
                    //  So as to control the class name
                    this.currentIndex = index;
                }
            }

    })

</script>
-